

Tutorial
Updated
ANOTHER Magnetic Reed Switch RCM Installation
[TUTORIAL] [MOD] RCM mode with just a magnet (maghax). No visible changes to the Switch or Joycon!!! v1.7 2018-06-28
Please post any improvements or clarifications you'd like to see. If this passes muster, Mods can move it to the tutorials forum if appropriate.
-----------------------------------
This should be a pretty solid method for installing a MAGNETIC REED RELAY into your Right Joycon. the purpose is to have a cosmetically PERFECT Switch, with the ability to launch RCM with almost no effort. You just need to have a strong magnet to hold near the bottom right corner of the right joycon while you press power and volume + when booting. There are no known side affects of this method. i.e. you can still charge, use the joycon or switch normally. It's essentially stock when there is no magnet nearby and should last forever with no risk (after installation). I'd not send it in for warranty repair with the reed switch installed though") . This is a MUCH better option than a jig if you don't mind some soldering
. This is a MUCH better option than a jig if you don't mind some soldering
The tutorial requires MODEST disassembly and soldering skill.
I'm not saying my approach and tutorial is any better than what other's have done (and posted). They certainly deserve credit. However, this is what I did and I think it's the best approach. I had previously posted a PSA about "why jigs are a bad idea" as I don't agree with them generally. So here is an explanation (for the reasonably skilled solderer) to do a magnetic reed switch the way I did it.
Note that much of the tutorial text is IN the spoilers with the pictures. Don't miss it. It is always at the top above the picture. I elected to keep this pretty visual rather than text, but happy to add more if people want more detail.
It is advisable to disconnect the joycon battery before starting to solder. I didn't disconnect the battery when I did the mod. So there isn't a picture of it.
 I didn't include info on how to open the case beyond showing the triwing screwdriver. There are better tutorials on opening the joycon VIDEO and TEXT


 If it isn't obvious, the way you know you did it right are with the below two tests, with and without magnet, and what you should see on the screen. Speaking of Magnets: I'd consider using a 1/4" or larger rare earth or "neodymium magnet" They come in different grades N35 N42 N50 etc. The higher the number the stronger. Any of them should work. The dark brown or black "ceramic" magnets work but they are not as strong so you might consider a larger size (maybe 1/2"??). Ebay has tons of them, Harbor Freight has rare earth magnets and magnetic grabber tools. Buymagnets.com is also an option but shipping might kill it.


Here is a nice discussion of specific wire lengths and soldering technique as well as a way to use the kickstand to store the magnet [Post 84]
Please post any improvements or clarifications you'd like to see. If this passes muster, Mods can move it to the tutorials forum if appropriate.
v1.0
- beta tutorial
v1.1
- added some more text, and links to joycon teardowns
v1.2
- added reed dimensions
- added info about side affects and charging (there are no side effects)
v1.3
- added details on magnets
v1.4
- added more purchase options for magnetic reed switch
v1.5
- added link to https://gbatemp.net/threads/f-g-joycon-mod-magnethax-switch-edition.502459/ for credit to an older magnetic switch thread and instructions
v1.6
- added advise to disconnect battery before starting soldering.
v1.7
- added a user experience link at the bottom describing some more details.
This should be a pretty solid method for installing a MAGNETIC REED RELAY into your Right Joycon. the purpose is to have a cosmetically PERFECT Switch, with the ability to launch RCM with almost no effort. You just need to have a strong magnet to hold near the bottom right corner of the right joycon while you press power and volume + when booting. There are no known side affects of this method. i.e. you can still charge, use the joycon or switch normally. It's essentially stock when there is no magnet nearby and should last forever with no risk (after installation). I'd not send it in for warranty repair with the reed switch installed though
. This is a MUCH better option than a jig if you don't mind some solderingThe tutorial requires MODEST disassembly and soldering skill.
I'm not saying my approach and tutorial is any better than what other's have done (and posted). They certainly deserve credit. However, this is what I did and I think it's the best approach. I had previously posted a PSA about "why jigs are a bad idea" as I don't agree with them generally. So here is an explanation (for the reasonably skilled solderer) to do a magnetic reed switch the way I did it.
Note that much of the tutorial text is IN the spoilers with the pictures. Don't miss it. It is always at the top above the picture. I elected to keep this pretty visual rather than text, but happy to add more if people want more detail.
It is advisable to disconnect the joycon battery before starting to solder. I didn't disconnect the battery when I did the mod. So there isn't a picture of it.
Note, I used 6cm wires. I wish I had cut them to about 3cm. You will see later they were a little too long. Also, I didn't take a picture of it, but I generally use the soldering iron to melt off 1mm of the wire end for soldering. I don't usually use wire strippers on Kynar insulated solid 30AWG wire. Note this is also called "wire wrap wire" in many circles.

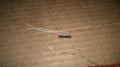
This is one of the main items different from what most people have done. This approach takes less space and allows the wires to exit the reed switch from the same side toward the connector. BE CAREFUL!!! It's VERY easy to break the glass on the reed switch when bending the leads. I broke two, though they were not ruined, I didn't want them chipped. Use some tweezers or needle nose pliers to bend it about 1mm beyond the end of the glass.

The goal here is to use enough heat shrink to cover the exposed leads and solder, but little enough that it doesn't interfere with placement. I went about 1/8" beyond the electrical connections on each end of the device.

Sorry I didn't get a better picture here!! It will give you the idea however.

Be careful with the foam. It actually serves a purpose protecting the other side of the flex cable from abrasion against the soldered pins.

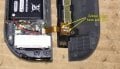
Here are pins 1 and 10 that you want to solder to. Be VERY careful. This is a tight soldering job and you don't want to mess up. You can still back out at this point if you aren't comfortable.

I think this is the best place to put it. The Joycon is pretty tight once assembled but there is ample room above the PCB and wire routing location where I have stuck it here.

Here is a nice discussion of specific wire lengths and soldering technique as well as a way to use the kickstand to store the magnet [Post 84]
Attachments
Last edited by gallymimu,


 s
s