Hardware Tutorial
Updated
Using NAND-AID to repair a broken eMMC (fix 160-0103 system memory error)
Warning
This tutorial is only for advanced users and has a serious risk of bricking the console. Make sure you read it completely before executing any step and that you understand every step and its implications.
While not strictly required, it is still recommended to install ISFShax, before soldering NAND-AID. In case something goes wrong, this then gives more options to troubleshoot the problem.
What is this for?
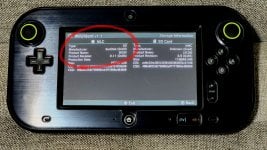
If you are encountering Error Code 160-0103 "There is a Problem with the system memory" or your Wii U is freezing at bootup it is likely that the eMMC Chip is failing.
This tutorial goes into fixing this Error 160-0103, by cloning your MLC to a SD card and fixing corruptions while doing so. This can become useful if the MLC (eMMC) chip is hardware damaged.
Please note: There are other possible causes for the 160-0103 error (like a CBHC brick).
Also we found other ways to fix this problem. To find the the procedure which is right for you follow the Ultimate Wii U Troubleshooting Guide
In short the other options are:
- Reinstalling the system on a clean SD card. It works without dumping the MLC and spares you the manual process of fixing all the errors by hand and gives you a 100% clean system: https://gbatemp.net/threads/how-to-upgrading-rebuilding-wii-u-internal-memory-mlc.636309/ (You need to install ISFShax first, before you solder NAND-AID! Also you'll loose all data)
- Using the front SD slot as a replacment, so you don't even have to solder: https://gbatemp.net/threads/fixing-...-soldering-using-rednand-with-isfshax.642268/
NOTE: In case you can't boot the recovery menu anymore, there is the option of dumping the eMMC using a Cardreader connected to the big pads on the NAND-AID. Else you can use defuse to rebuild a completely fresh MLC instead, so head over to https://gbatemp.net/threads/how-to-upgrading-rebuilding-wii-u-internal-memory-mlc.636309/
NOTE²: In case you get a purple LED but no screen output you might still be able to use the recovery menu blindly. TODO: Give exact steps for this.
Prerequisites
Use this fork of the recovery menu.
Use this fork of wupclient.
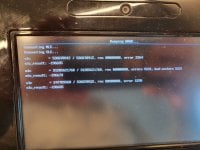
Before beginning use the recovery menu to dump the syslogs, then search all the .log files for
MEDIA ERROR and DATA CORRUPTION.Only errors concerning the dev:mlc01 are relevant. Here the example for such an error:
Code:
10:48:16:325: FSA: ### MEDIA ERROR ###, dev:mlc01, err:-2228230, cmd:11, path:(null)
Code:
10:48:16:325: FSA: ### MEDIA ERROR ###, dev:odd01, err:-2228230, cmd:11, path:(null)A media error on mlc01 means the eMMC itself noticed it can no longer retrieve the data error free and indicates a failure of the eMMC.
In case you find a MEDIA ERROR show us the log file, please, so we can add it to https://hackmd.io/d12Fq9g-QlCjN2HJp7Yvew. It's fine to DM the log to @SDIO, @Lazr1026 or me in case you're concerned about the serial number.
In case you find DATA CORRUPTION only this might or might not be a damaged eMMC. It's recommended to show us the logs, too, so we can analyze them more deep. DATA CORRUPTION means the file system of the Wii U detected that a file is corrupted. That could be caused by either a bad eMMC chip or if a write got interrupted (e. g. power loss during save)
Required Knowledge
WARNING: Before you begin, doing anything to mlc/emmc, you need to understand a few core concepts. Make sure to read carfully and be aware of the implications, or you can seriously mess things up, loosing all data. If that happens you need defuse as descibed here.
The Wii U has not just one internal storage, but it has 3:
- SLCCMPT: Holds all the vWii stuff, the system, the saves, the WiiWare tiles, we don't care for it in this tutorial.
- MLC: Is where all your userdata goes, like games, saves, your accounts and it also hold the system applications. It's also called eMMC and what this tutorial is about.
- SLC: Holds the second stage bootloader (boot1), the core Operating Systems (IOSU and CafeOS), the tickets for the installed titles (eShop and system apps), and some config files. Besides that it holds a file "scfm.img".
This file is used as a block level write cache for the MLC. This means part of the MLC state resides in this file. They need always to be treated as one, if you restore one, you need also to restore the other. If they don't match, because you restored an older version of the mlc for example, the filesystem on top of them will become inconsistent and there will be no way of fixing that. You would either have to restore an older backup of both the SLC and the MLC or you would need to format the MLC. Both are things we try to avoid here.
What you can do: Read the dying eMMC to an Image, then clone it to a SD card and then use the SD card in place of the eMMC, without turning the console on in between.
You could then also read back the state of the current state of the SD card and flash it back to the eMMC and then run off the eMMC again. But only if you don't turn on the Wii U between the read and the swap.
What you can not do: Read the eMMC to an image, then use the console and then replace the eMMC by an SD card with that older image. Because then the SD won't have the current state.
You also can't flash an Image to the SD, use it for a while and then flash the image back a second time.
Where to get a NAND-AID from?
It's always a good idea to ask if someone near you has one. They might be willing to sell it for cheap.
Else here are some available for 3 € : https://gbatemp.net/threads/637225/
If that doesn't work for you you can also go to some PCB manufacturer like https://jlcpcb.com and let them do the printing. This is around $30 for 5 PCBs, so you could resell 4 to other users. The gerber file is available here and the important options are a thickness of 0.6 mm and castellated holes.
Dumping old MLC
Now that you confirmed it's really a hardware damaged MLC it's time to replace and fix it:
- Use the recovery menu to dump OTP + SEEPROM.
- Dump MLC + SLC from within the recovery menu. Turn your Wii U off by pulling the power cable and don't turn it back on until you replaced the eMMC with the SD card.
Note: Errors while dumping SLC are harmless and I would be surprised if you get no errors on MLC as it's hardware damages after all.
- Merge the dump on the PC, for Windows use
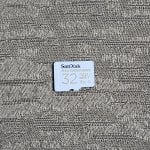
copy /b mlc.bin.part01 + mlc.bin.part02 + (...) + mlc.bin.part15 mlc.bin. For linux or mac os x usecat mlc.bin.part* > mlc.bin - Write the MLC dump onto a SD card with the same size of your MLC. So for a 8 GB unit use a 8 GB card and for a 32 GB console use a 32GB card (64GB won't work). 8 GB units can also use 16GB cards, but only 8GB will be usable.
We currently recommend SanDisk Max Endurance cards for this but other cards have been used, too. Choice is yours.
On Windows you can use Win32DiskImager or Etcher to write the mlc.bin to the SD card.
On Linux you can use:dd if=mlc.bin of=/dev/XXX bs=1M status=progressReplace XXX with the name of the block device if the sdcard. You can uselsblkto figure out the name. Also make sure the sd card isn't mounted. Optionally to improve the performance, you can try to runblkdiscard -ffirst (before the dd) on the SD and then add theconv=sparseoption to the dd command.
Soldering NAND-AID
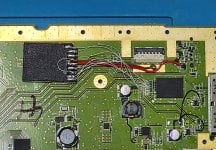
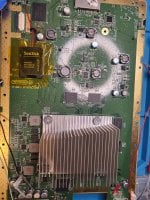
- Cut the CLK line (R26) - using a scalpel or an x-acto knife - to disable the eMMC.
- Install the NAND-AID and insert the SD. For soldering the NAND-AID it's recommend to first solder the big GND VIA. Since v3.0 you'll see a uncovered VIA on the Wii Us motherboard through this GND hole. This VIA is GND, too, so it doesn't matter if you short with it. Also since v3.0 there's a GND arm right nex to the hole in case you want to solder an alternative GND connection instead.
The board will suck lots of the heat away, so you need some patience and really need to make sure the solder properly flows. Check that the connections really holds, before you move on to the rest. To make soldering easier, you should first tin the GND pad on the board, so it has fresh solder and preheating the board also helps.
After GND solder the data connections to the pads/resistors on the board.
Add the wire for 3V3. Then add the SD slot and after that the capacitor. Also short the DSB pads, which shorts the eMMC CLK to GND. If you ever want to access the eMMC again, you need to open the DSB jumper again.
NOTE: On some old board revisions there's a capacitor in the way. It's save to just remove it.
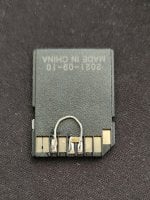
NOTE²: In case you're kind of a patchwork person you can also use a microSD to SD adapter and a capacitor instead of the NAND-AID. How to do this is out of scope of this tutorial through, so you are a bit on your own. See this post for more details: https://gbatemp.net/threads/using-n...0103-system-memory-error.636361/post-10213230
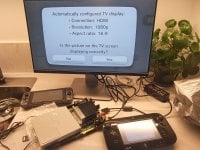
TODO: Show adapter installed into a Wii U.
Repairing the corruption
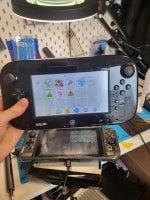
- Boot to the recovery menu again, then start the network and wupserver.
TODO: Add how to add network config to the SD card
- Run MLC Checker from recovery and inspect your mlcchecker.txt log.
- For corrupted files inside of
/vol/storage_mlc01/usr/title/use wupserversdelete_title()option, so for exampledelete_title("/vol/storage_mlc01/usr/title/00050000/1010ED00"). - For corrupted files inside of
/vol/storage_mlc01/sys/title/use the Install WUP option to reinstall the corresponding system title. It's recommended to do this as a last step. Also some titles might not interrupt the boot, so you could even reinstall them with NUSspli as a very last step. - For corrupted folders: These can't be deleted but we have to move them. Even if moved, these still crash a factory reset (so don't do one) The only way to get rid of them is a reformat (see https://gbatemp.net/threads/how-to-upgrading-rebuilding-wii-u-internal-memory-mlc.636309/ ) TODO: Add how to move them while keeping quotas in mind. In case these folders where in
/vol/storage_mlc01/sys/the corresponding title needs to get reinstalled afterwards. - For corrupted files at other subfolders in
/vol/storage_mlc01/usr/it should be save to delete the files (with wupclientsw.rm()], so for examplew.rm("/vol/storage_mlc01/usr/save/00050000/1010ed00/user/80000002/userdata.dat"). This might damage savefiles and stuff through, so always make sure that you know what you're deleting and how to fix the result then (for example by deleting the games save from data management). In case you are unsure ask before doing something stupid! - For other corrupted files in
/vol/storage_mlc01/sys/ask us what to do!
flush_mlc()in wupclient.
- For corrupted files inside of
- Run the MLC Checker again to see if you missed anything.
Bonus: Work around factory reset crash loop
There are some rare cases where users tried a factory reset while having corrupted folders. This results in a crash loop.
To break out of this loop you first have to install NAND-AID and fix the corruptions as told above. After that use wupclients
delete_title() function to remove all titles from /vol/storage_mlc01/usr/title/. Lastly select Set Initial Launch from the recovery menu and then select 0 - Initial Setup.See also
https://gbatemp.net/threads/how-i-fixed-160-0103-system-memory-error.626448/
https://www.boards.ie/discussion/2058305084/my-wii-u-it-met-with-a-terrible-fate
https://gbatemp.net/threads/how-to-upgrading-rebuilding-wii-u-internal-memory-mlc.636309/
Thanks
@SDIO For figuring anything out, doing all of the hard puzzling and coding night and day to make this possible
@GaryOderNichts For the recovery menu
@Nandster For the pictures as well as for documenting the whole process over at boards.ie
@Voultar For the NAND-AID PCB design
@skawo For providing an earlier Tutorial, we take some passages from
Last edited by SDIO,