How to make TurboGrafx16-CD Games into .cia format for Homebrewed 3DS!!!
Step 1: Make sure to have these PC applications and 5 files downloaded:
FILES
***Make sure all files listed are unzipped from their .zip files***
Step 2: Make two separate folders on your computer/desktop and name something similar to these:
The names of the folders do not matter as much, it is just for organization purposes for later. Just remember to have a “maker folder” and “game rom files folder” of some kind
Step 3: Once you have done Step 2 completely and put all the necessary files in the correct folders, then go to Step 4
Step 4: Copy and Paste chdman.exe, chd2cue.bat and cue2chd.bat files from the maker folder to your game roms files folder.
***So you’ll have the .bin files, .cue file and the 3 chd files you just copied and pasted in the game roms files folder now***
Step 5: Run “cue2chd.bat” to create a new .chd rom. It’ll have the same name as your .bin files and .cue file in the game roms files folder.
Step 6: Open up the NSUI Injector file you downloaded and run “New Super Ultimate Injector for 3DS.exe” (it should be a Purple 3DS console looking icon)
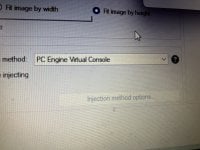
Step 7: Once you have the NSUI.exe file opened, drag your newly made .chd file into NSUI and you should see a GUI to input information for the game you’ll see on your 3DS’s Homescreen, like the title, publisher, release date, icon image, banner image, etc etc…)
Make sure to set the injection method to “RetroArch Mednafen PCE Fast Forwarder” because that one seems to work with the games the best so far.
Get all that information filled out and then go to Step 8.
Step 8: **Not required, but recommended for good game performance***
While still on the information page in NSUI, open up “Injection Method Options”, then go to “Edit core-specific options”:
Step 9: Once Step 7 and Step 8 are done, you can now export your .cia file to your Desktop (or wherever you need to put it). The Export CIA icon is to the left of the Wrench looking icon in NSUI.
Now that you have your .cia file created, we just have a couple more important steps to make sure the game will run. Go to Step 10
Step 10: Open up the HackingToolkit3DS file you downloaded and there should be a folder called “PackEnglishV9”
Open up:
PackEnglishV9 > PackHack > and then you should see 3 .exe files named:
Step 11: Drag your .cia file you created and put it in the same folder as the 3 .exe files from Step 10.
Now rename your .cia to a 4 letter all caps abbreviation to make it easier for the .exe program to recognize it.
Example: “Space Invaders.cia” >>>> “SACE.cia”
Step 12: Run “HackToolkit3DS.exe” and you should see a GUI pop up with a list of commands. The only commands you’ll need for this tutorial are “CE” for extracting the .cia and “CR” for rebuilding the cia
Follow these instructions:
Step 13: Once you’ve done Step 12, you will see some files and 3 folders pop up:
You will only need the “ExtractedRomFS” folder
Step 14: Open up ExtractedRomFS. You’ll see some files there. Do not mess with those files. You will only be adding one file to this folder.
The file being added is the “syscard3.pce” file. So drag the “syscard3.pce” file into the ExtractedRomFS. Go to Step 15
Step 15: Go back to “HackToolkit3DS.exe” and run it again
Follow these instructions:
You should now see a new .cia file created that looks like
“4 letter abbreviation_Edited.cia” Example: “SACE_Edited.cia”
That is your final .cia and now you can put it on your 3DS!
Step 16: Put your newly created .cia on your 3DS’s SD Card (put it in your cia folder and if you don’t have a cia folder on your SD card, create one)
Step 17: Put your SD card back into your 3DS and open FBI and install your .cia from your cia folder!
***Go back to your "PackHack" folder and run "CleanTool.exe" to have it delete all the extracted files from the HackingToolkit3DS folder completely***
***ENJOY YOUR NEWLY CREATED TURBOGRAFX16-CD GAME!***
***WOOO WOOO!!!***
Step 1: Make sure to have these PC applications and 5 files downloaded:
FILES
- “chdman.exe” (File attached in post)
- “chd2cue.bat” (File attached in post)
- “cue2chd.bat” (File attached in post)
- “syscard3.pce” (the BIOS file) (Google)
- A TurboGrafx16-CD game of your choice
- New Super Ultimate Injector for 3DS v0.28 (NSUI Injector) (Just search up "NSUI Injector archive" on Google and it should be the first link shown)
- HackingToolkit3DS v9 (File attached in post)
***Make sure all files listed are unzipped from their .zip files***
Step 2: Make two separate folders on your computer/desktop and name something similar to these:
- “TurboGrafx-CD Cia Maker” (will hold your chdman.exe, chd2cue.bat, cue2chd.bat, and syscard3.pce files)
- “The Name of your Game” (will hold the files of the TurboGrafx-CD game you found, so the .bin files and the .cue file)
The names of the folders do not matter as much, it is just for organization purposes for later. Just remember to have a “maker folder” and “game rom files folder” of some kind
Step 3: Once you have done Step 2 completely and put all the necessary files in the correct folders, then go to Step 4
Step 4: Copy and Paste chdman.exe, chd2cue.bat and cue2chd.bat files from the maker folder to your game roms files folder.
***So you’ll have the .bin files, .cue file and the 3 chd files you just copied and pasted in the game roms files folder now***
Step 5: Run “cue2chd.bat” to create a new .chd rom. It’ll have the same name as your .bin files and .cue file in the game roms files folder.
Step 6: Open up the NSUI Injector file you downloaded and run “New Super Ultimate Injector for 3DS.exe” (it should be a Purple 3DS console looking icon)
Step 7: Once you have the NSUI.exe file opened, drag your newly made .chd file into NSUI and you should see a GUI to input information for the game you’ll see on your 3DS’s Homescreen, like the title, publisher, release date, icon image, banner image, etc etc…)
Make sure to set the injection method to “RetroArch Mednafen PCE Fast Forwarder” because that one seems to work with the games the best so far.
Get all that information filled out and then go to Step 8.
Step 8: **Not required, but recommended for good game performance***
While still on the information page in NSUI, open up “Injection Method Options”, then go to “Edit core-specific options”:
- Click on “Mednafen PCE Fast: CD Image Cache” and click “enabled”
- Click on “Mednafen PCE Fast: CD Bios” and click “System Card 3”
- Then click “OK” to confirm these setting changes
Step 9: Once Step 7 and Step 8 are done, you can now export your .cia file to your Desktop (or wherever you need to put it). The Export CIA icon is to the left of the Wrench looking icon in NSUI.
Now that you have your .cia file created, we just have a couple more important steps to make sure the game will run. Go to Step 10
Step 10: Open up the HackingToolkit3DS file you downloaded and there should be a folder called “PackEnglishV9”
Open up:
PackEnglishV9 > PackHack > and then you should see 3 .exe files named:
- CleanTool.exe
- HackToolkit3DS.exe
- SetupUS.exe
Step 11: Drag your .cia file you created and put it in the same folder as the 3 .exe files from Step 10.
Now rename your .cia to a 4 letter all caps abbreviation to make it easier for the .exe program to recognize it.
Example: “Space Invaders.cia” >>>> “SACE.cia”
Step 12: Run “HackToolkit3DS.exe” and you should see a GUI pop up with a list of commands. The only commands you’ll need for this tutorial are “CE” for extracting the .cia and “CR” for rebuilding the cia
Follow these instructions:
- Where it says “Enter your choice”, type “CE” and press Enter
- Type your 4 letter abbreviation (without .cia at the end of it) and press Enter
- Type “n” and press Enter
- Wait till it is done.
- Press any key to continue, like it says on screen. Then go to Step 13.
Step 13: Once you’ve done Step 12, you will see some files and 3 folders pop up:
- ExtractedBanner
- ExtractedExeFS
- ExtractedRomFS
You will only need the “ExtractedRomFS” folder
Step 14: Open up ExtractedRomFS. You’ll see some files there. Do not mess with those files. You will only be adding one file to this folder.
The file being added is the “syscard3.pce” file. So drag the “syscard3.pce” file into the ExtractedRomFS. Go to Step 15
Step 15: Go back to “HackToolkit3DS.exe” and run it again
Follow these instructions:
- Type “CR” and press Enter
- Type your 4 letter abbreviation (without .cia at the end of it) and press Enter
- Type “0” and press Enter
- Type “0” and press Enter
- Wait till it is done.
- Press any key to continue, like it says on screen.
You should now see a new .cia file created that looks like
“4 letter abbreviation_Edited.cia” Example: “SACE_Edited.cia”
That is your final .cia and now you can put it on your 3DS!
Step 16: Put your newly created .cia on your 3DS’s SD Card (put it in your cia folder and if you don’t have a cia folder on your SD card, create one)
Step 17: Put your SD card back into your 3DS and open FBI and install your .cia from your cia folder!
***Go back to your "PackHack" folder and run "CleanTool.exe" to have it delete all the extracted files from the HackingToolkit3DS folder completely***
***ENJOY YOUR NEWLY CREATED TURBOGRAFX16-CD GAME!***
***WOOO WOOO!!!***
Attachments
Last edited by aquatubachris,