Tutorial
Updated
How to skip the "Connect Joycons" system init screen
I've seen this asked a lot over the years and since someone asked it today and I recently mapped out all the Settings saves, I decided to test my theory that the answer was there. It was.
Use case: You are stuck at the system initialize screen with the 'connect joycons' animation but you don't have joycons or one or both rails is broken.
TL;DR for those who already know how to edit system saves: Dump the SystemSettings save 8000000000000050, change the byte at offset 0x29484 from 0 to 1, repack, sign and replace the save.
Tools required:
- hactoolnet (fire up your command line skills)
- Lockpick_RCM (if you have an existing dump from this console a fresh dump is not required)
- TegraExplorer (if you're familiar with HacDiskMount you can use that instead)
- HxD (or hex editor of choice, this one is just free, lightweight, capable, and ad-free)
- Use Hekate/Nyx and make a full Raw EMMC backup if you never have! This is the first rule of any hacking endeavor.
- If you don't have a key file, use Lockpick_RCM to dump keys from either sysnand or emunand, it doesn't matter which for this purpose. This will dump the key file to SD in /switch/prod.keys.
- Reboot to RCM if needed and push the TegraExplorer payload.
- Use the Volume keys to navigate to and select either [SYSTEM:/] EMMC (for sysnand) or [SYSTEM:/] EMUMMC (for emunand).
- Acknowledge the warning regarding modifying your system NAND and breathe easy since you made a backup, right? RIGHT? Please go back and do that if you haven't. Press Power to continue.
- Select save (this might take a minute to load if using file-based emunand).
- Select 8000000000000050, then select Copy to clipboard.
- Navigate back to the main menu by selecting Folder -> previous folder twice.
- Select [SD:/] SD CARD.
- Select Clipboard -> Current folder and wait for the copy to complete.
- Navigate back to the main menu by selecting Folder -> previous folder.
- Select Exit then either reboot to RCM or power off.
- Mount the SD card on your computer either using a card reader or by pushing the Memloader payload (this is always recommended to reduce stress on the SD reader connector component).
- Open a command prompt (eg. press Win+R and type cmd then press Return).
- Navigate to where you unzipped hactoolnet or drag the executable onto the command prompt window (this is a handy trick that makes the next few steps easier; Windows automatically enters the whole path to whatever you drop on it).
- I don't know what drive letter you mounted your SD as, but you do! So I'm going to pretend it's Z: but if it's something else, use that instead.
- [Note: if the console is Mariko (red-box, new/chipped or Switch Lite) you may need to edit prod.keys by changing "save_mac_key" to "save_mac_key_00" if you get an error like "Unable to sign save file."] If you dragged hactoolnet into the window, you'll have c:\whatever\hactoolnet.exe already populated, so after that, type a space then -t save -k z:\switch\prod.keys z:\8000000000000050 --outdir z:\syssave so your whole command should look like:
Again, please edit this so it matches your own path to hactoolnet and SD mount point.Code:
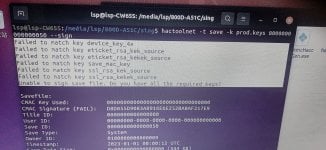
c:\whatever\hactoolnet.exe -t save -k z:\switch\prod.keys z:\8000000000000050 --outdir z:\syssave - Open z:\syssave\file in HxD.
- Press Ctrl+G to open the Go to Offset dialogue, and type in the number 29484 then select OK. The cursor should be hovering over a byte that reads 00.
- Type 01 then press Ctrl+S to Save.
- Go back to your command prompt and similarly enter c:\whatever\hactoolnet.exe -t save -k z:\switch\prod.keys z:\8000000000000050 --replacefile file z:\syssave\file. Verify that hactoolnet prints:
Code:Replaced file /file Successfully signed save file with key <key> - Eject the SD from the computer, reinsert into console, however you did it, get back to RCM with the SD inserted and inject TegraExplorer.
- Select [SD:/] SD CARD.
- Select 8000000000000050, then select Copy to clipboard.
- Navigate back to the main menu by selecting Folder -> previous folder.
- Use the Volume keys to navigate to and select either [SYSTEM:/] EMMC (for sysnand) or [SYSTEM:/] EMUMMC (for emunand), making the same choice as in Step 4.
- Acknowledge the warning, press Power to continue.
- Select save (as before, this might take a minute to load if using file-based emunand).
- Select 8000000000000050, then select Delete file.
- Acknowledge the warning, press Power to delete, wait for completion.
- Select Clipboard -> Current folder and wait for the copy to complete.
- Navigate back to the main menu by selecting Folder -> previous folder twice.
- Select Exit then do whatever you need to do to reboot, with or without CFW.
- You're done! Instead of the joycon connect animation you should get a screen asking you to accept the Eula then reboot, after which you should be in the OS!
Last edited by shchmue,
, Reason: clarify step 4 & 26


