Tutorial  Updated

How to flash the HWFLY Clone chips

See below for updates.

IF YOU BREAK YOUR BOOT0 PIN. DO NOT DM ME ASKING FOR HELP. THAT'S IT. YOU BREAK THAT PIN AND YOU CANT FLASH. YOUR CHIP IS STUCK WITH WHATEVER HWFLY PUT ON IT


Pre-requisites:


  • Raspberry Pi Zero W
    • You may use another flasher if you desire.
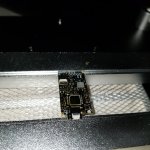
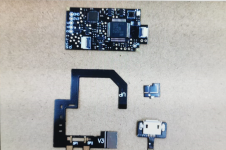
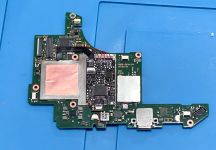
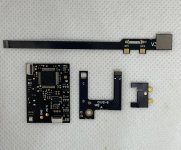
  • Pinout Diagram
  • Modchip Diagram
  • FULL_CHIP_STOCK.bin
  • Modchip Diagram, find the PA9(TX) and the PA10(RX) pins on your modchip, and do the following:
    • Connect GPIO14(TX) on your Raspberry Pi Zero W to the PA10(RX) pin on your modchip.
    • Connect GPIO15(RX) on your Raspberry Pi Zero W to the PA9(TX) pin on your modchip.

  1. Solder a wire to each of the following pinouts on the Raspberry Pi Zero W:
    • 3.3V
    • Ground
    • GPIO 14 (UART TX)
    • GPIO 15 (UART RX)
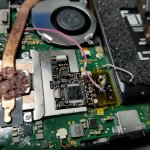
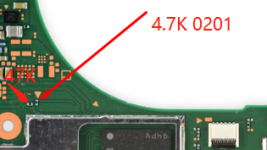
  2. Do the following to prepare the modchip:
    1. Lift pin 44 (also known as BOOT0).
    2. You will need a way to power the chip, so you need to find two 3.3v points. It can be on a MOSFET, but it will differ based on the revision of the modchip.
    3. Connect Ground on your Raspberry Pi Zero W to the Ground pin on your modchip.
    4. Check the Modchip Diagram, find the PA9(TX) and the PA10(RX) pins on your modchip, and do the following:
      • Connect GPIO14(TX) on your Raspberry Pi Zero W to the PA10(RX) pin on your modchip.
      • Connect GPIO15(RX) on your Raspberry Pi Zero W to the PA9(TX) pin on your modchip.
  3. Boot your Raspberry Pi Zero W and do the following:
    1. In the terminal, type the following command, and press enter:
      Bash:
      sudo nano /boot/config.txt
    2. Add the following line to the end of the file:
      INI:
      dtoverlay=pi3-miniuart-bt
    3. Press CTRL + X to save and exit the editor.
    4. In the terminal, type the following command, and press enter:
      Bash:
      sudo nano /boot/cmdline.txt
    5. Remove the following line from the file:
      INI:
      console=serial0,115200
    6. Press CTRL + X to save and exit the editor.
    7. Restart your Raspberry Pi with this command
      Bash:
      sudo /sbin/reboot
    8. In the terminal, type the following commands, and press enter after each command:

      Bash:
      git clone https://github.com/Pheeeeenom/stm32flash.git
      cd stm32flash
      sudo make install
  4. Now you will flash the modchip.
    Note: This will remove read protection, and the modchip will wipe itself (that is what we want).
    1. In the terminal, type the following command, and press enter:
      Bash:
      stm32flash -k /dev/serial0
    2. Now to flash Spacecraft-NX Version 0.2.0, type the following, and press enter:
      Bash:
      stm32flash -v -w ./FULL_CHIP_STOCK.bin /dev/serial0
  5. Once you're done flashing your modchip, remove the wiring from the modchip, and restore the 3.3v pin on the modchip to its original position.

Please post pictures of your work here to further the identification of the different board revisions!


UPDATE: So it seems like stitching the spacecraft bootloader and firmware together from the repo causes unstable glitching behaviors. For now, consistent glitching behavior works with this bootload/firmware combo.
This is the original file on the OLED variant chip which has 0.2.0 spacecraft. As for glitching, I'll figure it out, give me some time...unless someone else wants to hop in and reverse the differences.

For now, this at least solves the 0.1.0 HWFLY gen 3 issue. More to come.

UPDATE 2: This is only going to work on some HWFLY chips. Older ones use higher protection than the new revisions that seem to use the QFN FPGA.

UPDATE 3: This should fully work on OLED modchips with the QFN FPGA. https://github.com/Pheeeeenom/firmware
 
Last edited by Mena,

leerz

Well-Known Member
Member
Joined
Jan 11, 2015
Messages
752
Trophies
0
Age
36
Location
Makati
Website
leerz25.sitesled.com
XP
2,154
Country
Difficult process let me laugh… what is difficult here ? yeah I know find someone who have been able to do it …. I´m waiting return from people who have succes with it.
it may be for newbies.
it is afterall intermediate process, but given the great documentation mena and the others, they did a pretty great job making it look easy. a bonus for everyone is that they are willing to share, lest trying to make it better and easy to follow.

the hardest thing about this is just lifting the b0 point, since the chance of breaking it is great, it's also a pain that the trace is under the chip, therefore we can't supply cut the line, everything else should be doable. (cracking security levels is another thing, and that's a whole new level of difficulty since it requires glitching the glitch chip/ ie reversing and making r/w available and unfck the chip


alternately it may be safer to just lift the chip and use a socket for the package. not exactly easier, but safer.
 
  • Like
Reactions: 0x3000027E

tyiphius

Member
Newcomer
Joined
Dec 12, 2014
Messages
16
Trophies
0
Age
32
XP
139
Country
United States
If it means anything to anyone, I took the GD32f350 off the new OLED chip and put it on the HWFLY lite clone....Nothing!
I get a light blue flash, then it boots stock. Guess it's time to swap em back!
 

Attachments

  • 20220116_151104.jpg
    20220116_151104.jpg
    1.4 MB · Views: 124
  • 20220116_151218.jpg
    20220116_151218.jpg
    1.3 MB · Views: 119

Vladjaye

Well-Known Member
Newcomer
Joined
Jan 11, 2021
Messages
48
Trophies
0
Age
28
XP
379
Country
United States
Just a quick question. Is it safe to connect the OLED chip to USB port to check if it even powers on? Did not install it yet, so just wanted to check if it is usable. I'm talking about the new OLED HWFLY chip.
 

fragged

Well-Known Member
Member
Joined
Jun 19, 2018
Messages
229
Trophies
0
Age
38
XP
1,249
Country
United States
Just a quick question. Is it safe to connect the OLED chip to USB port to check if it even powers on? Did not install it yet, so just wanted to check if it is usable. I'm talking about the new OLED HWFLY chip.
As far as what I've seen from sellers there isn't an "OLED HWFLY" chip, they are selling the HWFLY Lite "V3" as being compatible with the OLED, but as you've seen many of them are just including new flex cables with old stock HWFLY Lite chips with Spacecraft-NX v0.1.0 on them.
It's a completely different OLED chip from what I've seen so far.
 

Vladjaye

Well-Known Member
Newcomer
Joined
Jan 11, 2021
Messages
48
Trophies
0
Age
28
XP
379
Country
United States
As far as what I've seen from sellers there isn't an "OLED HWFLY" chip, they are selling the HWFLY Lite "V3" as being compatible with the OLED, but as you've seen many of them are just including new flex cables with old stock HWFLY Lite chips with Spacecraft-NX v0.1.0 on them.
It's a completely different OLED chip from what I've seen so far.
I'm referring to this chip
 

Attachments

  • 1639751806633.png
    1639751806633.png
    692.2 KB · Views: 108

lufeig

Well-Known Member
Member
Joined
Oct 22, 2009
Messages
306
Trophies
1
Age
45
Location
São Paulo, Brazil
XP
1,057
Country
Brazil
confirming that the OLED modchip with USB that I ordered on Jan 1st on Aliexpress came with spacecraft 0.2 from factory
 

Attachments

  • tempImagemlHCom.png
    tempImagemlHCom.png
    4.7 MB · Views: 104
  • tempImageg9zkTi.png
    tempImageg9zkTi.png
    3.7 MB · Views: 104
  • Captura de Tela 2022-01-18 às 08.51.25.png
    Captura de Tela 2022-01-18 às 08.51.25.png
    242 KB · Views: 106

Excitedguy

Well-Known Member
Newcomer
Joined
Oct 21, 2006
Messages
75
Trophies
1
XP
716
Country
United States
I've been hearing the new OLED modchips are picky on which SD cards will work. Are the hwfly lite clone chips also picky on which SD cards will work or is this just an issue on the new OLED chip variant?
 

sean222

Well-Known Member
Newcomer
Joined
Sep 7, 2007
Messages
92
Trophies
1
XP
753
Country
Canada
I have this new OLED specific chip installed and can confirm it has Spacecraft 2.0 on it. No USB debug port on this chip for 'easily' flashing firmware.
 

Attachments

  • Boot0HexEditor.png
    Boot0HexEditor.png
    96.4 KB · Views: 97
  • O1CN01RCsnhy1TXa7czRxPb_!!0-fleamarket.jpg_790x10000Q75.jpg
    O1CN01RCsnhy1TXa7czRxPb_!!0-fleamarket.jpg_790x10000Q75.jpg
    79.6 KB · Views: 75
  • Like
Reactions: mvmiranda

JaRocker

Well-Known Member
Member
Joined
May 3, 2018
Messages
341
Trophies
0
XP
1,484
Country
Jamaica
it's a resistor afaik it is 300ohm but please don't take my word for it, that points to the cmd and it's easy to messup causing your oled to purple screen
Thanks dowpuld you be able to post a link to where I can buy it. Also do you know if that chip had anything to do with the emmc. Since the got broken I’m getting and emmc error. And I can’t boot systems I’m stuck in hekate. I can’t even use emummc
 

mocthulang

Member
Newcomer
Joined
Jan 21, 2022
Messages
13
Trophies
0
Age
42
XP
100
Country
Vietnam
please help
I followed the instructions and flashed successfully. but when re-installing the oled, only the white light is on at startup, then off, then the oled boots into ofw. does anyone have the full .bin file of v0.1.0 for hwfly lite? I will try to flash again
 
  • Like
Reactions: leerz

Site & Scene News

Popular threads in this forum

General chit-chat
Help Users
  • No one is chatting at the moment.
    K3Nv2 @ K3Nv2: Sorry for accidentally bending over