- Joined
- Jun 25, 2010
- Messages
- 1,096
- Trophies
- 1
- Location
- Your computer's Recycle Bin
- Website
- www.google.com
- XP
- 1,995
- Country

15/12/2014 -- VERSION 9.3 and .4 change some stuff in Hompass, but it still works!, Windows method users, you'll need to follow a new way.
So you live in the middle of nowhere or just dont have any luck with streetpass. Since ver 6.2.0-12x Nintendo introduced a Streetpass Relay Station to all nintendo zone hotspots. Since you can make your own NZone at home it was just a matter of time to know how nintendo stored this data on their servers.
We found out that Nintendo uses the MAC Address of the router where the 3DS connects to. And the idea is pretty simple, we have a list of MAC's that people use to spoof their devices, so the 3DS thinks its connecting to the same router as someone else is from the other of the world.
Enough chit chat, lets get to the guide:
Before beggining some important things:
You only streetpass with the same relay once every 8 hours, however you can change your mac at any time to one of those in the list.
Please try to use the mac's on the spreadsheet.
Don't cycle through all the macs in just 10 min, leave 30 min between mac changing so the next person who connects to you doesnt always get your mii.
Try to enable streetpass on all the games you have to get the best experience.
Also it has been confirmed that the ssid DOES mater so use attwifi ALWAYS.
The first question you ask yourself is: What device to use?
I'm going to use Ubuntu as it's one of the simplest distros.
Method 1 (NEW)
This new method is the same as below, but it's easier for the user because it's just a simple script (which is a hibrid script, it as the ubuntu and DD-Wrt in one script) with automatic mac changing and running on boot automatically.
Thanks to duke_srg for making this script.
So first we are going to download the script:
Then we are going to make it executable
And finally we are going to run it, you need only to run this command once, because the script starts on boot. The last part of this command defines which mac's lists to use and it also, based on the total number of macs, it defines how long it takes to change to the next mac. Base16 is about 30min between macs.
8 * 60 / number_of_macs_in_lists= time_between_changes
Some possible options are: BASE16, GBATEMP, BASE256. You need to have a "," in between like below:
After running you should open your 3ds and see if you can connect to your AP and get any streetpass.
If you want to temporarily stop it run:
And to run it again:
Method 2
VIDEO GUIDE:
Before beggining some important things:
You only streetpass with the same relay once every 8 hours, however you can change your mac at any time to one of those in the list.
Please try to use the mac's on the spreadsheet.
Don't cycle through all the macs in just 10 min, leave 30 min between mac changing so the next person who connects to you doesnt always get your mii.
Try to enable streetpass on all the games you have to get the best experience.
Also it has been confirmed that the ssid DOES mater so use attwifi ALWAYS.
Downloads!
Hostapd (downloadable through ubuntu)
Dnsmasq (also through ubuntu)
And Ubuntu (you can use the live cd but if you are running this too often is better to install it on a Virtual Machine or Dual boot it with windws)
And a script to make everything simple made by somebunny Wifi Zone.txt v1
NEW VERSION This one has the same 6 macs AND no need to edit the file for changing interfaces http://www.mediafire.com/download/3wxss78e67dnxcc/home_zone
Requirements
1 Wifi Card capable of getting in to master mode
Another internet card (it can be a ethernet, wifi or 3G modem the only requirement is to be connect to the internet)
A 3DS (duh!)
The guide
Boot into your linux and download Hostapd and Dnsmasq
Open a terminal (CTRL+ALT+T)
Plug in any (if) wifi dongles to you computer and type on the terminal
And you should see something like this:
Now eth0 is a cable connection and wlan0, wlan1 etc are wifi dongles
If on a laptop and using 2 wifi dongles wlan0 is likely to be your internal wifi and wlan1 your usb dongle
After knowing what name do your interfaces have let's make the NZone spoofer
No need to make this part with the new script
On the console type "sudo gedit /etc/dnsmasq.conf"
Press 2x ENTER go back to the top of the file and paste this:
Go back to that terminal and type this:
Now run the somebunny script
This command can be run with the following option:
Where X can be a number from 1 to 6 and it will change the mac for the first 6 macs from the list
Where Y is the number from your wlan that's going to host.
And Internet_interface can be wlanX ethX pppX depending on your configuration
(you write this everytime you want to use your nzone hotspot)
To stop it
If all was done correctly you should open your 3ds and BAM you are in a nintendo zone AT YOUR HOME
Now you just need to keep your 3ds closed and wait for that green light everyone likes to see")
Try to enable streetpass on all the games you have to get the best experience.
Also it has been confirmed that the ssid DOES mater so use attwifi ALWAYS
Thanks to Somebunny for the script.
Method 3
by ground
Step 1: download the neccesary stuff
You need to download the following apps (the commands for the terminal is stated between the ()) :
1) Hostapd ( sudo apt-get install hostapd )
2) dnsmasq ( sudo apt-get install dnsmasq)
Step 2: decide you hardware adressess
In order to set up a proper streetpass relay you need the right hardware:
- a wifi card capable of getting into master mode
- another internet card (an be 3g/ethernet or modum)
Connect all the devices ant open the terminal, now enter “ifconfig”. This will give you a list with the devices and note them down. For this tutorial I will use the following names:
Wlan0 = the dongle which is gonna create an acces point
Wlan1 = the dongle which is gonna connect to the actual internet.
Step 3: Write the the scripts
First we are gonna write the script which is used by hostapd (so the basic settings). Open an text editor and put the following lines in it:
–---------------------------------
interface=wlan0
driver=nl80211
ssid=_The Cloud
hw_mode=g
channel=6
macaddr_acl=0
auth_algs=1
ignore_broadcast_ssid=0
wpa=0
–------------------------------
Change wlan0 to the the card which is going into acces point mode.
Save this file somewhere as streetpass.conf (I put it in my home folder)
The second file is a little bit larger, but open up a new empty text file and put the following in it:
–---------------------------------------------
ifconfig wlan0 up 10.0.0.1 netmask 255.255.255.0
sleep 2
killall dnsmasq
killall hostapd
sleep 2
/etc/init.d/dnsmasq start
sleep 5
iptables --flush
iptables --table nat --flush
iptables --delete-chain
iptables --table nat --delete-chain
iptables --table nat --append POSTROUTING --out-interface wlan1 -j MASQUERADE
iptables --append FORWARD --in-interface wlan0 -j ACCEPT
sysctl -w net.ipv4.ip_forward=1
ifconfig wlan0 down
ifconfig wlan0 hw ether 4E:53:50:4F:4F:40
ifconfig wlan0 up
timeout 180s sudo hostapd ./streetpass.conf
sleep 2
echo 1 done
ifconfig wlan0 down
ifconfig wlan0 hw ether 4E:53:50:4F:4F:41
ifconfig wlan0 up
timeout 180s sudo hostapd ./streetpass.conf
sleep 2
echo 2 done
ifconfig wlan0 down
ifconfig wlan0 hw ether 4E:53:50:4F:4F:42
ifconfig wlan0 up
timeout 180s sudo hostapd ./streetpass.conf
sleep 2
echo 3 done
ifconfig wlan0 down
ifconfig wlan0 hw ether 4E:53:50:4F:4F:43
ifconfig wlan0 up
timeout 180s sudo hostapd ./streetpass.conf
sleep 2
echo 4 done
ifconfig wlan0 down
ifconfig wlan0 hw ether 4E:53:50:4F:4F:44
ifconfig wlan0 up
timeout 180s sudo hostapd ./streetpass.conf
sleep 2
echo 5 done
ifconfig wlan0 down
ifconfig wlan0 hw ether 4E:53:50:4F:4F:45
ifconfig wlan0 up
timeout 180s sudo hostapd ./streetpass.conf
sleep 2
echo 6 done
ifconfig wlan0 down
ifconfig wlan0 hw ether 4E:53:50:4F:4F:46
ifconfig wlan0 up
timeout 180s sudo hostapd ./streetpass.conf
sleep 2
echo 7 done
ifconfig wlan0 down
ifconfig wlan0 hw ether 4E:53:50:4F:4F:47
ifconfig wlan0 up
timeout 180s sudo hostapd ./streetpass.conf
sleep 2
echo 8 done
ifconfig wlan0 down
ifconfig wlan0 hw ether 4E:53:50:4F:4F:48
ifconfig wlan0 up
timeout 180s sudo hostapd ./streetpass.conf
sleep 2
echo 9 done
ifconfig wlan0 down
ifconfig wlan0 hw ether 4E:53:50:4F:4F:49
ifconfig wlan0 up
timeout 180s sudo hostapd ./streetpass.conf
sleep 2
echo 10 done
ifconfig wlan0 down
ifconfig wlan0 hw ether 4E:53:50:4F:4F:4A
ifconfig wlan0 up
timeout 180s sudo hostapd ./streetpass.conf
sleep 2
echo 11 done
ifconfig wlan0 down
ifconfig wlan0 hw ether 4E:53:50:4F:4F:4B
ifconfig wlan0 up
timeout 180s sudo hostapd ./streetpass.conf
sleep 2
echo 12 done
ifconfig wlan0 down
ifconfig wlan0 hw ether 4E:53:50:4F:4F:4C
ifconfig wlan0 up
timeout 180s sudo hostapd ./streetpass.conf
sleep 2
echo 13 done
ifconfig wlan0 down
ifconfig wlan0 hw ether 4E:53:50:4F:4F:4D
ifconfig wlan0 up
timeout 180s sudo hostapd ./streetpass.conf
sleep 2
echo 14 done
ifconfig wlan0 down
ifconfig wlan0 hw ether 4E:53:50:4F:4F:4E
ifconfig wlan0 up
timeout 180s sudo hostapd ./streetpass.conf
sleep 2
echo 15 done
ifconfig wlan0 down
ifconfig wlan0 hw ether 4E:53:50:4F:4F:4F
ifconfig wlan0 up
timeout 180s sudo hostapd ./streetpass.conf
sleep 2
echo 16 done
–------------------------------------------------------------
so first of all change every wlan0 and wlan1 to your right cards, and leave everything until
“ sysctl -w net.ipv4.ip_forward=1” . This because everything above it is used to establish a good connection.
Beneath it you can change whatever you wan. You can find the Mac adresses you want to visit and put more or less addresses in it. Make sure you type it like this:
ifconfig wlan0 down
ifconfig wlan0 hw ether 4E:53:50:4F:4F:4F → put the address here
ifconfig wlan0 up
timeout 180s sudo hostapd ./streetpass.conf → change 180s to whatever ssecond you want to stay
sleep 2 connected
echo 16 done → says when it is finished with the current mac
Save this file as streetpass (I did it in my home folder again)
Step 4: start the cycle!
First start your 3ds and put it into sleep. Now open the terminal and type the following:
“chmod +x ./streetpass” (where ./streetpass should be your location to the last big file)
now type the following:
“sudo ./streetpass” (where ./streetpass should be your location to the last big file)
now sit back and enjoy.
With VMWare:
MacCyclers for Windows 7/8 And Alternative Guides
http://gbatemp.net/threads/how-to-have-a-homemade-streetpass-relay.352645/page-116#post-4874439
http://gbatemp.net/threads/homepass-chaldrons-mac-cycler-for-windows.352935/
http://gbatemp.net/threads/macycle-the-improved-mac-changer-for-homepass.353328/
http://gbatemp.net/threads/homepass-macpass.354279/
Guide #1
By DarkKnigh_t
I will explain my setup in detail now.
UPDATE: LD560 corrected me in a couple of things since hes the original poster of this guide thanks to him for helping me and figuring these things out His corrections are marked in RED letters
Hardware I'm using
I'm using a pc running windows 8.1 (x64 bit) and a TP Link Wifi usb stick. The computer is connected with a cable to my homes router and the Wifi stick is plugged in my computer.
First steps to setup
First plug your Wifi usb stick into your computer and MAKE SURE you have the LATEST drivers installed. Google, go on the official website and find the latest drivers. The generic drivers that windows installs sometimes don't work. After you done that go into your adapter settings and right click on the icon that represents your Wifi(be it a wifi stick or a wifi card) and select RENAME and name it "Wi-Fi". Then when you done that in it should look something like this.
 REMEMBER YOUR WI-FI SHOULDN'T BE CONNECTED TO ANYTHING!
Setting up your attwifi network
Now when you've done that time to go into cmd. Type cmd and right click run as administrator.
Type in:
netsh wlan set hostednetwork mode=allow ssid=attwifi key=password
(press enter on your keyboard)
netsh wlan start hostednetwork
(press enter on your keyboard)
To stop the connection type: netsh wlan stop hostednetwork.
You should stop your network when changing MAC's so as to not cause the Virtual Network to fail. Same applies with Virtual Router, stop the program. Change the MAC start the network again.
Now this should bring attwifi to your adapter settings and it should look like this.
 Now to explain some things. First icon is my wired connection that I use on my computer to browse internet. The second icon is my WIFI USB STICK the TP Link one. The third icon is the attwifi network. Now if you noticed i circled two names there:
1. Is the name i gave it when you right click on the icon and choose to rename. You should do that so that you know that thats the attwifi connection. The name can be anything.
(I would not re-name this at all. Windows 8.1 has a bad habit of remembering plug and play devices such as USB WiFi. You might think this is a good thing but it is NOT!!
Say you choose to unplug your WiFi stick into another USB port, because you have changed this set-up Windows Virtual Hotpost can potentially assign this with a different Network name (but the same SSID) this believe it or not can actually cause massive problems with the Virtual Hotspot.
The same applies if you connect a different USB WiFi Stick to replace an old one.)
2.The second name is the SSID that we gave it in cmd. It has to be named attwifi!
Now you right click on your attwifi connection and select properties. In the little box i have everything checked except "Microsoft network adapter multiplexor protocol". In the little box scroll all the way down to the bottom to IPv4 protocol and click that and select properties.
Set it up to look like this.
Also these same settings can be applied to people who are now on IPv6.
Okay now we are getting somewhere. Now go back into the adapter settings where all our connections are and select your WIRED connection. Right click and properties. Open the sharing tab and set it up like this.
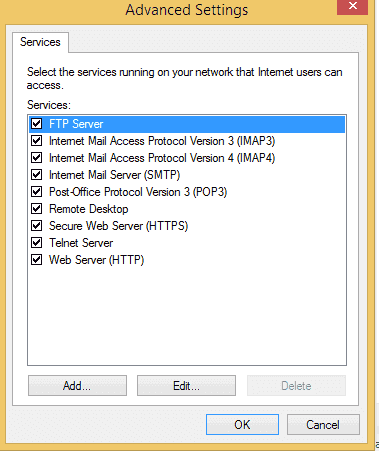
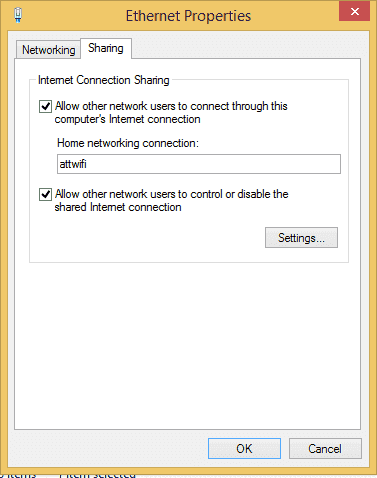 Click settings and i have checked everything. (maybe this isn't necessary but someone recommended it and i left it like that).[Allow other network users to control the connection doesn't need to be ticked, I have ticked and un-ticked several services whilst testing this. It makes no difference.] It should be like this.
 Now we are done with that. One thing we should do now is to right click on attwifi and select status.
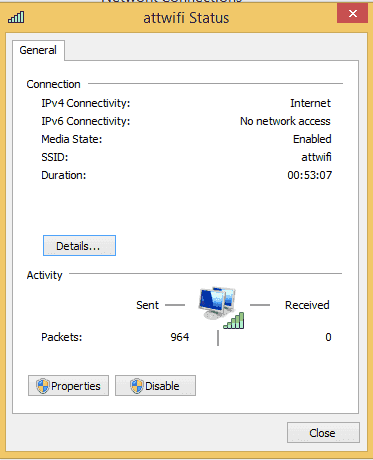 As you can see under IPv4 it says i have internet connectivity that means when the 3ds IF IT CONNECTS OKAY will pass the internet part of the connection test. If it says under IPv4 "no network access" then what i do is go into properties of your WIRED CONNECTION and under sharing deselect sharing click ok and then go into properties and select sharing again for attwifi. That fixed my problems alot.
ADDITION(for people with laptops)
IF you are running a laptop and you want to share its connection the principles are the same plug in a cable between the router and your laptop use that connection to have internet on your laptop. DISCONNECT your wifi card from your router. RENAME THAT WIFI to "Wi-Fi" and everything else should be the same.
I know it can be done without a wired connection but i still haven't tested that BUT it should be the same your wifi connection called "Wi-Fi" should be sharing the internet with attwifi. But remember your laptop then will be losing internet connection all the time when mac's change.
(You should just set-up the connection anyway. Windows 8.1 Virtual Network is finky at best and you run the risk of Limited Connectivity all the time, this will never be spotted by a 3DS as it will pass the Internet Connection check all the time. Only a Tablet / Smart Phone / PC or MAC will spot Limited Connectivity)
Setting up the connection near guarantee's that there will be no further problems. Also Street Pass seems to be instant with a network connection parameters put in the 3DS
Next thing is to setup the 3ds.
First thing is delete any connections you had before. Search for a new connection. Add attwifi and it will test the connection. If it passes YAY YOU DID IT if it doesnt like mine then we need to setup the connection.
1. Click the connection 1 you just added.
2. Click CHANGE SETTINGS.
3. Go one time to the right and click IP SETTINGS
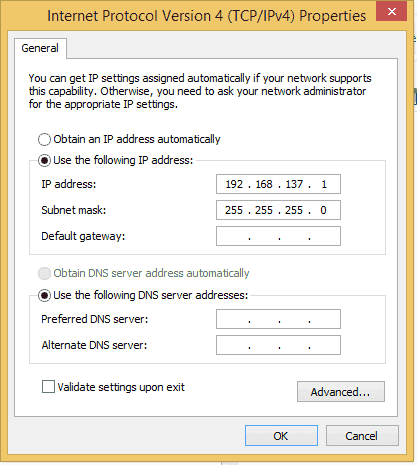
4. "Auto-Obtain IP adress" click NO and click DETAILED SETUP
5. ENTER THE ADDRESSES like in the picture shown here
 The IP address of the 3ds the one here 192.168.137.5 is what I choose because it doesnt matter what number you pick at the end but just make it like this so future problems can be resolved easier.
(Just don't go over 255 when your setting your last number..lol)
6. Now it will tell you that you have to setup your DNS next because you changed your gateway address. click okay and set it up like this.
 And click okay and test your connection and it should work now if you followed the guide to the letter.
THINGS TO REMEMBER
1. Nintendo Zone should appear but it won't work so don't try it. What we need is that nintendo zone just appears that's good.
2. When you set up your 3ds attwifi connection DON'T DELETE it anymore its okay and it should work no more need to delete the connection and set it up again. If it doesn't work we know the problem is in the computer not the connection setup on the 3ds.
3. SOMETIMES to fix connection issues its good to go into cmd and type the following:
netsh wlan stop hostednetwork
netsh wlan start hostednetwork
Thats restarting the hostednetwork and it can fix problems a lot because windows sucks and it messes up the connection.
4. Some people have it setup in a different way using routers, wifi cards, linux, windows xp... The principles are the same but some things will be different. This guide should apply for people using windows 7 and 8.
5. Sometimes your 3DS might need its Wireless settings reset, just turn off the Wireless on the side of the console and turn back on, this sometimes happens with Wireless N cards, but can still happen with G Cards too. This just refreshes your 3DS.
I hope this helps someone and please if you are stuck or don't understand something ask we will help asap
PS this is a guide to set up the connection and not how to get streetpasses. I will write that one later after people get this working first!
That's go to everyone who were involved in helping me and others hopefully we can help more people with their problems!
Guide #2
By elridge
Before beggining some important things:
You only streetpass with the same relay once every 8 hours, however you can change your mac at any time to one of those in the list.
Please try to use the mac's on the spreadsheet.
Don't cycle through all the macs in just 10 min, leave 30 min between mac changing so the next person who connects to you doesnt always get your mii.
Try to enable streetpass on all the games you have to get the best experience.
Also it has been confirmed that the ssid DOES mater so use attwifi ALWAYS.
Requirements:
A wired connection
A Wifi card (i tested this on an old 1390 WLAN card, so i guess most should work).
Mac Shift
Virtual Router Manager
Connect your computer through your wired connection and disconnect from any wireless one.
The Setup:
Just install Virtual Router, unzip Mac Shift on an accesible folder (or just the root of your C: drive) and run the following from a command line with administrator privileges (Type "cmd" without quotes on the search box of your start menu, when the "cmd.exe" file appears, just shift-click it and select "Run as Administrator"):
This will set up a Virtual Wifi Miniport on your network connections.
Then, still on command line, go to the folder where you unzipped Mac Shift (If you unzipped it on C:\, you may want to type "Cd \" without quotes) and type:
*Your wifi name should be the name of your Wireless Network Adapter typed just as it appears on your "Network Connections" folder, for example, for me it was "Wireless Network Connection". Please take in mind that this should be your Wireless Network adapter name, and NOT the one of your just-created "virtual network", nor the name of your wired adapter.
** Mac Address should be typed without ":", for example, 4E53504F4F46
So, this line should look something like:
Run Virtual Router Manager.
Complete the network name (Should be "attwifi")
Put any password you like (remember to set up your connection on your 3DS later!).
As "shared connection", select your Wired Adapter.
Click on "Start Virtual Router", wait a few seconds, and you should get your street pass!
To cycle between MACs:
Just don't close your command line window!
Press the UP arrow to bring back your last typed command, and change the last numbers of the mac address. This will restart your network connections (I stopped the Virtual Router every time before changing my MAC and restarted ir after doing so, but i don't believe this is necessary).
Remember that, when you stop the Virtual Router, you should stop seeing the "attwifi" network, so no problem from neighbors stealing your internet (which was secured anyway). If you want to remove the Virtual Wifi Miniport, just type the following in an administrator privileged command line:
And, to return your Wifi Adapter to it's original MAC address:
UPDATE: Here's a script that changes your mac http://gbatemp.net/threads/how-to-have-a-homemade-streetpass-relay.352645/page-14#post-4740736
ANOTHER UPDATE: Here's a script that ALSO changes your mac http://gbatemp.net/threads/macycle-the-improved-mac-changer-for-homepass.353328
Enjoy!
By assassinz
I got this setup to work on a PC using WinXP Pro without using a wired connection. So I think this will work on a Windows PC with either WiFi or wired (Ethernet) connections.
SUMMARY:
What we are going to do here is modify some drivers so the Nintendo WiFi USB Connector will be recognized on your computer as the Buffallo WLI-U2-KG54-YB. Then we will hex edit the software for another device (the ASUS WL-167g) which uses the same chipset as the Wi-Fi Connector, and make an Access Point. Then we will use Technitium MAC Address Changer to manually change the MAC address of the Nintendo USB WiFi Connector. (I hope someone can write a script to have Technitium automatically change the MAC addresses every 5 mins. That would be awesome!)
******************************************************************
First, go to http://www.digifail.com/text/wfchack.shtml and read/follow all instructions up to and including the Soft AP Configuration section and stop.
Current links for Drivers and software you'll need:
Get the Buffallo driver at http://www.buffalotech.com/support-and-downloads/download/U2KG54_1-01-02-0002.zip
Get the ASUS utility at http://www.asus.com/us/Networking/WL167g/#support_Download_17
Get the Technitium MAC Address changer at http://go.technitium.com/fwlink/?id=13
After everything is up and running, use these settings in the ASUS WiFi software:
Click the Config button, go to the Basic Tab and name the SSID to attwifi.
Encryption Tab: Network Authentication - Open, Data Encryption - WEP. Then Manually Assign a Key (whatever you want).
Soft AP Tab: use Soft AP Mode, make sure the name of your internet connection is showing in the Internet field and ENABLE ICS should be checked.
Access Control Tab: Access Control Policy - Accept. Add all the Remote StreetPass Relay MAC's to the Access Control List.
After you're done, click the Apply button in the lower left corner, then Save Configuration.
Finally, make a new internet connection on your 3DS and use attwifi as the name of the SSID. Use WEP as the encryption and use the same Key you assigned in the ASUS software.
You'll know everything is working if your 3DS shows that there is a Nintendo Zone available. You cannot make a connection to the Nintendo Zone if you assigned a WEP key or other data encryption to attwifi, but you will be able to start getting Street Passes now.
Just disable Data Encryption settings in the ASUS software and on your 3DS connection setting for attwifi and you can connect to the Nintendo Zone.
After you get a Street Pass, use Technitium MAC Address Changer to manually change to the next MAC address so you can get another Street Pass.
So you live in the middle of nowhere or just dont have any luck with streetpass. Since ver 6.2.0-12x Nintendo introduced a Streetpass Relay Station to all nintendo zone hotspots. Since you can make your own NZone at home it was just a matter of time to know how nintendo stored this data on their servers.
We found out that Nintendo uses the MAC Address of the router where the 3DS connects to. And the idea is pretty simple, we have a list of MAC's that people use to spoof their devices, so the 3DS thinks its connecting to the same router as someone else is from the other of the world.
Enough chit chat, lets get to the guide:
Before beggining some important things:
You only streetpass with the same relay once every 8 hours, however you can change your mac at any time to one of those in the list.
Please try to use the mac's on the spreadsheet.
Don't cycle through all the macs in just 10 min, leave 30 min between mac changing so the next person who connects to you doesnt always get your mii.
Try to enable streetpass on all the games you have to get the best experience.
Also it has been confirmed that the ssid DOES mater so use attwifi ALWAYS.
The first question you ask yourself is: What device to use?
- BEFORE ANYTHING ELSE Try this MASSIVE guides and scripts by Duke_Srg (for linux/windows/DD-WRT)
- Use a linux machine (ubuntu on this guide)
- Use a Android
- Use a router capable of mac spoofing (mostly DD-WRT)
- Use a RaspBerry Pi
- Use a Mac OSx
- Use a Windows 7 / 8 Computer
- Use a Windows XP Computer
Quick access to all stuff
List of macs
Devices Recommendation
Devices Recommendation
- Linux Script: Wifi Zone.txt v1
- My changed version with attwifi and 6 macs http://gbatemp.net/attachments/wifi_zone-zip.3809/?temp_hash=591f2e7bc68fc057c208a4b4e9029c18
- NEW VERSION 13/08/2013 :
This one has the same 6 macs AND no need to edit the file for changing interfaces.
Thanks to duke_srg for this.
Edit the title line with the games you have. The default has Mk7, Super Mario 3D world and AC:NL
For more codes see https://docs.google.com/spreadsheet/ccc?key=0Ajsweg1Cjr5_dGhlaDNfd2Fid0ZpNTBYQ2pwVUlLT3c#gid=0 - Windows Script: http://gbatemp.net/threads/how-to-have-a-homemade-streetpass-relay.352645/page-14#post-4740736
LINUX MACHINE
I'm going to use Ubuntu as it's one of the simplest distros.
Method 1 (NEW)
This new method is the same as below, but it's easier for the user because it's just a simple script (which is a hibrid script, it as the ubuntu and DD-Wrt in one script) with automatic mac changing and running on boot automatically.
Thanks to duke_srg for making this script.
So first we are going to download the script:
Code:
sudo wget -O /tmp/nzone.sh http://nintendozone.dynu.net/nzone.sh
Code:
sudo chmod +x /tmp/nzone.sh8 * 60 / number_of_macs_in_lists= time_between_changes
Some possible options are: BASE16, GBATEMP, BASE256. You need to have a "," in between like below:
Code:
sudo /tmp/nzone.sh BASE256,GBATEMPIf you want to temporarily stop it run:
Code:
sudo /usr/local/bin/nzone.ap stop
Code:
sudo /usr/local/bin/nzone.ap startMethod 2
VIDEO GUIDE:
Before beggining some important things:
You only streetpass with the same relay once every 8 hours, however you can change your mac at any time to one of those in the list.
Please try to use the mac's on the spreadsheet.
Don't cycle through all the macs in just 10 min, leave 30 min between mac changing so the next person who connects to you doesnt always get your mii.
Try to enable streetpass on all the games you have to get the best experience.
Also it has been confirmed that the ssid DOES mater so use attwifi ALWAYS.
Downloads!
Hostapd (downloadable through ubuntu)
Dnsmasq (also through ubuntu)
And Ubuntu (you can use the live cd but if you are running this too often is better to install it on a Virtual Machine or Dual boot it with windws)
And a script to make everything simple made by somebunny
NEW VERSION This one has the same 6 macs AND no need to edit the file for changing interfaces http://www.mediafire.com/download/3wxss78e67dnxcc/home_zone
Requirements
1 Wifi Card capable of getting in to master mode
Another internet card (it can be a ethernet, wifi or 3G modem the only requirement is to be connect to the internet)
A 3DS (duh!)
The guide
Boot into your linux and download Hostapd and Dnsmasq
Open a terminal (CTRL+ALT+T)
Code:
sudo apt-get update && sudo apt-get install hostapd
sudo apt-get install dnsmasq
Code:
iwconfigAnd you should see something like this:
Code:
ppp0      no wireless extensions.

wlan0     IEEE 802.11abg  ESSID:off/any
          Mode:Managed  Access Point: Not-Associated   Tx-Power=15 dBm
          Retry  long limit:7   RTS thr:off   Fragment thr:off
          Power Management:off

lo        no wireless extensions.

eth0      no wireless extensions.
Now eth0 is a cable connection and wlan0, wlan1 etc are wifi dongles
If on a laptop and using 2 wifi dongles wlan0 is likely to be your internal wifi and wlan1 your usb dongle
After knowing what name do your interfaces have let's make the NZone spoofer
No need to make this part with the new script
Make a new document on your home folder and name it "soft.sh"
Edit it and write this in it:
Then make another file called "hostapd.conf"
Paste this in it: (change wlan0 to what you are going to use has hotspot) (also you might have to change the driver See the part "checking wifi card support")
Now go ahead and open (i.e edit it) somebunny's script (i suggest having it saved on the home folder for ease of use)
You'll find this:
WHOOO thats alot of stuff dont worry we just need to edit 2 to 3 lines
Change:
"zone=" to the wlan your using has hotspot i.e zone=wlan1
"world=" to the interface you are using to connect to the internet i.e world=eth0
"mac=" to one of the mac on the list (check the spoiler on the top of the topic)
Go back to that terminal and type this
Now to run the NZone Spoofer
(this part needs to be run everytime you boot your computer.)
Example: sudo ./soft.sh wlan0 eth0
See if you find the hotspot with something else then hit CTRL+C to stop it.
Edit it and write this in it:
Code:
#!/bin/bash
#Initial wifi interface configuration
ifconfig $1 up 10.0.0.1 netmask 255.255.255.0
sleep 2

###########Start dnsmasq, modify if required##########
if [ -z "$(ps -e | grep dnsmasq)" ]
then
dnsmasq
fi
###########

#Enable NAT
iptables --flush
iptables --table nat --flush
iptables --delete-chain
iptables --table nat --delete-chain
iptables --table nat --append POSTROUTING --out-interface $2 -j MASQUERADE
iptables --append FORWARD --in-interface $1 -j ACCEPT

#Thanks to lorenzo
#Uncomment the line below if facing problems while sharing PPPoE, see lorenzo's comment for more details
#iptables -I FORWARD -p tcp --tcp-flags SYN,RST SYN -j TCPMSS --clamp-mss-to-pmtu

sysctl -w net.ipv4.ip_forward=1

#start hostapd
hostapd ./hostapd.conf 1> /dev/null
killall dnsmasq
Then make another file called "hostapd.conf"
Paste this in it: (change wlan0 to what you are going to use has hotspot) (also you might have to change the driver See the part "checking wifi card support")
Code:
interface=wlan0
driver=nl80211
ssid=_The Cloud
hw_mode=g
channel=6
macaddr_acl=0
auth_algs=1
ignore_broadcast_ssid=0
wpa=0
Now go ahead and open (i.e edit it) somebunny's script (i suggest having it saved on the home folder for ease of use)
You'll find this:
#!/bin/bash
#
# wifi_zone_new
# A script that emulates a Nintendo Zone in a way that you can actually connect to
# other people all over the world.
#
# Initial version written by Somebunny (9. August 2013).
#
#
# documentation (sort of)
#
# You will need the following packages/programs:
# - rfkill
# - dnsmasq (will be killed if already running)
# - hostapd (will be killed if already running)
# You should not need any additional configuration work.
#
# This script MUST be run as root, or using sudo, reconfiguring network
# interfaces does not seem to work when run by non-root.
#
# Please adapt the following sections to your own computer:
# - variables "zone" and "world", found below
# - you can add hotsoptr in "InitZone()", just copy what is there
#
# Usage: call the script with one extra parameter that describes the
# MAC address to use. I have prepared some options that work from
# the thread in the gmatemp forums.
#
# Shutdown: call the script with the parameer "stop".
#
#
# A first attempt to organise everything in a somewhat smarter way.
#
# First, some obligatory checks.
if [[ $EUID -ne 0 ]]; then
echo "This script must be run as root or with sudo."
echo "I don't like this either, but some calls here are really picky!"
exit 1
fi
# some global settings; you should only need to adapt them for your system once
# * this is the network interface used for your custom AP; must be wireless
zone=wlan1
# * this is the network interface used to access the internet; can be almost anything
world=wlan2
# some local variables; using default values so that something is there
ssid="_The Cloud"
mac=f4:6d:04:a1:6b:86
country=DE
name="Somebunny, WiFi card that recently died"
#
# local function that sets up the local variables;
# crude but better than having to change the script every time
# NOTE: this part should be heavily modified so that it doesn't
# depend on a static config. Maybe something with an external
# file or something, so you don't have to share your relay point
# with the entire world if you don't want to.
#
InitZone() {
# kill all existing support tools
killall dnsmasq 2> /dev/null
killall hostapd 2> /dev/null
# flush routing entries
iptables --flush
# deconfigure network interface
/sbin/ifconfig $zone down
case $1 in
"stop")
# emergency exit - restore old network state
echo "Stopping Nintendo Zone hotspot"
/etc/init.d/network-manager restart # yeah... didn't find a better way to fix it...
exit
;;
"default")
# default settings, my old WiFi card that recently died
;;
"stick1")
# this is my old and trusty WiFi stick
ssid="_The Cloud"
mac=00:25:86:d1:d8:a3
country=DE
name="Somebunny, old and trusty WiFi stick"
;;
"duke")
# my first tester, who helped me figure out how it works!
mac=5C:3C:27:F31:CA
country=RU
name="Dukes second MAC address"
;;
# "duke2")
# # my first tester, who helped me figure out how it works!
# # doesn't work, even with country code! werid...
# mac=20:CF:30:CE:1C:C8
# country=RU
# name="Dukes first MAC address"
# ;;
"signz")
# from the gbatemp forums
# couldn't get it working yet!
mac=40:53:50:4f:4f:46
#country=DE # doesn't work!
#country=US # doesn't work!
name="Provided by SignZ; couldn't make it work yet"
;;
"neocrux")
# from the gbatemp forums
mac=00:eb:2d:d8:62:aa
country=US
name="Provided by neocrux"
;;
"jhjsaat")
# from the gbatemp forums
mac=34:08:04:BF:AC:8A
#country=US
#country=US # doesn't work!
name="jhjsaat's personal router, from Google docs"
;;
"kaleoomega")
# from the gbatemp forums
mac=CC:FE:3C:92F:43
#country=US
#country=US # doesn't work!
name="kaleoOmega's personal phone"
;;
esac
}
# networkmanager often leaves a lock on the wireless hardware, remove it
rfkill unblock wifi
# set up parameters
InitZone $1
# give our wifi device a static IP address in the correct range so hostapd can associate with it
/sbin/ifconfig $zone hw ether $mac
/sbin/ifconfig $zone 192.168.23.1 up
# start dnsmasq
dnsmasq -i $zone --dhcp-range=192.168.23.50,192.168.23.150,255.255.255.0,12h
# enable IP forwarding
echo 1 > /proc/sys/net/ipv4/ip_forward
# set basic routes so that our associated devices can reach the web
iptables -t nat -A POSTROUTING -o $zone -j MASQUERADE
iptables -A FORWARD -i $zone -o $world -m state --state RELATED,ESTABLISHED -j ACCEPT
iptables -A FORWARD -i $world -o $zone -j ACCEPT
# start hostapd, spawn a temporary file
TMPDIR=`mktemp -d`
tmpfile=$TMPDIR/nztmp
echo $tmpfile
trap "rm -rf $TMPDIR" EXIT
echo "interface=${zone}" >> $tmpfile
echo "driver=nl80211" >> $tmpfile
echo "channel=1" >> $tmpfile
echo "ssid=${ssid}" >> $tmpfile
echo "auth_algs=1" >> $tmpfile
echo "wpa=0" >> $tmpfile
echo "country_code=${country}" >> $tmpfile
# uncomment the following two lines if you want MAC filtering
#echo "macaddr_acl=1" >> $tmpfile
#echo "accept_mac_file=/home/ms/hostapd/hostapd_mac_file" >> $tmpfile
echo "Starting Nintendo Zone hotspot, using config ''${name}''"
echo "SSID: ${ssid}"
echo "Country: ${country}"
hostapd $tmpfile -B -d > /dev/null 2> /dev/null
rm -rf $TMPDIR
#
# wifi_zone_new
# A script that emulates a Nintendo Zone in a way that you can actually connect to
# other people all over the world.
#
# Initial version written by Somebunny (9. August 2013).
#
#
# documentation (sort of)
#
# You will need the following packages/programs:
# - rfkill
# - dnsmasq (will be killed if already running)
# - hostapd (will be killed if already running)
# You should not need any additional configuration work.
#
# This script MUST be run as root, or using sudo, reconfiguring network
# interfaces does not seem to work when run by non-root.
#
# Please adapt the following sections to your own computer:
# - variables "zone" and "world", found below
# - you can add hotsoptr in "InitZone()", just copy what is there
#
# Usage: call the script with one extra parameter that describes the
# MAC address to use. I have prepared some options that work from
# the thread in the gmatemp forums.
#
# Shutdown: call the script with the parameer "stop".
#
#
# A first attempt to organise everything in a somewhat smarter way.
#
# First, some obligatory checks.
if [[ $EUID -ne 0 ]]; then
echo "This script must be run as root or with sudo."
echo "I don't like this either, but some calls here are really picky!"
exit 1
fi
# some global settings; you should only need to adapt them for your system once
# * this is the network interface used for your custom AP; must be wireless
zone=wlan1
# * this is the network interface used to access the internet; can be almost anything
world=wlan2
# some local variables; using default values so that something is there
ssid="_The Cloud"
mac=f4:6d:04:a1:6b:86
country=DE
name="Somebunny, WiFi card that recently died"
#
# local function that sets up the local variables;
# crude but better than having to change the script every time
# NOTE: this part should be heavily modified so that it doesn't
# depend on a static config. Maybe something with an external
# file or something, so you don't have to share your relay point
# with the entire world if you don't want to.
#
InitZone() {
# kill all existing support tools
killall dnsmasq 2> /dev/null
killall hostapd 2> /dev/null
# flush routing entries
iptables --flush
# deconfigure network interface
/sbin/ifconfig $zone down
case $1 in
"stop")
# emergency exit - restore old network state
echo "Stopping Nintendo Zone hotspot"
/etc/init.d/network-manager restart # yeah... didn't find a better way to fix it...
exit
;;
"default")
# default settings, my old WiFi card that recently died
;;
"stick1")
# this is my old and trusty WiFi stick
ssid="_The Cloud"
mac=00:25:86:d1:d8:a3
country=DE
name="Somebunny, old and trusty WiFi stick"
;;
"duke")
# my first tester, who helped me figure out how it works!
mac=5C:3C:27:F3
1:CAcountry=RU
name="Dukes second MAC address"
;;
# "duke2")
# # my first tester, who helped me figure out how it works!
# # doesn't work, even with country code! werid...
# mac=20:CF:30:CE:1C:C8
# country=RU
# name="Dukes first MAC address"
# ;;
"signz")
# from the gbatemp forums
# couldn't get it working yet!
mac=40:53:50:4f:4f:46
#country=DE # doesn't work!
#country=US # doesn't work!
name="Provided by SignZ; couldn't make it work yet"
;;
"neocrux")
# from the gbatemp forums
mac=00:eb:2d:d8:62:aa
country=US
name="Provided by neocrux"
;;
"jhjsaat")
# from the gbatemp forums
mac=34:08:04:BF:AC:8A
#country=US
#country=US # doesn't work!
name="jhjsaat's personal router, from Google docs"
;;
"kaleoomega")
# from the gbatemp forums
mac=CC:FE:3C:92
F:43#country=US
#country=US # doesn't work!
name="kaleoOmega's personal phone"
;;
esac
}
# networkmanager often leaves a lock on the wireless hardware, remove it
rfkill unblock wifi
# set up parameters
InitZone $1
# give our wifi device a static IP address in the correct range so hostapd can associate with it
/sbin/ifconfig $zone hw ether $mac
/sbin/ifconfig $zone 192.168.23.1 up
# start dnsmasq
dnsmasq -i $zone --dhcp-range=192.168.23.50,192.168.23.150,255.255.255.0,12h
# enable IP forwarding
echo 1 > /proc/sys/net/ipv4/ip_forward
# set basic routes so that our associated devices can reach the web
iptables -t nat -A POSTROUTING -o $zone -j MASQUERADE
iptables -A FORWARD -i $zone -o $world -m state --state RELATED,ESTABLISHED -j ACCEPT
iptables -A FORWARD -i $world -o $zone -j ACCEPT
# start hostapd, spawn a temporary file
TMPDIR=`mktemp -d`
tmpfile=$TMPDIR/nztmp
echo $tmpfile
trap "rm -rf $TMPDIR" EXIT
echo "interface=${zone}" >> $tmpfile
echo "driver=nl80211" >> $tmpfile
echo "channel=1" >> $tmpfile
echo "ssid=${ssid}" >> $tmpfile
echo "auth_algs=1" >> $tmpfile
echo "wpa=0" >> $tmpfile
echo "country_code=${country}" >> $tmpfile
# uncomment the following two lines if you want MAC filtering
#echo "macaddr_acl=1" >> $tmpfile
#echo "accept_mac_file=/home/ms/hostapd/hostapd_mac_file" >> $tmpfile
echo "Starting Nintendo Zone hotspot, using config ''${name}''"
echo "SSID: ${ssid}"
echo "Country: ${country}"
hostapd $tmpfile -B -d > /dev/null 2> /dev/null
rm -rf $TMPDIR
WHOOO thats alot of stuff dont worry we just need to edit 2 to 3 lines
Change:
"zone=" to the wlan your using has hotspot i.e zone=wlan1
"world=" to the interface you are using to connect to the internet i.e world=eth0
Go back to that terminal and type this
Code:
sudo chmod +x wifi_zone
sudo chmod +x soft.sh
Now to run the NZone Spoofer
(this part needs to be run everytime you boot your computer.)
Code:
sudo ./soft.sh wifi_card_interface interface_with_internetSee if you find the hotspot with something else then hit CTRL+C to stop it.
On the console type "sudo gedit /etc/dnsmasq.conf"
Press 2x ENTER go back to the top of the file and paste this:
Code:
# disables dnsmasq reading any other files like /etc/resolv.conf for nameservers
no-resolv
# Interface to bind to
interface=wlan0
# Specify starting_range,end_range,lease_time
dhcp-range=10.0.0.3,10.0.0.20,12h
# dns addresses to send to the clients
server=8.8.8.8
server=8.8.4.4
Go back to that terminal and type this:
Code:
sudo chmod +x ./home_zoneNow run the somebunny script
Code:
sudo ./home_zone spoofX wlanY INTERNET_INTERFACEWhere X can be a number from 1 to 6 and it will change the mac for the first 6 macs from the list
Where Y is the number from your wlan that's going to host.
And Internet_interface can be wlanX ethX pppX depending on your configuration
(you write this everytime you want to use your nzone hotspot)
To stop it
Code:
sudo ./home_zone stopIf all was done correctly you should open your 3ds and BAM you are in a nintendo zone AT YOUR HOME
- You should also remove your router from the 3ds internet configuration so your 3ds MUST connect to the hotspot
Now you just need to keep your 3ds closed and wait for that green light everyone likes to see
Try to enable streetpass on all the games you have to get the best experience.
Also it has been confirmed that the ssid DOES mater so use attwifi ALWAYS
Thanks to Somebunny for the script.
Method 3
by ground
Step 1: download the neccesary stuff
You need to download the following apps (the commands for the terminal is stated between the ()) :
1) Hostapd ( sudo apt-get install hostapd )
2) dnsmasq ( sudo apt-get install dnsmasq)
Step 2: decide you hardware adressess
In order to set up a proper streetpass relay you need the right hardware:
- a wifi card capable of getting into master mode
- another internet card (an be 3g/ethernet or modum)
Connect all the devices ant open the terminal, now enter “ifconfig”. This will give you a list with the devices and note them down. For this tutorial I will use the following names:
Wlan0 = the dongle which is gonna create an acces point
Wlan1 = the dongle which is gonna connect to the actual internet.
Step 3: Write the the scripts
First we are gonna write the script which is used by hostapd (so the basic settings). Open an text editor and put the following lines in it:
–---------------------------------
interface=wlan0
driver=nl80211
ssid=_The Cloud
hw_mode=g
channel=6
macaddr_acl=0
auth_algs=1
ignore_broadcast_ssid=0
wpa=0
Change wlan0 to the the card which is going into acces point mode.
Save this file somewhere as streetpass.conf (I put it in my home folder)
The second file is a little bit larger, but open up a new empty text file and put the following in it:
–---------------------------------------------
ifconfig wlan0 up 10.0.0.1 netmask 255.255.255.0
sleep 2
killall dnsmasq
killall hostapd
sleep 2
/etc/init.d/dnsmasq start
sleep 5
iptables --flush
iptables --table nat --flush
iptables --delete-chain
iptables --table nat --delete-chain
iptables --table nat --append POSTROUTING --out-interface wlan1 -j MASQUERADE
iptables --append FORWARD --in-interface wlan0 -j ACCEPT
sysctl -w net.ipv4.ip_forward=1
ifconfig wlan0 down
ifconfig wlan0 hw ether 4E:53:50:4F:4F:40
ifconfig wlan0 up
timeout 180s sudo hostapd ./streetpass.conf
sleep 2
echo 1 done
ifconfig wlan0 down
ifconfig wlan0 hw ether 4E:53:50:4F:4F:41
ifconfig wlan0 up
timeout 180s sudo hostapd ./streetpass.conf
sleep 2
echo 2 done
ifconfig wlan0 down
ifconfig wlan0 hw ether 4E:53:50:4F:4F:42
ifconfig wlan0 up
timeout 180s sudo hostapd ./streetpass.conf
sleep 2
echo 3 done
ifconfig wlan0 down
ifconfig wlan0 hw ether 4E:53:50:4F:4F:43
ifconfig wlan0 up
timeout 180s sudo hostapd ./streetpass.conf
sleep 2
echo 4 done
ifconfig wlan0 down
ifconfig wlan0 hw ether 4E:53:50:4F:4F:44
ifconfig wlan0 up
timeout 180s sudo hostapd ./streetpass.conf
sleep 2
echo 5 done
ifconfig wlan0 down
ifconfig wlan0 hw ether 4E:53:50:4F:4F:45
ifconfig wlan0 up
timeout 180s sudo hostapd ./streetpass.conf
sleep 2
echo 6 done
ifconfig wlan0 down
ifconfig wlan0 hw ether 4E:53:50:4F:4F:46
ifconfig wlan0 up
timeout 180s sudo hostapd ./streetpass.conf
sleep 2
echo 7 done
ifconfig wlan0 down
ifconfig wlan0 hw ether 4E:53:50:4F:4F:47
ifconfig wlan0 up
timeout 180s sudo hostapd ./streetpass.conf
sleep 2
echo 8 done
ifconfig wlan0 down
ifconfig wlan0 hw ether 4E:53:50:4F:4F:48
ifconfig wlan0 up
timeout 180s sudo hostapd ./streetpass.conf
sleep 2
echo 9 done
ifconfig wlan0 down
ifconfig wlan0 hw ether 4E:53:50:4F:4F:49
ifconfig wlan0 up
timeout 180s sudo hostapd ./streetpass.conf
sleep 2
echo 10 done
ifconfig wlan0 down
ifconfig wlan0 hw ether 4E:53:50:4F:4F:4A
ifconfig wlan0 up
timeout 180s sudo hostapd ./streetpass.conf
sleep 2
echo 11 done
ifconfig wlan0 down
ifconfig wlan0 hw ether 4E:53:50:4F:4F:4B
ifconfig wlan0 up
timeout 180s sudo hostapd ./streetpass.conf
sleep 2
echo 12 done
ifconfig wlan0 down
ifconfig wlan0 hw ether 4E:53:50:4F:4F:4C
ifconfig wlan0 up
timeout 180s sudo hostapd ./streetpass.conf
sleep 2
echo 13 done
ifconfig wlan0 down
ifconfig wlan0 hw ether 4E:53:50:4F:4F:4D
ifconfig wlan0 up
timeout 180s sudo hostapd ./streetpass.conf
sleep 2
echo 14 done
ifconfig wlan0 down
ifconfig wlan0 hw ether 4E:53:50:4F:4F:4E
ifconfig wlan0 up
timeout 180s sudo hostapd ./streetpass.conf
sleep 2
echo 15 done
ifconfig wlan0 down
ifconfig wlan0 hw ether 4E:53:50:4F:4F:4F
ifconfig wlan0 up
timeout 180s sudo hostapd ./streetpass.conf
sleep 2
echo 16 done
–------------------------------------------------------------
so first of all change every wlan0 and wlan1 to your right cards, and leave everything until
“ sysctl -w net.ipv4.ip_forward=1” . This because everything above it is used to establish a good connection.
Beneath it you can change whatever you wan. You can find the Mac adresses you want to visit and put more or less addresses in it. Make sure you type it like this:
ifconfig wlan0 down
ifconfig wlan0 hw ether 4E:53:50:4F:4F:4F → put the address here
ifconfig wlan0 up
timeout 180s sudo hostapd ./streetpass.conf → change 180s to whatever ssecond you want to stay
sleep 2 connected
echo 16 done → says when it is finished with the current mac
Save this file as streetpass (I did it in my home folder again)
Step 4: start the cycle!
First start your 3ds and put it into sleep. Now open the terminal and type the following:
“chmod +x ./streetpass” (where ./streetpass should be your location to the last big file)
now type the following:
“sudo ./streetpass” (where ./streetpass should be your location to the last big file)
now sit back and enjoy.
Windows 7/8
With VMWare:
MacCyclers for Windows 7/8 And Alternative Guides
http://gbatemp.net/threads/how-to-have-a-homemade-streetpass-relay.352645/page-116#post-4874439
http://gbatemp.net/threads/homepass-chaldrons-mac-cycler-for-windows.352935/
http://gbatemp.net/threads/macycle-the-improved-mac-changer-for-homepass.353328/
http://gbatemp.net/threads/homepass-macpass.354279/
Guide #1
By DarkKnigh_t
I will explain my setup in detail now.
UPDATE: LD560 corrected me in a couple of things since hes the original poster of this guide thanks to him for helping me and figuring these things out
His corrections are marked in RED lettersHardware I'm using
I'm using a pc running windows 8.1 (x64 bit) and a TP Link Wifi usb stick. The computer is connected with a cable to my homes router and the Wifi stick is plugged in my computer.
First steps to setup
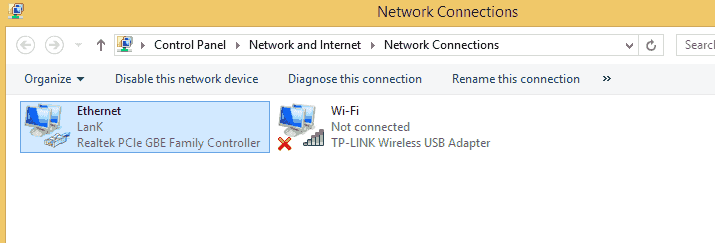
First plug your Wifi usb stick into your computer and MAKE SURE you have the LATEST drivers installed. Google, go on the official website and find the latest drivers. The generic drivers that windows installs sometimes don't work. After you done that go into your adapter settings and right click on the icon that represents your Wifi(be it a wifi stick or a wifi card) and select RENAME and name it "Wi-Fi". Then when you done that in it should look something like this.
Setting up your attwifi network
Now when you've done that time to go into cmd. Type cmd and right click run as administrator.
Type in:
netsh wlan set hostednetwork mode=allow ssid=attwifi key=password
(press enter on your keyboard)
netsh wlan start hostednetwork
(press enter on your keyboard)
To stop the connection type: netsh wlan stop hostednetwork.
You should stop your network when changing MAC's so as to not cause the Virtual Network to fail. Same applies with Virtual Router, stop the program. Change the MAC start the network again.
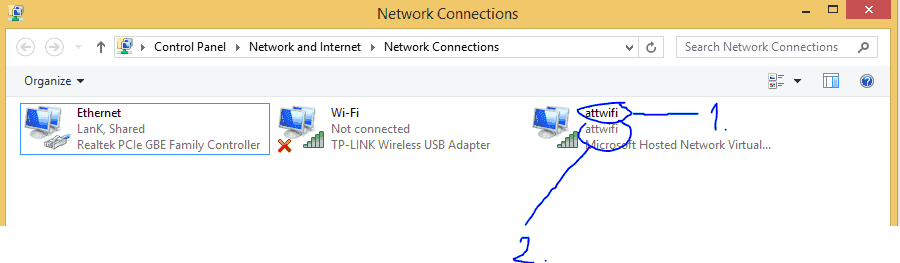
Now this should bring attwifi to your adapter settings and it should look like this.
1. Is the name i gave it when you right click on the icon and choose to rename. You should do that so that you know that thats the attwifi connection. The name can be anything.
(I would not re-name this at all. Windows 8.1 has a bad habit of remembering plug and play devices such as USB WiFi. You might think this is a good thing but it is NOT!!
Say you choose to unplug your WiFi stick into another USB port, because you have changed this set-up Windows Virtual Hotpost can potentially assign this with a different Network name (but the same SSID) this believe it or not can actually cause massive problems with the Virtual Hotspot.
The same applies if you connect a different USB WiFi Stick to replace an old one.)
2.The second name is the SSID that we gave it in cmd. It has to be named attwifi!
Now you right click on your attwifi connection and select properties. In the little box i have everything checked except "Microsoft network adapter multiplexor protocol". In the little box scroll all the way down to the bottom to IPv4 protocol and click that and select properties.
Set it up to look like this.
Also these same settings can be applied to people who are now on IPv6.
Okay now we are getting somewhere. Now go back into the adapter settings where all our connections are and select your WIRED connection. Right click and properties. Open the sharing tab and set it up like this.
ADDITION(for people with laptops)
IF you are running a laptop and you want to share its connection the principles are the same plug in a cable between the router and your laptop use that connection to have internet on your laptop. DISCONNECT your wifi card from your router. RENAME THAT WIFI to "Wi-Fi" and everything else should be the same.
I know it can be done without a wired connection but i still haven't tested that BUT it should be the same your wifi connection called "Wi-Fi" should be sharing the internet with attwifi. But remember your laptop then will be losing internet connection all the time when mac's change.
(You should just set-up the connection anyway. Windows 8.1 Virtual Network is finky at best and you run the risk of Limited Connectivity all the time, this will never be spotted by a 3DS as it will pass the Internet Connection check all the time. Only a Tablet / Smart Phone / PC or MAC will spot Limited Connectivity)
Setting up the connection near guarantee's that there will be no further problems. Also Street Pass seems to be instant with a network connection parameters put in the 3DS
Next thing is to setup the 3ds.
First thing is delete any connections you had before. Search for a new connection. Add attwifi and it will test the connection. If it passes YAY YOU DID IT
if it doesnt like mine then we need to setup the connection.1. Click the connection 1 you just added.
2. Click CHANGE SETTINGS.
3. Go one time to the right and click IP SETTINGS
4. "Auto-Obtain IP adress" click NO and click DETAILED SETUP
5. ENTER THE ADDRESSES like in the picture shown here
(Just don't go over 255 when your setting your last number..lol)
6. Now it will tell you that you have to setup your DNS next because you changed your gateway address. click okay and set it up like this.
THINGS TO REMEMBER
1. Nintendo Zone should appear but it won't work so don't try it. What we need is that nintendo zone just appears that's good.
2. When you set up your 3ds attwifi connection DON'T DELETE it anymore its okay and it should work no more need to delete the connection and set it up again. If it doesn't work we know the problem is in the computer not the connection setup on the 3ds.
3. SOMETIMES to fix connection issues its good to go into cmd and type the following:
netsh wlan stop hostednetwork
netsh wlan start hostednetwork
Thats restarting the hostednetwork and it can fix problems a lot because windows sucks and it messes up the connection.
4. Some people have it setup in a different way using routers, wifi cards, linux, windows xp... The principles are the same but some things will be different. This guide should apply for people using windows 7 and 8.
5. Sometimes your 3DS might need its Wireless settings reset, just turn off the Wireless on the side of the console and turn back on, this sometimes happens with Wireless N cards, but can still happen with G Cards too. This just refreshes your 3DS.
I hope this helps someone and please if you are stuck or don't understand something ask we will help asap
PS this is a guide to set up the connection and not how to get streetpasses. I will write that one later after people get this working first!
That's go to everyone who were involved in helping me and others hopefully we can help more people with their problems!
Guide #2
By elridge
Before beggining some important things:
You only streetpass with the same relay once every 8 hours, however you can change your mac at any time to one of those in the list.
Please try to use the mac's on the spreadsheet.
Don't cycle through all the macs in just 10 min, leave 30 min between mac changing so the next person who connects to you doesnt always get your mii.
Try to enable streetpass on all the games you have to get the best experience.
Also it has been confirmed that the ssid DOES mater so use attwifi ALWAYS.
Requirements:
A wired connection
A Wifi card (i tested this on an old 1390 WLAN card, so i guess most should work).
Mac Shift
Virtual Router Manager
Connect your computer through your wired connection and disconnect from any wireless one.
The Setup:
Just install Virtual Router, unzip Mac Shift on an accesible folder (or just the root of your C: drive) and run the following from a command line with administrator privileges (Type "cmd" without quotes on the search box of your start menu, when the "cmd.exe" file appears, just shift-click it and select "Run as Administrator"):
Code:
netsh wlan set hostednetwork mode=allowThis will set up a Virtual Wifi Miniport on your network connections.
Then, still on command line, go to the folder where you unzipped Mac Shift (If you unzipped it on C:\, you may want to type "Cd \" without quotes) and type:
Code:
macshift -i "YOUR WIFI CONNECTION NAME"* macaddress***Your wifi name should be the name of your Wireless Network Adapter typed just as it appears on your "Network Connections" folder, for example, for me it was "Wireless Network Connection". Please take in mind that this should be your Wireless Network adapter name, and NOT the one of your just-created "virtual network", nor the name of your wired adapter.
** Mac Address should be typed without ":", for example, 4E53504F4F46
So, this line should look something like:
Code:
macshift -i "Wireless Network Connection" 4E53504F4F46Run Virtual Router Manager.
Complete the network name (Should be "attwifi")
Put any password you like (remember to set up your connection on your 3DS later!).
As "shared connection", select your Wired Adapter.
Click on "Start Virtual Router", wait a few seconds, and you should get your street pass!
To cycle between MACs:
Just don't close your command line window!
Press the UP arrow to bring back your last typed command, and change the last numbers of the mac address. This will restart your network connections (I stopped the Virtual Router every time before changing my MAC and restarted ir after doing so, but i don't believe this is necessary).
Remember that, when you stop the Virtual Router, you should stop seeing the "attwifi" network, so no problem from neighbors stealing your internet (which was secured anyway). If you want to remove the Virtual Wifi Miniport, just type the following in an administrator privileged command line:
Code:
netsh wlan set hostednetwork mode=disallowAnd, to return your Wifi Adapter to it's original MAC address:
Code:
macshift -i "Wireless Network Connection" -rUPDATE: Here's a script that changes your mac http://gbatemp.net/threads/how-to-have-a-homemade-streetpass-relay.352645/page-14#post-4740736
ANOTHER UPDATE: Here's a script that ALSO changes your mac http://gbatemp.net/threads/macycle-the-improved-mac-changer-for-homepass.353328
Enjoy!
Windows XP
By assassinz
I got this setup to work on a PC using WinXP Pro without using a wired connection. So I think this will work on a Windows PC with either WiFi or wired (Ethernet) connections.
SUMMARY:
What we are going to do here is modify some drivers so the Nintendo WiFi USB Connector will be recognized on your computer as the Buffallo WLI-U2-KG54-YB. Then we will hex edit the software for another device (the ASUS WL-167g) which uses the same chipset as the Wi-Fi Connector, and make an Access Point. Then we will use Technitium MAC Address Changer to manually change the MAC address of the Nintendo USB WiFi Connector. (I hope someone can write a script to have Technitium automatically change the MAC addresses every 5 mins. That would be awesome!)
******************************************************************
First, go to http://www.digifail.com/text/wfchack.shtml and read/follow all instructions up to and including the Soft AP Configuration section and stop.
Current links for Drivers and software you'll need:
Get the Buffallo driver at http://www.buffalotech.com/support-and-downloads/download/U2KG54_1-01-02-0002.zip
Get the ASUS utility at http://www.asus.com/us/Networking/WL167g/#support_Download_17
Get the Technitium MAC Address changer at http://go.technitium.com/fwlink/?id=13
After everything is up and running, use these settings in the ASUS WiFi software:
Click the Config button, go to the Basic Tab and name the SSID to attwifi.
Encryption Tab: Network Authentication - Open, Data Encryption - WEP. Then Manually Assign a Key (whatever you want).
Soft AP Tab: use Soft AP Mode, make sure the name of your internet connection is showing in the Internet field and ENABLE ICS should be checked.
Access Control Tab: Access Control Policy - Accept. Add all the Remote StreetPass Relay MAC's to the Access Control List.
After you're done, click the Apply button in the lower left corner, then Save Configuration.
Finally, make a new internet connection on your 3DS and use attwifi as the name of the SSID. Use WEP as the encryption and use the same Key you assigned in the ASUS software.
You'll know everything is working if your 3DS shows that there is a Nintendo Zone available. You cannot make a connection to the Nintendo Zone if you assigned a WEP key or other data encryption to attwifi, but you will be able to start getting Street Passes now.
Just disable Data Encryption settings in the ASUS software and on your 3DS connection setting for attwifi and you can connect to the Nintendo Zone.
After you get a Street Pass, use Technitium MAC Address Changer to manually change to the next MAC address so you can get another Street Pass.
Attachments
Last edited by dicamarques,