Tutorial
Updated
Extract and Decrypt games, NAND backups, and SD contents with ninfs
This is a tutorial that shows you how to use ninfs (formerly fuse-3ds) to extract the contents of games, NAND backups, and SD card contents. This tutorial is a work in progress; please post a reply if something is confusing or needs a correction.
This supports Windows, macOS, and Linux. This tutorial mostly focuses on the GUI on Windows. For macOS/Linux steps plus CLI/installable-module usage, see the README and latest release at the repository.
What sets ninfs apart from others like ctrtool is that it doesn't need to decrypt separately first. Instead, files are decrypted as needed. For example, if you mount a CIA, you can see all of the files in it, and you only need to copy out what you need. This makes it much faster and more efficient, especially for larger games where it can take a while (and several gigabytes of space) to decrypt!
Want to see a video demonstration? Here is one with Pokémon Ultra Moon, using fuse-3ds v1.0.
Windows users simply need two things:
You also need the ARM9 bootROM. You can use boot9strap to dump it by holding START+SELECT+X at boot, and finding it at /boot9strap/boot9.bin on the SD card. You can find boot9strap setup at 3DS Hacks Guide.
For newer digital games (2015+), you also need a SeedDB. Check out the SeedDB list.
You will need boot9.bin or boot9_prot.bin, and seeddb.bin. This will be placed at %APPDATA%\3ds on Windows, and `~/.3ds` on macOS/Linux.
If one of the files could not be found, an error will be displayed.

Run ninfs (either the exe, or the module if you installed it). A console window will appear, then a GUI a few seconds later.

First, choose the type that you want at the top:
Finally, click "Mount". If there are no errors, Windows Explorer/File Explorer will automatically open at the mount. Some example contents are shown below.


 Now you can copy out the files you want.
You can add "Mount with ninfs" to the context menu when you right-click on files. It will try to automatically detect the file type and show it in the GUI, so you can just click Mount.
Open ninfs, click "Help & Extras", then click "Add to menu". Read the dialog, then click "Add entry" or "Remove entry" to add or remove the context menu entry.
If you move or rename the EXE, you will need to re-add it.
This supports Windows, macOS, and Linux. This tutorial mostly focuses on the GUI on Windows. For macOS/Linux steps plus CLI/installable-module usage, see the README and latest release at the repository.
What sets ninfs apart from others like ctrtool is that it doesn't need to decrypt separately first. Instead, files are decrypted as needed. For example, if you mount a CIA, you can see all of the files in it, and you only need to copy out what you need. This makes it much faster and more efficient, especially for larger games where it can take a while (and several gigabytes of space) to decrypt!
Want to see a video demonstration? Here is one with Pokémon Ultra Moon, using fuse-3ds v1.0.
In this short video, I show that the CIA is encrypted, then I use ninfs to mount it and browse its contents in Windows/File Explorer. I can also use the decrypted.cxi file to immediately start playing it in Citra.
(Note that slowness is due to the virtual machine, speed would be faster on a normal computer!)
(Note that slowness is due to the virtual machine, speed would be faster on a normal computer!)
Getting started
Windows users simply need two things:
- Install the latest release of WinFsp
- Download the latest release of ninfs at GitHub or the GBAtemp Download Center
- You should download the win64 version if you're using 64-bit Windows.
You also need the ARM9 bootROM. You can use boot9strap to dump it by holding START+SELECT+X at boot, and finding it at /boot9strap/boot9.bin on the SD card. You can find boot9strap setup at 3DS Hacks Guide.
For newer digital games (2015+), you also need a SeedDB. Check out the SeedDB list.
Setting up boot9/SeedDB
You will need boot9.bin or boot9_prot.bin, and seeddb.bin. This will be placed at %APPDATA%\3ds on Windows, and `~/.3ds` on macOS/Linux.
If one of the files could not be found, an error will be displayed.
Both boot9 and SeedDB use similar steps for setup. This part shows boot9 steps, but it is the same for SeedDB.
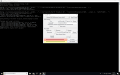
If you click "Fix boot9", you will see a dialog allowing you to choose the boot9 file, and the searched paths.

Click "Select boot9 to copy..." then find the boot9.bin or boot9_prot.bin file. If it is valid, it will be copied.

If you click "Fix boot9", you will see a dialog allowing you to choose the boot9 file, and the searched paths.
Click "Select boot9 to copy..." then find the boot9.bin or boot9_prot.bin file. If it is valid, it will be copied.
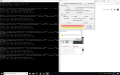
Using the GUI
Run ninfs (either the exe, or the module if you installed it). A console window will appear, then a GUI a few seconds later.
First, choose the type that you want at the top:
- CTR Cart Image (".3ds", ".cci")
- CDN contents (directory with "cetk", "tmd", and contents)
- CTR Importable Archive (".cia")
- Executable Filesystem (".exefs", "exefs.bin")
- Nintendo 3DS NAND backup ("nand.bin")
- Using a directory instead of drive letter is highly recommended for this!
- You need the OTP for this if the NAND backup does not have essential.exefs embedded by GodMode9. If you have essential.exefs as a separate file, you can extract it from that. If the Counter can't be automatically generated, you also need the CID.
- You can write to the NAND. In the GUI, you need to enable this option. Otherwise, the mount will be read-only.
- NCCH (".cxi", ".cfa", ".ncch", ".app")
- Read-only Filesystem (".romfs", "romfs.bin")
- SD Card Contents ("Nintendo 3DS" from an SD card)
- You need movable.sed from the system whose SD card contents you want to browse. You can get it from essential.exefs, or by copying it from CTRNAND -> private -> movable.sed.
- You can write to the SD contents. In the GUI, you need to enable this option. Otherwise, the mount will be read-only.
- 3DSX Homebrew (".3dsx")
- Titles directory ("title" from NAND or SD)
- To browse SD card titles, the contents must be decrypted first. You can use the SD Card Contents mount first to do that, then use this one.
- Nintendo DSi NAND backup ("nand_dsi.bin")
- Nintendo DS ROM image (".nds", ".srl")
- Nintendo Switch NAND backup ("rawnand.bin")
Finally, click "Mount". If there are no errors, Windows Explorer/File Explorer will automatically open at the mount. Some example contents are shown below.
- If you mounted CCI, CDN, CIA, NCCH, or Titledir, you can see "decrypted.cxi" (or "decrypted.cfa" for non-executable contents) which acts like a decrypted version of the game. You can use it in applications that require decrypted contents like Citra.
- For NAND, you can use a tool like OSFMount to mount partitions like CTRNAND, TWLN, and TWLP. Make sure you used directory mount, not drive letter.
If you enabled writing, you can also write back to the partitions. They will be re-encrypted as you write. - For SD, you can browse the decrypted contents, and use something like the titledir mount to browse the installed games. You can also write to it, and the files you write will be re-encrypted.
You can extract game saves and extdata with a tool like 3ds-save-tool.
Add to context/right-click menu
You can add "Mount with ninfs" to the context menu when you right-click on files. It will try to automatically detect the file type and show it in the GUI, so you can just click Mount.
Open ninfs, click "Help & Extras", then click "Add to menu". Read the dialog, then click "Add entry" or "Remove entry" to add or remove the context menu entry.
If you move or rename the EXE, you will need to re-add it.
Troubleshooting
- I am using Windows 7, 8, or 8.1 and am getting "The procedure entry point ucrtbase.terminate could not be located in the dynamic link library api-ms-win-crt-runtime-l1-1-0.dll.".
- You are missing "Update for Universal C Runtime in Windows". This was distributed via Windows Update. If you don't have it, you can install the update: https://support.microsoft.com/en-us/help/2999226/update-for-universal-c-runtime-in-windows
- I am on Windows 7 and am getting an error saying the driver is not signed when trying to install WinFsp.
I am on Windows 7 and am getting "Cannot create WinFsp-FUSE file system: unspecified error."- It is likely you are missing SHA-2 code signing support. This was distrbuted via Windows Update. If you don't have it, you can install this security advisory: https://technet.microsoft.com/en-us/library/security/3033929.aspx
Last edited by ihaveahax,