


Hello all,
I have reverse engineered some of the PHAT Xbox One revision 2 (also called Silverton) hardware so it is possible to dump the NAND memory with a hardware method. These are Xbox One console manufactured around 2015 and later.
Previously, only the original Xbox One (code-named Durango) had a method published for NAND dumping.
This method is similar to the one for Durango but it has some extra steps.
Disclaimer
I am not responsible and will not be responsible for any damage you do to your console, nor is GBATemp or any other people on the forum. Make sure you know what you are doing and your soldering skills are good.
Acknowledgement
Special thanks to a good friend who helped with some of the electronics and wants to remain anonymous. Also, I took some pictures from the original 2013 Durango tutorial, specifically for the parts of the hardmod that have not changed much.
Materials Needed
Steps
1. Tear down your console until you can manipulate both sides of the motherboard (do not remove the FAN from the main CPU)
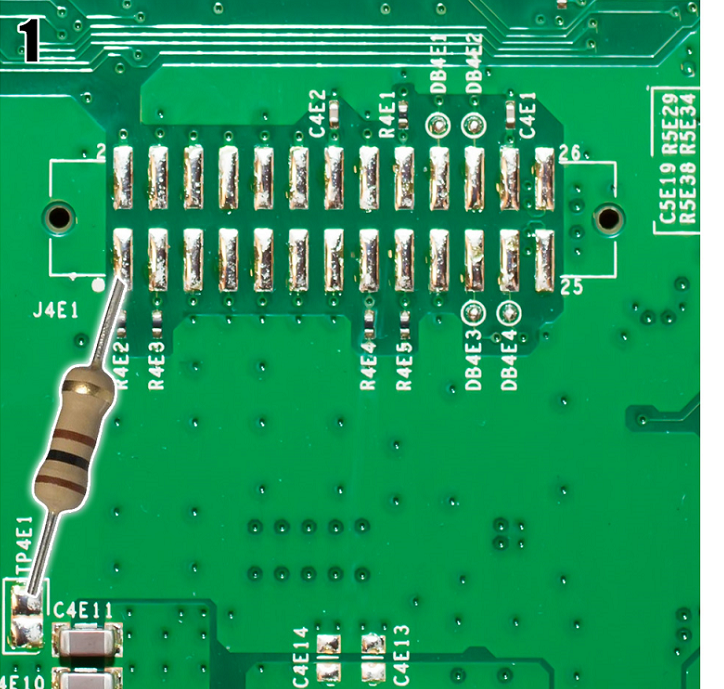
2. Install a 200-300 Ohm resistor between points R4E5 (pin #1) and TP4E1 (this is just GND so any other GND works too). This is done to hold the SMC on reset so the Southbridge isn't powered on.

3. Solder a ~16 kOhm resistor between the two legs on the right side of the component U3D2. This is done to modify the U3D2 component so that it powers-up the NAND memory at ~3.3v instead of the normal 1.8v

NOTE: I didn't have any 16 kOhm SMD resistor at hand, so I soldered a 10kOhm+5kOhm+1kOhm resistors in series. You can see the blue resistors in the picture above.
4. On the back side of the board, under the NAND memory, remove resistor labeled R7R1. Store it in a safe place, it is a very small component. Short the connection where the resistor was.
NOTE: This is one of the new things you need to do in this model.

5. Now, go back to the front side of the board, remove the third resistor counting from the top, on the left side of the Southbridge. (The Southbridge is the chip with the Xbox logo). This is labeled R4D5. You should have the two pads of the resistor footprint not shorted, that is, disconnected.
6. Time to solder the cables for th eMMC signals. In total you will have to solder 4 cables, corresponding to:
7. The first wire will be for the CLK signal. You shall solder it to the left pad of the resistor you just removed in step 6, a.k.a. R4D5.
8. The second wire will be for the CMD signal. You have to solder it to the second resistor below the one you removed. (i.e.: there is one resistor between the one you removed and the resistor where you have to solder the CMD wire). This is labeled R4D8. Solder the wire to the left side of the resistor
9. The third wire is for DAT0. Solder the cable to the left side of the 6th resistor counting from the bottom. This is labeled R4D24.
10. Last cable can be soldered to any GND point in the board. See pictures.

11. Finally, I connected all this cables to an intermediate breakout board.

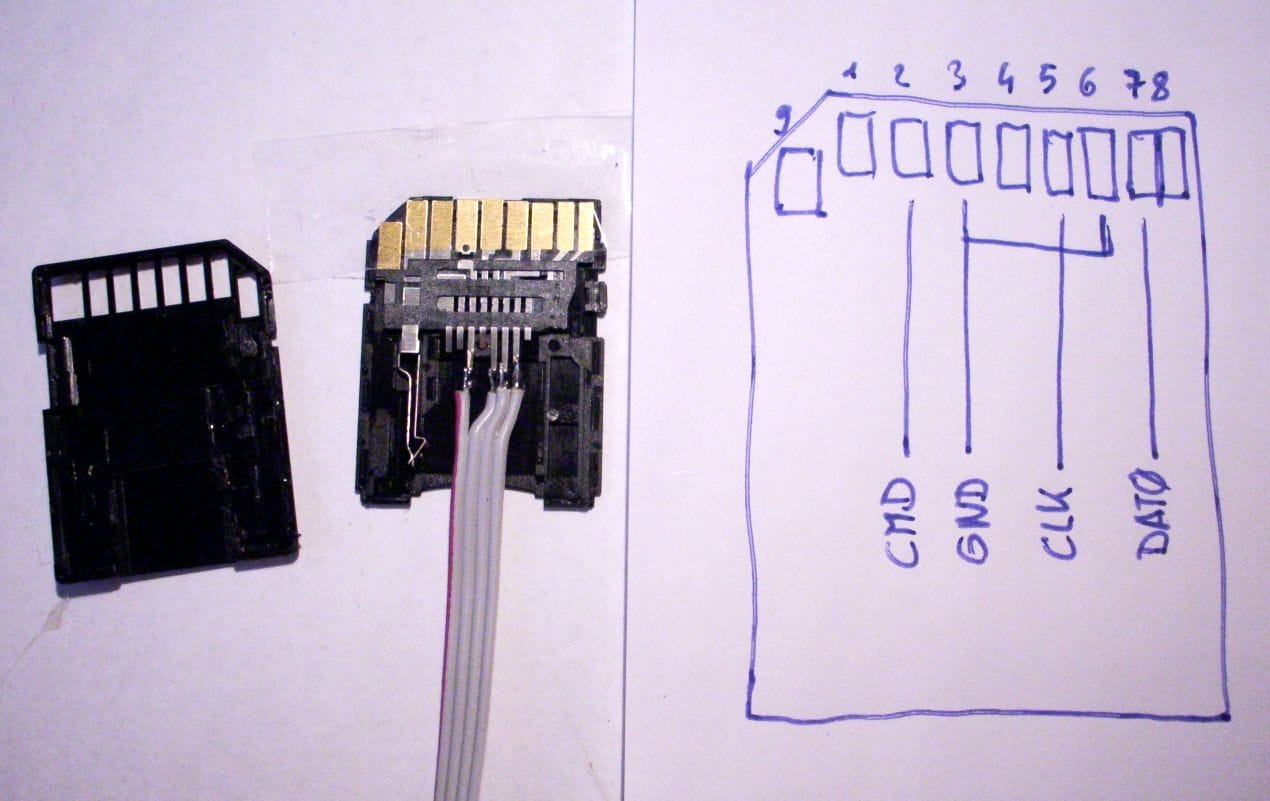
12. From this breakout board, connect the CLK,CMD,DAT0,GND to the CLK,CMD,DAT0 and GND of a dissasembled microSD to SD adapter, as seen in the picture. You can do the connections directly as well without using the breakout board.
13. Reassemble the sd card adapter and make sure it fits correctly into your SD Card reader.

NOTE: Not every SD Card reader will be able to read the NAND memory. Only those that support one-bit eMMC mode will be able to read it (my laptop's integrated reader worked, yours may or may not).
14. Plug the SD Card into your reader, and connect the power supply to the Xbox One. You don't need to have the front-board with the power button connected.

15. On Windows, use "win32diskimager" tool to make an image of the NAND. It should be ~5 Gb in size.
16. On Linux, use the following command: "sudo dd if=/dev/sdc of=/home/torus/xb1nand.img bs=4M status=progress" to dump the NAND into your /home/ directory.
17. Profit!
---
I'm still slowly analyzing the NAND dumps as they are not directly recognized by the NANDone tool, but this was a fun project! You can extract several unencrypted files from your NAND like your console's certificate, among other things. In the future I would like to reverse engineer the hardware and make tutorials for Xbox One S, Xbox One X, etc. but I don't have those consoles.
Hope you find it useful and let me know your results or questions if you try this!
Don't hesitate to reach out for other Xbox One discussions or questions
I have reverse engineered some of the PHAT Xbox One revision 2 (also called Silverton) hardware so it is possible to dump the NAND memory with a hardware method. These are Xbox One console manufactured around 2015 and later.
Previously, only the original Xbox One (code-named Durango) had a method published for NAND dumping.
This method is similar to the one for Durango but it has some extra steps.
Disclaimer
I am not responsible and will not be responsible for any damage you do to your console, nor is GBATemp or any other people on the forum. Make sure you know what you are doing and your soldering skills are good.
Acknowledgement
Special thanks to a good friend who helped with some of the electronics and wants to remain anonymous. Also, I took some pictures from the original 2013 Durango tutorial, specifically for the parts of the hardmod that have not changed much.
Materials Needed
- Soldering Iron
- Microscope or magnifying lens (optional but very helpful for the extra small components we'll be working with)
- 28 awg wire or similar
- A 16 KOhm resistor (more than exactly 16 kOhm, e.g.: 16.6 kOhm is okay. less than 16 kOhm won't work)
- A 200-300 Ohm resistor
- microSD to SD card adapter
- SD Card reader (integrated in your PC or USB) with one-bit mode support,
Steps
1. Tear down your console until you can manipulate both sides of the motherboard (do not remove the FAN from the main CPU)
2. Install a 200-300 Ohm resistor between points R4E5 (pin #1) and TP4E1 (this is just GND so any other GND works too). This is done to hold the SMC on reset so the Southbridge isn't powered on.
3. Solder a ~16 kOhm resistor between the two legs on the right side of the component U3D2. This is done to modify the U3D2 component so that it powers-up the NAND memory at ~3.3v instead of the normal 1.8v
NOTE: I didn't have any 16 kOhm SMD resistor at hand, so I soldered a 10kOhm+5kOhm+1kOhm resistors in series. You can see the blue resistors in the picture above.
4. On the back side of the board, under the NAND memory, remove resistor labeled R7R1. Store it in a safe place, it is a very small component. Short the connection where the resistor was.
NOTE: This is one of the new things you need to do in this model.
5. Now, go back to the front side of the board, remove the third resistor counting from the top, on the left side of the Southbridge. (The Southbridge is the chip with the Xbox logo). This is labeled R4D5. You should have the two pads of the resistor footprint not shorted, that is, disconnected.
6. Time to solder the cables for th eMMC signals. In total you will have to solder 4 cables, corresponding to:
- CMD
- DAT0
- CLK
- GND
7. The first wire will be for the CLK signal. You shall solder it to the left pad of the resistor you just removed in step 6, a.k.a. R4D5.
8. The second wire will be for the CMD signal. You have to solder it to the second resistor below the one you removed. (i.e.: there is one resistor between the one you removed and the resistor where you have to solder the CMD wire). This is labeled R4D8. Solder the wire to the left side of the resistor
9. The third wire is for DAT0. Solder the cable to the left side of the 6th resistor counting from the bottom. This is labeled R4D24.
10. Last cable can be soldered to any GND point in the board. See pictures.
11. Finally, I connected all this cables to an intermediate breakout board.
12. From this breakout board, connect the CLK,CMD,DAT0,GND to the CLK,CMD,DAT0 and GND of a dissasembled microSD to SD adapter, as seen in the picture. You can do the connections directly as well without using the breakout board.
13. Reassemble the sd card adapter and make sure it fits correctly into your SD Card reader.
NOTE: Not every SD Card reader will be able to read the NAND memory. Only those that support one-bit eMMC mode will be able to read it (my laptop's integrated reader worked, yours may or may not).
14. Plug the SD Card into your reader, and connect the power supply to the Xbox One. You don't need to have the front-board with the power button connected.
15. On Windows, use "win32diskimager" tool to make an image of the NAND. It should be ~5 Gb in size.
- If Windows asks if you want to format the new drive that has been detected, chose no. Otherwise, you will brick your console.
16. On Linux, use the following command: "sudo dd if=/dev/sdc of=/home/torus/xb1nand.img bs=4M status=progress" to dump the NAND into your /home/ directory.
- your device path might be different. It was /dev/sdc for me. You can check to which device path Linux has asigned your SD reader reading the kernel logs using the commands dmesg or "tail -F /var/log/messages" (to see it in realtime as you plug the sd).
17. Profit!
---
I'm still slowly analyzing the NAND dumps as they are not directly recognized by the NANDone tool, but this was a fun project! You can extract several unencrypted files from your NAND like your console's certificate, among other things. In the future I would like to reverse engineer the hardware and make tutorials for Xbox One S, Xbox One X, etc. but I don't have those consoles.
Hope you find it useful and let me know your results or questions if you try this!
Don't hesitate to reach out for other Xbox One discussions or questions
Last edited by Torus,


")


