Gaming Looking for advice for dismantling DSi.

zeello

The reason we can't have nice things.
OP
Member
Joined
Apr 15, 2013
Messages
774
Trophies
1
XP
1,224
Country
United States
I recently made this thread where I asked for ideas on dismantling a 3DS XL.
http://gbatemp.net/threads/removing-top-half-of-3ds-xl-need-advice-instructions.346321/

But I've decided to practice on my DSi first.
(In addition, I'd like the help of anyone who has dismantled a DS system before, such as anything I should watch out for so I don't ruin the system in the process.)

For starters, what tools do I need? I'm guess all I need is a screwdriver designed for tiny screws. But I think I should also grab a modeling knife, razor, or chisel. I used a chisel once to remove the cover of a laptop screen, as well as remove the adhesive black squares covering the screws, so it would probably be handy to do the exact same thing here.

Has anyone here dismantled a DS system before? If so which one?
 

raulpica

With your drill, thrust to the sky!
Former Staff
Joined
Oct 23, 2007
Messages
11,056
Trophies
0
Location
PowerLevel: 9001
XP
5,716
Country
Italy
DS Fat, DS Lite (lots) and iirc a DSi too.

They're really hard for a beginner and it's certain for you to break something. Only start practicing on a already broken console, imho.

You just need a Philips screwdriver, a triwing screwdriver (you NEED one) and a little tweezer to help you with some connectors.
 

RodrigoDavy

Well-Known Member
Member
Joined
Feb 9, 2011
Messages
1,453
Trophies
0
XP
879
Country
Brazil
About a week ago, I tried changing the case of my gba sp and now it doesn't work anymore. :cry:

But if you're really willing to do it, I suggest to find instructions on how to open and close your DSi/3DS... Don't try to figure things out by yourself, there's a right way and order to do these things. For example, I had many times opened my Dualshock Controller to fix some buttons, but I could never fix the L2 and R2 button, one day I decided reading a tutorial and I discovered I had to actually close the controller without the L2 and R2 buttons and just then push the buttons in their respective holes
 

zeello

The reason we can't have nice things.
OP
Member
Joined
Apr 15, 2013
Messages
774
Trophies
1
XP
1,224
Country
United States
Will the DSi work without a top screen attached?

Some users are telling me the 3DS XL needs to think a top screen is attached for it to function. That seems to be the case with the DS fat as well.
 

zeello

The reason we can't have nice things.
OP
Member
Joined
Apr 15, 2013
Messages
774
Trophies
1
XP
1,224
Country
United States


Huge thanks to geishroy for posting the above vid in another thread.

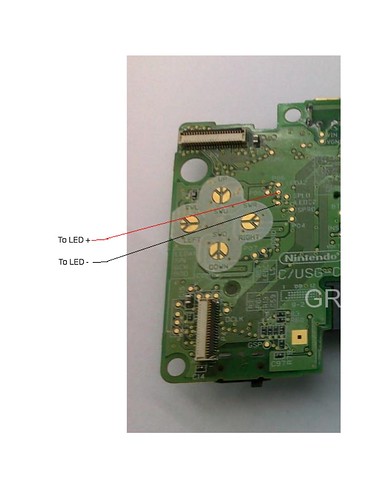
Anyway, aside from the vid itself, the vid maker also provided this image:

6752733273_ed94be4f55.jpg

Now my question is: Where can I buy the bulb that needs to the attached to the system?
And what kind (and/or size) of bulb is it exactly? So I know what to ask for.

Thanks again!
 
  • Like
Reactions: geishroy

Chocolina

Well-Known Member
Member
Joined
May 28, 2012
Messages
450
Trophies
0
XP
176
Country
United States
Madness!

I understand mutilating a DS into a botched GBA Micro, but I don't understand it being "practice" for the 3DS. Theres no GBA mode in a 3DS. What purpose could a single screen serve for games that require two screens? Say goodbye to Kingdom Hearts as they use bottom screens for maps. And any 3DS screen is going to have that game on the top screen for the 3D effect. Shiiieeeet I don't even think you could play Pokemon or Final Fantasy, which were like the main games for GBA. I mean if you can't play Pokemon on a GBA, then why bother?

How does your brain work?!
 

BORTZ

DO NOT SCREENSHOT
Supervisor
Joined
Dec 2, 2007
Messages
13,243
Trophies
3
Age
34
Location
Pittsburgh
XP
15,986
Country
United States
I think if you can close the circuit for the top screen the bottom one will work, but i dont know why you would want to do that.
 

Foxi4

Endless Trash
Global Moderator
Joined
Sep 13, 2009
Messages
30,825
Trophies
3
Location
Gaming Grotto
XP
29,842
Country
Poland
As I said in the thread you linked to in the first post, we're all advising you in crime, practically. You'll mutilate the system and there really isn't a whole lot of content that you could use on a single screen.
 

cracker

Nyah!
Member
Joined
Aug 24, 2005
Messages
3,619
Trophies
1
XP
2,213
Country
United States
If you do decide to do it yourself then be very careful with the ribbon cable for the touch screen. It is a very common occurrence that it gets muffed up when unlocked or relocking the connector since the component is very fragile. Soldering a new one back in is very hard to do even with the right tools and knowing what you are doing.
 

zeello

The reason we can't have nice things.
OP
Member
Joined
Apr 15, 2013
Messages
774
Trophies
1
XP
1,224
Country
United States
They're really hard for a beginner and it's certain for you to break something. Only start practicing on a already broken console, imho.
Aha! I just completely dismantled my DSi, and put it back together, and it still works!

Though, I diced up one of the rubber squares covering the screws on the top screen... if that counts as breaking something. (purely cosmetic) I also stupidly peeled off the black square sticker underneath one of the speakers.. although this doesn't affect anything.

Anyway, the system works without cameras... but it doesn't work without a top screen.

So here comes the tricky part.. I need to figure out how this..

6752733273_ed94be4f55.jpg


..corresponds to a DSi as opposed to a DS Lite

As well as what to actually do once I find out.

If you do decide to do it yourself then be very careful with the ribbon cable for the touch screen. It is a very common occurrence that it gets muffed up when unlocked or relocking the connector since the component is very fragile. Soldering a new one back in is very hard to do even with the right tools and knowing what you are doing.
There was a tiny transparent black ribbon cable from the bottom screen that connects to the motherboard.. the cable is in such a position that I had to disconnect the entire motherboard just to get it in right. (I had to practically slip the motherboard into the cable rather than the other way around)

Try following a dismantling guide from ifixit.com
I used consolezombie's youtube vid. (either of two vids: the DSi complete disassembly, and the DSi top screen replacement vid... the two vids are practically the same)
 

zeello

The reason we can't have nice things.
OP
Member
Joined
Apr 15, 2013
Messages
774
Trophies
1
XP
1,224
Country
United States
Wow, this vid uses a different method. He attaches a resistor to the top screen ribbon cable. (edit: lol you can even see this in the preview image for the vid)

DS Lite to GBA Tutorial Part 1 of 3

channel: rs1n

He cuts the ribbon cable right off the top screen, using a knife or scissors. The system actually powers on!!

This might be the method I will have to go with, since I have no idea where else to solder the resistor to.

edit: HE SLIMS DOWN THE RIBBON CABLE! The cable is less than half as wide after he's through with it.
 

cracker

Nyah!
Member
Joined
Aug 24, 2005
Messages
3,619
Trophies
1
XP
2,213
Country
United States
You can use a multimeter or continuity tester to trace the two contact on the board to connect. One line is really only needed to be found -- the line that tests for a constant 'on' signal. The other is just a power line so any 3.3v or 5v line on the motherboard will work with the right resistor value according to which you choose.
 
  • Like
Reactions: zeello

zeello

The reason we can't have nice things.
OP
Member
Joined
Apr 15, 2013
Messages
774
Trophies
1
XP
1,224
Country
United States
You can use a multimeter or continuity tester to trace the two contact on the board to connect. One line is really only needed to be found -- the line that tests for a constant 'on' signal. The other is just a power line so any 3.3v or 5v line on the motherboard will work with the right resistor value according to which you choose.
Which would you recommend, a multimeter or continuity tester? (if there is a difference) Looks like I'll be making a trip to Radio Shack....

To be honest I have no idea how this works. Would the battery need to be inserted into the system in order to begin testing for points?
 

cracker

Nyah!
Member
Joined
Aug 24, 2005
Messages
3,619
Trophies
1
XP
2,213
Country
United States
A multimeter will come in handy in many situations but a continuity tester will be sufficient for this. A continuity tester can be easily homemade if you want to save money. All you need is 2 pieces of semi-rigid wire (probes), a 3v watch battery (like a cr2032, cr3032, etc.), an led or very low watt battery and some tape.

First test the led and battery by putting the legs around the battery (try both ways) and if it lights you are good to go. Tape the leg on the positive side of the battery.

Make it like:
[Tape this -------------------------------------- to this together tight] [twist wire 2 and led leg together and tape tight]
Wire on positive side -> battery -> led or lightbulb with negative leg connected -> wire 2 connected to positive side of led or lightbulb

If the led has long legs then you can omit wire 2 and use the positive leg as a probe. Touch the probes together and if the led/bulb lights up you have successfully built a continuity tester. If not then you probably have the led/bulb backwards or have a bad connection with the wires.

Now you just need to touch one of the 2 wires in the cable that you want to trace and poke around at the golden pads (or holes with metal surrounding them - vias) until the led lights up and then mark it. Repeat again for the other wire. Double check the connections to make sure they are the right wires and pads. Then solder in the resistor to those two points.

The battery on the DSi doesn't need to be connected.
 
  • Like
Reactions: zeello

Site & Scene News

Popular threads in this forum

General chit-chat
Help Users
    Veho @ Veho: https://www.keepretro.com/products/miyoo-a30