

You are using an out of date browser. It may not display this or other websites correctly.
You should upgrade or use an alternative browser.
You should upgrade or use an alternative browser.


cannot find the guide :-(
I found the guide by hitting "quote", I don't know why it won't show up in the post. :?

so i only have a 3ds and acekard 2i, i followed the guide and the AKAIO is now updated to 1.89 but my 3ds firmware is still 2.2.0-4U...what am i doin wrong?
i want to update my 3ds firmware to higher level, like 4.1 or 4.2 even
help
thanks
i want to update my 3ds firmware to higher level, like 4.1 or 4.2 even
help
thanks

On the 8th of September 2010 Nintendo released firmware update 1.4.1 for the DSi/ DSi XL, this update blocks the Acekard 2i from working even if it was previously updated with the 'Danny Phantom' 1.4 fix. In order for the Acekard 2i to be used on a console with firmware 1.4.1, you need to apply the the 'Alex Rider - Stormbreaker' 1.4.1 fix. You can find out the firmware version of your DSi by going to the System Settings (Wrench Icon) and the Firmware version will be displayed in bottom right corner of the top screen. No retail purchased consoles have been reported as coming with firmware 1.4.1 preinstalled, but they are likely to start showing up within the next few weeks.
Firmware 1.4.2 is only for China, and is their version of the 1.4.1 update. The 'Alex Rider - Stormbreaker' fix works for both firmware versions
If your DSi has firmware 1.4, it's important you update your Acekard's firmware before you update your DSi's firmware. Before you update the DSi's firmware to 1.4.1, make sure the Acekard is displayed in the DSi's menu as Alex Rider - Stormrider
 .[/indent]

In order for the Acekard 2i to work on a DSi or DSi XL with FirmWare version 1.4/ 1.4.1, you need to update the Acekard's internal firmware. This can only be done using a DS Phat/ DS Lite or a DSi with FirmWare version =< 1.3. All new DSi's or DSi XL's will come with FW1.4 preinstalled, so if you don't have access to a DS Phat/ DS Lite or a DSi with FirmWare =< 1.3 you *must* purchase your Acekard 2i from a retailer such as Premium Update + Flashing Service. Even if you intend to use your AK2i with a DS Lite, you should still update the firmware incase your DSL breaks and you later replace it with a DSi or DSi XL. Likewise it's also a good idea even if your DSi has FW 1.3 and you intend to keep it that way, someone else may update the DSi's firmware for you without knowing.


Contents
1. Extracting from Archives
2. Setting up your MicroSD card
3. Installing AKAIO
4. Putting games onto the Acekard
5. Cheats
6. Soft Reset
7. Download Play
8. Updating Loaders
9. Updating Cheats
10. Installing Skins
11. Updating the Acekard 2i's firmware to 1.4.1
12. Contact issues
13. DMA Mode
14. F.A.Q's
15. Troubleshooting
16. Links
Step 1. Extracting from Archives.
Most DS games/ software/ firmware along with AKAIO are compressed into a single file to reduce their size and to make it easier to transmit over the internet. These files will normally have the .7z/ .rar/ .zip file extensions. You will need to install an application to uncompress these files, you can use 7zip or WinRar
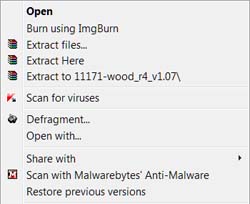
Once installed both should give you a new 'context' menu. Right clicking on an archive (.7z/ .rar/ .zip) will give you to the options, "Extract Here", "Extract files..." and "Extract to Directory [archive name].
Step 2. Setting up your MicroSD card.
Most computer operating systems don't format MicroSD cards to the SD Card Association's standards, this can cause problems later on. To avoid this problem, use the official SD Association Formatter which can be downloaded from Here. You won't be able to select the File Allocation unit size or file system, as the SD formatter automatically selects those based on your MicroSD card and the SD Card Association's standards. All non-SDHC MicroSD cards will be formatted as FAT, while all SDHC MicroSD cards will be formatted as FAT32.

 You must use the Panasonic SD formatter to format your MicroSD cards. If you don't you'll encounter problems when using AKAIO 1.7.1
If you are using a non-windows based PC, you can use the Gparted Live-CD to format your MicroSD card. This can also be used to fix the problem where AKAIO resets back to the default settings after soft-reseting, this is caused by all of the space on the MicroSD card not being allocated.
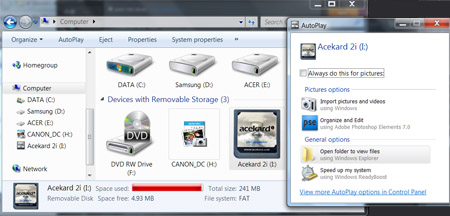
When you want to remove your MicroSD card from your computer, it's important you goto 'My Computer', right click on your MicroSD card and select 'Eject'. This can prevent data corruption.

You can give your MicroSD card a custom Acekard icon when inserted into a PC, this allows you to easily identify your Acekard's MicroSD card. This is optional, is isn't required to use your Acekard.
To download click on each image, and extract the downloaded archive to the Directory': This is another term for Folder.
Step 3. Installing AKAIO.
There are two choices of software you can install on your Acekard: AKAIO and the official. Most people choose AKAIO because it's updated more frequently and hence more compatible with recent releases. It also has aditional features such as being able to update loaders/ cheats over WiFi. Although AKAIO isn't official software, Acekard do approve of it and even have a link to it on their own website. It's based on previous software Acekard released as open source.

Note: Due to the way AKAIO 1.7.1 has been archived, you may get a pair of errors when extracting "Cannot set security data" and "This security ID may not be assigned as the owner of this object". These errors are nothing to worry about, and won't effect the extraction. If you use the link in this guide to download AKAIO 1.7.1, these errors have been fixed.
If done correctly you should see
 akmenu4.nds and
 Auto Mode' enabled in your DS's system menu, your DS will automatically load AKAIO when powered on if the Acekard is inserted. You will however still get the Health and Safety screen on power up, and you will still need to press (A) or tap the screen to proceed.
These are what each of the buttons do within AKAIO:
If you have a child, you can lock the Start Menu which will stop them deleting games or changing the settings which are accessible through the Start Menu. To do this insert the MicroSD card into your PC and double click on the globalsettings.ini. This file is located in the __aio directory on your MicroSD card. Near the bottom of the file you should find the line:
CODE
LockStartMenu = 0
change this to:
CODE
LockStartMenu = 1
and it will lock the Start Menu.
Step 4. Putting games onto the Acekard.
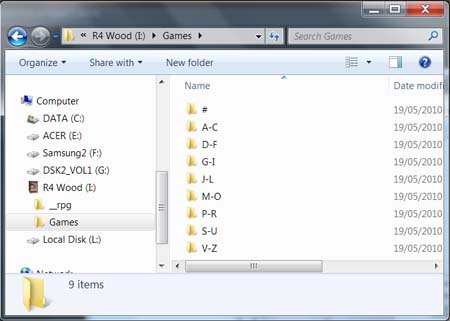
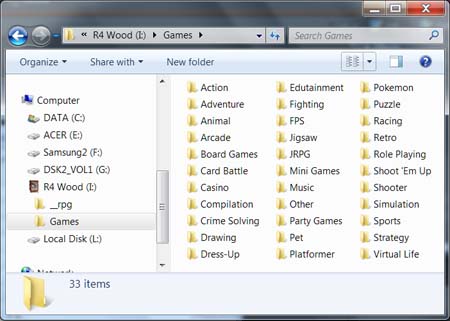
You can copy your nds files to the root directory, or place them in subdirectories. For example you could have a directory for each game genre (Adventure, RPG, racing etc), by alphabetical (A-C,D-F,G-I etc) or just put them all in a 'games' directory.
The Acekard cannot load games from archives, you must place the nds files themselves on the MicroSD card. ROMs can be reduced in size by using trimmer such as NDSTokyoTrim, these remove the padded space from the ROMs. If you trim a DSi enhanced game, you may end up with a bad ROM so you shouldn't do it until the trimming tools have been updated. NDSTokyoTrim will be updated shortly and will no longer suffer from this issue. An alternative trimmer which is also very popular is TinyTrimmer which you can download Here
Converting Saves for use with AKAIO.
AKAIO 1.7.1 uses lowercase file extensions for it's save files, it won't see those with uppercase file extensions. AKAIO 1.5.1 and earlier used uppercase SAV if the ROM filename was 8 characters or less long and so these will need to be renamed in order to use them with AKAIO. many of the various R4 OSmenu's for the various R4 carts also use use the .SAV extension, these too will need to be renamed.
The Official Acekard software normally uses *.nds.sav for it's saves, while AKAIO normally uses *.sav for it's saves. These saves will also need to be renamed if you want to use them with AKAIO. Alternatively you can goto the Start Menu => System Options => File System Settings and next to Save Ext. you will be able to change the save type to .nds.sav.
A tool which will rename *.SAV to *.sav, and *.nds.sav to *.sav can be downloaded here. This will be performed in all directories on the MicroSD card. Before renaming it will back your saves up to the 'My Documents\DS-Saves\[Date]\[Time]' directory on your HardDisk.
If you have saves from the Acekard R.P.G or EZ-Flash V, you will have to use the ShunyWeb coverter to use them. You may still need to rename them afterwards with the tool above.
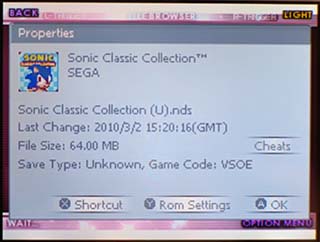
In all cases, the save must have the same filename as the NDS file.
Managing your games
You can use software such as RToolDS or Rominator to manage your ROMs and copy them to your MicroSD card, you can also use software such as NdsCRC or OfflineList to rename/ repackage your ROMs (into archives).
RtoolDS:

Homebrew should normally be placed in the root directory, as there are one or two that expect that to be their location.
My Documents\DS-Saves\[date]\[time]
Step 5. Cheats.
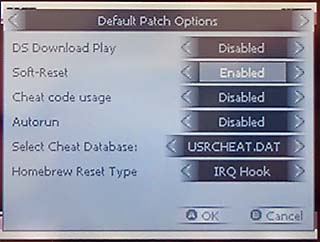
In AKAIO 1.7 there is a known bug which occurs if you disable the cheats. For this reason you should have the cheats enabled globally. This has been fixed in AKAIO 1.7.1, so use this version
By default cheats are normally disabled. To enable cheats globally, from within AKAIO press (start), select 'System Options', press the (L) button and next to 'Cheat code usage' select 'enabled'. Press (A).
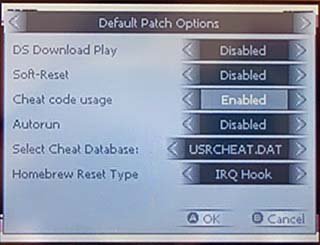
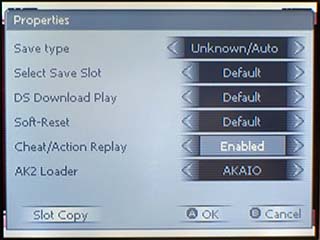
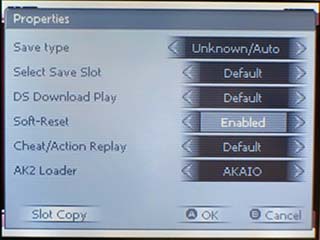
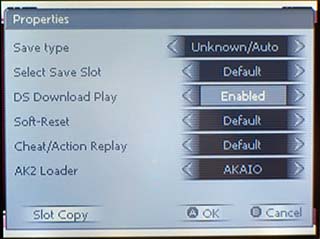
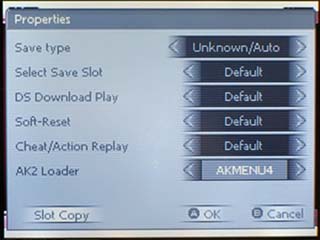
Alternatively you can enable or disable cheats on a per game basis, this will override the selected option under 'Default Patch Options'. To do this press the (Y) button on a selected ROM, press the (Y) button again, next to 'Cheat/Action Replay' select 'enabled'. 'Default' means it will use the setting from 'Default Patch Options'.

As of AKAIO 1.7.1, a new shortcut has been added. (L. Trigger) + (Up) will enable cheats for selected game. (L. Trigger) + (Down) will disable cheats for the selected game.
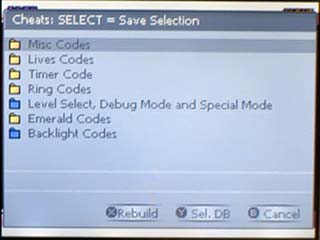
Now you have to select the cheats you wish to enable for your game. To do this this highlight your ROM, press the (Y) button. If the cheat database contains cheats for this game you will see 'Cheats' on the right side of the screen. Now press the (select) button or tap 'Cheats' with the stylus, and select the cheats to enable. When you are finished selecting your cheats you must press the (select) button to save your selection. You only need to press the (X) button after you've updated the cheat database.

Most cheats will require a key combination to be pressed for them to used within the game, each key combination is displayed on the cheat selection screen.
Step 6. Soft Reset.
Soft Reset allows you to use a key combination to go back to the AKAIO menu from within a game. This saves you having to power off/ on the DS. The Soft Reset button combination is: (L. Trigger)+(R. Trigger) +(B)+(A)+(Down), these need to be pressed at the same time.
Alternatively you can enable or disable Soft Reset on a per game basis, this will override the selected option under 'Default Patch Options'. To do this press the (Y) button on a selected ROM, press the (Y) button again, next to 'Soft-Reset' select 'Enabled', press (A). 'Default' means it will use the setting from 'Default Patch Options'.
As of AKAIO 1.7.1, a new shortcut has been added. (L. Trigger) + (Left) will enable soft reset for selected game. (L. Trigger) + (Right) will disable Soft Reset for the selected game.
Step 7. Download Play.
AKAIO supports the full WiFi function of the DS:
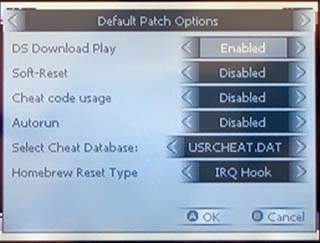
Alternatively you can enable or disable Download Play on a per game basis, this will override the selected option under 'Default Patch Options'. To do this press the (Y) button on a selected ROM, press the (Y) button again, next to 'DS Download Play' select 'Enabled', press (A). 'Default' means it will use the setting from 'Default Patch Options'.
There is no WiFi setup in AKAIO, you must already have your WiFi connection setup. If you are using a DS Lite or DS Phat, you must run the WFC setup present in a WiFi enabled game such as MarioKart. If you are using a DSi you can do this through your DSi's Connection Settings menu which you can access through the wrench icon in your DSi's menu, you must use connections 1-3 which are for DS Mode and use WEP. AKAIO will then use these saved WiFi Settings. In both cases you will only be able to use WiFi with a router which is using WEP encryption, WPA/ WPA2 is not supported (even on the DSi). You will also need to have SSID broadcasting enabled on your router for AKAIO to update over WiFi, although the DS games seem to work fine with this disabled.
You cannot update AKAIO itself over WiFi, only the Loaders, Cheats, Savelist.bin and WiFi plugin.
Step 8. Updating Loaders.
Since the initial realise of AKAIO 1.7.1, there have been several loader updates to address certain bugs. The first update fixed bugs in the loaders for 4 games: 'Dragon Quest IX Sentinels of the Starry Skies', 'Kaidan Restaurant Ura Menu 100-Sen', 'Alice in Wonderland' and 'RPG Tsukuru'. The second addressed a soft-reset issue where changing a skin could result in AKAIO hanging on a white screen when attempting to restart. Because of this, you *will* need to update the loaders as in this guide.
You *CANNOT* update AKAIO itself over WiFi, updating loaders over WiFi only updates the loaders and not AKAIO. To use updated loaders, you *must* be using the latest version of AKAIO. If you are using AKAIO 1.6RC1, 1.6RC2 or 1.7 and attempt to update the loaders, you will get a white screen or processing error when you attempt to start any game. You *MUST* install AKAIO 1.7.1 if you want to use the updated loaders.
Loaders are what AKAIO uses to load games and to circumvent any AntiPiracy protection present in the games. As new games are released, loaders may need updating if you want to play the latest games. The latest loaders can be downloaded from Here, extract these to the
__AIO\LOADERS\ directory on your SD card.
There is another loader directory on your SD card named
__AIO\AK2LOADER\, do not get these two directories mixed up. In
__AIO\AK2LOADER\ you can optionally place the the loader from the official software. This can be useful in situations where the default AKAIO loader has issues loading a certain game, but the official doesn't. Just place
akmenu4.nds from the Official software archive which you can download from Here, into this folder. You can rename
akmenu4.nds to [whatever you want].nds, for example you could rename akmenu4.nds to 4.21.nds. To choose what loader AKAIO uses to load a games, highlight a ROM and press the (Y) button, then press the (Y) button again. Next to 'AK2 Loader' you will be able to select 'AKAIO' (Default) or any loader present in
__AIO\AK2LOADER\. This will only change what loader is used for this specific game, the rest will still use the AKAIO loader by default.
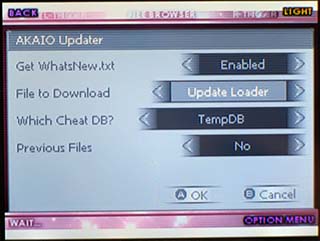
Loaders can also be updated over WiFi. From within AKAIO press (start), select 'More ->', select 'WiFi update'. On the next screen next to 'File to Download' select 'Update Loader' and press (A).
You *must* be using the latest version of AKAIO if you want to use updated loaders.
Step 9. Updating Cheats.
As of August 2010, neither the main GBAtemp cheat database or TempDB is being maintained. The last version of TempDB can be downloaded from Here. Which was updated by Elixirdream on 07/08/2010.
Cheats codes are updated regularly, TempDB is normally updated once or twice a week by elixirdream . To update download this file from the GBAtemp Cheat Database and extract it to the
__AIO/CHEATS/ directory on your SD card.
. To update download this file from the GBAtemp Cheat Database and extract it to the
__AIO/CHEATS/ directory on your SD card.
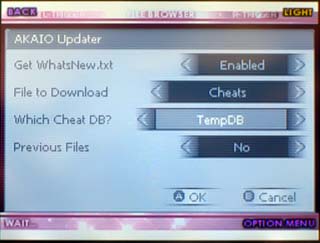
Like the loaders these can also be updated over WiFi. To do this from within AKAIO press (start), select 'More ->', select 'WiFi update'. On the next screen next to 'File to Download' select 'Cheats'
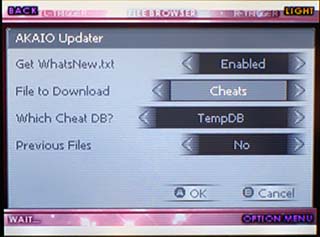
next to 'Which Cheat DB?' Select 'TempDB', and press (A).
If you've previously used cheats with a game and updated the cheat database. No updated cheats will show for this game until you rebuild it's cheat cache. To do this highlight a ROM and press (Y), then press (select), and then press (X). When AKAIO asks you if you want to 'Rebuild .CC file?' press (A).
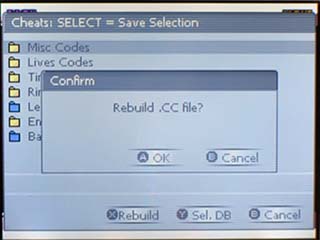
This only needs to be done if the updated cheat database contains new or updated cheats for that specific game. AKAIO creates a .CC file for each game you use cheats with.
Step 10. Installing Skins.
There are many customized skins you can use from places such as the skin section on Acekard's website or NDSthemes which will change the way your Acekard looks. To install, download the skin and extract the downloaded archive to the
__AIO/UI/ folder on your MicroSD Card. Each skin must be in it's own folder, AKAIO will use the folder name to identify the skin within AKAIO.

If it's not already done so in your skins archive, The files: clock_colon.bmp, clock_numbers.bmp, day_numbers.bmp, year_numbers.bmp will need to be placed into a folder named "calendar" within the skin's folder. Take notice of the spelling of "calendar", as it's easily misspelt.


Sometimes the skins you install may be corrupted or missing required elements which can cause problems. When you select the skin, it may prevent the GUI appearing which means you can't change the skin back. Fortunately this is very easy to fix, to do this insert the MicroSD card into your PC and double click on the globalsettings.ini. This file is located in the __aio directory on your MicroSD card. Near the top you will find the line:
CODE
uiName = XXX
XXX refers to the skin name which you are using. Change this to:
CODE
uiName = zelda
Which will change the skin back to the default Zelda skin.
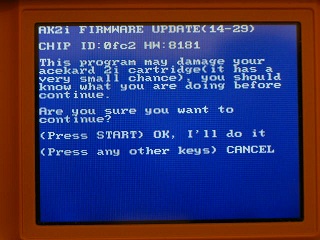
Step 11. Updating the Acekard 2i's firmware.
This step is optional and only needs to performed if you want to use your Acekard 2i with a DSi which has firmware version 1.4 or 1.4.1. Even if you intend to use your AK2i with a DS Lite, it is still a good idea to perform the firmware update incase your DS Lite breaks and you later replace it with a DSi or DSi XL.
Many people refer to 'Acekard Official' and 'AKAIO' as firmware, this isn't correct and can cause mis-undertandings when it comes to updating the firmware. They are the Acekard's Operating System/ OSMenu/ Kernel and reside on the MicroSD card, it's similar to how Windows is stored on your computers HardDisk. The Acekard's firmware resides on the Acekard's internal 2MB flash memory and is completly seperate. The Acekard's firmware controls it's most basic functions and tells it what to do when it powers on, such as load AKAIO. When you update the Acekard's firmware, you are updating the Acekard's internal memory and is independant of whatever version of Acekard Official/ AKAIO you have on your MicroSD card.
After updating your Acekard's firmware, it will appear in the DSi menu as
Alex Rider - Stormrider. When used with on the DS Phat/ DS Lite, it will still appear as
 in the DS menu. If you see the
 Danny Phantom icon in your DSi's menu, you also need to perform the update if you want to use your Acekard 2i on a DSi or DSi XL with firmware 1.4.1
Download the firmware update from Here
 and extract the contents to the root directory of your MicroSD card. You should have two files
ak2ifw_update_141_DSi.nds and
ak2ifw_update_141_DSL.nds
and extract the contents to the root directory of your MicroSD card. You should have two files
ak2ifw_update_141_DSi.nds and
ak2ifw_update_141_DSL.nds
ak2ifw_update_141_DSi.nds is used to update a single cart, and can be used on the DS Lite, DS Phat and DSi FW =< 1.3. In most cases this is the file you should use because there's less chance of anything going wrong. If your DSi has firmware 1.4, you can also use this on your DSi to perform the Acekard's firmware update *provided* you see the Danny Phantom icon
when you boot your DSi with your Acekard 2i inserted.
ak2ifw_update_141_DSL.nds is used to update multiple carts and also unbrick an Acekard previously bricked by either update. It's primarly used by retailers or people who are going sell on their Acekard's. It allows you to update multiple Acekards in quick sucession without having to swap memory cards or reboot the NDS between flashings. This file only runs on the DS Lite or DS Phat because the DSi will not allow you to eject a cartridge beyond the DSi menu.
Make sure your DS is fully charged or running from mains before attempting to update the firmware. Interrupting the process flashing may cause your AK2i to become bricked.
Once the progress indicator goes past 0%, do NOT interrupt the flashing process.
Updating a Single cart:
Boot your Acekard and run
ak2ifw_update_141_DSi.nds
Press (start), after the update is complete it will give you the following message:
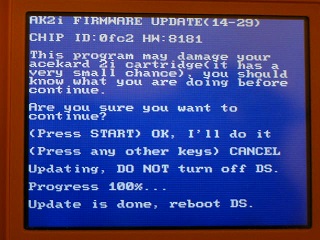
The update is complete, you can now power off the console.
To update multiple carts or to unbrick a previously bricked cart.
Boot your Acekard and run
ak2ifw_update_141_DSL.nds. This can also be run on any working cart, doesn't have to be an Acekard because it's not going to update the cart you launch it on. You are just using it to get the update into the DS's memory so you can eject the cart.
After you've run it, you will get the following prompt:
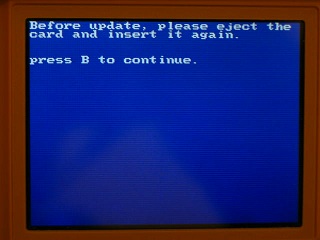
Eject your cart and insert the cart you wish to update or unbrick. Press (B) and you get:
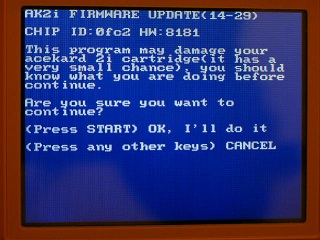
Press (start). Once the update is complete you will get the following message:
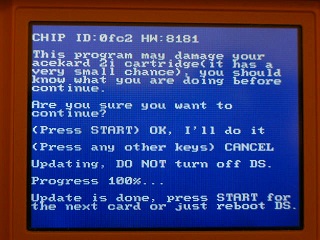
Important: If this was the only cart you wanted to update, power off now!
Do NOT press (start).
If you have another cart to flash, eject the cart and insert another. Press (start) and it will start flashing immediately, it will give no warnings, prompts or ask for confirmation. Repeat the process for as many carts as you have.
If your cart is bricked, you may see a different Chip ID such as:

After sucessfully unbricking, it should change back to 0FC2.
If you see the following message:

Your Acekard 2i is either a clone, or an Acekard 2.1 mis-labelled as an Acekard 2i (the retailers stick the Acekard sticker on the cartridges).
12. Contact issues.
Contact issues can prevent your Acekard from appearing in the DS menu. It can also make your DS freeze mid game or during booting. If your Acekard doesn't appear in the DS menu it is normally a slot-1 contact issue, or a bad flash. It's not the MicroSD card , your DS will still detect the Acekard even if the MicroSD card isn't inserted. You should first try unbricking you cart as in the unbricking guide
 above. If that doesn't work then try a paper trick as below.
If your Acekard freezes mid game, this can be a slot-1 contact issue, or less commonly a MicroSD card contact issue. If your Acekard sits on a blue loading screen when you power it on, it means it can't see your MicroSD card. You can verify this by trying to boot your Acekard up with no MicroSD card inserted, you should find it will sit there on the blue loading screen.
If you are using a DSi XL, pulling the cart slightly out of the slot after insertion has been known to work. Insert the Acekard into the XL's cart slot normally until it locks in position. Once locked without depressing the cart pull it out slightly. You shouldn't be able to pull out by much as it should still be locked in position.
If none of these methods work, you will need to send it back to your retailer for a replacement. There really is little else you can do.'My Acekard doesn't appear in the DS menu, what do I do?'There are normally 2 possible causes of this:
In all of the paper tricks don't go over the top and use something too thick, as it could cause your Acekard to get stuck in the DS cart slot. At the most it should be the thickness of a business card, no thicker. Start with a single piece of paper and then work upwards until it works
The Paper Trick
First give the contacts on the Acekard a clean, then have a look inside the slot-1 on your DS with a torch. If it's full of debris, give the inside of the slot-1 on your DS a clean. Becareful not to bend the contacts.
If that still doesn't work, see if the Acekard is loose in the slot. If so the the paper trick may solve the issue. You can use various thickness of paper depending on how loose the cart is. If you use to much paper the cart can get stuck in the slot, so try one piece at a time. Another solution is to place pieces of tape on the top and bottom of the sticker.
Cut a piece of paper to the size and shape of the Acekard, leave an extra piece that will fold over the top of the cart. You should use a single piece of paper not card, and then work upwards.

Run your thumb over the sticker of the Acekard, you will likely feel a slight bump chich is from the glob top chip underneath the shell. If you do lay the Acekard sticker side down on a flat surface. See if you are able rock the Acekard from side to side.


If you can, then using a normal piece of paper can cause your Acekard to get stuck in the slot. This is because it will be widest at the point where the bump is. It's also possible it may be rocking while inside the cart slot. To solve this cut a square out of the center of the paper.

Cut the square so you can see the '2' through the hole.

Place the piece of paper over the Acekard sticker side and insert into the DS.

If the cart gets stuck you can use the flap to pull the piece of paper out.

If you don't like seeing the paper, you can use clear plastic such as an OHP sheet or the plastic insert from the Acekard packaging.

The TK Paper Trick
While many suggest the 'paper trick', it's only really useful if the cart is loose. Sometimes the paper trick won't work because the PCB is low in the cart. The grey plastic of the shell to the sides of the contacts will stop the cart from going back any further in the cart slot. An alternative is the 'sliding trick' below.
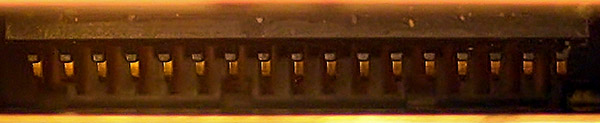
Have a look at the contacts on your Acekard, these are 2 of mine for you to compare it to:
You can see the top cart has lower contacts than the other, and on the bottom cart you can see the contacts are too far to the left.
If the contacts are low, It's easily fixed.

Inside the Acekard shell, there's a small strip underneath the PCB where the contacts are. We want to increase the distance between the PCB and shell at this point, this will push the contacts on the Acekard closer towards those of the DS.
You can achieve this by sliding something non-conductive underneath the PCB where the contacts are. Once this is underneath all the way, it isn't easy to remove. This can be paper or plastic, but in both cases it shouldn't be too thick. You should use the bare minimum thickness which will solve the contact problem. If you push the contacts to far, they will bend the contacts in the DS; which will stop retail carts making contact with them. If you don't want what you slide underneath to be visible, you can use clear plastic such as the type you use on overhead projector sheets.
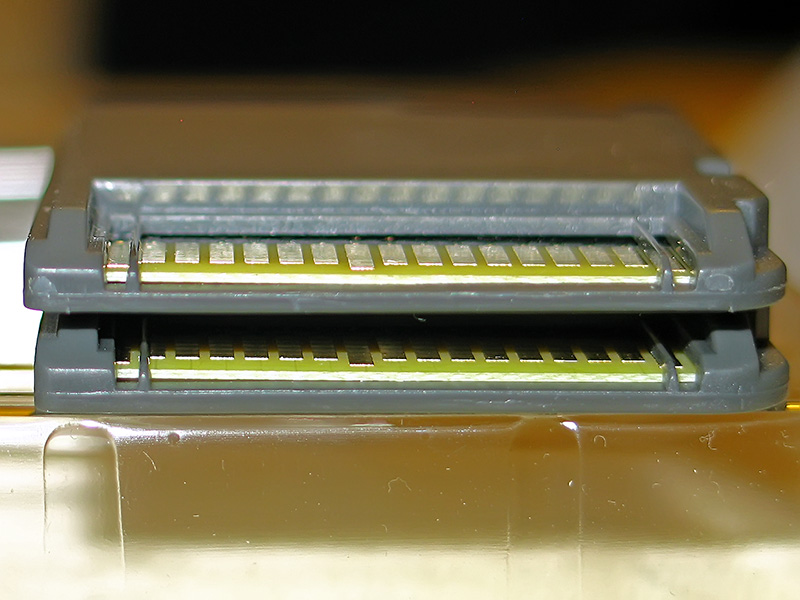
You will need to cut the opposite corners of what you slide underneath like in the photo, this will make it easier for you to angle it in because of the two bars to side side of the contacts.

You can pull the PCB up with your nail so you can slide it underneath.


Afterwards you should be able to visibly see the PCB is higher in the cart.
The Combo Paper Trick
This should work for the DSi XL, athough I don't have one to try it on.
Cut a piece of paper (not card) like so:

Again you should leave a small piece which will fold over the top of the Acekard. If the Acekard has a bump on the front, then you should cut a square out of the paper as in the 1st paper trick.
Insert one end underneath the PCB contacts

Fold the other end round so it covers the sticker.

Insert the Acekard into your DS.
If it still doesn't work, pull the extra flap and your Acekard will lift out of the slot slightly. The extra thickness of paper should hold it in position.

13. DMA Mode.
DMA stands for Direct Memory Access, it is a way of allowing a device to directly access memory blocks without the involvment of the Central Processor Unit. This reduces the processing overhead and in the case of the Acekard, reduces lag associated with MicroSD data transfers.
Games are loaded using Yellow DMA mode by default, which enhances performance in many games. There is no way to turn off DMA, it is on permantly. AKAIO has 3 different DMA modes which should between them work for all games. For this reason, non-DMA mode has been removed as it is no longer needed. You can tell which DMA mode is being used from the colour of 'Loading'; Yellow is the newly added DMA mode, Green is the previous QuickSave DMA mode and Red is the original DMA mode.
You can override which DMA mode AKAIO uses by holding the down (A) or (X) button immediately after you press (A) to launch the game. (A) will force AKAIO to use Original DMA mode, (X) will force AKAIO to use QuickSave DMA mode. The colour of 'loading' will change so you know which mode it is using.
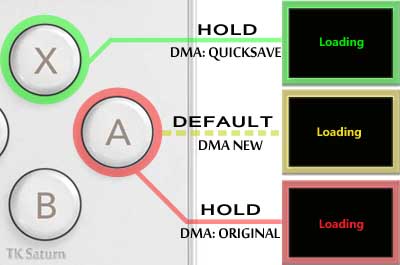
Normally you shouldn't need to use these modes as AKAIO will automatically select the DMA mode to use. However if you are having issues with a game, it can be worth trying an alternative DMA mode to see if it fixes the issue. It may also need to be used for games which have been released since the last loader update, as AKAIO won't know which DMA mode to use for them.
14. Troubleshooting.
Problem: 'My Acekard sits on a blue loading when it boots':
Your MicroSD cart isn't making contact with the Acekard.
Problem: 'When I try to boot my Acekard it says "System file is missing"'
You haven't set up AKAIO correctly, akmenu4.nds is missing from the root directory of your MicroSD card. Format the MicroSD card and start again.
Problem: 'After the blue loading it goes to a black screen and sits there
You haven't set up AKAIO correctly, AKAIO can't find the __aio directory, check it is present. Format the MicroSD card and start again.
Problem: 'When I try to start a game, it sits there on a Yellow loading
Make sure you formatted your MicroSD card with the SD formatter.
Problem: 'No cart is present in the DS/ DSi menu when my Acekard is inserted':
Your Acekard isn't making contact with the slot-1 cart slot.
Problem: 'When I try to boot my Acekard I get the error "An error has occurred. Press and hold the Power Button to turn the system off. Please see the Nintendo DSi Operations Manual for help troubleshooting." '
Your Acekard hasn't been updated to 1.4, while your DSi has.
Problem: 'When I try to update my Acekard to 1.4, it sits on 0% progress forever.'
The 0% progress is a known problem and has been fixed by a new updater, use the one provided above
.
Problem:'My Acekard doesn't see my saves from my R4'
Use the batch file linked above
to rename your saves.
Problem:'AKAIO doesn't see my saves from the Official software'
Use the batch file linked above
to rename your saves.
problem:'When I soft-reset, AKAIO forgets my settings'
There is a know issue with some MicroSD cards where not all of the space on the card has been allocated. You have use GParted to reallocated the drive. This is a live-cd, you will need to burn to a CD-R and then boot from it.
Problem:'I've updated my Acekard's firmware to 1.4, but I still don't see the Danny Phantom icon'
The Danny Phantom icon only appears on the DSi. On the DS Lite or DS Phat you will still see the Acekard icon after flashing.
Problem:'I've updated my Acekard's firmware to 1.4.1, but I still don't see the Alex Rider - Storm Breaker icon'
The Alex Rider - Storm Breaker icon only appears on the DSi. On the DS Lite or DS Phat you will still see the Acekard icon after flashing.
15. F.A.Q's.
nchor]xbottom[/anchor]
Firmware 1.4.2 is only for China, and is their version of the 1.4.1 update. The 'Alex Rider - Stormbreaker' fix works for both firmware versions
If your DSi has firmware 1.4, it's important you update your Acekard's firmware before you update your DSi's firmware. Before you update the DSi's firmware to 1.4.1, make sure the Acekard is displayed in the DSi's menu as Alex Rider - Stormrider
Beginners guide to setting up.
In order for the Acekard 2i to work on a DSi or DSi XL with FirmWare version 1.4/ 1.4.1, you need to update the Acekard's internal firmware. This can only be done using a DS Phat/ DS Lite or a DSi with FirmWare version =< 1.3. All new DSi's or DSi XL's will come with FW1.4 preinstalled, so if you don't have access to a DS Phat/ DS Lite or a DSi with FirmWare =< 1.3 you *must* purchase your Acekard 2i from a retailer such as Premium Update + Flashing Service. Even if you intend to use your AK2i with a DS Lite, you should still update the firmware incase your DSL breaks and you later replace it with a DSi or DSi XL. Likewise it's also a good idea even if your DSi has FW 1.3 and you intend to keep it that way, someone else may update the DSi's firmware for you without knowing.
- DS Phat is the term people use to refer to the original DS (the one before the DS Lite).
Contents
1. Extracting from Archives
2. Setting up your MicroSD card
3. Installing AKAIO
4. Putting games onto the Acekard
5. Cheats
6. Soft Reset
7. Download Play
8. Updating Loaders
9. Updating Cheats
10. Installing Skins
11. Updating the Acekard 2i's firmware to 1.4.1
12. Contact issues
13. DMA Mode
14. F.A.Q's
15. Troubleshooting
16. Links
Step 1. Extracting from Archives.
Most DS games/ software/ firmware along with AKAIO are compressed into a single file to reduce their size and to make it easier to transmit over the internet. These files will normally have the .7z/ .rar/ .zip file extensions. You will need to install an application to uncompress these files, you can use 7zip
or WinRar Once installed both should give you a new 'context' menu. Right clicking on an archive (.7z/ .rar/ .zip) will give you to the options, "Extract Here", "Extract files..." and "Extract to Directory [archive name].
Step 2. Setting up your MicroSD card.
Most computer operating systems don't format MicroSD cards to the SD Card Association's standards, this can cause problems later on. To avoid this problem, use the official SD Association Formatter which can be downloaded from Here. You won't be able to select the File Allocation unit size or file system, as the SD formatter automatically selects those based on your MicroSD card and the SD Card Association's standards. All non-SDHC MicroSD cards will be formatted as FAT, while all SDHC MicroSD cards will be formatted as FAT32.
- This was previously known as the Panasonic SD Formatter, but has now been adopted by the SD Card Association as their own
If you are using a non-windows based PC, you can use the Gparted Live-CD to format your MicroSD card. This can also be used to fix the problem where AKAIO resets back to the default settings after soft-reseting, this is caused by all of the space on the MicroSD card not being allocated.
When you want to remove your MicroSD card from your computer, it's important you goto 'My Computer', right click on your MicroSD card and select 'Eject'. This can prevent data corruption.
You can give your MicroSD card a custom Acekard icon when inserted into a PC, this allows you to easily identify your Acekard's MicroSD card. This is optional, is isn't required to use your Acekard.
To download click on each image, and extract the downloaded archive to the Directory': This is another term for Folder.
- 'Root directory': This is what you will see if you double click on your MicroSD card in Windows Explorer. The root directory is just a single \ and is the first directory on the card. For example if your MicroSD card is 'F:' it's root directory is 'F:\'
Step 3. Installing AKAIO.
There are two choices of software you can install on your Acekard: AKAIO and the official. Most people choose AKAIO because it's updated more frequently and hence more compatible with recent releases. It also has aditional features such as being able to update loaders/ cheats over WiFi. Although AKAIO isn't official software, Acekard do approve of it and even have a link to it on their own website. It's based on previous software Acekard released as open source.
- If you have a recently purchased AK2.1 from the 'bad batch' (will have a Spansion memory chip) use the official 4.22 or AKAIO 1.7.1. Official 4.22 can be downloaded Here
If done correctly you should see
These are what each of the buttons do within AKAIO:
- The (Up) button will select the ROM or Folder above.
- The (Down) button will select the ROM or Folder below.
- The (Right) button will select the page of ROMs/ Folders to the right.
- The (Left) button will select the page of ROMs/ Folders to the left.
- The (L. Trigger) functions as Shift button while in the file browser. In 'System Options' it will change the page tab to 'Default Patch Options' << 'File System Settings' << 'Interface Settings'
- (L. Trigger) + (Up) Will enable Cheats for the selected game.
- (L. Trigger) + (Down) Will disable Cheats for the selected game.
- (L. Trigger) + (Left) Will enable Soft-Reset for the selected game.
- (L. Trigger) + (Right) Will disable Soft-Reset for the selected game.
- (L. Trigger) + (Y) Will display System Options. This the same as going to the Start Menu and selecting System Options
- The (R. Trigger) button will change the backlight brightness (but not on the DSi). In 'System Options' it will change the page tab to 'Interface Settings' >> 'File System Settings' >> 'Default Patch Options'
- The (A) button will load a game, open a folder or OK within dialog boxes.
- The (B) button will go up a directory, or Cancel within dialog boxes.
- The (Y) button will bring up the options for the selected item
- The (X) button will create a shortcut to the highlighted ROM/ Folder in AKAIO's root menu.
- The (Y) button will change the settings for the highlighted ROM
- The (Select) button will display the cheats for this ROM if there are any available.
- The (X) button will delete all the previous cheats for this game and rebuild them from the cheat database.
- The (Y) button button will allow you to use an alternative cheat database for this game.
- The (Select) button will save your cheat selection.
- The (Select) Button will change the ROM listing layout from Filenames + Icons (4 per page) >> Header Names + Icons (4 per page) >> Filenames (10 per page)
- The (Start) button will bring up the AKAIO menu.
- 'ROM': Read Only Memory. This is the memory inside a retail cartridge, People use ROM to refer to the image dumped from a cartridge.
If you have a child, you can lock the Start Menu which will stop them deleting games or changing the settings which are accessible through the Start Menu. To do this insert the MicroSD card into your PC and double click on the globalsettings.ini. This file is located in the __aio directory on your MicroSD card. Near the bottom of the file you should find the line:
CODE
LockStartMenu = 0
change this to:
CODE
LockStartMenu = 1
and it will lock the Start Menu.
Step 4. Putting games onto the Acekard.
You can copy your nds files to the root directory, or place them in subdirectories. For example you could have a directory for each game genre (Adventure, RPG, racing etc), by alphabetical (A-C,D-F,G-I etc) or just put them all in a 'games' directory.
- You can use This batch file to quickly create alphabetical directories inside a games directory. Download and extract to the root directory of your MicroSD card, then double click on makedir.
- You can use This batch file to quickly create genre directories inside a games directory. Download and extract to the root directory of your MicroSD card, then double click on makedir.
Do not ask for or post links to commercial ROMs on here, you will be banned.
The Acekard cannot load games from archives, you must place the nds files themselves on the MicroSD card. ROMs can be reduced in size by using trimmer such as NDSTokyoTrim, these remove the padded space from the ROMs. If you trim a DSi enhanced game, you may end up with a bad ROM so you shouldn't do it until the trimming tools have been updated. NDSTokyoTrim will be updated shortly and will no longer suffer from this issue. An alternative trimmer which is also very popular is TinyTrimmer which you can download Here
Converting Saves for use with AKAIO.
AKAIO 1.7.1 uses lowercase file extensions for it's save files, it won't see those with uppercase file extensions. AKAIO 1.5.1 and earlier used uppercase SAV if the ROM filename was 8 characters or less long and so these will need to be renamed in order to use them with AKAIO. many of the various R4 OSmenu's for the various R4 carts also use use the .SAV extension, these too will need to be renamed.
The Official Acekard software normally uses *.nds.sav for it's saves, while AKAIO normally uses *.sav for it's saves. These saves will also need to be renamed if you want to use them with AKAIO. Alternatively you can goto the Start Menu => System Options => File System Settings and next to Save Ext. you will be able to change the save type to .nds.sav.
A tool which will rename *.SAV to *.sav, and *.nds.sav to *.sav can be downloaded here. This will be performed in all directories on the MicroSD card. Before renaming it will back your saves up to the 'My Documents\DS-Saves\[Date]\[Time]' directory on your HardDisk.
If you have saves from the Acekard R.P.G or EZ-Flash V, you will have to use the ShunyWeb coverter to use them. You may still need to rename them afterwards with the tool above.
In all cases, the save must have the same filename as the NDS file.
Managing your games
You can use software such as RToolDS or Rominator to manage your ROMs and copy them to your MicroSD card, you can also use software such as NdsCRC or OfflineList to rename/ repackage your ROMs (into archives).
RtoolDS:
Homebrew should normally be placed in the root directory, as there are one or two that expect that to be their location.
- Homebrew is software people have created at home using flashcarts such as the Acekard. It's normally free to use.
Step 5. Cheats.
In AKAIO 1.7 there is a known bug which occurs if you disable the cheats. For this reason you should have the cheats enabled globally. This has been fixed in AKAIO 1.7.1, so use this version
By default cheats are normally disabled. To enable cheats globally, from within AKAIO press (start), select 'System Options', press the (L) button and next to 'Cheat code usage' select 'enabled'. Press (A).
Alternatively you can enable or disable cheats on a per game basis, this will override the selected option under 'Default Patch Options'. To do this press the (Y) button on a selected ROM, press the (Y) button again, next to 'Cheat/Action Replay' select 'enabled'. 'Default' means it will use the setting from 'Default Patch Options'.
As of AKAIO 1.7.1, a new shortcut has been added. (L. Trigger) + (Up) will enable cheats for selected game. (L. Trigger) + (Down) will disable cheats for the selected game.
Now you have to select the cheats you wish to enable for your game. To do this this highlight your ROM, press the (Y) button. If the cheat database contains cheats for this game you will see 'Cheats' on the right side of the screen. Now press the (select) button or tap 'Cheats' with the stylus, and select the cheats to enable. When you are finished selecting your cheats you must press the (select) button to save your selection. You only need to press the (X) button after you've updated the cheat database.
Most cheats will require a key combination to be pressed for them to used within the game, each key combination is displayed on the cheat selection screen.
- The Cheat codes are the same as Action Replay codes, you can use R4CEE to add your own.
Step 6. Soft Reset.
Soft Reset allows you to use a key combination to go back to the AKAIO menu from within a game. This saves you having to power off/ on the DS. The Soft Reset button combination is: (L. Trigger)+(R. Trigger) +(B)+(A)+(Down), these need to be pressed at the same time.
- The official software uses a 'different' key combination which is (L)+®+(A)+(B)+(X)+(Y)
Alternatively you can enable or disable Soft Reset on a per game basis, this will override the selected option under 'Default Patch Options'. To do this press the (Y) button on a selected ROM, press the (Y) button again, next to 'Soft-Reset' select 'Enabled', press (A). 'Default' means it will use the setting from 'Default Patch Options'.
As of AKAIO 1.7.1, a new shortcut has been added. (L. Trigger) + (Left) will enable soft reset for selected game. (L. Trigger) + (Right) will disable Soft Reset for the selected game.
Step 7. Download Play.
AKAIO supports the full WiFi function of the DS:
- Wii Connectivity
- Download Play
- Multiplayer with one Game Card
- Multiplayer with multiple Game Cards
- Update of Loaders, Cheats, Savelist.bin and WiFi plugin over WiFi
Alternatively you can enable or disable Download Play on a per game basis, this will override the selected option under 'Default Patch Options'. To do this press the (Y) button on a selected ROM, press the (Y) button again, next to 'DS Download Play' select 'Enabled', press (A). 'Default' means it will use the setting from 'Default Patch Options'.
There is no WiFi setup in AKAIO, you must already have your WiFi connection setup. If you are using a DS Lite or DS Phat, you must run the WFC setup present in a WiFi enabled game such as MarioKart. If you are using a DSi you can do this through your DSi's Connection Settings menu which you can access through the wrench icon in your DSi's menu, you must use connections 1-3 which are for DS Mode and use WEP. AKAIO will then use these saved WiFi Settings. In both cases you will only be able to use WiFi with a router which is using WEP encryption, WPA/ WPA2 is not supported (even on the DSi). You will also need to have SSID broadcasting enabled on your router for AKAIO to update over WiFi, although the DS games seem to work fine with this disabled.
You cannot update AKAIO itself over WiFi, only the Loaders, Cheats, Savelist.bin and WiFi plugin.
- Savelist.bin tells AKAIO what save file size to use for games.
Step 8. Updating Loaders.
Since the initial realise of AKAIO 1.7.1, there have been several loader updates to address certain bugs. The first update fixed bugs in the loaders for 4 games: 'Dragon Quest IX Sentinels of the Starry Skies', 'Kaidan Restaurant Ura Menu 100-Sen', 'Alice in Wonderland' and 'RPG Tsukuru'. The second addressed a soft-reset issue where changing a skin could result in AKAIO hanging on a white screen when attempting to restart. Because of this, you *will* need to update the loaders as in this guide.
You *CANNOT* update AKAIO itself over WiFi, updating loaders over WiFi only updates the loaders and not AKAIO. To use updated loaders, you *must* be using the latest version of AKAIO. If you are using AKAIO 1.6RC1, 1.6RC2 or 1.7 and attempt to update the loaders, you will get a white screen or processing error when you attempt to start any game. You *MUST* install AKAIO 1.7.1 if you want to use the updated loaders.
Loaders are what AKAIO uses to load games and to circumvent any AntiPiracy protection present in the games. As new games are released, loaders may need updating if you want to play the latest games. The latest loaders can be downloaded from Here, extract these to the
There is another loader directory on your SD card named
Loaders can also be updated over WiFi. From within AKAIO press (start), select 'More ->', select 'WiFi update'. On the next screen next to 'File to Download' select 'Update Loader' and press (A).
You *must* be using the latest version of AKAIO if you want to use updated loaders.
Step 9. Updating Cheats.
As of August 2010, neither the main GBAtemp cheat database or TempDB is being maintained. The last version of TempDB can be downloaded from Here. Which was updated by Elixirdream on 07/08/2010.
Cheats codes are updated regularly, TempDB is normally updated once or twice a week by elixirdream
. To update download this file from the GBAtemp Cheat Database and extract it to the
Like the loaders these can also be updated over WiFi. To do this from within AKAIO press (start), select 'More ->', select 'WiFi update'. On the next screen next to 'File to Download' select 'Cheats'
next to 'Which Cheat DB?' Select 'TempDB', and press (A).
If you've previously used cheats with a game and updated the cheat database. No updated cheats will show for this game until you rebuild it's cheat cache. To do this highlight a ROM and press (Y), then press (select), and then press (X). When AKAIO asks you if you want to 'Rebuild .CC file?' press (A).
This only needs to be done if the updated cheat database contains new or updated cheats for that specific game. AKAIO creates a .CC file for each game you use cheats with.
Step 10. Installing Skins.
There are many customized skins you can use from places such as the skin section on Acekard's website or NDSthemes which will change the way your Acekard looks. To install, download the skin and extract the downloaded archive to the
If it's not already done so in your skins archive, The files: clock_colon.bmp, clock_numbers.bmp, day_numbers.bmp, year_numbers.bmp will need to be placed into a folder named "calendar" within the skin's folder. Take notice of the spelling of "calendar", as it's easily misspelt.
- AKAIO can use the same skins as the official software
Sometimes the skins you install may be corrupted or missing required elements which can cause problems. When you select the skin, it may prevent the GUI appearing which means you can't change the skin back. Fortunately this is very easy to fix, to do this insert the MicroSD card into your PC and double click on the globalsettings.ini. This file is located in the __aio directory on your MicroSD card. Near the top you will find the line:
CODE
uiName = XXX
XXX refers to the skin name which you are using. Change this to:
CODE
uiName = zelda
Which will change the skin back to the default Zelda skin.
Step 11. Updating the Acekard 2i's firmware.
This step is optional and only needs to performed if you want to use your Acekard 2i with a DSi which has firmware version 1.4 or 1.4.1. Even if you intend to use your AK2i with a DS Lite, it is still a good idea to perform the firmware update incase your DS Lite breaks and you later replace it with a DSi or DSi XL.
Many people refer to 'Acekard Official' and 'AKAIO' as firmware, this isn't correct and can cause mis-undertandings when it comes to updating the firmware. They are the Acekard's Operating System/ OSMenu/ Kernel and reside on the MicroSD card, it's similar to how Windows is stored on your computers HardDisk. The Acekard's firmware resides on the Acekard's internal 2MB flash memory and is completly seperate. The Acekard's firmware controls it's most basic functions and tells it what to do when it powers on, such as load AKAIO. When you update the Acekard's firmware, you are updating the Acekard's internal memory and is independant of whatever version of Acekard Official/ AKAIO you have on your MicroSD card.
After updating your Acekard's firmware, it will appear in the DSi menu as
Download the firmware update from Here
Once the progress indicator goes past 0%, do NOT interrupt the flashing process.
Updating a Single cart:
Boot your Acekard and run
- Use ak2ifw_update_141_DSi.nds even if you are performing the update using a DS Lite or DS Phat. The DSL/ DSP will run both updates, while the DSi will only run the DSi update.
Press (start), after the update is complete it will give you the following message:
The update is complete, you can now power off the console.
To update multiple carts or to unbrick a previously bricked cart.
Boot your Acekard and run
After you've run it, you will get the following prompt:
Eject your cart and insert the cart you wish to update or unbrick. Press (B) and you get:
Press (start). Once the update is complete you will get the following message:
Important: If this was the only cart you wanted to update, power off now!
If you have another cart to flash, eject the cart and insert another. Press (start) and it will start flashing immediately, it will give no warnings, prompts or ask for confirmation. Repeat the process for as many carts as you have.
If your cart is bricked, you may see a different Chip ID such as:
After sucessfully unbricking, it should change back to 0FC2.
If you see the following message:
Your Acekard 2i is either a clone, or an Acekard 2.1 mis-labelled as an Acekard 2i (the retailers stick the Acekard sticker on the cartridges).
12. Contact issues.
Contact issues can prevent your Acekard from appearing in the DS menu. It can also make your DS freeze mid game or during booting. If your Acekard doesn't appear in the DS menu it is normally a slot-1 contact issue, or a bad flash. It's not the MicroSD card , your DS will still detect the Acekard even if the MicroSD card isn't inserted. You should first try unbricking you cart as in the unbricking guide
If your Acekard freezes mid game, this can be a slot-1 contact issue, or less commonly a MicroSD card contact issue. If your Acekard sits on a blue loading screen when you power it on, it means it can't see your MicroSD card. You can verify this by trying to boot your Acekard up with no MicroSD card inserted, you should find it will sit there on the blue loading screen.
If you are using a DSi XL, pulling the cart slightly out of the slot after insertion has been known to work. Insert the Acekard into the XL's cart slot normally until it locks in position. Once locked without depressing the cart pull it out slightly. You shouldn't be able to pull out by much as it should still be locked in position.
If none of these methods work, you will need to send it back to your retailer for a replacement. There really is little else you can do.'My Acekard doesn't appear in the DS menu, what do I do?'There are normally 2 possible causes of this:
The Paper Trick
First give the contacts on the Acekard a clean, then have a look inside the slot-1 on your DS with a torch. If it's full of debris, give the inside of the slot-1 on your DS a clean. Becareful not to bend the contacts.
If that still doesn't work, see if the Acekard is loose in the slot. If so the the paper trick may solve the issue. You can use various thickness of paper depending on how loose the cart is. If you use to much paper the cart can get stuck in the slot, so try one piece at a time. Another solution is to place pieces of tape on the top and bottom of the sticker.
Cut a piece of paper to the size and shape of the Acekard, leave an extra piece that will fold over the top of the cart. You should use a single piece of paper not card, and then work upwards.
Run your thumb over the sticker of the Acekard, you will likely feel a slight bump chich is from the glob top chip underneath the shell. If you do lay the Acekard sticker side down on a flat surface. See if you are able rock the Acekard from side to side.
If you can, then using a normal piece of paper can cause your Acekard to get stuck in the slot. This is because it will be widest at the point where the bump is. It's also possible it may be rocking while inside the cart slot. To solve this cut a square out of the center of the paper.
Cut the square so you can see the '2' through the hole.
Place the piece of paper over the Acekard sticker side and insert into the DS.
If the cart gets stuck you can use the flap to pull the piece of paper out.
If you don't like seeing the paper, you can use clear plastic such as an OHP sheet or the plastic insert from the Acekard packaging.
The TK Paper Trick
While many suggest the 'paper trick', it's only really useful if the cart is loose. Sometimes the paper trick won't work because the PCB is low in the cart. The grey plastic of the shell to the sides of the contacts will stop the cart from going back any further in the cart slot. An alternative is the 'sliding trick' below.
Have a look at the contacts on your Acekard, these are 2 of mine for you to compare it to:
You can see the top cart has lower contacts than the other, and on the bottom cart you can see the contacts are too far to the left.
If the contacts are low, It's easily fixed.
Inside the Acekard shell, there's a small strip underneath the PCB where the contacts are. We want to increase the distance between the PCB and shell at this point, this will push the contacts on the Acekard closer towards those of the DS.
You can achieve this by sliding something non-conductive underneath the PCB where the contacts are. Once this is underneath all the way, it isn't easy to remove. This can be paper or plastic, but in both cases it shouldn't be too thick. You should use the bare minimum thickness which will solve the contact problem. If you push the contacts to far, they will bend the contacts in the DS; which will stop retail carts making contact with them. If you don't want what you slide underneath to be visible, you can use clear plastic such as the type you use on overhead projector sheets.
You will need to cut the opposite corners of what you slide underneath like in the photo, this will make it easier for you to angle it in because of the two bars to side side of the contacts.
You can pull the PCB up with your nail so you can slide it underneath.
Afterwards you should be able to visibly see the PCB is higher in the cart.
The Combo Paper Trick
This should work for the DSi XL, athough I don't have one to try it on.
Cut a piece of paper (not card) like so:
Again you should leave a small piece which will fold over the top of the Acekard. If the Acekard has a bump on the front, then you should cut a square out of the paper as in the 1st paper trick.
Insert one end underneath the PCB contacts
Fold the other end round so it covers the sticker.
Insert the Acekard into your DS.
If it still doesn't work, pull the extra flap and your Acekard will lift out of the slot slightly. The extra thickness of paper should hold it in position.
13. DMA Mode.
DMA stands for Direct Memory Access, it is a way of allowing a device to directly access memory blocks without the involvment of the Central Processor Unit. This reduces the processing overhead and in the case of the Acekard, reduces lag associated with MicroSD data transfers.
Games are loaded using Yellow DMA mode by default, which enhances performance in many games. There is no way to turn off DMA, it is on permantly. AKAIO has 3 different DMA modes which should between them work for all games. For this reason, non-DMA mode has been removed as it is no longer needed. You can tell which DMA mode is being used from the colour of 'Loading'; Yellow is the newly added DMA mode, Green is the previous QuickSave DMA mode and Red is the original DMA mode.
You can override which DMA mode AKAIO uses by holding the down (A) or (X) button immediately after you press (A) to launch the game. (A) will force AKAIO to use Original DMA mode, (X) will force AKAIO to use QuickSave DMA mode. The colour of 'loading' will change so you know which mode it is using.
Normally you shouldn't need to use these modes as AKAIO will automatically select the DMA mode to use. However if you are having issues with a game, it can be worth trying an alternative DMA mode to see if it fixes the issue. It may also need to be used for games which have been released since the last loader update, as AKAIO won't know which DMA mode to use for them.
14. Troubleshooting.
Problem: 'My Acekard sits on a blue loading when it boots':
Your MicroSD cart isn't making contact with the Acekard.
Problem: 'When I try to boot my Acekard it says "System file is missing"'
You haven't set up AKAIO correctly, akmenu4.nds is missing from the root directory of your MicroSD card. Format the MicroSD card and start again.
Problem: 'After the blue loading it goes to a black screen and sits there
You haven't set up AKAIO correctly, AKAIO can't find the __aio directory, check it is present. Format the MicroSD card and start again.
Problem: 'When I try to start a game, it sits there on a Yellow loading
Make sure you formatted your MicroSD card with the SD formatter.
Problem: 'No cart is present in the DS/ DSi menu when my Acekard is inserted':
Your Acekard isn't making contact with the slot-1 cart slot.
Problem: 'When I try to boot my Acekard I get the error "An error has occurred. Press and hold the Power Button to turn the system off. Please see the Nintendo DSi Operations Manual for help troubleshooting." '
Your Acekard hasn't been updated to 1.4, while your DSi has.
Problem: 'When I try to update my Acekard to 1.4, it sits on 0% progress forever.'
The 0% progress is a known problem and has been fixed by a new updater, use the one provided above
Problem:'My Acekard doesn't see my saves from my R4'
Use the batch file linked above
Problem:'AKAIO doesn't see my saves from the Official software'
Use the batch file linked above
problem:'When I soft-reset, AKAIO forgets my settings'
There is a know issue with some MicroSD cards where not all of the space on the card has been allocated. You have use GParted to reallocated the drive. This is a live-cd, you will need to burn to a CD-R and then boot from it.
Problem:'I've updated my Acekard's firmware to 1.4, but I still don't see the Danny Phantom icon'
The Danny Phantom icon only appears on the DSi. On the DS Lite or DS Phat you will still see the Acekard icon after flashing.
Problem:'I've updated my Acekard's firmware to 1.4.1, but I still don't see the Alex Rider - Storm Breaker icon'
The Alex Rider - Storm Breaker icon only appears on the DSi. On the DS Lite or DS Phat you will still see the Acekard icon after flashing.
15. F.A.Q's.
- Yes, the AK2i works on the DS Lite and DS Phat.
- Yes, it works on the DSi XL/ LL too.
- No, it can't use the DSi's additional features.
- Yes, it will run DSi enhanced games, but in DS mode.
- Yes, after you perform the 1.4 update you can still use your Acekard 2i with a DS Lite
- No, there's no way of changing the Danny Phantom/ Alex Rider - Storm Breaker icon.
- The latest DSi Firmware version is 1.4
- No, you cannot downgrade your DSi's firmware.
- No, there's no way to update the firmware other than using a DSL/ DSP/ DSi FW =< 1.3.
- No, you don't need to update the firmware if you will never use it on a DSi.
- Yes, Zelda Spirit tracks works (including clean rom).
- Yes, Pokemon SS/HG works (including clean rom).
- Yes, WarioWare DIY works.
- The largest MicroSD supported is 32GB.
- Yes, you can use SDHC cards.
- No, you can't use SDXC cards.
- No, you can't use exFAT.
- No, Class 2 cards are normally fine while playing games. The games will just take a longer to load.
- Yes, it will connect wirelessly to the wii.
- Yes, it will connect wirelessly to other people using retail carts (over WFC you may need to be running the ROM of the same region)
- No, it doesn't bypass the health and safety screen, Yes you will still have to tap the screen.
- Yes, you can use Action Replay codes. You will need to use R4CEE, guide is in this thread.
- No, it doesn't work with WPA/WPA2 security. You will need to drop your routers security back to WEP.
- Soft Reset key combination is (L)+®+(B)+(A)+(Down). You can either enable it globally in system settings or per rom by pressing (Y) twice on the selected rom.
- Yes, Download Play is supported. You can either enable it globally in system settings or per rom by pressing (Y) twice on the selected rom.
- Yes, you can use SavSender to transfer saves to and from your retail carts (but not Pokemon HG/SS)
- Yes, you can delete the firmware update files from your MicroSD card once you've sucessfully updated the firmware.
nchor]xbottom[/anchor]
Despite the conversion attempt above, the info in this guide is outdated. While the first post could be fixed up and made usable, the AKAIO GBATemp wiki link contains much more information and is still being updated, so I'm unstickying this to let that be the main info link in this thread's place.
Similar threads
- Replies
- 4
- Views
- 1K
- Replies
- 8
- Views
- 7K
- Replies
- 80
- Views
- 78K
- Replies
- 8
- Views
- 7K
Site & Scene News
New Hot Discussed
-
-
23K views
Wii U and 3DS online services shutting down today, but Pretendo is here to save the day
Today, April 8th, 2024, at 4PM PT, marks the day in which Nintendo permanently ends support for both the 3DS and the Wii U online services, which include co-op play...by ShadowOne333 179 -
16K views
Nintendo Switch firmware update 18.0.1 has been released
A new Nintendo Switch firmware update is here. System software version 18.0.1 has been released. This update offers the typical stability features as all other... -
16K views
The first retro emulator hits Apple's App Store, but you should probably avoid it
With Apple having recently updated their guidelines for the App Store, iOS users have been left to speculate on specific wording and whether retro emulators as we... -
15K views
Delta emulator now available on the App Store for iOS
The time has finally come, and after many, many years (if not decades) of Apple users having to side load emulator apps into their iOS devices through unofficial...by ShadowOne333 96 -
14K views
MisterFPGA has been updated to include an official release for its Nintendo 64 core
The highly popular and accurate FPGA hardware, MisterFGPA, has received today a brand new update with a long-awaited feature, or rather, a new core for hardcore...by ShadowOne333 54 -
11K views
Nintendo takes down Gmod content from Steam's Workshop
Nintendo might just as well be a law firm more than a videogame company at this point in time, since they have yet again issued their now almost trademarked usual...by ShadowOne333 113 -
9K views
A prototype of the original "The Legend of Zelda" for NES has been found and preserved
Another video game prototype has been found and preserved, and this time, it's none other than the game that spawned an entire franchise beloved by many, the very...by ShadowOne333 31 -
8K views
Nintendo "Indie World" stream announced for April 17th, 2024
Nintendo has recently announced through their social media accounts that a new Indie World stream will be airing tomorrow, scheduled for April 17th, 2024 at 7 a.m. PT...by ShadowOne333 53 -
8K views
Anbernic reveals specs details of pocket-sized RG28XX retro handheld
Anbernic is back with yet another retro handheld device. The upcoming RG28XX is another console sporting the quad-core H700 chip of the company's recent RG35XX 2024... -
8K views
"Famidash", a new fanmade demake for the NES of Geometry Dash
Homebrew games for retro consoles have seen a rise over the years thanks to new tools and community-made development kits, which help a lot in the process of creating...by ShadowOne333 23
-
-
-
179 replies
Wii U and 3DS online services shutting down today, but Pretendo is here to save the day
Today, April 8th, 2024, at 4PM PT, marks the day in which Nintendo permanently ends support for both the 3DS and the Wii U online services, which include co-op play...by ShadowOne333 -
113 replies
Nintendo takes down Gmod content from Steam's Workshop
Nintendo might just as well be a law firm more than a videogame company at this point in time, since they have yet again issued their now almost trademarked usual...by ShadowOne333 -
97 replies
The first retro emulator hits Apple's App Store, but you should probably avoid it
With Apple having recently updated their guidelines for the App Store, iOS users have been left to speculate on specific wording and whether retro emulators as we...by Scarlet -
96 replies
Delta emulator now available on the App Store for iOS
The time has finally come, and after many, many years (if not decades) of Apple users having to side load emulator apps into their iOS devices through unofficial...by ShadowOne333 -
77 replies
Nintendo Switch firmware update 18.0.1 has been released
A new Nintendo Switch firmware update is here. System software version 18.0.1 has been released. This update offers the typical stability features as all other...by Chary -
60 replies
TheFloW releases new PPPwn kernel exploit for PS4, works on firmware 11.00
TheFlow has done it again--a new kernel exploit has been released for PlayStation 4 consoles. This latest exploit is called PPPwn, and works on PlayStation 4 systems...by Chary -
55 replies
Nintendo Switch Online adds two more Nintendo 64 titles to its classic library
Two classic titles join the Nintendo Switch Online Expansion Pack game lineup. Available starting April 24th will be the motorcycle racing game Extreme G and another...by Chary -
54 replies
MisterFPGA has been updated to include an official release for its Nintendo 64 core
The highly popular and accurate FPGA hardware, MisterFGPA, has received today a brand new update with a long-awaited feature, or rather, a new core for hardcore...by ShadowOne333 -
53 replies
Nintendo "Indie World" stream announced for April 17th, 2024
Nintendo has recently announced through their social media accounts that a new Indie World stream will be airing tomorrow, scheduled for April 17th, 2024 at 7 a.m. PT...by ShadowOne333 -
52 replies
The FCC has voted to restore net neutrality, reversing ruling from 2017
In 2017, the United States Federal Communications Commission (FCC) repealed net neutrality. At the time, it was a major controversy between internet service providers...by Chary
-
Popular threads in this forum
General chit-chat
- No one is chatting at the moment.


