

Tutorial
Updated
How to create professional Virtual Console injects
Hello everyone. Today I'm going to tell you how to make accurate-looking Virtual Console injects for the Wii or vWii. There's no current n00b-friendly injectors for the Wii yet - @Asdolo and @ranses-12- have made easy to use injectors for the 3DS and Wii U respectively - so I'm posting a tutorial on how to do Wii manual injection the best way possible.
Please check to pay attention to this tutorial when injecting a VC WAD. If you don't, you could have a chance of BRICKING your Wii, so make sure to have brick protection (such as BootMii as boot2, or Priiloader) before proceeding any further.
To clarify as well, @SuperrSonic and @jj-kwik have made forwarder channels to custom emulator .DOL files that auto-boot a ROM from a certain directory in the SD Card or USB, unofficially adding support for more systems such as the Game Boy line. However, I will not be covering those here.
Only downside is, even if you do everything correctly, there is a chance that your game might not work, or partly not emulated correctly. This is especially the case with Nintendo 64, Neo Geo, Sega Master System and Commodore 64.
Here is a list of suitable injectors depending on the consoles:
Last but not least, you might need a WAD depending on the console:
This section will discuss injecting with the injector depending on which console you're making a VC WAD for.
Now that you have the output WAD from the injector, we have work to do. Open up CustomizeMii, and drag the output WAD you created onto the application.

Click the Title tab, and type in a channel title on the All Languages field, making sure that it does not exceed beyond 20 characters. If you have used AutoInjectuwad, do not do this.
Also make sure that any language fields are blank as well. If you see any field filled in, especially the Japanese title field, remove the title and leave it blank to keep the accurateness of what we will be left with in the end.
Once that's done, click the Banner tab, and look for VCPic.tpl. Replace it with a picture of the injected game's title screen. It has to be resized with a photo editor to look as best as possible. Do the same with IconVCPic.tpl in the Icon tab.
Click the Layout tab, and look for banner.brlyt. Extract that using the Extract button.
Open up VCbrlyt from the HowardC's tools folder that you extracted, and open the newly extracted brlyt file from the application.

Type in the game's title in the Name field. In some cases, type in "^" to separate the title into two lines. Click Set All.
Type in the game's original release date in the Year field. Once that's done, click Set All.
Type in the game's number of players in the Players field. After that, click Set.
Once all of that is done, click "Color Editor And Preview" to make sure that everything is correct. If it is, then close the Color Editor And Preview window (NOT THE VCBRLYT WINDOW) and click Save Changes.
On CustomizeMii, replace banner.brlyt with the custom brlyt that you made, and click Create WAD. Save the WAD in a certain directory.
You will be left with a WAD containing the injected ROM, custom banner, icon, brlyt, region free patch and Title ID. But we are not done yet.
Extract the new WAD with a WAD unpacker, and open the WAD folder. Open the HowardC's tools folder in another window, and go to the U8Tool folder (if there is one). Open the U8Tool application from there. This is where you extract and repack .app files. Look for the 00000005.app, and extract it. The newly made folder should be named "00000005_app_OUT".
If you're injecting an NES game, do not do this as the save icons are located in 00000001.app rather than 00000005.app.
Open the VCIcon application, and select the console that you're injecting. Open the game title image from the application. Make sure that the image has been resized for best quality.
Once that's done, click Make Preview to make sure that everything's right. If it is, click Make. You should have three TPL files where your game title image should be. Ignore the IconVCPic.tpl and VCPic.tpl files, as we're after the third file, the save icon file. It should be named either "banner.tpl", "save_banner.tpl", or a group of WTE files, depending on the console.
Open VCSaveInject, and select the console you're injecting for. Look for the save icon file(s) you just made. The rest is put in spoiler sections for different consoles.
First, this is an optional but recommended step, but if you have used AutoInjectuwad, or any other injection method besides Devilken, before repacking the WAD, replace the existing 00000004.app with the special one that removes the "Operations Guide" option from the game's HOME Menu. Make sure to have a backup of the original one first. You have to also delete or move the manual file from the extracted 00000005.app. Depending on the console, the file is named either "emanual.arc", "html.arc", or "man.arc.zlib", among other things.
Now for the highly recommended steps. Repack the 00000005.app using U8Tool if you extracted it already. In the case of Genesis/Mega Drive/Master System, repack all the CCF files using CCFTool before repacking the .app file. This process is just like extracting the same files, except you have to click on "Pack" instead of "Extract".
After this, repack the WAD using a WAD packer. It can be ShowMiiWads, or wwPacker, any method you use to repack your WADs.
Finally we're done with all the extracting, modifying and repacking. Now it's time to test it just to make sure it works before installing it.
First, open Dolphin if you have installed it already. Before proceeding, it would be a good time to remember that Dolphin can emulate things that a real Wii or GameCube would not be capable of running.
Make sure you have the latest version of Dolphin, as well as a powerful CPU/RAM for best results. Open the emulated Wii Menu from Dolphin once (to avoid any issues installing the WAD into the emulator's Wii Menu, especially with the latest version), by clicking on Tools on the top of the emulator's window, then on "Load Wii System Menu".
Please note that there may be a few issues that you might not expect on a real Wii, such as the "System files are corrupted" message appearing randomly, or the "This channel cannot be used" message appearing when you try to launch an out-of-region channel WAD from Dolphin's Wii Menu.
Once you have opened the Wii Menu once and closed the emulation, click "Install WAD" from Tools, then locate the WAD you just repacked (not any of the other ones we did in Section 2 or 3). It should be installed. Open the emulator's Wii Menu again to check that it is installed. If it isn't, then try again.
If it is installed, double check the banner and icon to make sure that they are right. If they are not (especially with the banner), it can result in a banner brick when you install it on a real Wii. If the banner and/or icon don't appear to be right on Dolphin, try again from the beginning, making sure that you pay attention to everything.
If everything appears to be working on Dolphin, open the WAD itself to make sure that the game works properly. Again, there is a chance that even if you do everything correctly, the game might not completely or partially work, especially with N64, Neo Geo, Master System and Commodore 64.
If the game doesn't appear to work, or doesn't work at all, I am sorry that your injection does not work and I apologize for that.
But if your WAD works 100% on Dolphin, then congratulations! You have passed this tutorial successfully!
If you have your game working properly, and the banner, icon and save icons working properly as well, then install the WAD on your Wii from an SD card, USB drive or even FTP server, and enjoy!
Happy injecting!
Please check to pay attention to this tutorial when injecting a VC WAD. If you don't, you could have a chance of BRICKING your Wii, so make sure to have brick protection (such as BootMii as boot2, or Priiloader) before proceeding any further.
Section 1: What you need
To create injects for the Wii you will need several tools, and an injector depending on which console you're making a VC inject for. There are currently two injectors available: AutoInjectuwad Injector, and Devilken's Injector. Devilken's Injector contains a few more additional features, such as removing the "Operations Guide" option from the HOME Menu using a special 00000004.app file, as well as Neo Geo AES injection. AutoInjectuwad, however, is supported with Genesis/Mega Drive, homebrew .DOL and TurboGrafx-16/PC Engine injection. And then there's Impaler's Wad Creator. It works just like AutoInjectuwad does, but I will not discuss it here.
To clarify as well, @SuperrSonic and @jj-kwik have made forwarder channels to custom emulator .DOL files that auto-boot a ROM from a certain directory in the SD Card or USB, unofficially adding support for more systems such as the Game Boy line. However, I will not be covering those here.
Only downside is, even if you do everything correctly, there is a chance that your game might not work, or partly not emulated correctly. This is especially the case with Nintendo 64, Neo Geo, Sega Master System and Commodore 64.
Here is a list of suitable injectors depending on the consoles:
- Nintendo: AutoInjectuwad Injector (Devilken has also support for NES, but that doesn't count)
- Super Nintendo: AutoInjectuwad Injector (Devilken has also support for SNES, but that doesn't count)
- Nintendo 64: AutoInjectuwad Injector/Devilken's Injector
- Sega Genesis/Mega Drive: AutoInjectuwad Injector
- Sega Master System: Injector not available
- NEC TurboGrafx-16/PC Engine: AutoInjectuwad Injector
- NEC TurboGrafx-CD/PC Engine CD: Tutorial here
- SNK Neo Geo AES: Devilken's Injector
- Commodore 64: Tutorial here
Last but not least, you might need a WAD depending on the console:
- Kirby's Adventure, Super Mario Bros. 3 (Nintendo)
- Donkey Kong Country 2: Diddy's Kong Quest (Super Nintendo)
- Sin & Punishment, Ocarina of Time, Majora's Mask, Mario Kart 64, Super Mario 64 (Nintendo 64)
- Comix Zone (Sega Genesis/Mega Drive)
- Sonic the Hedgehog, Phantasy Star (Sega Master System)
- Bomberman '93 (TurboGrafx-16/PC Engine)
- Castlevania: Rondo of Blood (TurboGrafx-CD/PC Engine CD)
- King of Fighters '94 (Neo Geo AES)
- International Karate (PAL) (Commodore 64)
Section 2: Beginning
This section will discuss injecting with the injector depending on which console you're making a VC WAD for.
If you have downloaded and extracted the AutoInjectuwad Injector v3 archive, open up the AutoInjectuwad Injector application. You will be greeted with a number of various options.
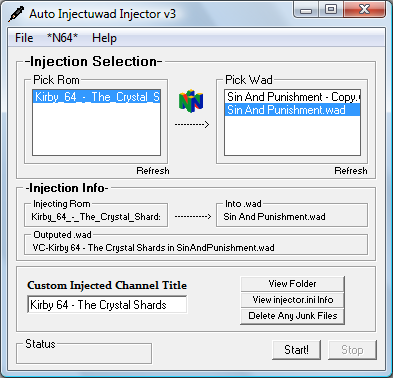
Click Console Mode on the top, and select the console you want to inject.
Then select a ROM on the left field, and a WAD on the right field. REMEMBER: Both the WAD and the ROM have to be the same console, or it will not work!!
The injector also needs a custom channel title for the injection to work. Once you have selected a console, WAD and ROM, type in the game's title in the Custom Injected Channel Title. Make sure it does not exceed beyond 20 characters, so think of any short name. (e.g. if I had to inject Teenage Mutant Turtles 4: Turtles in Time, I have to type in simply "TMNT 4" in the field.)
Once you have everything filled in, click the "Start!" button. Wait for the injection to be done. If it gives you a runtime error, just start again.
When the injection succeeds, you will be left with an output WAD named "VC-[Channel Title] in [Base WAD].wad".
If you have downloaded and extracted the Devilken's Injector archive, open up the folder you extracted it to. Hold Ctrl+Shift and right click while doing so. Then click on the "Open command window here" option. You will have a command window redirected to the Devilken folder. Type this command in:
"VC [Base WAD].wad [ROM Folder]"
As with AutoInjectuwad, make sure that the WAD and the ROM have to be the same console. If you're injecting Neo Geo, you have to extract the entire Neo Geo game archive onto the ROM folder. Also make sure that there is only one ROM in the ROM folder. You might also have to remove the "Operations Guide" option from the injected WAD's HOME Menu. To do this, you must have a special 00000004.app file in the same folder as the ROM. This is optional but recommended.
After you have filled in the aforementioned command line, press Enter. You will be greeted with some code, followed by an option to choose which region the output WAD should be. If you want the WAD to be region free, type in 3 and press Enter.
After that, you will be given the choice to choose a Title ID for the output wad. Type in any 4-character line you can think of, as long as it doesn't conflict with an already existing channel on your Wii. Once you have done that, press Enter once more.
The injection will now finish, and you will be left with an output WAD named "title.wad". This is the WAD containing the injected ROM, region and Title ID you chose.
Section 3: Editing the Output WAD
Now that you have the output WAD from the injector, we have work to do. Open up CustomizeMii, and drag the output WAD you created onto the application.
Click the Title tab, and type in a channel title on the All Languages field, making sure that it does not exceed beyond 20 characters. If you have used AutoInjectuwad, do not do this.
Also make sure that any language fields are blank as well. If you see any field filled in, especially the Japanese title field, remove the title and leave it blank to keep the accurateness of what we will be left with in the end.
Once that's done, click the Banner tab, and look for VCPic.tpl. Replace it with a picture of the injected game's title screen. It has to be resized with a photo editor to look as best as possible. Do the same with IconVCPic.tpl in the Icon tab.
Click the Layout tab, and look for banner.brlyt. Extract that using the Extract button.
Open up VCbrlyt from the HowardC's tools folder that you extracted, and open the newly extracted brlyt file from the application.
Type in the game's title in the Name field. In some cases, type in "^" to separate the title into two lines. Click Set All.
Type in the game's original release date in the Year field. Once that's done, click Set All.
Type in the game's number of players in the Players field. After that, click Set.
Once all of that is done, click "Color Editor And Preview" to make sure that everything is correct. If it is, then close the Color Editor And Preview window (NOT THE VCBRLYT WINDOW) and click Save Changes.
On CustomizeMii, replace banner.brlyt with the custom brlyt that you made, and click Create WAD. Save the WAD in a certain directory.
You will be left with a WAD containing the injected ROM, custom banner, icon, brlyt, region free patch and Title ID. But we are not done yet.
Section 4: Save Files
If we need to keep the official-looking style of the output WAD we need to edit the save icon and text, to not confuse it with other existing save files.
Extract the new WAD with a WAD unpacker, and open the WAD folder. Open the HowardC's tools folder in another window, and go to the U8Tool folder (if there is one). Open the U8Tool application from there. This is where you extract and repack .app files. Look for the 00000005.app, and extract it. The newly made folder should be named "00000005_app_OUT".
If you're injecting an NES game, do not do this as the save icons are located in 00000001.app rather than 00000005.app.
Open the VCIcon application, and select the console that you're injecting. Open the game title image from the application. Make sure that the image has been resized for best quality.
Once that's done, click Make Preview to make sure that everything's right. If it is, click Make. You should have three TPL files where your game title image should be. Ignore the IconVCPic.tpl and VCPic.tpl files, as we're after the third file, the save icon file. It should be named either "banner.tpl", "save_banner.tpl", or a group of WTE files, depending on the console.
Open VCSaveInject, and select the console you're injecting for. Look for the save icon file(s) you just made. The rest is put in spoiler sections for different consoles.
After that, look for 00000001.app, and delete anything that is filled in the title field. Type in the game title from there. Make sure that it does not exceed over 20 characters as with the WAD title, and for some cases type "^" to separate the title into two lines as with the brlyt file. The second line will only be displayed after you click on the save icon from the Wii Menu and you are given the option to copy, move or delete it.
Once that is done, click Inject. You will be left with an edited 00000001.app.
Once that is done, click Inject. You will be left with an edited 00000001.app.
After that, look for 00000001.app, and delete anything that is filled in the title field. Type in the game title from there. Make sure that it does not exceed over 20 characters as with the WAD title, and for some cases type "^" to separate the title into two lines as with the brlyt file. Also please note that if you have not extracted 00000005.app, it will give you an error when injecting and will only inject the title, not the save icon and/or banner. The second line will only be displayed after you click on the save icon from the Wii Menu and you are given the option to copy, move or delete it.
Once that is done, click Inject. You will be left with an edited 00000001.app, as well as an edited save icon file inside the 00000005.app folder.
Once that is done, click Inject. You will be left with an edited 00000001.app, as well as an edited save icon file inside the 00000005.app folder.
After that, look for the extracted 00000005.app folder, and delete anything that is filled in the title field. Type in the game title from there. Make sure that it does not exceed over 20 characters as with the WAD title, and for some cases type "^" to separate the title into two lines as with the brlyt file. The second line will only be displayed after you click on the save icon from the Wii Menu and you are given the option to copy, move or delete it.
Once that is done, click Inject. You will be left with an 00000005.app folder with edited contents, as well as an edited save icon file inside the folder.
Once that is done, click Inject. You will be left with an 00000005.app folder with edited contents, as well as an edited save icon file inside the folder.
Before proceeding any further, open CCFTool, and extract data.ccf in the 00000005.app folder. After that, extract misc.ccf.zlib from the new "data_ccf_OUT" folder. This is because the save files are located within a ccf.zlib file within a ccf file within the 00000005.app file.
Instead of looking for a certain TPL file, look for the folder with the WTE files. After that, look for a certain text document within the extracted misc.ccf.zlib folder. It should be named "banner.cfg.txt". Then, delete anything that is filled in the title field under the console drop-down box. Type in the game title from there. Make sure that it does not exceed over 20 characters as with the WAD title, and for some cases type "^" to separate the title into two lines as with the brlyt file. The second line will only be displayed after you click on the save icon from the Wii Menu and you are given the option to copy, move or delete it.
Once that is done, click Inject. You will be left with an edited banner.cfg.txt file, as well as edited WTE files.
After that, look for a certain text document within the 00000005.app folder. It should be named "TITLE.TXT". Then, delete anything that is filled in the title field. Type in the game title from there. Make sure that it does not exceed over 20 characters as with the WAD title, and for some cases type "^" to separate the title into two lines as with the brlyt file. The second line will only be displayed after you click on the save icon from the Wii Menu and you are given the option to copy, move or delete it.
Once that is done, click Inject. You will be left with an edited TITLE.TXT file, as well as an edited save icon file inside the 00000005.app folder.
Once that is done, click Inject. You will be left with an edited TITLE.TXT file, as well as an edited save icon file inside the 00000005.app folder.
Before proceeding any further, please note that the Neo Geo save icon and banner (not the one you created) are located within a "banner.bin" file in the 00000005.app folder. THIS IS NOT TO BE CONFUSED WITH THE CHANNEL'S BANNER.
Now that we've got that out of the way, you should have looked for the "banner.tpl" file you just created. Look for the "banner.bin" file within the 00000005.app folder (DO NOT LOOK FOR THE BANNER.BIN FILE WITHIN AN EXTRACTED 00000000.APP OR YOU MAY BRICK GUARANTEED), and delete anything that is filled in the title field. Type in the game title from there. Make sure that it does not exceed over 20 characters as with the WAD title, and for some cases type "^" to separate the title into two lines as with the brlyt file. The second line will only be displayed after you click on the save icon from the Wii Menu and you are given the option to copy, move or delete it.
Once that is done, click Inject. You will be left with an edited banner.bin file inside the 00000005.app folder.
After that, look for 00000001.app, and delete anything that is filled in the title field. Type in the game title from there. Make sure that it does not exceed over 20 characters as with the WAD title, and for some cases type "^" to separate the title into two lines as with the brlyt file. I haven't tested yet whether you have to have the 00000005.app extracted into a folder like with Super NES, but just extract it in case. The second line will only be displayed after you click on the save icon from the Wii Menu and you are given the option to copy, move or delete it.
Once that is done, click Inject. You will be left with an edited 00000001.app, as well as (if you extracted the 00000005.app) an edited save icon file inside the 00000005.app folder.
Once that is done, click Inject. You will be left with an edited 00000001.app, as well as (if you extracted the 00000005.app) an edited save icon file inside the 00000005.app folder.
Section 5: Finishing
OK, now you have checked that the banner and icon are done, the injecting is done, and the save icon and banner are also done. Now it's time to repack all that into a new WAD, test it on Dolphin (a GameCube/Wii emulator) to make sure it works, and if it does so install it on your Wii or vWii.
First, this is an optional but recommended step, but if you have used AutoInjectuwad, or any other injection method besides Devilken, before repacking the WAD, replace the existing 00000004.app with the special one that removes the "Operations Guide" option from the game's HOME Menu. Make sure to have a backup of the original one first. You have to also delete or move the manual file from the extracted 00000005.app. Depending on the console, the file is named either "emanual.arc", "html.arc", or "man.arc.zlib", among other things.
Now for the highly recommended steps. Repack the 00000005.app using U8Tool if you extracted it already. In the case of Genesis/Mega Drive/Master System, repack all the CCF files using CCFTool before repacking the .app file. This process is just like extracting the same files, except you have to click on "Pack" instead of "Extract".
After this, repack the WAD using a WAD packer. It can be ShowMiiWads, or wwPacker, any method you use to repack your WADs.
Finally we're done with all the extracting, modifying and repacking. Now it's time to test it just to make sure it works before installing it.
First, open Dolphin if you have installed it already. Before proceeding, it would be a good time to remember that Dolphin can emulate things that a real Wii or GameCube would not be capable of running.
Make sure you have the latest version of Dolphin, as well as a powerful CPU/RAM for best results. Open the emulated Wii Menu from Dolphin once (to avoid any issues installing the WAD into the emulator's Wii Menu, especially with the latest version), by clicking on Tools on the top of the emulator's window, then on "Load Wii System Menu".
Please note that there may be a few issues that you might not expect on a real Wii, such as the "System files are corrupted" message appearing randomly, or the "This channel cannot be used" message appearing when you try to launch an out-of-region channel WAD from Dolphin's Wii Menu.
Once you have opened the Wii Menu once and closed the emulation, click "Install WAD" from Tools, then locate the WAD you just repacked (not any of the other ones we did in Section 2 or 3). It should be installed. Open the emulator's Wii Menu again to check that it is installed. If it isn't, then try again.
If it is installed, double check the banner and icon to make sure that they are right. If they are not (especially with the banner), it can result in a banner brick when you install it on a real Wii. If the banner and/or icon don't appear to be right on Dolphin, try again from the beginning, making sure that you pay attention to everything.
If everything appears to be working on Dolphin, open the WAD itself to make sure that the game works properly. Again, there is a chance that even if you do everything correctly, the game might not completely or partially work, especially with N64, Neo Geo, Master System and Commodore 64.
If the game doesn't appear to work, or doesn't work at all, I am sorry that your injection does not work and I apologize for that.
But if your WAD works 100% on Dolphin, then congratulations! You have passed this tutorial successfully!
If you have your game working properly, and the banner, icon and save icons working properly as well, then install the WAD on your Wii from an SD card, USB drive or even FTP server, and enjoy!
Happy injecting!
Last edited by CatmanFan,


