Moving EmuMMC hidden partition to a larger SD card
Hey folks!
So I recently got a 128GB SD Card to replace my old 64GB, which was setup with atmosphere and EmuMMC. However I soon found a problem: Since I set up EmuMMC with a partition, I couldn't figure out an easy way to transfer that hidden partition to my new SD Card. It's not that hard but I figured I'll write a quick tutorial on how to do this, for the next one looking to do this.
Please read carefully when doing this, as a wrong turn can end up in you wiping out a hard drive or partition. Always double check the size of what you are about to use and unplug any USB storage devices to minimize the possibility of error. Oh! and always keep track of which SD card you are using! My 128 and 64GB SDs looked bloody the same and I almost wiped the original one with all my savegames.
What you needCloning the old SD Card to a new oneAdjusting the partitions on the new SD Card
- Computer with Windows capable of reading MicroSD cards.
- The new SD Card you want to use will be wiped during the process, make a copy of everything.
- Free space on your computer, as much as your original SD Card. So if you are going to migrate from a 64GB SD Card, you'll need 64GB free. If you can read two SD cards on your computer at the same time, you don't need this.
- HDD Raw Copy Tool. I used the portable version but you do you, they're both the same thing.
- Mini Tool Partition Wizard.
- I will reffer to the sd card currently on your switch as the old one, and the one you want to change to, as the new one.
- A bunch of patience, this is going to take a while.
- Computer with Windows capable of reading MicroSD cards.
- Turn off your Switch, remove the old SD Card and insert it into your computer. Open HDD Raw Copy Tool. We are goint to make a full image of this card.
- This tool is very simple to use, you choose a source, you choose a destination, a copy gets made. So our source is the SD Card.
- HDD Raw Copy Tool is going to show you a list of all your hard drives and removable storage (USBs will show up here too, so be careful!). Pick your SD Card, if the name doesn't help you you can look at the size to guide you, then click Continue>>>
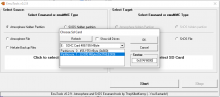
- And for our destination, it's going to be a file. So we double click where it says "FILE", browse where we want to put the image. Keep in mind you need to put it in a place with as much free space as your SD Card. Once you press Continue>>> again, a summary window will appear, check everything is correct, specially check if you havent chosen another hard drive as destination instead of FILE, as this WILL WIPE OUT said hard drive. Once checked press Start. This is going to take a while, about and hour and a half for my 64GB card with the shitiest card reader in the whole vast world.
- Once it's done, close HDD Raw Copy Tool. Extract the SD Card and insert the new one. Open HDD Raw Copy Tool again.
- Our source is now a file, so double click on file, browse to where you dumped your SD Card and select it. Our Destination is the new SD Card. A message will pop up telling you that this will wipe out data, double check you are copying to where you want to and hit START again. And wait for two whiles once again.
If you have a way to read both SD Cards at the same time it's possible to make this quicker, although personally I don't recommend it, you could choose as Source the old SD card and the new SD card as Destination and skip the need of saving the old SD card image on your computer.
If all you want to do is swap SD Cards of the same size, then you are donezo! You can put the new SD Card on the switch, turn it on with your evil homebrew method of choice and it should work! If your new SD card is larger, we are going to have to adjust the partition table, so come along to the next fascinating step!
- Turn off your Switch, remove the old SD Card and insert it into your computer. Open HDD Raw Copy Tool. We are goint to make a full image of this card.
If everything works correctly, your new SD Card boots on the switch, but if you are a smart guy you'll have figured out that the switch recognizes exactly the same size as your previous SD Card. That's because we made a clone and a lot of the free space is not asigned to a partition. That's why we need Mini Tool Partition Wizard.
- Make sure you insert the new SD Card onto the computer and start Mini Tool Partition Wizard. Choose Disk Partition & Management. Look for your SD Card on the list below (Pay attention to the size)
- You will see something like this (Please don't mind the actual sizes shown in the picture, as I did this with and old 32GB SD Card just for the pic.):
. Depending on your SD Card, you will probably see the first 16MB as unallocated, you can ignore that, it's normal.

- If what you see is the opposite, first unformatted, then FAT32, then you can just resize the FAT32 area and be done with it. Skip to step 12
- The FAT32 area (Or perharps it shows up as exFAT) is where your homebrew, atmosphere, etc... folders are located, the Unformatted is the hiddden partition where you have your EmuMMC, which will be 29.1GB (Or around that). We want to increase the size of the FAT32 area to use the gray area (Unallocated). The problem is, we can't do that because the stupid unformatted thing is in the middle of everything!
- Right click on the Unformatted partition and choose "Copy".
- A Window will show up to let you choose where you want to copy the partition. Go to your SD Card and select the unallocated space. Hit Next.
- We need to copy this partition to THE END of the SD card. Always keeping the size as 29.1GB, move it around until it's the last thing on the SD Card.
- Hit Finish.
- Once it's done, apply changes. (Upper left corner)
- You will now have two 29.1GB partitions, delete the one that we had from the beginning, that was in the middle of everything: Right click, Delete. Apply changes.
- You should have your original FAT32 partition, a bunch of unallocated space and at the end, the last 29.1GB of the SD Card, a partition marked as "Unformatted". We are almost done!
- Right click on your FAT32 partition and choose "Move/Resize". Use the arrows to enlarge the partition and make it occupy all the space on the SD Card.
- Apply changes. That's it! Done. You SD Card should boot your Switch as normal and you should see all the space of your SD card available. Enjoy! If that's not the case, recheck all the steps and feel free to ask me any question.
- Make sure you insert the new SD Card onto the computer and start Mini Tool Partition Wizard. Choose Disk Partition & Management. Look for your SD Card on the list below (Pay attention to the size)