Wii U Stuck on Logo

ChefVortivask

Well-Known Member
OP
Member
Joined
Apr 3, 2023
Messages
337
Trophies
0
Age
26
XP
535
Country
United States
Hello everyone,

First time poster here. I decided to make this post since I am having issues with my Wii U. Currently, my Wii U will not boot up to the main menu. It stays stuck on the Wii U logo indefinitely.

There are a few things to note about my console. The console is the black 32 gb model. I believe it was bought during the 2012 holiday season (release) as we were expecting to play Pikmin 3 before it got delayed. The system has never been modded in any fashion. It was not the most heavily played console, and I can't even give a good estimate of when it was last used (at least more than 3 years).

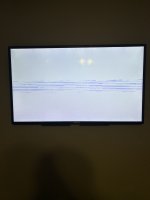
I have already tried doing the UDPIH, however it does not seem to be working. When using the second recovery menu, I get a white screen with some blue lines (see attached image). I believe this is similar to what @fadafwet described in his post. I was able to get the logs from the system, which I have attached to this post. Any idea what the issue may be and how to fix it? Any help would be much appreciated.
 

Attachments

  • Garbled Screen.jpg
    Garbled Screen.jpg
    1.5 MB · Views: 91
  • logs.zip
    63.9 KB · Views: 82

SDIO

Well-Known Member
Member
Joined
Feb 13, 2023
Messages
2,258
Trophies
0
Age
28
XP
1,376
Country
Germany
What I'll need to do is remove the solder bridge from the DIS jumper
Yes
and solder wires to the pads on the NAND AID (DAT 0, 1, 2, and 3, CLK, CMD, and maybe ground and/or 3V3?).
In addition to the signals you need GND. but not 3V3. Connecting 3V3 could damage one or both devices. The eMMC will be powered by the Wii U.

You would also remove the MLC replacement SD card from the Slot (so IOSU will be garanteed to error out early and leave the SDIO bus alone.

Those wires then get soldered to the corresponding holes on the Raspberry Pi (in my case, a Raspberry Pi Zero).
Yes. Also keep the wires short. They don't need to be super short, but don't make them unnecessary long.
I can then hook up the Pi to my computer through USB and perform the rest of the steps described by @Leeful.
I am not sure how you would hook up the zero to the PC. The Pi won't show up as a cardreader, so you can't use the same steps. You will do most of it in linux on the Pi. The eMMC should show up as /dev/mmcblk1 if everything worked. The Pi also needs access to some storage to write the Image to.
For the cloning itself you would use something like gddrescue on the Pi

Of course the Pi should be powered through the Wii U using another USB cable.
I used an y cable to power it from two of the Wii U ports. I am not sure if one port is enough. Also I didn't connect peripherals to Pi (had it headless and sshed to it), except an USB to SATA adapter for the destination HDD, but the HDD had external power.

The only thing I'm confused about is if I need to run any specific software on the Raspberry Pi. Again, I'm not too knowledgeable in this field, and it has been a while since I've messed around with a Raspberry Pi, but clearly I have to do something if the sdio interface needs to be enabled in config.txt.
You need to enable the SDIO interface on the Pi. You do this by adding this line at the top of the config.txt
Code:
dtoverlay=sdio,poll_once=off
If needed you can also reduce the SDIO or limit the size of the bus (in case you only wire up DAT0 and not DAT1-3)
Code:
dtoverlay=sdio,bus_width=1,sdio_overclock=25,poll_once=off
 

ChefVortivask

Well-Known Member
OP
Member
Joined
Apr 3, 2023
Messages
337
Trophies
0
Age
26
XP
535
Country
United States
Yes

In addition to the signals you need GND. but not 3V3. Connecting 3V3 could damage one or both devices. The eMMC will be powered by the Wii U.

You would also remove the MLC replacement SD card from the Slot (so IOSU will be garanteed to error out early and leave the SDIO bus alone.


Yes. Also keep the wires short. They don't need to be super short, but don't make them unnecessary long.

I am not sure how you would hook up the zero to the PC. The Pi won't show up as a cardreader, so you can't use the same steps. You will do most of it in linux on the Pi. The eMMC should show up as /dev/mmcblk1 if everything worked. The Pi also needs access to some storage to write the Image to.
For the cloning itself you would use something like gddrescue on the Pi


I used an y cable to power it from two of the Wii U ports. I am not sure if one port is enough. Also I didn't connect peripherals to Pi (had it headless and sshed to it), except an USB to SATA adapter for the destination HDD, but the HDD had external power.


You need to enable the SDIO interface on the Pi. You do this by adding this line at the top of the config.txt
Code:
dtoverlay=sdio,poll_once=off
If needed you can also reduce the SDIO or limit the size of the bus (in case you only wire up DAT0 and not DAT1-3)
Code:
dtoverlay=sdio,bus_width=1,sdio_overclock=25,poll_once=off
I really don’t have much experience with Linux or messing around with command lines. I also don’t have a standalone monitor so I guess I could hook it up to a TV? Honestly it sounds like the SD tool might be easier for someone like me who doesn’t have much experience with these sorts of things. If I understand the SD tool correctly, I just wire up the pads on the NAND-AID to the corresponding pads on the SD tool, power on the Wii U, plug it into my computer, and dump/write the mlc to the SD card.
 

SDIO

Well-Known Member
Member
Joined
Feb 13, 2023
Messages
2,258
Trophies
0
Age
28
XP
1,376
Country
Germany
If it is a zero w, it has wifi. If you have a fresh install of raspbian on the, you can just add your wifi credentials and it should come up on the network and you can ssh into it. No extra minitor required: https://desertbot.io/blog/headless-raspberry-pi-4-ssh-wifi-setup

You always have the option to build the sd tool yourself out of an micro SD adapter.
 

SDIO

Well-Known Member
Member
Joined
Feb 13, 2023
Messages
2,258
Trophies
0
Age
28
XP
1,376
Country
Germany
I don't think that a few weeks matter. But voultar was pretty sielent recently, so I am not sure if and when he will release it. You could also build the adapter yourself, if you don't want to wait. Or you could look for another SD breakout. Or solder directly to an SD adapter.
 

ChefVortivask

Well-Known Member
OP
Member
Joined
Apr 3, 2023
Messages
337
Trophies
0
Age
26
XP
535
Country
United States
I could mess around and try making my own adapter. My computer doesn't have a full size SD card slot, but I can always get an adapter. Do you have a link or some sort of a reference for making my own?
 

SDIO

Well-Known Member
Member
Joined
Feb 13, 2023
Messages
2,258
Trophies
0
Age
28
XP
1,376
Country
Germany
You can look at the SDIO pinout of a micro SD. Then you just have to connect 1:1 GND, CLK, CMD and DAT0.

WIth the cardreader you have to be a little bit careful, as not all work. I heard USB3.0 for some reason seem to have a problem with it.
 

ChefVortivask

Well-Known Member
OP
Member
Joined
Apr 3, 2023
Messages
337
Trophies
0
Age
26
XP
535
Country
United States
So obviously I'll need to open the adapter to solder to the part of the pins that are inside. Do I close it up afterwards (is there even room to do so), otherwise how do I isolate the connections?
 

ChefVortivask

Well-Known Member
OP
Member
Joined
Apr 3, 2023
Messages
337
Trophies
0
Age
26
XP
535
Country
United States
Sounds easy enough. That's interesting that cardreader matters. I almost ordered a USB 3.0 reader before I read your reply. Does anyone have the names of card readers that are confirmed to work?
 

SDIO

Well-Known Member
Member
Joined
Feb 13, 2023
Messages
2,258
Trophies
0
Age
28
XP
1,376
Country
Germany
I think in that NAND dumping thread they talkes about the working ones. I used a LogiLink CR0023 USB2.0 CardReader. It is black square and supports all kinds of formats.
Post automatically merged:

Havea look at this project: https://www.pcbway.com/project/shareproject/MicroSD_breakout_board.html
Maybe others would also be interested in that and you can sell the ones you don't need. Maybe @Lazr1026 also wants one.
 
Last edited by SDIO,

ChefVortivask

Well-Known Member
OP
Member
Joined
Apr 3, 2023
Messages
337
Trophies
0
Age
26
XP
535
Country
United States
Those boards are a bit pricey, particularly for shipping.

Do you have a link to a particular thread about NAND dumping? There were so many that I didn't even know where to start.
 

SDIO

Well-Known Member
Member
Joined
Feb 13, 2023
Messages
2,258
Trophies
0
Age
28
XP
1,376
Country
Germany
There is not much to it. It's just connecting the signals on the NAND AID to the ones on the card reader. Then you turn on the Wii U, wait 30 seconds or so and then connect the Cardreader. It should then show up on the PC as a SD card. Windows will ask you to format, but you say NO. If you format, everything is lost. Then you use Win32DiskImager, select cardreader and say Read.

Here is the original thread: https://gbatemp.net/threads/successfully-dumped-wiiu-emmc-nand-with-hardmod.457165/
 

ChefVortivask

Well-Known Member
OP
Member
Joined
Apr 3, 2023
Messages
337
Trophies
0
Age
26
XP
535
Country
United States
I think there was a misunderstanding. I'm already aware of how the dump is performed and know that it's fairly straightforward. What I was wondering about is that you said there were discussions of working card readers in a thread. I'm rereading that post and noticing that the thread you linked (which I've already read) is the one you must be referring to. Originally I thought you were referring to multiple threads, but I now believe that is not the case. Apologies for the confusion.

I think I'm going to try the dump on another laptop of mine that has a full sized SD card slot before I buy a card reader just to see if it works.
Post automatically merged:

Yeah I went back and reread the original post on that thread and it looks like I'm an idiot and missed the part where it catalogues working card readers. My mistake.
 

SDIO

Well-Known Member
Member
Joined
Feb 13, 2023
Messages
2,258
Trophies
0
Age
28
XP
1,376
Country
Germany
I would prefere laptop cardreaders over usb ones. At least in linux the laptop ones give the os os access on a much lower level, so you can see the errors in the kernel log and can also send discard commands and such. Same like the pi. The USB ones hide all that and just look like a generic usb mass storage device to the OS
 

V10lator

Well-Known Member
Member
Joined
Apr 21, 2019
Messages
2,635
Trophies
1
Age
36
XP
5,488
Country
Germany
if the laptop has linux
Live DVD/USB... I would suggest to use some Linux Live DVD/USB here. Not only cause it allows way more low-level control but also cause
tried the laptop card reader but it didn't work.
is a error description only Windows will give. Linux might show why it didn't work.
 

Site & Scene News

Popular threads in this forum

General chit-chat
Help Users
  • No one is chatting at the moment.
    SylverReZ @ SylverReZ: @OctoAori20, Cool. Same here.