Recently got an Xbox for cheap (hard drive and disc drive work), and figured out it is (maybe?) softmodded since it has a game save for UnleashX.
Now, I can't seem to boot into UnleashX (booted with eject button) so I'm thinking the original owner either fucked up the install, or removed it entirely.
I've also tried booting Rocky5's Extras disc (which I thought previously was a waste of time), and turns out I was right. No boot - just errors.
From what I've gathered so far, the Xbox seems to be pretty much stock now and it might be a giant fucking waste of time trying to get this "UnleashX" working, but I'd like someone to prove me wrong.
Hello to the mods allowing Original Xbox-specific topics in the Xbox 360 section
Have you tried rebuilding the HDD with FATXplorer Beta? What I did was copy the partition files from the OGXBox Installer Disc and imported them to the HDD. A modchip like an OpenXenium or Aladdin works out too.
Good thing I know you from the XBOX-SCENE Discord.
Have you tried rebuilding the HDD with FATXplorer Beta? What I did was copy the partition files from the OGXBox Installer Disc and imported them to the HDD. A modchip like an OpenXenium or Aladdin works out too.
Good thing I know you from the XBOX-SCENE Discord.
Unfortunately, I don't have a working computer with an IDE port (the only one I have has a dead power supply?) otherwise I would've just done the hotswap softmod.
I also don't have a ton of money to spend on this thing. It has already costed me $35 just to get the console and controller, so I'd like to avoid this thing becoming the typical money pit it typically is.
Fair enough. I suppose snagging up a cheap $5 IDE to USB adapter wouldn't be a bad investment. I don't suggest the supplied AC adapter but rather grab the power from the Xbox. Or you could perhaps burn DarkDestiny's OGXbox Installer Disc and rebuild the HDD that way if you're not wanting to risk buying an adapter for this very purpose.
AFAIK If the system is stock, the HDD will be locked anyway so you can't access it without a key/bios dump.
Double check the other saves to see if there may be an exploit already installed e.g. Ndure. Otherwise easiest option may be to either make/buy a cable to softmod it or install a modchip.
Also, remember to check the model in case the clock capacitor needs removing.
I don't know if your console is one you can TSOP flash but you should do that.
Doing that lets you load up a modchip BIOS and ensures that if the hard drive goes bad, you can easily replace it and reinstall the OG dashboard along with a modded dashboard without needing the hard drive to be locked.
It's also quite easy to dump the eeprom.bin file using a rp2040. You can use ArduinoProm and use Arduino IDE to convert it to a RP2040 image. 3 wires to attach to the xbox after that and takes less than a second to dump. This is how I was able to dump mine.
Fair enough. I suppose snagging up a cheap $5 IDE to USB adapter wouldn't be a bad investment. I don't suggest the supplied AC adapter but rather grab the power from the Xbox. Or you could perhaps burn DarkDestiny's OGXbox Installer Disc and rebuild the HDD that way if you're not wanting to risk buying an adapter for this very purpose.
Bought an IDE to SATA adapter from AliExpress (the small one with tantalum capacitors and a host/slave jumper), it should be coming within the next month or 2.
AFAIK If the system is stock, the HDD will be locked anyway so you can't access it without a key/bios dump.
Double check the other saves to see if there may be an exploit already installed e.g. Ndure. Otherwise easiest option may be to either make/buy a cable to softmod it or install a modchip.
Also, remember to check the model in case the clock capacitor needs removing.
I'm not worried about the clock capacitor since it's a bitch to take apart because of the top shell. I'd rather just do that all at once when I get my SATA to IDE adapter
Yep, pretty much what I'll be doing once I get my IDE to SATA adapter. Although I'll be ditching the original IDE hard drive altogether since it won't be necessary anymore.
I don't know if your console is one you can TSOP flash but you should do that.
Doing that lets you load up a modchip BIOS and ensures that if the hard drive goes bad, you can easily replace it and reinstall the OG dashboard along with a modded dashboard without needing the hard drive to be locked.
It's a v1.0 or v1.1 (haven't really narrowed it down yet), so it should be able to TSOP. But I'd rather not TSOP and just go with a modchip at that point.
It's also quite easy to dump the eeprom.bin file using a rp2040. You can use ArduinoProm and use Arduino IDE to convert it to a RP2040 image. 3 wires to attach to the xbox after that and takes less than a second to dump. This is how I was able to dump mine.
I'm not worried about the clock capacitor since it's a bitch to take apart because of the top shell. I'd rather just do that all at once when I get my SATA to IDE adapter
Didn't know it could work with USB adapters, but then I never had any success with it when I tried and that was with an old Slot 1 IDE system. I ended up just getting a cheap MC and usb adapter to softmod in the end.
But you absolutely should be concerned about the clock cap if it is a 1.0/1.1 because leaking capacitors can cause damage to the system, I'd say remove it sooner before it causes more work in the future.
Also, might be worth checking if you need to replace the IDE cable if you plan on replacing the HDD, it's something I've seen recommended, although with my replacement IDE drives I haven't had any issues but apparently SATA is more 'sensitive' and errors could occur.
I followed this guide to install all of the software: https://www.tomshardware.com/how-to/program-raspberry-pi-pico-with-arduino-ide
Then just loaded up arduino ide and plugged in my waveshare rp2040 so it would detect. Set it up with the appropriate com port loaded the ArduinoProm.ino file and uploaded it to the device. Had to double check in the config file which pins I had to use and once I wired it up, just dumped and flashed it using the python files and instructions provided with ArduinoProm.
EDIT: I also have the .uf2 file it created so you don't have to go through all of that. Just let me know and I can figure out a way to send it to you.
Got my el cheap-crap-o IDE to SATA adapter in yesterday.
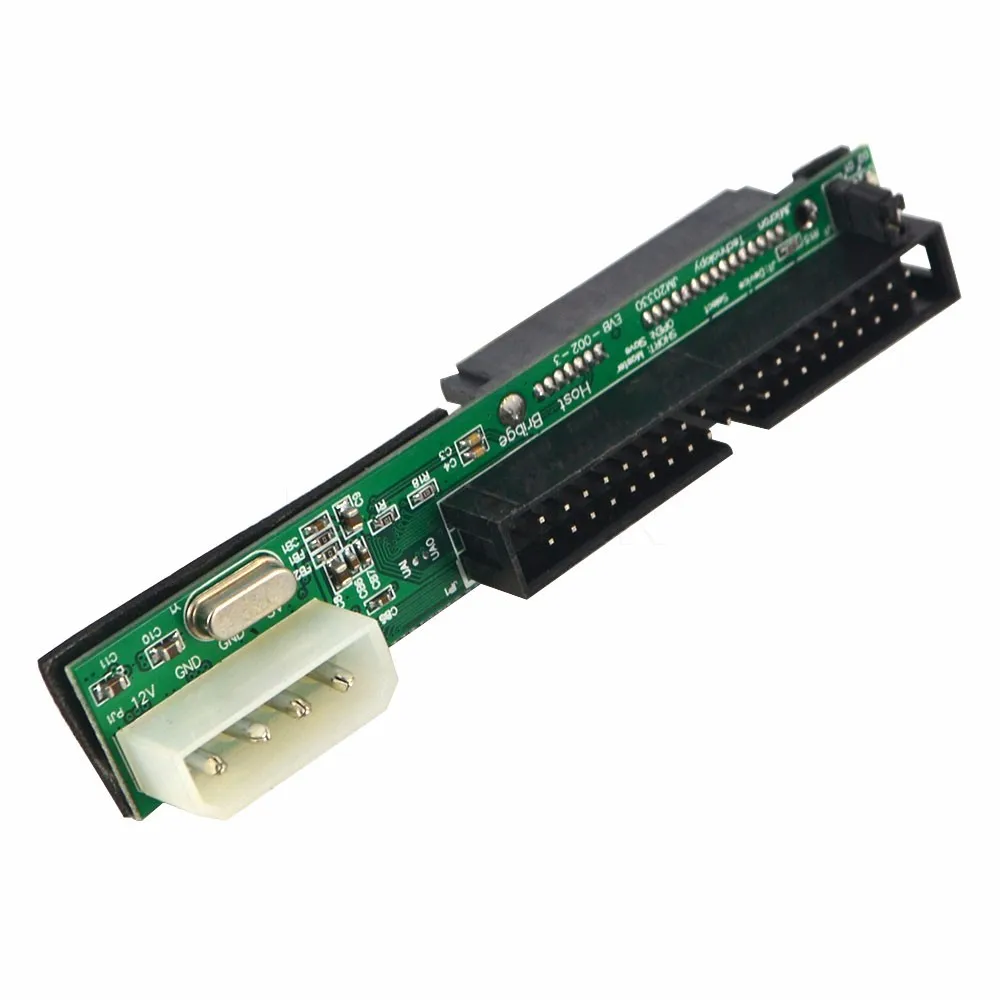
This adapter, specifically:
It's the cheap 2.5" IDE to SATA adapter with the JMicron chip. Has a single jumper for master / slave (jumped = master, not jumped = slave).
Following what @fringle said (using ArduinoPROM for RP2040 device), I got my EEPROM dumped after 3 hours of pure frustration.
I couldn't seem to get the Python script for ArduinoPROM to see my Raspberry Pi Pico despite doing everything as instructed.
Use Arduino IDE, install the RP2040 board plugin, compile and upload, wire it up to the Xbox, dump EEPROM. Seems simple, right? Yes and no.
First problem I ran into which was previously mentioned: Couldn't get ArduinoPROM's Python script to see my Raspberry Pi Pico. After multiple hours of trying different things (including switching wires on the Pico), I figured it out.
Turns out, the Raspberry Pi Pico has default pins for certain protocols. This meaning the Arduino library defaulted to those pins. Before this I tried re-configuring the pins in ArduinoPROM's
Code:
.ino
file, but this resulted in an "Unrecognized device" error in Device Manager after compiling and flashing.
So ultimately after realizing the Pico has default pins and whatever Arduino library it uses refuses to work properly, I wired it up, turned the Xbox on (they don't mention this - the Xbox has to be on while the EEPROM is dumped), and finally got the Python script to see my Pico.
This is what my wiring looked like:
Not the prettiest, but it certainly works temporarily.
If you're colorblind or overlooking things like I was, pin 6 is for I2C0 SDA and pin 7 is for I2C0 SCL. Both are the default pins for I2C0 if not configured. GND pins are common so it doesn't matter which are used. I2C is the protocol used for the EEPROM. I2C0 means it's on the RP2040's first I2C bus and I2C1 is for the second I2C bus.
This is important, because no other 2 pins will work. i.e. Meaning pins 1 and 2, or, 11 and 12, or, 16 and 17, or, 26 and 27, or 21 and 22, will NOT work unless you can somehow reconfigure it without errors.
I've attached a compiled
Code:
.uf2
of ArduinoPROM below, but BE WARNED. THIS IS FOR (genuine) RASPBERRY PI PICO SPECIFICALLY! IT WILL NOT WORK FOR ANY OTHER RP2040 BOARD!!
After dumping the EEPROM, I ran into yet ANOTHER issue. This time, the replacement SATA hard drive was in a "Disabled, frozen [SEC2]" state. Unplugging and plugging it back in did nothing. Even tried going into sleep mode and restarting the computer. Doing some research, apparently the BIOS (and/or - I kinda glossed over this) Windows 10 automatically locks hard drives so malicious programs cannot reprogram them. The SATA hard drive was connected directly into the motherboard.
So, after having to install Windows 7 on an entirely different computer (which took 3 hours, btw), I ran into yet another issue (the gift that keeps giving).
Turns out, that while FATXplorer 3.0 Beta does officially support Windows 7, it doesn't work out of the box - even after installing both 64-bit and 86-bit versions of .NET 7 Desktop Runtime. After running FATXplorer, it'd just refuse to open.
Installing Service Pack 2 helped some. Running FATXplorer wouldn't make it immediately exit like before, but it gave an error saying something wasn't installed. It was pretty late / early in the morning, so I don't exactly remember what it was whining about, but I think it was .NET Framework 4.8, but not entirely sure.
Finally in FATXplorer, I could see the SATA hard drive - and it's finally NOT in a "Disabled, frozen" state. After locking it with the HDD key from the dumped EEPROM, I could finally boot the Xbox into a dashboard with the SATA hard drive. Tried using the stock 40 wire IDE cable with the IDE to SATA adapter - No dice.
Now the hard drive is locked. And when plugging it back into my Windows 7 computer, it was no longer recognized as a hard drive. Intel Storage Manager saw it and was prompting for the key, but obviously that didn't work. FATXplorer didn't see it, partition manager didn't see it - Obviously this was going downhill pretty fast. Restarting didn't help because the BIOS was prompting for the key, too.
Plugging it back into my Windows 10 computer, it recognized the hard drive and was in a "Locked" state. After unlocking, I could finally use it again. And this time, the hard drive was no longer frozen even after unplugging and plugging it back in - for whatever reason.
Calling it a success, I went to sleep at nearly 7 in the morning.
After waking up and dicking around with it some more, I realized that what I wanted was no longer viable with the stock BIOS. Specifically not being able to use large hard drives (which I realize later on, is probably doable even softmodded). This meaning I had to TSOP... which is the very thing I didn't want to do in the first place....
For some reason, I couldn't solder the write enable points together with a blob of solder (would just roll away with the soldering iron) so I had to use spare wire.
It worked for the first point on top of the motherboard.
However, this didn't work out so well for the point on the bottom...
If you can't tell from the picture, one of the pads lifted completely off. At this point, I said fuck it and threw in a wire connecting them together using bigger alternative points.
After spending an hour or two researching how to TSOP, I came to the conclusion that EvolutionX is the easiest and simplest method without having to use up my scarce supply of blank CDs or DVDs. Using the Rocky5 soft mod disc I burnt in earlier posts, I installed EvolutionX. However... this didn't give me the result I want. Turns out, build 3935 of EvolutionX has the TSOP flash functionality. Great... it'd be nice if that was specifically mentioned in the certain guide I was following.*Cough* ConsoleMods.org
After installing Cerbios, I could finally set up the hard drive once again. Hopefully this time it was done properly.
Formatting the hard drive in FATXplorer with the Cerbios option, disabling the G partition and having the F partition use the rest of the space, I copied over a stock retail 5960 dashboard to start off with.
Little note / annoyance here, but Rocky5's source for the 5960 dashboard works and all, but doesn't have any sound effects in the dashboard or anything like that. I had to find a different source for the 5960 dashboard with the audio files and use that in conjunction with Rocky5's.
Using the Rocky5 disc, I installed the UIX dashboard. Works great and looks good without destroying the look of the original MS dashboard.
Installed a couple of XISO games and they worked as well. Putting the games into regular extracted folders would've worked, but I really didn't want to resort to this. Repackinator works, but not for all games. Had to use game folders for certain games because it wasn't in their database and it'd refuse to package as XISO.
After dicking around with Cerbios for an hour or two (longer than what was needed to be quite honest) with the stock 40 wire IDE cable with the SATA adapter, and flashing different versions specifically for UDMA 2; I realized it wasn't going to work at all and to cut my losses.
With the stock 40 wire IDE cable and SATA adapter, AND Cerbios in UDMA 2 (figured out
Code:
Cerbios Hybrid V2.3.1 BETA.bin
is always in UDMA 2...), it wouldn't work at all. Booting would throw errors including safe mode which does supposedly UDMA 2 too, but whatever. All in all it was not a fun time and several hours wasted trying different things to no avail.
Having everything setup, I started to clean up and put the Xbox back together. This is when the problems arise once again for the hundredth time.
The problem is the IDE cable.
I did some research beforehand and found a post on Reddit of someone moving the IDC to a different spot on the cable. They didn't go into specifics and theirs was a decent length of IDE cable. At least a little longer than what I have.
Unfortunately, I don't have pictures of it before the connector was moved, but it should give a pretty good idea of bad of an idea it is to use a cable like this.
A little under 17 inches factoring in it being scrunched up.
Moving the connector was the hard part. I ended up breaking the little tabs holding the support brace in.
Even being as careful as I could, pulling the connector apart eventually broke the tabs holding it together.
At this point, I said fuck it, no loss if I keep trying. (Mind you this is about 18 to 20 hours into the project.)
Threw the cable in the Xbox, mocked up how long it needed to be for the DVD drive, marked it with a permanant marker, and put the connector on the cable. Obviously since the tabs were broken, this thing isn't going back on perfectly all in one piece.
Another broken tab...
How fucked up the connector is after putting it back on.
Showing the angled bend coming from the motherboard to the disc drive.
Testing the franken-cable.
Don't mind it showing safe mode - I turned it on with the eject button.
Booted okay into the dashboard, which is a good sign meaning that the cable is still good one end to the other.
Inserted the Rocky5 softmod installer disc... and success! IDC transplant didn't ruin the entire cable!
Finally, everything is almost done without running into major issues.
Having to figure out where to bend the cable, I ran into a few issues. Nothing major like previous ones, but just a minor one. Mainly the IDE cable interfering with the shell fitting together because the IDE cable is not meant to be routed like this. (You can see where they stamped out a part of the RF shielding for the IDE cable on the top shell.)
Came up with this solution since it doesn't cover any screwholes nor those protruding plastic pieces holding the RF shield in on the top half of the housing.
I've come to the conclusion that all of this was a giant waste of time, money, and effort.
If I could've spent a little more money on a better IDE to SATA adapter instead of buying multiple of these el cheap-crap-o adapters, it wouldn't be picky about UDMA modes. In the same vein, spending the $10 on a cheap Aladdin would've avoided the TSOP problem entirely - but unfotunately had to cheap out on a lot of these parts because they aren't affordable and anything Xbox-related gets very expensive very quickly (ironically enough).
I did end up removing the clock capacitor since I had the board out for TSOP anyway. It was blown up, but the electrolytic fluid didn't seem to corrode anything.
The thermal paste for the CPU and GPU were replaced - albeit the GPU thermal paste was partially removed due to it turning into literal bubblegum after heating (couldn't take it all off since it melted into infinity). The CPU thermal paste came off like hard gum - it was pretty tough to remove without scratching the die but it did come off some after soaking in isoprophyl alcohol for a bit and gently scraping with a plastic spudger.
The thermal paste for the CPU and GPU were replaced - albeit the GPU thermal paste was partially removed due to it turning into literal bubblegum after heating (couldn't take it all off since it melted into infinity). The CPU thermal paste came off like hard gum - it was pretty tough to remove without scratching the die but it did come off some after soaking in isoprophyl alcohol for a bit and gently scraping with a plastic spudger.
Wd-40 will get the bubble gum off the cpu and gpu and heatsinks saturate a rag and scrub then it litterally comes up like butter, just clean behind that with 90% iso.
It does get pretty expensive. I first ordered a cheap adapter which resulted in not being able to use the dvd rom drive. Ended up ordering a startech adapter and still couldn't use the drive, turns out the 80 wire ide cable I got was also bad. After a replacement cable it all finally works as it should and was able to get cerbios UDMA 6 going with an SSD but still didn't work with the original adapter. I also installed an internal wii2hdmi. Still have two more xboxes to get setup up completely and will probably cut one down to a slim with no dvd drive using the cheap adapter.
Got my replacement 24-inch 80-wire IDE cable in today. It's a cheap one from China and actually pretty poor quality. One of the plastic pieces on the connector (not the part holding the wires in) of the IDE cable broke off and the wires feel like they're rigid plastic instead of like the old cable's material. I'm thinking it's a downgrade compared to the 18-inch 80-wire IDE cable before and might swap it back in.
Since I had the Xbox open, I figured it was a good time to experiment with Cerbios UDMA modes.
Had to FTP EvolutionX and Cerbios files to the old IDE hard drive as a backup in case the higher UDMA modes didn't play nice with the cheap IDE to SATA adapter.
Started with Cerbios v2.3.1 Beta UDMA 6 (configured through CerbiosTool) and it surprisingly works. Also tested UDMA 5 and 4 with the same BIOS and had no issues. All 4 modes (2, 4, 5 and 6) still take 50 seconds to cold boot, but I don't have any problems with that. I don't have any game discs to test with, but the Rocky5 softmod disc seems to work even with the disc drive connected.
So in conclusion, the cheap IDE to SATA adapter works with (Cerbios) UDMA 4/5/6 connected to 80 wire IDE cable. I didn't test this thoroughly so it may not be completely conclusive.
For reference, this is the IDE to SATA adapter I have:
Wd-40 will get the bubble gum off the cpu and gpu and heatsinks saturate a rag and scrub then it litterally comes up like butter, just clean behind that with 90% iso.
It does get pretty expensive. I first ordered a cheap adapter which resulted in not being able to use the dvd rom drive. Ended up ordering a startech adapter and still couldn't use the drive, turns out the 80 wire ide cable I got was also bad. After a replacement cable it all finally works as it should and was able to get cerbios UDMA 6 going with an SSD but still didn't work with the original adapter. I also installed an internal wii2hdmi. Still have two more xboxes to get setup up completely and will probably cut one down to a slim with no dvd drive using the cheap adapter.
I was actually about to get one of those adapters you have because it has tantalum capacitors instead of the electrolytic caps version (they use cheap crap caps) but realized it has no host/slave jumper and didn't want to chance it.
One of the plastic pieces on the connector (not the part holding the wires in) of the IDE cable broke off and the wires feel like they're rigid plastic instead of like the old cable's material.
That is kind of what happened to the cable that wouldn't work for me. While attempting try different configurations and drives the middle connector completely broke off. I'm still able to use the end connectors though so may just use it with the adapter that doesn't support a the DVD rom in the slim build I'm going to make eventually.
That is kind of what happened to the cable that wouldn't work for me. While attempting try different configurations and drives the middle connector completely broke off. I'm still able to use the end connectors though so may just use it with the adapter that doesn't support a the DVD rom in the slim build I'm going to make eventually.
I know what you mean. These newer IDE cables just don't seem as flexible as the older ones. They use to be able to take a beating but these newer ones just seem brittle and if you bend them the wrong way they're done.
I know what you mean. These newer IDE cables just don't seem as flexible as the older ones. They use to be able to take a beating but these newer ones just seem brittle and if you bend them the wrong way they're done.
Thought about making them myself instead of buying them, but it's very expensive for it to be worth it and even then it's not cost efficient. A 100+ foot roll and 80 wire 40 pin connectors (different from the regular connectors) makes it cheaper in terms of bulk cost, but way more expensive than other 80 wire IDE cables. Not cost efficient.
Fair enough. I suppose snagging up a cheap $5 IDE to USB adapter wouldn't be a bad investment. I don't suggest the supplied AC adapter but rather grab the power from the Xbox. Or you could perhaps burn DarkDestiny's OGXbox Installer Disc and rebuild the HDD that way if you're not wanting to risk buying an adapter for this very purpose.
When I had to access my hdd I used the $5 special and power from the Xbox but found the Xbox would turn itself off after a couple minutes ( due to and I'm assuming here, not detecting the hdd ) is there a way around that?
Sony made a shocking announcement today, revealing that the company plans to move away from physical game releases in the future. Citing claims of how the industry is...
After much speculation, a lot of which being caused by dbrand's unceremonious reveal of their Companion Cube casing, the Steam Machine is finally available to order...
What once seemed like a far off dream, and after many, many community restarts throughout the years, the elusive Mother 1 / EarthBound Beginnings Remake, which is a...
Since being decompiled Super Mario 64 has seen a considerable amount of interest. We've had multiple PC ports, but the efforts beyond that are really astounding. It's...
Remember when you could get an Xbox Series S for $300? Those were the days. Microsoft has today announced the latest in their console price hikes, seeing their...
Happy June 15th! Well, this one was close enough. Atmosphere has been updated to add support for the latest Nintendo Switch firmware, 22.5.0. This means all of you...
The delays may be behind us, but the news isn't all good for Grand Theft Auto VI. Rockstar have today announced that pre-orders for the game will go live tomorrow, on...
It's that time again. Batten down the hatches and ride out the storm, because we've got another Switch update! And Switch 2, but that's somewhat less impactful given...
After being announced earlier this month, the first early access release for Pokemon Infinite Fusion 2: Hoenn is now live. This first release includes the first two...
Last month we got confirmation of a new model of Switch 2 to better comply with upcoming EU regulations. With the legislation set to come into effect in February of...
Sony made a shocking announcement today, revealing that the company plans to move away from physical game releases in the future. Citing claims of how the industry is...
After much speculation, a lot of which being caused by dbrand's unceremonious reveal of their Companion Cube casing, the Steam Machine is finally available to order...
Remember when you could get an Xbox Series S for $300? Those were the days. Microsoft has today announced the latest in their console price hikes, seeing their...
The delays may be behind us, but the news isn't all good for Grand Theft Auto VI. Rockstar have today announced that pre-orders for the game will go live tomorrow, on...
Last month we got confirmation of a new model of Switch 2 to better comply with upcoming EU regulations. With the legislation set to come into effect in February of...
The end has come for the PlayStation 3 and the PlayStation Vita. After supporting the PSN Store on the PS3 and PS Vita since 2006 and 2011 respectively, Sony has...
Since being decompiled Super Mario 64 has seen a considerable amount of interest. We've had multiple PC ports, but the efforts beyond that are really astounding. It's...
What once seemed like a far off dream, and after many, many community restarts throughout the years, the elusive Mother 1 / EarthBound Beginnings Remake, which is a...
Apple have today announced price increases, primarily focused on their MacBook and iPad lines. These increases have already come into effect, with both prices and the...
It's that time again. Batten down the hatches and ride out the storm, because we've got another Switch update! And Switch 2, but that's somewhat less impactful given...


")


 *Cough*


