Hacking switch died after installing modchip, and I need help

Argoneon

Member
OP
Newcomer
Joined
Oct 22, 2023
Messages
8
Trophies
0
Age
26
XP
31
Country
Korea, South
After I installed a rp2040 hwfly clone to my switch (mariko), my switch fails to start.

What I mean by 'fails to start' is that device's screen is not turning on at all, no initial fan spin, and no response to any input.

At first I thought the modchip was bad, so I removed everything and tried to boot without the modchip. It still couldnt start.

For now, I just reassembled everything back, including modchip, and closed the cover, just to prevent unwanted damage while storing.

What I tried:
1. power button pressing for 20s - no response
2. connecting to the dock - the dock started to make ticking sound right after the device is connected. while ticking, power led blinks rapidly as well, and the device still was not able to start.
3. connecting usb-c power directly to the device - small ticking sound comes from fan ducts. device fails to start.

I am not electronics expert, so I couldnt get these all well, but according to this link, there could some short circuit happend while I was soldering.

The link:
Nintendo Switch not turning on/charging after sitting for almost a year. I’ve tried resets, power cycling, and even replaced the battery. All I get is a faint “ticking” sound from the speakers. Any ideas? : r/consolerepair -

Anyone knows about this symptom? and what can I do next?
 

Stidwack

Active Member
Newcomer
Joined
Aug 30, 2023
Messages
25
Trophies
0
Age
32
XP
243
Country
United States
Sounds like you need to bust out a multimeter and test your solder points for shorts. Can you post pictures of your work?
 

Argoneon

Member
OP
Newcomer
Joined
Oct 22, 2023
Messages
8
Trophies
0
Age
26
XP
31
Country
Korea, South
was it working before modchip install?
surely. I played ToTK until lately
Post automatically merged:

Sounds like you need to bust out a multimeter and test your solder points for shorts. Can you post pictures of your work?
I have no multimeter so what I can do is either to buy a multimeter and try it myself, or hire someone who can deal with circuit issue. I am thinking the second option right now, as I value more about my save files rather than money.
Post automatically merged:

Sounds like you need to bust out a multimeter and test your solder points for shorts. Can you post pictures of your work?
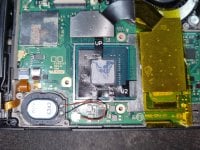
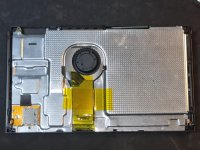
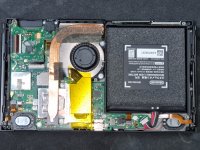
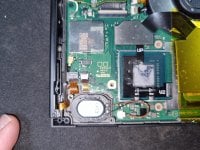
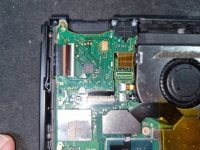
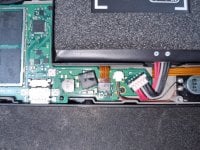
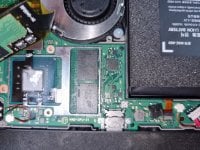
pictures here

1. shielded
1697969777942.jpg


2. before heatpipe removed
1697969777871.jpg


3. soldering bit focused
1697969778089.jpg


4. others
1697969778141.jpg

1697969778215.jpg

1697969778304.jpg

1697969778469.jpg
 

Attachments

  • 1697969778089.jpg
    1697969778089.jpg
    2.7 MB · Views: 30
  • 1697969777942.jpg
    1697969777942.jpg
    3.4 MB · Views: 25
  • 1697969777871.jpg
    1697969777871.jpg
    3.7 MB · Views: 28
  • 1697969778469.jpg
    1697969778469.jpg
    2.7 MB · Views: 27
  • 1697969778304.jpg
    1697969778304.jpg
    2.6 MB · Views: 27
  • 1697969778141.jpg
    1697969778141.jpg
    2.9 MB · Views: 25
  • 1697969778215.jpg
    1697969778215.jpg
    3 MB · Views: 25
Last edited by Argoneon,
  • Like
Reactions: Blythe93

icantfly

Well-Known Member
Newcomer
Joined
Dec 13, 2022
Messages
74
Trophies
0
Age
17
XP
543
Country
Portugal
did you disconnected battery before instaling?
maybe you broke a ribbon cable or not connected properly
 
Last edited by icantfly,

Argoneon

Member
OP
Newcomer
Joined
Oct 22, 2023
Messages
8
Trophies
0
Age
26
XP
31
Country
Korea, South
did you disconnected battery before instaling?
maybe you broke a ribbon cable or not connected properly
First, yes, I removed battery before installing.
But, since my soldering skill isn't that good, ribbon cable breaking still can happen.
I have no clue where it could happen, since, on my level of sight in pcb-work, I didn't make any mistake.
Based on my symptom, where do you think it happened?
 

Hassal

Well-Known Member
Member
Joined
Apr 22, 2023
Messages
561
Trophies
0
Age
24
XP
510
Country
United Arab Emirates
"I am not electronics expert..."

That says it all, you attempted something you have no expertise in and you pay the tax of being clueless.

Did you isolate your eMMC board from touching your modchip when you sandwiched the two? Usually when I used this chip I leave the latch of the bottom connector open so the daughterboard don't press down making contact to components it shouldn't be touching.
 
  • Angry
Reactions: Tom8823

Argoneon

Member
OP
Newcomer
Joined
Oct 22, 2023
Messages
8
Trophies
0
Age
26
XP
31
Country
Korea, South
Describe how you remove the Emmc module out from metal bracket.
And what color code did you see after you install modchip and trying to boot?
1. first I lift off the shielding from the motherboard, so resultedly I get emmc bond together with shield thing. Then I sled in a sheet of paper in between shielding and emmc to remove adhesive.
2. when power-on trial, didnt get any flashes.

but when I was flashing firmware, I got yellow ~ green light lit up once right after I dropped uf2, which means it is good.
firmware version was 2.73 btw.

I am 100% sure that modchip is alive.
As I said on the original thread, I uninstalled it once. And when I did that, I was doubting the modchip is bad.
I tried to reconnect it to the pc, flash-nuked it, and reflashed once again with 2.73.
All these steps worked as same as when I was doing preparation.
Post automatically merged:

"I am not electronics expert..."

That says it all, you attempted something you have no expertise in and you pay the tax of being clueless.

Did you isolate your eMMC board from touching your modchip when you sandwiched the two? Usually when I used this chip I leave the latch of the bottom connector open so the daughterboard don't press down making contact to components it shouldn't be touching.
yup, very much my skill issue. no excuses at all.

I didn't isolate that bit, but since the powering on didn't happen even before I closed up the lid, so it is very likely that emmc-modchip interference isn't the issue over here, I guess.

but you refreshed my mind.
I was doubting the cpu went bad, as the soldering is only done on it.
but now I am thinking, maybe emmc went bad somehow. maybe I scratched something when I was removing adhesive, or maybe some moisture dropped in to connector while I was not noticing it.
anyhow, now I am thinking maybe emmc has to be checked to test if it is alive.

luckily there is an emmc adapter sold in aliexpress. I'll buy it, and dump nand if it is alive, so that I can backup and restore saves afterwards when I get another cfw switch.
 
Last edited by Argoneon,

NuadaXXX

Well-Known Member
Member
Joined
Apr 7, 2016
Messages
140
Trophies
0
Location
NIRVANA
XP
791
Country
Gambia, The
It's hard to say what the problem is - you'll need a multimeter to figure it out.

One of my switches has the problem it starts only with mod chip, but OFW-(Online) and Emu-CFW works then flawless

but without chip, the switch is dead. (only black screen)

if you find nothing with a multimeter, maybe try another chip.
 
Last edited by NuadaXXX,

Argoneon

Member
OP
Newcomer
Joined
Oct 22, 2023
Messages
8
Trophies
0
Age
26
XP
31
Country
Korea, South
what just came in my mind is that, could it be the flux seep in between pcb and cpu, messes up lead that connects cpu to the board, so it ended up to my symptom?
in that case I need heatgun, reballing stencil and more dedicated skillset to soldering.
Post automatically merged:

back to rom dump topic

1. I can dump emmc with mmcblknx, but the resulting file will remain encrypted.
2. biskey cannot be acquired since my device is mariko: no rcm payload can be fed without modchip.
3. since biskey is missing, rawnand.bin cannot be decrypted and read by hacdiskmount
4. therefore, nand dump has no meaning other than verifying my nand module is alive.
5. there is no reason to buy mmcblknx.

I still have it in my mind that emmc might be damaged, however, it is very likely that either cpu lead balls or the ceramic capacitors on top of cpu went bad while soldering.
so I am actively searching pcb repair expert right now.
 
Last edited by Argoneon,

iiTzSamurai

Well-Known Member
Member
Joined
Oct 26, 2021
Messages
320
Trophies
0
Age
35
XP
1,250
Country
United States
The only thing you need to do is check your points with a multi meter. The fact you even attempted to boot the device without checking your readings could have damaged the apu which leaves you with a paper weight. No offense but you shouldn’t attempt any soldering on pcb without one.

With that said the chance of getting your switch fixed probably has something to do with the m92 chip once you check your readings and it still doesn’t boot
 

Argoneon

Member
OP
Newcomer
Joined
Oct 22, 2023
Messages
8
Trophies
0
Age
26
XP
31
Country
Korea, South
The only thing you need to do is check your points with a multi meter. The fact you even attempted to boot the device without checking your readings could have damaged the apu which leaves you with a paper weight. No offense but you shouldn’t attempt any soldering on pcb without one.

With that said the chance of getting your switch fixed probably has something to do with the m92 chip once you check your readings and it still doesn’t boot
As an knowledge I knew that I shouldnt, but I was overconfident about it. It looked too easy on every tutorial documents and video, so I misassumed the lack of my skillset.

I learnt a $300 + my 400hrs of totk playtime worth lesson.

Luckily, my switch never went into a cfw which means that my nintendo account has survived, unbanned. All my purchases are still valid.
More luckily, I 100% cleared all my last played games, so save lost isnt that critical.
Of course it feels bad by thinking few hundred hours of legit playing are gone, but I definitely have to value more about money rather than the save file, which will complicate the repair process obviously.

Im gonna search for any local pcb meister who calls $300 below for repair, other than that, I will just pick up some already-cfw-ed secondhand nintendo switch in the market.

In the meanwhile, since I found out that my PC is capable of running Yuzu in 200% speed while playing ToTK, I will just mess around with it. I have both switch and ToTK cartridge, physically, so I shouldnt be too worried about piracy issue, I guess?

Anyways, thanks for you all for the help and advices.
 
Last edited by Argoneon,

damex

Member
Newcomer
Joined
Dec 6, 2016
Messages
11
Trophies
0
XP
129
Country
Serbia, Republic of
surely. I played ToTK until lately
Post automatically merged:


I have no multimeter so what I can do is either to buy a multimeter and try it myself, or hire someone who can deal with circuit issue. I am thinking the second option right now, as I value more about my save files rather than money.
Post automatically merged:


pictures here

1. shielded
View attachment 400515

2. before heatpipe removed
View attachment 400516

3. soldering bit focused
View attachment 400517

4. others
View attachment 400518
View attachment 400519
View attachment 400520
View attachment 400521
i can see on this photo 1697969778469.jpg that two flex cables (one from display and one from joycon) is not seated properly. one that is from display would not let 'console boot' as in 'you will not see what is going on' and i am not sure beyond that. accidentally didn't connect that one properly on my switch after recent disassembly and at first had malfunctioning touch zone and 'non bootable console' reconnecting that flex properly fixed it for me. might not be the case here.
 

Argoneon

Member
OP
Newcomer
Joined
Oct 22, 2023
Messages
8
Trophies
0
Age
26
XP
31
Country
Korea, South
i can see on this photo 1697969778469.jpg that two flex cables (one from display and one from joycon) is not seated properly. one that is from display would not let 'console boot' as in 'you will not see what is going on' and i am not sure beyond that. accidentally didn't connect that one properly on my switch after recent disassembly and at first had malfunctioning touch zone and 'non bootable console' reconnecting that flex properly fixed it for me. might not be the case here.
thanks I will definitely try that
Post automatically merged:

i can see on this photo 1697969778469.jpg that two flex cables (one from display and one from joycon) is not seated properly. one that is from display would not let 'console boot' as in 'you will not see what is going on' and i am not sure beyond that. accidentally didn't connect that one properly on my switch after recent disassembly and at first had malfunctioning touch zone and 'non bootable console' reconnecting that flex properly fixed it for me. might not be the case here.

those two flex cables were seemingly misoriented but in fact they were well connected. I pulled it out and put it back, but the symptom stayed the same.

on the other hand, this chip looks ungood.
1699042522670.jpg


some sign of heated moisture? or something else is visible (I mean by not shiny surface, that is not visible in any other chips)

I dont know if this is the reason of the symptom, or result of the symptom, but at least that looks like a chip replacement is required.
 
Last edited by Argoneon,

queeflordcum

New Member
Newbie
Joined
Nov 5, 2023
Messages
1
Trophies
0
Age
19
XP
14
Country
United States
"I am not electronics expert..."

That says it all, you attempted something you have no expertise in and you pay the tax of being clueless.

Did you isolate your eMMC board from touching your modchip when you sandwiched the two? Usually when I used this chip I leave the latch of the bottom connector open so the daughterboard don't press down making contact to components it shouldn't be touching.
you dont need to be an ahole :)
 
  • Like
Reactions: Manaboy

gunbarrel

New Member
Newbie
Joined
Dec 5, 2023
Messages
1
Trophies
0
Age
26
XP
12
Country
United States
Looks like something got blown or took a lot of heat in the process of installing the modchip. Maybe that's the initial problem
 

eddz

Well-Known Member
Newcomer
Joined
Dec 4, 2023
Messages
53
Trophies
0
XP
117
Country
Australia
I recently did a chip (Instinct NX) install in the OLED switch. One rookie mistake which caused hours of grief was that I didn't put the OLED screen ribbon cable in fully (it felt like it was in fully, but there was a fraction of a mm still out). I suggest using IPA to clean the ribbon cable of fingerprints (if you've been touching it) and be sure to put pressure on it whilst flipping down the flap to lock it in place.
 

Manaboy

Well-Known Member
Newcomer
Joined
Dec 18, 2017
Messages
68
Trophies
0
Age
36
XP
247
Country
United Kingdom
Looked at your pics, mind you I've not got to instilling this chip as it was too inflated then life got in the way but check your Nand board? I've repaired many switches and without that board fully seated the switch will show no sign of life, have you tried booting into safe mode?
 
Last edited by Manaboy,

Site & Scene News

Popular threads in this forum

General chit-chat
Help Users
    K3Nv2 @ K3Nv2: People's funny bones are the same taste indeed