yep)do you prefer to solder directly on the EMMC that directly on the motherboard?
You are using an out of date browser. It may not display this or other websites correctly.
You should upgrade or use an alternative browser.
You should upgrade or use an alternative browser.
Staff Posts
Recent threadmarks
sharing files
Important Posts
Recent threadmarks
Firmwaresthanks , do you have the fil to produce the flat oled clk cmd etc
Yes, but so far only engineering samplesthanks , do you have the fil to produce the flat oled clk cmd etc
I'm not quite sure if they work
can send me file
Last edited by SQc04,
thanks
Can anyone tell me if the image scheme looks good?Hi guys, I salvaged the mosfet from an unused v1 flex cable and I need to install it into a Mariko switch.
According to a previous poster, it's a NP2016 mosfet (Here's the data sheet).
It has the same layout of the other more used mosfet and it looks a little bit weaker (but it was on the original flex cable, so I would assume it to still be plenty enough).
That said, considering that rehius himself said that single mosfet install to both caps should work without issues, does the attached scheme image make sense?
And assuming I don't short anything but the single mosfet is simply not enough will something bad happen or can I just desolder everything and wait for more mosfets?
Also, can I use simple epoxy to keep wires and components in place? UV resin would cost me a liver (bonus pic of the epoxy I got from the local electronics shop)
Thanks!
Is necessary bridge them? Or soldering in only one?
What do you mean by "directly"?
The Source must be connected to GND, which point is up to you, closer to the MOSFET is better.
Remember to use at least 0.2mm wire for Source and Drain connections.
Those 0.2mm are really hard to come by, I used 0.1mm but I got no diode reading. Could the small AWG be the cause? Wiring is good.
Hello everyone, I spent a week on instaiing picofly and finally decided to buy better flux and smaller tip.
It worked and I sucessfully loaded to hecate and atmosfere. Glitching in seconds. But my tools does not allow to solder all details beautifully.
A few things I learned from this install. I am not a profesional, so I may mistaken somewere.
1. Mosfet installation is really hard. If you are not professional at micro soldering and you do not wanna become him, better buy cable from ali. Save your time and effort.
2. I mistaken and bought 470k resistors instead 47R))) Luckily I found 100R resistors and it is worked. Do not make a mistake with it. It should have 470 numbers on it, not 472 or 471.
3. You can remove buttons and usb port on pico without soldering blow dryer(how to translate it to english?))
4. Better do not use enamel wires because if they stuck somewhere and glitch may not work. It was when I clamped it with heat pipe. Also it may wear out, so either fix it firmly or use single-core wires.
5. You can try alternative points on board instead emmc ones.
6. Do not work tired. I had everything installed and mounted as in the latst photo. The only problem I had was that it short-circuited with the lid closed. I tried to re-solder gnd and forgot to disable battery.If you installed pico, you may have noticed that a few seconds after the power was turned off, glitch occurred. At that time, I tried to solder the gnd, and in the end my mosfet burned out. The second time(yes i know, i am so dump). It smells unpleasant, and you will definitely notice it.
So every time you doing something disable battery cable!
Seems that all I wanted to said. Thanks for attention.
Also a few photos of my bad install. This is just to better understand what you will have to do.
1. Mosfet size. 2,3 Original pico vs chineese one. 4,5 CPU and mosfet. 6. Almos done install.
Attachments
-
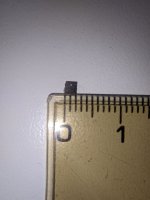 photo_2023-04-18_17-36-48.jpg110.9 KB · Views: 43
 -
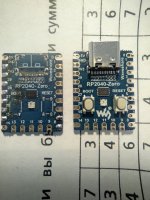 LMC_20230413_172913_lmc-tmhls_miatoll(noeis).jpg4.3 MB · Views: 47
 -
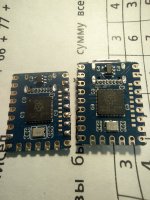 LMC_20230413_172934_lmc-tmhls_miatoll(noeis).jpg4.2 MB · Views: 35
 -
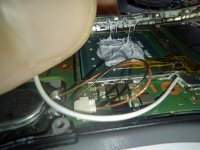 LMC_20230415_174739_lmc-tmhls_miatoll(noeis).jpg3.8 MB · Views: 40
 -
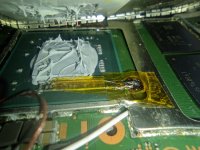 LMC_20230415_174748_lmc-tmhls_miatoll(noeis).jpg4.1 MB · Views: 38
 -
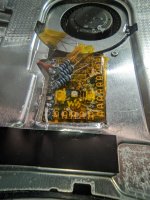 LMC_20230416_093941_lmc-tmhls_miatoll(noeis).jpg4.8 MB · Views: 35
reboot hekate menu OFW isn't it correct?the most correct way is to boot OFW (Vol+ & Vol- on the NO SD screen) then update the system in official way.
Post automatically merged:
rp2040 pulls the gate down, so it's safe to skip resistors unless you are going to remove the pico board without removing the mosfet later
Post automatically merged:
So direct soldering to the motherboard you don't recommend it and that's what I see most people doing the oppositeyep)
hekate - reboot OFW is the same as Vol+ & Vol-reboot hekate menu OFW isn't it correct?
hekate Full Stock boot option is also possible, but that is not "real" OFW boot
Congratunations for your courage to make it to the end even without experince. Everyone start from somewhere but you went to the deep at onceHello everyone, I spent a week on instaiing picofly and finally decided to buy better flux and smaller tip.
It worked and I sucessfully loaded to hecate and atmosfere. Glitching in seconds. But my tools does not allow to solder all details beautifully.
A few things I learned from this install. I am not a profesional, so I may mistaken somewere.
1. Mosfet installation is really hard. If you are not professional at micro soldering and you do not wanna become him, better buy cable from ali. Save your time and effort.
2. I mistaken and bought 470k resistors instead 47R))) Luckily I found 100R resistors and it is worked. Do not make a mistake with it. It should have 470 numbers on it, not 472 or 471.
3. You can remove buttons and usb port on pico without soldering blow dryer(how to translate it to english?))
4. Better do not use enamel wires because if they stuck somewhere and glitch may not work. It was when I clamped it with heat pipe. Also it may wear out, so either fix it firmly or use single-core wires.
5. You can try alternative points on board instead emmc ones.
6. Do not work tired. I had everything installed and mounted as in the latst photo. The only problem I had was that it short-circuited with the lid closed. I tried to re-solder gnd and forgot to disable battery.If you installed pico, you may have noticed that a few seconds after the power was turned off, glitch occurred. At that time, I tried to solder the gnd, and in the end my mosfet burned out. The second time(yes i know, i am so dump). It smells unpleasant, and you will definitely notice it.
So every time you doing something disable battery cable!
Seems that all I wanted to said. Thanks for attention.
Also a few photos of my bad install. This is just to better understand what you will have to do.
1. Mosfet size. 2,3 Original pico vs chineese one. 4,5 CPU and mosfet. 6. Almos done install.
 . One huge advice is always use flux. You soldering job seems like you have not used flux at all. With flux the whole job becomes much much easier!
Yeah, ordered good flux today. Used rosin flux before and it doesn't seem to help much.Congratunations for your courage to make it to the end even without experince. Everyone start from somewhere but you went to the deep at once. One huge advice is always use flux. You soldering job seems like you have not used flux at all. With flux the whole job becomes much much easier!
Where did you find such small single-core wires? This is the best I could find on Ali.32 AWG is 0.202 mm so it's good for picofly,
if you don't want to use the enamelled one
This is awesome!
ali have awg32Yeah, ordered good flux today. Used rosin flux before and it doesn't seem to help much.
Where did you find such small single-core wires? This is the best I could find on Ali.
Post automatically merged:
https://it.aliexpress.com/item/1005...vid=202304180841571634468859112480001315333_1
why?We do it in the cell phone repair industry a lot due to torn leads on the board. The chip on it's back kinda looks like a dead bugView attachment 365679
They mentioned because of torn leads on the board, but man, that BGA enamel wire job looks METICULOUS!why?
Similar threads
- Replies
- 5
- Views
- 2K
- Replies
- 2
- Views
- 757
- Replies
- 42
- Views
- 7K
Site & Scene News
New Hot Discussed
-
-
35K views
New static recompiler tool N64Recomp aims to seamlessly modernize N64 games
As each year passes, retro games become harder and harder to play, as the physical media begins to fall apart and becomes more difficult and expensive to obtain. The... -
30K views
Nintendo officially confirms Switch successor console, announces Nintendo Direct for next month
While rumors had been floating about rampantly as to the future plans of Nintendo, the President of the company, Shuntaro Furukawa, made a brief statement confirming... -
28K views
Name the Switch successor: what should Nintendo call its new console?
Nintendo has officially announced that a successor to the beloved Switch console is on the horizon. As we eagerly anticipate what innovations this new device will... -
16K views
DOOM has been ported to the retro game console in Persona 5 Royal
DOOM is well-known for being ported to basically every device with some kind of input, and that list now includes the old retro game console in Persona 5 Royal... -
15K views
Mario Builder 64 is the N64's answer to Super Mario Maker
With the vast success of Super Mario Maker and its Switch sequel Super Mario Maker 2, Nintendo fans have long been calling for "Maker" titles for other iconic genres... -
14K views
Anbernic reveals the RG35XXSP, a GBA SP-inspired retro handheld
Retro handheld manufacturer Anbernic has revealed its first clamshell device: the Anbernic RG35XXSP. As the suffix indicates, this handheld's design is inspired by... -
14K views
Majora’s Mask PC port 2Ship2Harkinian gets its first release
After several months of work, the Harbour Masters 64 team have released their first public build of 2Ship2Harkinian, a feature-rich Majora's Mask PC port. This comes... -
12K views
"Nintendo World Championships: NES Edition", a new NES Remix-like game, launching July 18th
After rumour got out about an upcoming NES Edition release for the famed Nintendo World Championships, Nintendo has officially unveiled the new game, titled "Nintendo...by ShadowOne333 78 -
12K views
Microsoft is closing down several gaming studios, including Tango Gameworks and Arkane Austin
The number of layoffs and cuts in the videogame industry sadly continue to grow, with the latest huge layoffs coming from Microsoft, due to what MIcrosoft calls a...by ShadowOne333 65 -
11K views
Ubisoft reveals 'Assassin's Creed Shadows' which is set to launch later this year
Ubisoft has today officially revealed the next installment in the Assassin's Creed franchise: Assassin's Creed Shadows. This entry is set in late Sengoku-era Japan...
-
-
-
325 replies
Name the Switch successor: what should Nintendo call its new console?
Nintendo has officially announced that a successor to the beloved Switch console is on the horizon. As we eagerly anticipate what innovations this new device will...by Costello -
235 replies
Nintendo officially confirms Switch successor console, announces Nintendo Direct for next month
While rumors had been floating about rampantly as to the future plans of Nintendo, the President of the company, Shuntaro Furukawa, made a brief statement confirming...by Chary -
141 replies
New static recompiler tool N64Recomp aims to seamlessly modernize N64 games
As each year passes, retro games become harder and harder to play, as the physical media begins to fall apart and becomes more difficult and expensive to obtain. The...by Chary -
99 replies
Majora’s Mask PC port 2Ship2Harkinian gets its first release
After several months of work, the Harbour Masters 64 team have released their first public build of 2Ship2Harkinian, a feature-rich Majora's Mask PC port. This comes...by Scarlet -
96 replies
Ubisoft reveals 'Assassin's Creed Shadows' which is set to launch later this year
Ubisoft has today officially revealed the next installment in the Assassin's Creed franchise: Assassin's Creed Shadows. This entry is set in late Sengoku-era Japan...by Prans -
88 replies
The Kingdom Hearts games are coming to Steam
After a little more than three years of exclusivity with the Epic Games Store, Square Enix has decided to bring their beloved Kingdom Hearts franchise to Steam. The...by Chary -
78 replies
"Nintendo World Championships: NES Edition", a new NES Remix-like game, launching July 18th
After rumour got out about an upcoming NES Edition release for the famed Nintendo World Championships, Nintendo has officially unveiled the new game, titled "Nintendo...by ShadowOne333 -
71 replies
DOOM has been ported to the retro game console in Persona 5 Royal
DOOM is well-known for being ported to basically every device with some kind of input, and that list now includes the old retro game console in Persona 5 Royal...by relauby -
66 replies
Select PlayStation 2 games are coming to PlayStation 5
Sony is once more attempting to reintroduce players to their older library of games by re-releasing classic PlayStation 2 titles onto the PlayStation Store. During...by Chary -
65 replies
Microsoft is closing down several gaming studios, including Tango Gameworks and Arkane Austin
The number of layoffs and cuts in the videogame industry sadly continue to grow, with the latest huge layoffs coming from Microsoft, due to what MIcrosoft calls a...by ShadowOne333
-
Popular threads in this forum
General chit-chat
-
 Maximumbeans
Loading…
-
-
-
-
-
-
-
-
-
-
-
-
-
-
-
 @
BigOnYa:
I played the intro to far cry 5, that is like some crazy Jim Jones cult shit. Still its petty damn good. You get to shot them crazy f ers.+1
 -
-
-
-
-
-
-
-
-
-


