

Make your own 3D images for N3DS (ENG & ESP)
i am the creator to these guide, i am spanish for these reason i had translator my guide using google, sorry for my errors.
Hi, I open this thread to make a guide on how to create and display 3D images with the Nintendo 3DS
how the 3d n3ds:
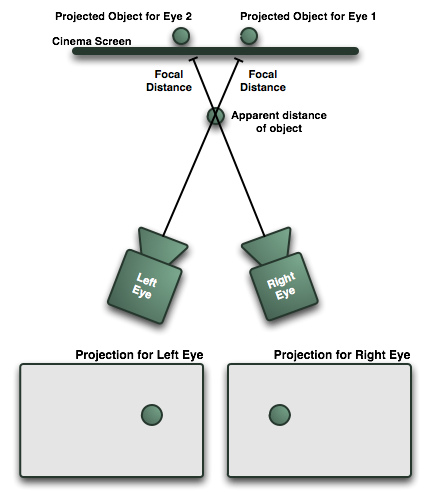
 the screen sends different images to each eye, similar to how we see reality, an eye go with a different angle to another that causes the brain to interpret a sense of depth
![estereograma[1].jpg](https://2.bp.blogspot.com/_2GfhNtOe-1g/SPngx9TPw1I/AAAAAAAABDc/n6BbVAsK-Qg/s1600/estereograma[1].jpg)
the screen works similarly to the next image, projecting each image with a different angle to each eye

like taking pictures stereoscopes
if we get better quality 3D images to the camera would need 3DS or a camera

or does not want to spend much money, make them with a camera you already have, or even mobile
how to take it them is:
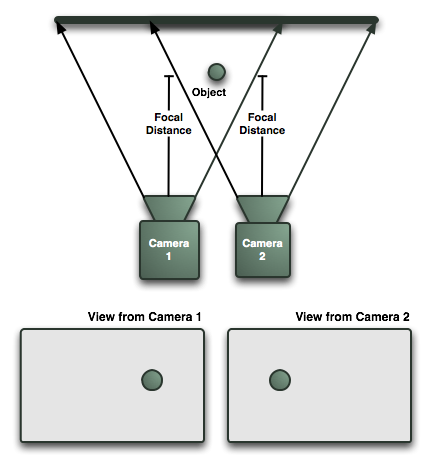
choose one or the other way to get the images depends on the distance, the number of objects that are intermediate and other parameters, it is best to move them both ways and see which do better, in my practice the first option is best provided that we approach a pivotal point in terms of depth.
do not forget that if you only have a camera, you can only take pictures of objects that do not move, otherwise the image will look bad or not well appreciated.
pictures will be as follows (two files each with one of these images and perspectives)
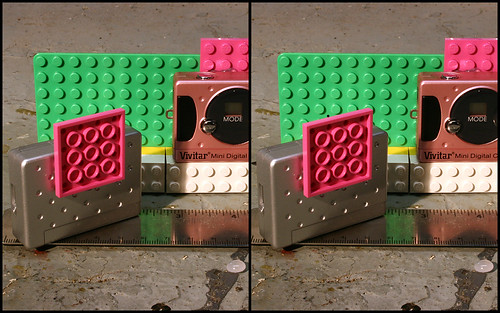
to get the images from left to right
program
There are several programs to join and create images. mpo or view it from your computer as anaglyph and so on, I use StereoPhoto maker
to create the image are loaded two pictures (file-> open left / right images ...) and creating burdens on the screen a couple of pictures one winged another. In the top menu you will see, before creating the. Mpo, as would, for this I usually see them in anaglipho and with red cyan 3D glasses. for that you give the icon that has many blue and red squares

if the image is not focused (the two images are too far apart) you click on the icon that says "auto" and you the self-aligning, if the menus frets notice that you can align them manually.
then you can change the resolution of the images to fit the screen size than the 3ds, using the "resize" whose icon is a square with arrows pointing inside to the outside (I choose 680 x 400)
keep playing. mpo, giving FILE-> save. mpo ... DSCF0410 name and place (changing the last numbers you have on your last card into the 3ds)
3D VIDEOS
as a curiosity, if you download a movie 3d (in my case IMAX documentaries) and view them you will see two moving images while recording with a different angle, because if you put a full screen, do a screen capture (key impr pa) open the same paint, paste the screenshot, save the image, and drag the icon to the program, you separate the two images and you can save. mpo and watch it on 3DS
images typical of a reef documentary
screenshot of the documentary

in anaglyph

http://www.megaupload.com/?d=N07SXP9W file. Mpo
is my first guide, if not well or have any doubts nothing more comment, constructive criticism welcome
ON SPANISH
Hi, I open this thread to make a guide on how to create and display 3D images with the Nintendo 3DS
how the 3d n3ds:
the screen works similarly to the next image, projecting each image with a different angle to each eye
like taking pictures stereoscopes
if we get better quality 3D images to the camera would need 3DS or a camera
or does not want to spend much money, make them with a camera you already have, or even mobile
how to take it them is:
choose one or the other way to get the images depends on the distance, the number of objects that are intermediate and other parameters, it is best to move them both ways and see which do better, in my practice the first option is best provided that we approach a pivotal point in terms of depth.
do not forget that if you only have a camera, you can only take pictures of objects that do not move, otherwise the image will look bad or not well appreciated.
pictures will be as follows (two files each with one of these images and perspectives)
to get the images from left to right
program
There are several programs to join and create images. mpo or view it from your computer as anaglyph and so on, I use StereoPhoto maker
to create the image are loaded two pictures (file-> open left / right images ...) and creating burdens on the screen a couple of pictures one winged another. In the top menu you will see, before creating the. Mpo, as would, for this I usually see them in anaglipho and with red cyan 3D glasses. for that you give the icon that has many blue and red squares
if the image is not focused (the two images are too far apart) you click on the icon that says "auto" and you the self-aligning, if the menus frets notice that you can align them manually.
then you can change the resolution of the images to fit the screen size than the 3ds, using the "resize" whose icon is a square with arrows pointing inside to the outside (I choose 680 x 400)
keep playing. mpo, giving FILE-> save. mpo ... DSCF0410 name and place (changing the last numbers you have on your last card into the 3ds)
3D VIDEOS
as a curiosity, if you download a movie 3d (in my case IMAX documentaries) and view them you will see two moving images while recording with a different angle, because if you put a full screen, do a screen capture (key impr pa) open the same paint, paste the screenshot, save the image, and drag the icon to the program, you separate the two images and you can save. mpo and watch it on 3DS
images typical of a reef documentary
screenshot of the documentary

in anaglyph

http://www.megaupload.com/?d=N07SXP9W file. Mpo
is my first guide, if not well or have any doubts nothing more comment, constructive criticism welcome
ON SPANISH
hola, abro este hilo para hacer una guía sobre como crear imágenes 3d y visualizarlas con la nintendo 3DS
como funciona el 3d de la n3ds:
la pantalla envía imágenes distintas a cada ojo, similar a como vemos la realidad, un ojo ve con distinto angulo al otro lo que hace que el cerebro interprete una sensación de profundidad
la pantalla funciona de forma similar a la siguiente imagen, proyectando cada imagen con distinto angulo a cada ojo
como sacar fotografías estereoscopios
si queremos sacar imágenes 3d de mejor calidad a las de la cámara de la 3DS necesitaríamos o bien una cámara como esta
o bien si no queremos gastarnos tanto dinero, hacerlas con una cámara que ya tengas, o incluso con el móvil
la forma de sacarlas es la siguiente:

elegir uno u otro modo de sacar las imágenes depende de la distancia, de la cantidad de objetos que haya intermedios y demás parámetros, lo mejor es sacarlas de las dos maneras y ver cuales tienen mejor resultado, desde mi practica la primera opción es la mejor siempre que enfoquemos un punto central en cuanto a su profundidad.
no olvidéis que si solo se tiene una cámara, solo podrás sacar fotos a objetos que no se muevan de lo contrario la imagen se verá mal o no se apreciará bien.
las imagenes quedarán así(dos archivos cada uno con una de las siguientes imágenes y perspectivas)
sacar las imágenes de izquierda a derecha
programa
existen varios programas para unir las imágenes y crear el .mpo o visualizarlo desde el ordenador en forma anaglypha y demás, yo uso stereophoto maker

para crear la imagen se cargan las dos fotografias (file->open left/right images...) y las cargas creando en la pantalla un par de imágenes una alado de la otra. En el menú superior podrás ver, antes de crear el .mpo, como quedarían, para ello yo suelo ponerlas en anaglipho y verlas con unas gafas 3d cian rojo. para ello le das al icono que tiene muchos cuadraditos azules y rojos
si la imagen no esta bien enfocada(las dos imágenes están demasiado separadas) pulsas sobre el icono que pone "auto" y te las autoalinea, si trasteas mas por los menús observarás que puedes alinearlas manualmente.
a continuación podrás cambiar la resolución de las imágenes para adecuarlas al tamaño de la pantalla superior de la 3ds, mediante la opción "resize" cuyo icono es un cuadrado con flechas en el interior apuntando al exterior(yo elijo 680 x 400)
toca guardar el .mpo, dandole a FILE->save .mpo... y pon de nombre DSCF0410(cambiando los últimos números a los últimos que tengas en tu tarjeta SD en la 3ds)
VIDEOS 3D
como curiosidad, si te bajas una película 3d(en mi caso documentales del imax) y los visualizas verás dos imágenes en movimiento a la vez con distinto angulo de grabación, pues si los pones a pantalla completa, haces una captura de pantalla(tecla impr pa) abres el paint mismo, pegas la captura de pantalla, guardas la imagen, y arrastras el icono al programa, te separará las dos imágenes y podrás guardar el .mpo y verlo en la 3DS
imágenes propias de un documental de arrecifes
captura de pantalla del documental
en anaglifo
http://www.megaupload.com/?d=N07SXP9Wel archivo .mpo
es mi primera guía, si no está bien o tenéis dudas nada mas comentarla, criticas constructivas bien recibidas
pdt- en una pagina que son muy...vagos... hay peliculas y documentales en 3d estereoscopico
como funciona el 3d de la n3ds:
la pantalla funciona de forma similar a la siguiente imagen, proyectando cada imagen con distinto angulo a cada ojo
como sacar fotografías estereoscopios
si queremos sacar imágenes 3d de mejor calidad a las de la cámara de la 3DS necesitaríamos o bien una cámara como esta
o bien si no queremos gastarnos tanto dinero, hacerlas con una cámara que ya tengas, o incluso con el móvil
la forma de sacarlas es la siguiente:
elegir uno u otro modo de sacar las imágenes depende de la distancia, de la cantidad de objetos que haya intermedios y demás parámetros, lo mejor es sacarlas de las dos maneras y ver cuales tienen mejor resultado, desde mi practica la primera opción es la mejor siempre que enfoquemos un punto central en cuanto a su profundidad.
no olvidéis que si solo se tiene una cámara, solo podrás sacar fotos a objetos que no se muevan de lo contrario la imagen se verá mal o no se apreciará bien.
las imagenes quedarán así(dos archivos cada uno con una de las siguientes imágenes y perspectivas)
sacar las imágenes de izquierda a derecha
programa
existen varios programas para unir las imágenes y crear el .mpo o visualizarlo desde el ordenador en forma anaglypha y demás, yo uso stereophoto maker
para crear la imagen se cargan las dos fotografias (file->open left/right images...) y las cargas creando en la pantalla un par de imágenes una alado de la otra. En el menú superior podrás ver, antes de crear el .mpo, como quedarían, para ello yo suelo ponerlas en anaglipho y verlas con unas gafas 3d cian rojo. para ello le das al icono que tiene muchos cuadraditos azules y rojos
si la imagen no esta bien enfocada(las dos imágenes están demasiado separadas) pulsas sobre el icono que pone "auto" y te las autoalinea, si trasteas mas por los menús observarás que puedes alinearlas manualmente.
a continuación podrás cambiar la resolución de las imágenes para adecuarlas al tamaño de la pantalla superior de la 3ds, mediante la opción "resize" cuyo icono es un cuadrado con flechas en el interior apuntando al exterior(yo elijo 680 x 400)
toca guardar el .mpo, dandole a FILE->save .mpo... y pon de nombre DSCF0410(cambiando los últimos números a los últimos que tengas en tu tarjeta SD en la 3ds)
VIDEOS 3D
como curiosidad, si te bajas una película 3d(en mi caso documentales del imax) y los visualizas verás dos imágenes en movimiento a la vez con distinto angulo de grabación, pues si los pones a pantalla completa, haces una captura de pantalla(tecla impr pa) abres el paint mismo, pegas la captura de pantalla, guardas la imagen, y arrastras el icono al programa, te separará las dos imágenes y podrás guardar el .mpo y verlo en la 3DS
imágenes propias de un documental de arrecifes
captura de pantalla del documental
en anaglifo
http://www.megaupload.com/?d=N07SXP9Wel archivo .mpo
es mi primera guía, si no está bien o tenéis dudas nada mas comentarla, criticas constructivas bien recibidas
pdt- en una pagina que son muy...vagos... hay peliculas y documentales en 3d estereoscopico


