

You are using an out of date browser. It may not display this or other websites correctly.
You should upgrade or use an alternative browser.
You should upgrade or use an alternative browser.


You can use any connector you want, but whatever you do don't connect the hard mod cable directly to a USB port. The voltage is too high and it will burn out the NAND chip.

You can use any connector you want, but whatever you do don't connect the hard mod cable directly to a USB port. The voltage is too high and it will burn out the NAND chip.
Ok so solder the wires from the PCB to the USB port, then solder the male end of the USB port to the microSD card adapter right? Or is that exactly what you meant by directly to the USB port lol?

If you don't want a permanent hardmod, you can have the wires directly to the SD adapter. (straight from the mainboard)
If you want it to be permanent then use whatever you have.
But a USB port will be really big that is why the use of microUSB (or miniUSB which I use)
Check this to see what I've done on my N3DSXL:
https://gbatemp.net/threads/tutoria...s-xl-n3ds-n3ds-xl.414498/page-67#post-6674481
The issue Mashers was talking about is you must never connect a USB source to the port (from USB charger or PC) because it will put 5V to the NAND, frying it.
If it's your console, no problem but if anyone grabs it and doesn't know, there might be a problem.
Yes that's correct. NAND chip goes to USB female, USB male goes to microSD adapter, microSD adapter goes in SD card reader, SD card reader connects to computer USB port.Ok so solder the wires from the PCB to the USB port, then solder the male end of the USB port to the microSD card adapter right? Or is that exactly what you meant by directly to the USB port lol?
And yes, when I said about not connecting it directly I meant don't do NAND chip to USB female and then USB male directly to computer USB port.
If you don't want a permanent hardmod, you can have the wires directly to the SD adapter. (straight from the mainboard)
If you want it to be permanent then use whatever you have.
But a USB port will be really big that is why the use of microUSB (or miniUSB which I use)
Check this to see what I've done on my N3DSXL:
https://gbatemp.net/threads/tutoria...s-xl-n3ds-n3ds-xl.414498/page-67#post-6674481
The issue Mashers was talking about is you must never connect a USB source to the port (from USB charger or PC) because it will put 5V to the NAND, frying it.
If it's your console, no problem but if anyone grabs it and doesn't know, there might be a problem.
I just dont know where to put the wires for a temporary hardmod. Like, when I close it I mean, to turn it on. I figure if I have to file a hole I might as well make it worth my time and add a port.

I just dont know where to put the wires for a temporary hardmod. Like, when I close it I mean, to turn it on. I figure if I have to file a hole I might as well make it worth my time and add a port.
Connect the wires to the board and then feed them through the hole of the stylus (On the back cover).
Connect the L and R buttons ribbons and close the back cover.
Test the console (without having the wires connected to anything to see if it is OK.)
Solder your frankenSD and test the console again (If everything is OK, the console will boot normally). If it errors with only the SD, you have to try with another SD adapter or check the solder in the SD.
I found it better to NOT having the wires too long.
Then test your SD card reader to see if you get the boot room.

I know right i fried my psp that i just bought with too high voltage... was last year. Opened it to fix fuse and broke motherboard in half somehow during disassembly...
Too high voltage sucks xD never even got to see my psp boot ever.
Be careful hardmodding i broke my 3ds doing that. I am good at opening and fixing PCs and laptops but when it comes to electronics like ds 3ds psp i am a failure.
Too high voltage sucks xD never even got to see my psp boot ever.
Be careful hardmodding i broke my 3ds doing that. I am good at opening and fixing PCs and laptops but when it comes to electronics like ds 3ds psp i am a failure.
Last edited by ironmaster49,
Connect the wires to the board and then feed them through the hole of the stylus (On the back cover).
Connect the L and R buttons ribbons and close the back cover.
Test the console (without having the wires connected to anything to see if it is OK.)
Solder your frankenSD and test the console again (If everything is OK, the console will boot normally). If it errors with only the SD, you have to try with another SD adapter or check the solder in the SD.
I found it better to NOT having the wires too long.
Then test your SD card reader to see if you get the boot room.
How do I get the wires from the back of the PCB to the stylus holder if it's on the back cover. Every picture I'm looking at of the points to solder to for the 2DS are on the front (back?) of the PCB... I have to flip it to solder to it. Is this correct or am I missing something?
^^^^ this is on the back (front? whatever) side of the PCB
EDIT: shit nevermind, I'm looking at it now and I see the little hole ._.
Last edited by stzy,
How do I get the wires from the back of the PCB to the stylus holder if it's on the back cover. Every picture I'm looking at of the points to solder to for the 2DS are on the front (back?) of the PCB... I have to flip it to solder to it. Is this correct or am I missing something?
^^^^ this is on the back (front? whatever) side of the PCB
EDIT: shit nevermind, I'm looking at it now and I see the little hole ._.
Oh, you're talking about a 2DS (damn I'm going blind).
The pinouts are on the other side of the board. You have to remove it completly, right above the "SLEEP" slider.
You can follow this guide.
If connecting the battery with the back plate removed, be ABSOLUTLY sure that you put it with the right + and - position or you'll fry the board).
https://pt.ifixit.com/Guide/Nintendo+2DS+Motherboard+Replacement/35842
Last edited by cravas,
Oh, you're talking about a 2DS (damn I'm going blind).
The pinouts are on the other side of the board. You have to remove it completly, right above the "SLEEP" slider.
You can follow this guide.
If connecting the battery with the back plate removed, be ABSOLUTLY sure that you put it with the right + and - position or you'll fry the board).
https://pt.ifixit.com/Guide/Nintendo+2DS+Motherboard+Replacement/35842
Thats the guide I was following actually and I just have to say, if anyone was thinking about following it, DO NOT. It's completely trash: he skips over some parts, wrong position of screws, has things on backwards in the photo so you don't know what's really going on. At one point he tries to tell you the camera lenses on the back are screws and they need to be unscrewed :/
Anyway I stripped one of the screws pretty badly so I think that's that for that. Gonna have to figure out a way to fix that.
Sorry to hear about the screw. But for it to happen maybe you have the wrong driver for it.
I use a Philips #00 but I know it's #000. What I do is press a bit from the top of the driver to give some downforce to the screw and rotate it.
But, yeah, it's really easy to damage them.
Good luck with it.
do you need an sd reader if your computer has one built in cause mine doesYes that's correct. NAND chip goes to USB female, USB male goes to microSD adapter, microSD adapter goes in SD card reader, SD card reader connects to computer USB port.
And yes, when I said about not connecting it directly I meant don't do NAND chip to USB female and then USB male directly to computer USB port.
You'll have to try it.do you need an sd reader if your computer has one built in cause mine does
Although haven't seen anyone saying they managed to make it work with in-built SD readers on PC (Mine didn't work also)
There is no harm in trying it, but it probably won't work. Only specific SD/MMC chipsets work with the 3DS NAND, which is why there are just a few recommended ones which are known to work.do you need an sd reader if your computer has one built in cause mine does
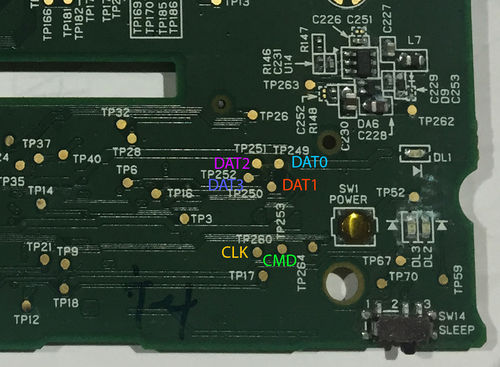
Can I actually just throw a blob of solder anywhere for GND or how does that work? I can't find any real examples on the web. Sorry for the noob question.
Use one of the solder blobs of either the SD reader or the SLOT 1:

Choose the best one for you.
Similar threads
- Replies
- 0
- Views
- 237
- Replies
- 0
- Views
- 494
- Replies
- 1
- Views
- 497
Site & Scene News
New Hot Discussed
-
-
25K views
Atmosphere CFW for Switch updated to pre-release version 1.7.0, adds support for firmware 18.0.0
After a couple days of Nintendo releasing their 18.0.0 firmware update, @SciresM releases a brand new update to his Atmosphere NX custom firmware for the Nintendo...by ShadowOne333 107 -
21K views
Wii U and 3DS online services shutting down today, but Pretendo is here to save the day
Today, April 8th, 2024, at 4PM PT, marks the day in which Nintendo permanently ends support for both the 3DS and the Wii U online services, which include co-op play...by ShadowOne333 179 -
17K views
GBAtemp Exclusive Introducing tempBOT AI - your new virtual GBAtemp companion and aide (April Fools)
Hello, GBAtemp members! After a prolonged absence, I am delighted to announce my return and upgraded form to you today... Introducing tempBOT AI 🤖 As the embodiment... -
13K views
The first retro emulator hits Apple's App Store, but you should probably avoid it
With Apple having recently updated their guidelines for the App Store, iOS users have been left to speculate on specific wording and whether retro emulators as we... -
13K views
Pokemon fangame hosting website "Relic Castle" taken down by The Pokemon Company
Yet another casualty goes down in the never-ending battle of copyright enforcement, and this time, it hit a big website which was the host for many fangames based and...by ShadowOne333 66 -
13K views
MisterFPGA has been updated to include an official release for its Nintendo 64 core
The highly popular and accurate FPGA hardware, MisterFGPA, has received today a brand new update with a long-awaited feature, or rather, a new core for hardcore...by ShadowOne333 54 -
13K views
Delta emulator now available on the App Store for iOS
The time has finally come, and after many, many years (if not decades) of Apple users having to side load emulator apps into their iOS devices through unofficial...by ShadowOne333 96 -
11K views
"TMNT: The Hyperstone Heist" for the SEGA Genesis / Mega Drive gets a brand new DX romhack with new features
The romhacking community is always a source for new ways to play retro games, from completely new levels or stages, characters, quality of life improvements, to flat...by ShadowOne333 36 -
10K views
Nintendo Switch firmware update 18.0.1 has been released
A new Nintendo Switch firmware update is here. System software version 18.0.1 has been released. This update offers the typical stability features as all other... -
10K views
Anbernic announces RG35XX 2024 Edition retro handheld
Retro handheld manufacturer Anbernic is releasing a refreshed model of its RG35XX handheld line. This new model, named RG35XX 2024 Edition, features the same...
-
-
-
179 replies
Wii U and 3DS online services shutting down today, but Pretendo is here to save the day
Today, April 8th, 2024, at 4PM PT, marks the day in which Nintendo permanently ends support for both the 3DS and the Wii U online services, which include co-op play...by ShadowOne333 -
169 replies
GBAtemp Exclusive Introducing tempBOT AI - your new virtual GBAtemp companion and aide (April Fools)
Hello, GBAtemp members! After a prolonged absence, I am delighted to announce my return and upgraded form to you today... Introducing tempBOT AI 🤖 As the embodiment...by tempBOT -
107 replies
Atmosphere CFW for Switch updated to pre-release version 1.7.0, adds support for firmware 18.0.0
After a couple days of Nintendo releasing their 18.0.0 firmware update, @SciresM releases a brand new update to his Atmosphere NX custom firmware for the Nintendo...by ShadowOne333 -
97 replies
The first retro emulator hits Apple's App Store, but you should probably avoid it
With Apple having recently updated their guidelines for the App Store, iOS users have been left to speculate on specific wording and whether retro emulators as we...by Scarlet -
96 replies
Delta emulator now available on the App Store for iOS
The time has finally come, and after many, many years (if not decades) of Apple users having to side load emulator apps into their iOS devices through unofficial...by ShadowOne333 -
96 replies
Nintendo takes down Gmod content from Steam's Workshop
Nintendo might just as well be a law firm more than a videogame company at this point in time, since they have yet again issued their now almost trademarked usual...by ShadowOne333 -
73 replies
Nintendo Switch firmware update 18.0.1 has been released
A new Nintendo Switch firmware update is here. System software version 18.0.1 has been released. This update offers the typical stability features as all other...by Chary -
66 replies
Pokemon fangame hosting website "Relic Castle" taken down by The Pokemon Company
Yet another casualty goes down in the never-ending battle of copyright enforcement, and this time, it hit a big website which was the host for many fangames based and...by ShadowOne333 -
54 replies
MisterFPGA has been updated to include an official release for its Nintendo 64 core
The highly popular and accurate FPGA hardware, MisterFGPA, has received today a brand new update with a long-awaited feature, or rather, a new core for hardcore...by ShadowOne333 -
53 replies
Nintendo "Indie World" stream announced for April 17th, 2024
Nintendo has recently announced through their social media accounts that a new Indie World stream will be airing tomorrow, scheduled for April 17th, 2024 at 7 a.m. PT...by ShadowOne333
-
Popular threads in this forum
General chit-chat
- No one is chatting at the moment.
-
-
-
-
-
-
-
-
-
-
-
-
-
 @
Psionic Roshambo:
32GBs is the baseline for 4K video editing these days and lots of recommendations for 64GBs but for games 16,GBs is honestly plenty for a long time.
@
Psionic Roshambo:
32GBs is the baseline for 4K video editing these days and lots of recommendations for 64GBs but for games 16,GBs is honestly plenty for a long time. -
-
-
-
-
-
-
-
-
-
@
Psionic Roshambo:
Some sort of police thing going on near me lol "Get out of the car with your hands up and walk backwards towards us" over a loud speaker thing
-
-
 like a 250 dollar kit back when DDR4 was Intel only