Tutorial
Updated
Trinket Internal Install.
Here's A Guide To Installing The Trinket M0 Into The Switch.
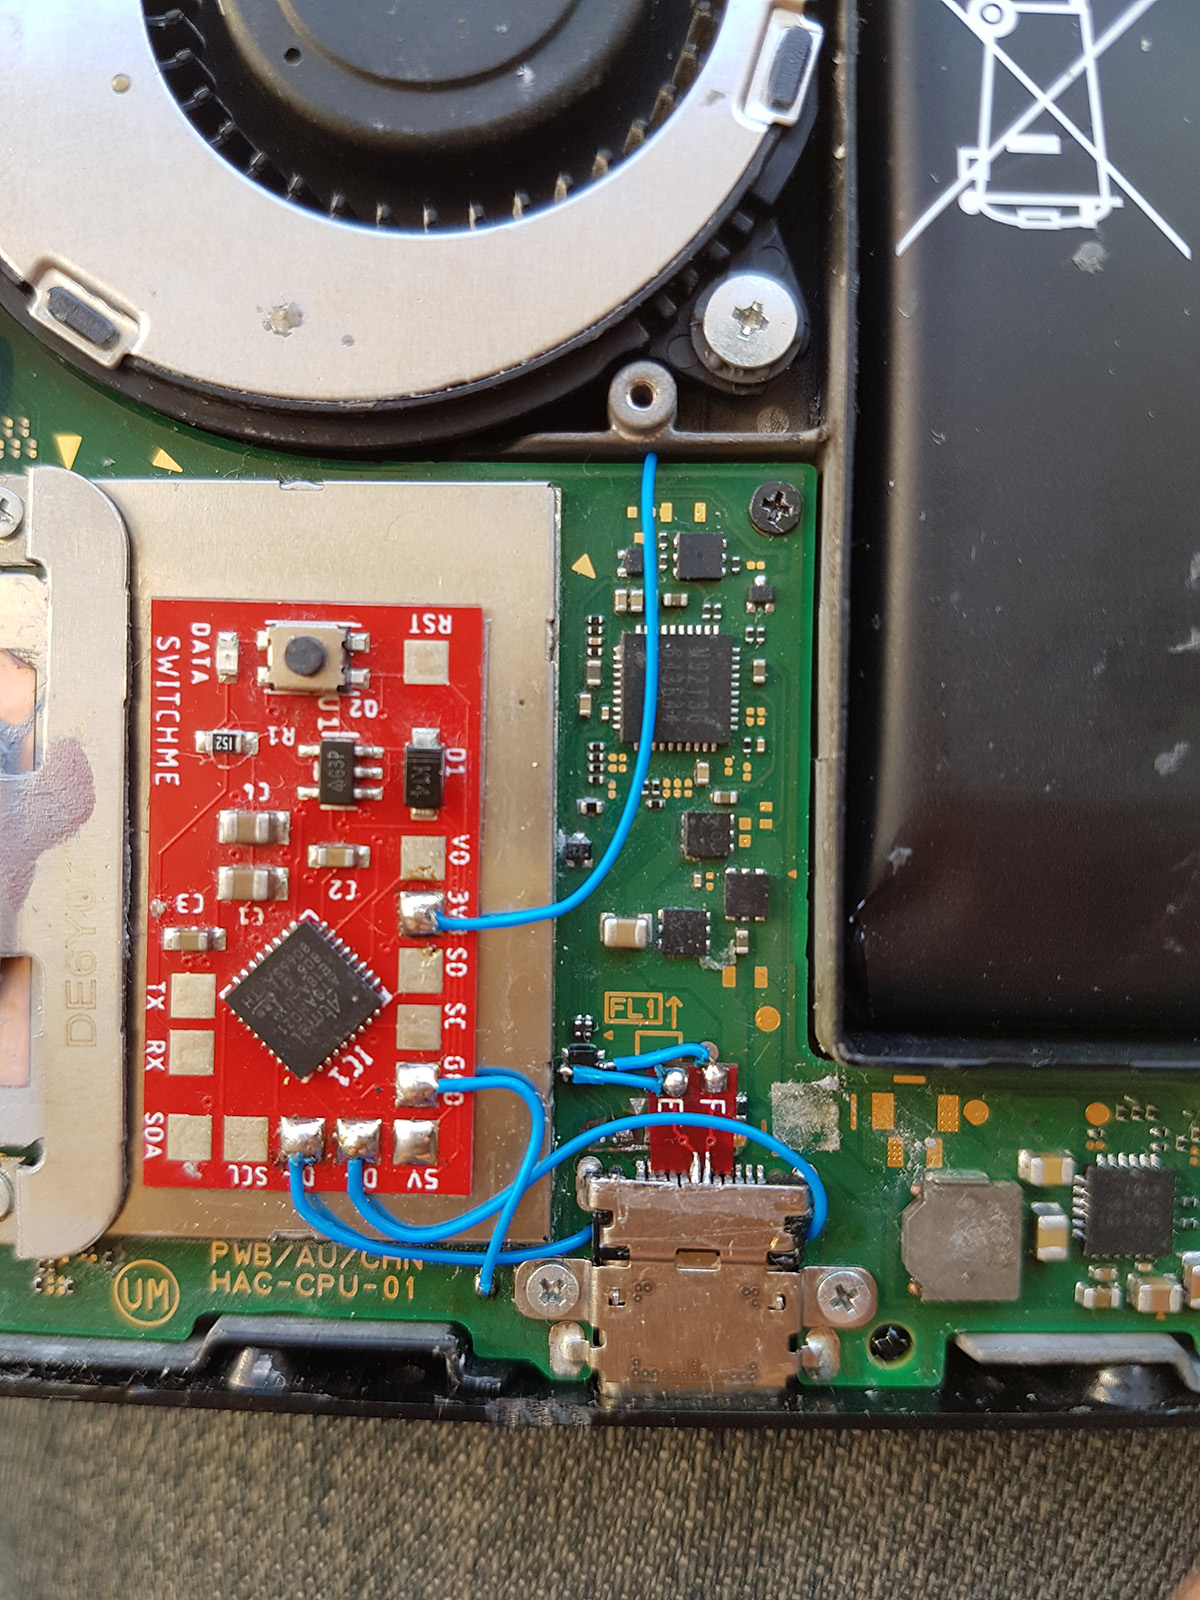
Program The Trinket Before You Remove The Usb Port, Saves You Doing It After You Complete The Install.
First Thing To Do Is Remove The Usb Port From The Trinket, If You Have A Hot Air Wand Then Use That To Remove The Port It Will Reduce The Risk Of Damage To The Pads.

Now That The Usb Port Has Been Removed You Want To Solder Wire To The Data Pads, White = Data- And Green Data+ In This Guide.
Now Solder Wire To The Bat Pad = Red, Gnd Pad = Black, Pad 4 = Orange & Pad 3 = Brown In This Guide.
Also Remove The Resistor Next To The Ppower Led Mark Out In Purple In This Guide.

When You Have The Trinket All Prepared, You Can Now Proceed To The Install To The Switch.

Once The Install Is Completely Done Then Clean Up The Points You Have Soldered To Using Isopropyl And Cotton Buds/Q-Tips.

Alternative Point For Pad 4.

Alternative Points For Joycon Rail Pin 10.
If You Decide On Using This Alternative Point Then Use Enamel Coated Jumper Wire 0.10mm.

Remember Take Your Time It's Not A Race lol. Rushing Can Lead To Mistakes.
Tools Required.
Kynar Wire 30 AWG.
Soldering Iron.
Hot Air Wand For Usb Port Removal(Optional)
Isopropyl.
Cotton Bud/Q-Tips.
Flux.
Solder.
Enamel Jumper Wire (Optional)
Thanks And Credit Goes To Xboxexpert For This Solution.
I Think That Covers Everything.
EDIT..
here's another method for the install of the trinket, this method does away with the pad 4, as some may find it tricky to solder to the cap used on the mobo.
the rst pad is used instead and the wire is linked to the power button, Also this has a bonus that you can double press the power button to put the trinket into boot loader mode for uploading a new payload.
of course you don't have to use the rst pad at all, you can't just press power button and volume up button, then press reset button for rcm mode.
this method should be ok for the novices.
install at your own risk.

the pad on the power button to use.

i have one more method to try but I really think this one is not to bad method.
the more methods the better I say, of course to try and make it as easy as possible for pros and novices.
EDIT...
another method for the install of the trinket.
this method is basically same as all other methods, just a different points uses for the bat pad and rst pad.
this install will allow you to have the trinket power off when you fully power off the switch.
double press the reset button on the trinket to get into boot loader mode, this may take a couple of attempts to do.
the payload that you use already will work with this method no need for new ones.
here's the diagram for method 3, you could possibly have this as a 4 wire install, if you install auto rcm mode, but as my sd card module port is buggerd I couldn't test that out.

ok it seems method 3 needs auto rcm installed for it to work without the need to use the rst pad
so for them that don't want to use auto rcm mode then solder a wire from rst pad to the point on the power button, and use pad 3 to the pin 10 on the joycon rail or one of the alt points on mobo.
beware the alt points are small so use at your own risk.
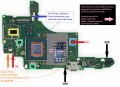
ok anyone with changing issues test these 2 points, you should get 5v on the usb port side, and around 3.2v on the switch side.
if your getting the volts on the switch side that are fluctuating up & down then replace the part with the v on top it's a diode, you want one that fits so the actual size is either 0402 or 0603 in dimension (i'm using 0402/0603 as an example for size purpose only)
around page 16 has more info about this component..
dont come moaning if you damage your console doing this install, i'm not responsible for you opening or taking a soldering iron to your console.
you do this at your own risk any damage is down to yourself.

another thing if your trinket starts to get very hot to the point you can't touch it, then the atmel ATSAMD21E18A-U ic is on it's way out, so you will need to replace the ic or just replace your trinket.
at some point it wont power up after this has happened.
1 = gets very hot.
2 = reset starts to become tempermental .
3 = dead
4 = fix replace the atmel ATSAMD21E18A-U ic
edit
added uf2 drag and drop files for r4 trinket gemma dongles or for a 4 wire internal install.
atmosphere
hekate 4.2
Sxos
rajnx
reinx
Program The Trinket Before You Remove The Usb Port, Saves You Doing It After You Complete The Install.
First Thing To Do Is Remove The Usb Port From The Trinket, If You Have A Hot Air Wand Then Use That To Remove The Port It Will Reduce The Risk Of Damage To The Pads.
Now That The Usb Port Has Been Removed You Want To Solder Wire To The Data Pads, White = Data- And Green Data+ In This Guide.
Now Solder Wire To The Bat Pad = Red, Gnd Pad = Black, Pad 4 = Orange & Pad 3 = Brown In This Guide.
Also Remove The Resistor Next To The Ppower Led Mark Out In Purple In This Guide.
When You Have The Trinket All Prepared, You Can Now Proceed To The Install To The Switch.
Once The Install Is Completely Done Then Clean Up The Points You Have Soldered To Using Isopropyl And Cotton Buds/Q-Tips.
Alternative Point For Pad 4.
Alternative Points For Joycon Rail Pin 10.
If You Decide On Using This Alternative Point Then Use Enamel Coated Jumper Wire 0.10mm.
Remember Take Your Time It's Not A Race lol. Rushing Can Lead To Mistakes.
Tools Required.
Kynar Wire 30 AWG.
Soldering Iron.
Hot Air Wand For Usb Port Removal(Optional)
Isopropyl.
Cotton Bud/Q-Tips.
Flux.
Solder.
Enamel Jumper Wire (Optional)
Thanks And Credit Goes To Xboxexpert For This Solution.
I Think That Covers Everything.
EDIT..
here's another method for the install of the trinket, this method does away with the pad 4, as some may find it tricky to solder to the cap used on the mobo.
the rst pad is used instead and the wire is linked to the power button, Also this has a bonus that you can double press the power button to put the trinket into boot loader mode for uploading a new payload.
of course you don't have to use the rst pad at all, you can't just press power button and volume up button, then press reset button for rcm mode.
this method should be ok for the novices.
install at your own risk.
the pad on the power button to use.
i have one more method to try but I really think this one is not to bad method.
the more methods the better I say, of course to try and make it as easy as possible for pros and novices.
EDIT...
another method for the install of the trinket.
this method is basically same as all other methods, just a different points uses for the bat pad and rst pad.
this install will allow you to have the trinket power off when you fully power off the switch.
double press the reset button on the trinket to get into boot loader mode, this may take a couple of attempts to do.
the payload that you use already will work with this method no need for new ones.
here's the diagram for method 3, you could possibly have this as a 4 wire install, if you install auto rcm mode, but as my sd card module port is buggerd I couldn't test that out.
ok it seems method 3 needs auto rcm installed for it to work without the need to use the rst pad
so for them that don't want to use auto rcm mode then solder a wire from rst pad to the point on the power button, and use pad 3 to the pin 10 on the joycon rail or one of the alt points on mobo.
beware the alt points are small so use at your own risk.
ok anyone with changing issues test these 2 points, you should get 5v on the usb port side, and around 3.2v on the switch side.
if your getting the volts on the switch side that are fluctuating up & down then replace the part with the v on top it's a diode, you want one that fits so the actual size is either 0402 or 0603 in dimension (i'm using 0402/0603 as an example for size purpose only)
around page 16 has more info about this component..
dont come moaning if you damage your console doing this install, i'm not responsible for you opening or taking a soldering iron to your console.
you do this at your own risk any damage is down to yourself.
another thing if your trinket starts to get very hot to the point you can't touch it, then the atmel ATSAMD21E18A-U ic is on it's way out, so you will need to replace the ic or just replace your trinket.
at some point it wont power up after this has happened.
1 = gets very hot.
2 = reset starts to become tempermental .
3 = dead
4 = fix replace the atmel ATSAMD21E18A-U ic
edit
added uf2 drag and drop files for r4 trinket gemma dongles or for a 4 wire internal install.
atmosphere
hekate 4.2
Sxos
rajnx
reinx
Attachments
Last edited by M-O-B,
, Reason: added updated uf2 file.