


Hmm i do have a teori that it is the loader/FW.img that do that and the patching. The "rednand" dump on sd is a copy of the real nand, thats why i think it would work. But i dont think its going to work heheredNAND might work but it still would get redirected to SDCard, right?
You are using an out of date browser. It may not display this or other websites correctly.
You should upgrade or use an alternative browser.
You should upgrade or use an alternative browser.

@Tommy084 Great to see someone else can confirm the eMMC dumping works. Could you let me know the make and model of the SD Card reader you used so that I can add it to the 'Working card readers list' in the OP. cheers.saturday night dumping
When did you make your Rednand? Before or after you installed CBHC?
If it was before you installed CBHC writing back just the eMMC (MLC.img) backup from the rednand wont help because the modified VC game CBHC uses will not be on there.
On the other hand if the rednand backup was created after you installed CBHC it might work if it was only the modified VC game that caused the brick.
If the modified system.xml is the cause of the brick, writing back just the eMMC wont help because system.xml is on the TSOP nand and that needs to be dumped with a teensy.
Thats why the best bet to recover from a brick is to restore both the eMMC and the TSOP nands.
I still have not got around to soldering up the TSOP yet but if you want to try it out before me here are some pics I made that I was gonna post when I did it:


I'm not sure if the 3.3v needs to be connected to the WiiU at all yet(or where to put it. some say TP163 is the 3.3v supply to the nand but here Crediar says that is not 3.3v).
I was going to just power up the wiiU with the eMMC clock jumper disconnected so that it is in the same state that allows the eMMC to be dumped.
If that does not work the TSOP will have to be powered with the WiiU switched off with its own 3.3v power supply from either the Teensy (might not be enough) or from another power suppy.
On the Teensy side the Teensy needs to be converted to 3.3v and you will need NANDway.py here and you would program your teensy with the NANDway_DualNANDEdition.hex.
I wish I could try it myself but still I'm waiting for a new magnifying lamp to do the soldering.
UPDATE: DO NOT USE THE DUAL NAND EDITION SETUP AS MENTIONED ABOVE, INSTEAD USE THE SIGNAL BOOSTER EDITION SETUP AS I COULD NOT GET CONSISTANT DUMPS USING DUAL NAND EDITION !!!

Last edited by Leeful,
The backups extracted from the rednand with dimoks' sdio_nand_extractor are exact copies of the nands on the WiiU at the time the rednand is created on the SD Card.redNAND might work but it still would get redirected to SDCard, right?
It is the rednand software itself that basically uses the copy of the nands on the SD card instead of using the real ones on the WiiU. That way when you are using rednand in theory if you mess anything up it is the nands on the SD Card that are affected and not the real nands on the WiiU.
The extracted nands from the rednand SD Card are:
MLC.img = MLC (Multi level cell) = Wii U Internal Storage [eMMC NAND]
SLC.img = SLC (Single level cell) = Wii U Nand chip [TSOP NAND BANK 2]
SLCCMPT.img = SLCCMPT (SLC Compatible Multi level cell) = Virtual Wii Nand Chip [TSOP NAND BANK 1]
The MLC.img worked fine when I flashed it back. (can't confirm the others yet)I'm not sure that those baks are flashable....
I made a rednand, extracted the backups then straight after did a hardmod backup (only the eMMC)
the SHA256 hashes of the MLC.img and the Hardmod-eMMC-Dump.img were identical.
To test some things out first I wrote back the MLC.img and the WiiU worked normally.
Then I wrote back the Hardmod-eMMC-Dump.img and the WiiU worked normally.

Wow, if redNAND baks work probably a lot of ppl will hardmodThe backups extracted from the rednand with dimoks' sdio_nand_extractor are exact copies of the nands on the WiiU at the time the rednand is created on the SD Card.
It is the rednand software itself that basically uses the copy of the nands on the SD card instead of using the real ones on the WiiU. That way when you are using rednand in theory if you mess anything up it is the nands on the SD Card that are affected and not the real nands on the WiiU.
The extracted nands from the rednand SD Card are:
MLC.img = MLC (Multi level cell) = Wii U Internal Storage [eMMC NAND]
SLC.img = SLC (Single level cell) = Wii U Nand chip [TSOP NAND BANK 2]
SLCCMPT.img = SLCCMPT (SLC Compatible Multi level cell) = Virtual Wii Nand Chip [TSOP NAND BANK 1]
The MLC.img worked fine when I flashed it back. (can't confirm the others yet)
I made a rednand, extracted the backups then straight after did a hardmod backup (only the eMMC)
the SHA256 hashes of the MLC.img and the Hardmod-eMMC-Dump.img were identical.
To test some things out first I wrote back the MLC.img and the WiiU worked normally.
Then I wrote back the Hardmod-eMMC-Dump.img and the WiiU worked normally.

I just got a really good idea that I would love to try. Redirect the data and IO pins from the eMMC to an SD card instead. I see one issue with this idea off the top of my head and that is that the boot process likely checks the ID's of the hardware to make sure they are compatible. Although, there are ways of spoofing the ID and other such info on SD cards so as long as there aren't any hardware hang ups that I haven't thought of yet then this could be entirely possible. It might also be possible to wait until the boot process checks the eMMC and then switch to the SD card. Of course that would be timing based so some kind of microcontroller would be needed.
Also, while scouring pics of the motherboard, it would be quite possible to have dual NANDS that you can flick with a switch to go between NAND chips.
Something like NandFlash Board would be nice to just hook up if I can find one with the right nand chip.
Both of the above mods are things that I am easily and completely capable of doing. I just got to find the desire to actually take the console away from the family for a day.
Last edited by DeadlyFoez,
In theory if this worked could you have a WiiU with 128GB internal storage (128GB SD Card)?I just got a really good idea that I would love to try. Redirect the data and IO pins from the eMMC to an SD card instead. I see one issue with this idea off the top of my head and that is that the boot process likely checks the ID's of the hardware to make sure they are compatible. Although, there are ways of spoofing the ID and other such info on SD cards so as long as there aren't any hardware hang ups that I haven't thought of yet then this could be entirely possible. It might also be possible to wait until the boot process checks the eMMC and then switch to the SD card. Of course that would be timing based so some kind of microcontroller would be needed.
Also, while scouring pics of the motherboard, it would be quite possible to have dual NANDS that you can flick with a switch to go between NAND chips.
Both of the above mods are things that I am easily and completely capable of doing. I just got to find the desire to actually take the console away from the family for a day.
That I would doubt. The whole filesystem would need to be reversed and find out if we could change the possible address range. That would be more likely possible with rednand. But anyone with enough time on their hands could probably do it, but not me. I'm not a coder.In theory if this worked could you have a WiiU with 128GB internal storage (128GB SD Card)?
@Tommy084 Great to see someone else can confirm the eMMC dumping works. Could you let me know the make and model of the SD Card reader you used so that I can add it to the 'Working card readers list' in the OP. cheers.
When did you make your Rednand? Before or after you installed CBHC?
If it was before you installed CBHC writing back just the eMMC (MLC.img) backup from the rednand wont help because the modified VC game CBHC uses will not be on there.
On the other hand if the rednand backup was created after you installed CBHC it might work if it was only the modified VC game that caused the brick.
If the modified system.xml is the cause of the brick, writing back just the eMMC wont help because system.xml is on the TSOP nand and that needs to be dumped with a teensy.
Thats why the best bet to recover from a brick is to restore both the eMMC and the TSOP nands.
I still have not got around to soldering up the TSOP yet but if you want to try it out before me here are some pics I made that I was gonna post when I did it:
View attachment 77322 View attachment 77323 View attachment 77324 View attachment 77325
I'm not sure if the 3.3v needs to be connected to the WiiU at all yet(or where to put it. some say TP163 is the 3.3v supply to the nand but here Crediar says that is not 3.3v).
I was going to just power up the wiiU with the eMMC clock jumper disconnected so that it is in the same state that allows the eMMC to be dumped.
If that does not work the TSOP will have to be powered with the WiiU switched off with its own 3.3v power supply from either the Teensy (might not be enough) or from another power suppy.
On the Teensy side the Teensy needs to be converted to 3.3v and you will need NANDway.py here and you would program your teensy with the NANDway_DualNANDEdition.hex.
I wish I could try it myself but still I'm waiting for a new magnifying lamp to do the soldering.
This is my reader and adapter
Logilink Cr0001b
Scandisk sd adapter
I have treid two times, and it gives a system error on boot, so the rednand must be with haxchi not cbhc. So going to try with teensy on tsop. Realy like your rig
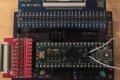
Can this work, have it from when i flashed ps3?
View attachment 5369
I also have a other teensy with 3,3v ready. Wil report back, right now im flashing back the bricked img.
EDITED
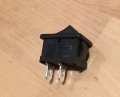
@Leeful can i use this switch? View attachment 5373
Attachments
Last edited by Tommy084,
Yes that Teensy should work but make sure it is running at 3.3v and not 5v. Also make sure to load the NANDway_DualNANDEdition.hex program onto the Teensy.Can this work, have it from when i flashed ps3?
I also have a other teensy with 3,3v ready. Wil report back, right now im flashing back the bricked img.
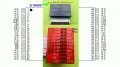
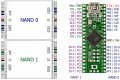
That switch will not work. It needs at least 6 terminals to connect all the wires. I used an 8 pin 2 position DPDT switch. I've made a diagram of how my switch is wired up.

You don't really need to use a switch. Just connect the RB2 to RB and CE2 to CE to dump the Wiiu nand and to dump the V-Wii nand connect the RB1 to RB and CE1 to CE.
Good Luck.
Yes that Teensy should work but make sure it is running at 3.3v and not 5v. Also make sure to load the NANDway_DualNANDEdition.hex program onto the Teensy
First, Thanks for replying
I dont get it to work, treid many times.
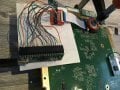
Did also f**** up some solder points, did get it repaired. But i have to use a clip, it also works. Dobble and triple checked al the connections, with a multimeter, from teensy to the solder points next to the chip, everything matches.
A bit confused about the powering of the nand useing a teensy with 3,3v regulator, i used the 5v point on the teensy next to the mini USB and gnd from point next to E6.
Also treid to use the wiiu, but it wont start when the chip is connected, treid also to connect to the chip after the wiiu have started, still no go.
Have treid the nandway signal booster edition to.
This is what i dont get ...
http://www.psdevwiki.com/ps3/File:Teensy-3_3V.jpg
Nandway.py gives a error in line 16, about not able to read ID an serial, check your instalation
Attachments
Last edited by Tommy084,
@Tommy084 A few things you could try:
1: Confirm that the teensy is running at 3.3v. (with the teensy connected only to the PC check that the voltage between the +5v and GND pins is 3.3v)
2: Try with the 3.3v wire disconnected from the teensy.
3: If you try with the nandway.py & NANDway_SignalBoosterEdition.hex the connections on the teensy are different. Here.
new error code with NANDway_DualNANDEdition.hex, useing WAY-launchers v2.05:
*******************************************************************************
Teensy found on port COM4
Starting : NANDway.py COM4 0 dump "C:\HACK\ps3\PS3Linker\fgjh.bin"
-------------------------------------------------------------------------------
NANDway v0.65 - Teensy++ 2.0 NAND Flasher for PS3/Xbox/Wii
(Original NORway.py by judges <[email protected]>)
(Original noralizer.py by Hector Martin "marcan" <[email protected]>)
Pinging Teensy...
Available memory: 3758 bytes
NAND0 information:
Raw ID data: 0xfe 0xff 0xff 0xff 0xff
Error reading size of NAND! Exiting...
Closing serial device...
Done.
-------------------------------------------------------------------------------
An error occurred. Verify your installation.
End.
Press any key to exit...
now i got power, hehe. used the point showed on the psdev site
**EDITED
Works now, but very slow
NANDway v0.65 - Teensy++ 2.0 NAND Flasher for PS3/Xbox/Wii
(Original NORway.py by judges <[email protected]>)
(Original noralizer.py by Hector Martin "marcan" <[email protected]>)
Pinging Teensy...
Available memory: 3758 bytes
NAND0 information:
Raw ID data: 0xbd 0xbd 0xbd 0xbd 0xbd
NAND chip manufacturer: unknown (0xbd)
NAND chip type: unknown (0xbd)
NAND size: 512 MB
NAND plus RAS size: 528 MB
Page size: 2048 bytes
Page plus RAS size: 2112 bytes
Block size: 524288 bytes
Block plus RAS size: 540672 bytes
RAS size: 64 bytes
Plane size: 67108864 bytes
Pages per block: 256
Number of blocks: 1024
Number of pages: 262144
Number of planes: 8
Bus width: 8-bit
Dumping...
4 KB / 540672 KB
Last edited by Tommy084,
That dump didt work and did never get finish
Found out that it only wrote BD BD BD BD...
So after wireing my teensy to use the signal booster i got this
-------------------------------------------------------------------------------
NANDway v0.65 - Teensy++ 2.0 NAND Flasher for PS3/Xbox/Wii
(Original NORway.py by judges <[email protected]>)
(Original noralizer.py by Hector Martin "marcan" <[email protected]>)
Pinging Teensy...
Available memory: 3776 bytes
NAND0 information:
Raw ID data: 0xec 0xdc 0x10 0x95 0x54
NAND chip manufacturer: Samsung (0xec)
NAND chip type: unknown (0xdc)
NAND size: 512 MB
NAND plus RAS size: 528 MB
Page size: 2048 bytes
Page plus RAS size: 2112 bytes
Block size: 131072 bytes
Block plus RAS size: 135168 bytes
RAS size: 64 bytes
Plane size: 268435456 bytes
Pages per block: 64
Number of blocks: 4096
Number of pages: 262144
Number of planes: 2
Bus width: 8-bit
Dumping...
35446 KB / 540672 KB
checked with HxD and the start is right atlast.
Thanks for your help!! @Leeful
PS had to have the wiiu turned on with out the jumper and connected the teensy after the wiiu have started.
EDITED
After dumping and i try to write the "rednand" slc.img i get:
Error : Size of "C:\Users\Tommy\Desktop\slc.bin" is 536870912 Bytes.
Should be 138412032 Bytes (135168 KB).
Command aborted.
and the teensy dump is bigger, 528 MB (553,648,128 bytes)
and slc, 512 MB (536,870,912 bytes)
Thats it for me today...
Attachments
Last edited by Tommy084,
Great to see you have made some progress with this. I'm gonna have to try it. I've been putting off doing the soldering for too long now.
On another note I've been trying to decrypt the nand dumps and this is what I've found that works.:


To make it more easy to get the OTP keys I've attatched a python script to extract the need keys for each nand. Just run it in the same folder as your otp.bin
Although this might not help the current situation it may be useful to someone in the future.
I'm gonna have to try it. I've been putting off doing the soldering for too long now.On another note I've been trying to decrypt the nand dumps and this is what I've found that works.:
Code:
To decrypt the image:
openssl aes-128-cbc -d -nopad -K YOUR_KEY_FROM_OPT -iv 00000000000000000000000000000000 -in Input.img -out Decrypted.img
Code:
To re-encrypt the image:
openssl enc -e -aes-128-cbc -nopad -K YOUR_KEY_FROM_OPT -iv 00000000000000000000000000000000 -in Decrypted.img -out RE-Encrypted.img
To make it more easy to get the OTP keys I've attatched a python script to extract the need keys for each nand. Just run it in the same folder as your otp.bin
Although this might not help the current situation it may be useful to someone in the future.
Attachments
Last edited by Leeful,
Great to see you have made some progress with this.
On another note I've been trying to decrypt the nand dumps and this is what I've found that works.:
Code:To decrypt the image: openssl aes-128-cbc -d -nopad -K YOUR_KEY_FROM_OPT -iv 00000000000000000000000000000000 -in Input.img -out Decrypted.img
View attachment 77826 View attachment 77827Code:To re-encrypt the image: openssl enc -e -aes-128-cbc -nopad -K YOUR_KEY_FROM_OPT -iv 00000000000000000000000000000000 -in Decrypted.img -out RE-Encrypted.img
To make it more easy to get the OTP keys I've attatched a python script to extract the need keys for each nand. Just run it in the same folder as your otp.bin
Although this might not help the current situation it may be useful to someone in the future.
Great work on the decrypting, i think i have to try that!
Got it to start writeing to nand now, after deleting some lines in the nandway.py. But i got some errors about erasing blocks, got 4 now and im at 165000 kB hehe. I wil keep reporting
About the soldering, why not use a clip?
Works great her now, after the nand got power propely. And signalbooster.
Dont get me wrong, I dont think you can solder, i sure not can, atleast not at this level, the solder points on the motherboard is very easy to destroy.
I got a spare chip, but i think the red mb is messed up, i gonna check
Last edited by Tommy084,
Could you pleas help me with the decrypting, never done it before....
Got the OTP.bin from before the brick, when i use your script with the SLC.img inside the same folder it gives mlc wiiu emmc key.bin
Got the OTP.bin from before the brick, when i use your script with the SLC.img inside the same folder it gives mlc wiiu emmc key.bin
Last edited by Tommy084,

Could you pleas help me with the decrypting, never done it before....
Got the OTP.bin from before the brick, when i use your script with the SLC.img inside the same folder it gives mlc wiiu emmc key.bin
Use an hexeditor on bin file and copy the otp in hex format like 0AED65DE3F8DEA05136C and replace YOUR_KEY_FROM_OPT with that. Tried this earlier today and it worked fine except that FF areas got filled with junk in decrypted img...
Thanks, got it working. I also got some scramble. A strange thing is that i can find the start up section (i think) on the rednand slc.img decrypted but not on the dump with teensy, can see many of the other titles thoUse an hexeditor on bin file and copy the otp in hex format like 0AED65DE3F8DEA05136C and replace YOUR_KEY_FROM_OPT with that. Tried this earlier today and it worked fine except that FF areas got filled with junk in decrypted img...
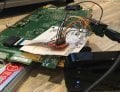
Finally got the courage to do the soldering. Dumping now using Dual Nand Edition. Will report back after more testing.


Dumping now using Dual Nand Edition. Will report back after more testing. Finally got the courage to do the soldering.
View attachment 77841 View attachment 77840 View attachment 77839
This is the most interesting thread on gbatemp! I've done several ps3 nor downgrades and some ps2 modchip installs. This is pr0n for me....
Similar threads
- Replies
- 5
- Views
- 731
- Replies
- 8
- Views
- 4K
- Replies
- 40
- Views
- 5K
-
- Article
- Replies
- 251
- Views
- 43K
Site & Scene News
New Hot Discussed
-
-
24K views
Nintendo Switch firmware update 18.0.1 has been released
A new Nintendo Switch firmware update is here. System software version 18.0.1 has been released. This update offers the typical stability features as all other... -
19K views
The first retro emulator hits Apple's App Store, but you should probably avoid it
With Apple having recently updated their guidelines for the App Store, iOS users have been left to speculate on specific wording and whether retro emulators as we... -
18K views
Delta emulator now available on the App Store for iOS
The time has finally come, and after many, many years (if not decades) of Apple users having to side load emulator apps into their iOS devices through unofficial...by ShadowOne333 96 -
18K views
TheFloW releases new PPPwn kernel exploit for PS4, works on firmware 11.00
TheFlow has done it again--a new kernel exploit has been released for PlayStation 4 consoles. This latest exploit is called PPPwn, and works on PlayStation 4 systems... -
15K views
Nintendo takes down Gmod content from Steam's Workshop
Nintendo might just as well be a law firm more than a videogame company at this point in time, since they have yet again issued their now almost trademarked usual...by ShadowOne333 120 -
14K views
Nintendo officially confirms Switch successor console, announces Nintendo Direct for next month
While rumors had been floating about rampantly as to the future plans of Nintendo, the President of the company, Shuntaro Furukawa, made a brief statement confirming... -
13K views
A prototype of the original "The Legend of Zelda" for NES has been found and preserved
Another video game prototype has been found and preserved, and this time, it's none other than the game that spawned an entire franchise beloved by many, the very...by ShadowOne333 31 -
12K views
Anbernic reveals specs details of pocket-sized RG28XX retro handheld
Anbernic is back with yet another retro handheld device. The upcoming RG28XX is another console sporting the quad-core H700 chip of the company's recent RG35XX 2024... -
11K views
Nintendo Switch Online adds two more Nintendo 64 titles to its classic library
Two classic titles join the Nintendo Switch Online Expansion Pack game lineup. Available starting April 24th will be the motorcycle racing game Extreme G and another... -
11K views
Nintendo "Indie World" stream announced for April 17th, 2024
Nintendo has recently announced through their social media accounts that a new Indie World stream will be airing tomorrow, scheduled for April 17th, 2024 at 7 a.m. PT...by ShadowOne333 53
-
-
-
230 replies
Name the Switch successor: what should Nintendo call its new console?
Nintendo has officially announced that a successor to the beloved Switch console is on the horizon. As we eagerly anticipate what innovations this new device will...by Costello -
201 replies
Nintendo officially confirms Switch successor console, announces Nintendo Direct for next month
While rumors had been floating about rampantly as to the future plans of Nintendo, the President of the company, Shuntaro Furukawa, made a brief statement confirming...by Chary -
120 replies
Nintendo takes down Gmod content from Steam's Workshop
Nintendo might just as well be a law firm more than a videogame company at this point in time, since they have yet again issued their now almost trademarked usual...by ShadowOne333 -
97 replies
The first retro emulator hits Apple's App Store, but you should probably avoid it
With Apple having recently updated their guidelines for the App Store, iOS users have been left to speculate on specific wording and whether retro emulators as we...by Scarlet -
96 replies
Delta emulator now available on the App Store for iOS
The time has finally come, and after many, many years (if not decades) of Apple users having to side load emulator apps into their iOS devices through unofficial...by ShadowOne333 -
82 replies
Nintendo Switch firmware update 18.0.1 has been released
A new Nintendo Switch firmware update is here. System software version 18.0.1 has been released. This update offers the typical stability features as all other...by Chary -
80 replies
TheFloW releases new PPPwn kernel exploit for PS4, works on firmware 11.00
TheFlow has done it again--a new kernel exploit has been released for PlayStation 4 consoles. This latest exploit is called PPPwn, and works on PlayStation 4 systems...by Chary -
71 replies
DOOM has been ported to the retro game console in Persona 5 Royal
DOOM is well-known for being ported to basically every device with some kind of input, and that list now includes the old retro game console in Persona 5 Royal...by relauby -
70 replies
"Nintendo World Championships: NES Edition", a new NES Remix-like game, launching July 18th
After rumour got out about an upcoming NES Edition release for the famed Nintendo World Championships, Nintendo has officially unveiled the new game, titled "Nintendo...by ShadowOne333 -
63 replies
Microsoft is closing down several gaming studios, including Tango Gameworks and Arkane Austin
The number of layoffs and cuts in the videogame industry sadly continue to grow, with the latest huge layoffs coming from Microsoft, due to what MIcrosoft calls a...by ShadowOne333
-
Popular threads in this forum
General chit-chat
- No one is chatting at the moment.
-
-
-
 @
BigOnYa:
My wife's doctor prescribed her a ointment for neck and knee pain, that cost $30. We just read the ingredients, and active ingredient is CBD, found exact ingredients in another off brand ointment online, for only $8. Our healthcare system at its finest.
@
BigOnYa:
My wife's doctor prescribed her a ointment for neck and knee pain, that cost $30. We just read the ingredients, and active ingredient is CBD, found exact ingredients in another off brand ointment online, for only $8. Our healthcare system at its finest. -
-
 @
Psionic Roshambo:
I always suggest kneepads with wheels to help with knee pain, then I get slapped
@
Psionic Roshambo:
I always suggest kneepads with wheels to help with knee pain, then I get slapped -
-
-
-
-
-
-
-
@ HiradeGirl:
https://www.youtube.com/watch?v=ntjkwIXWtrc&ab_channel=Apple
I feel uncomfortable from watching this. -
-
-
-
-
-
 @
Veho:
I get what they were trying to say but what the ad actually says is "we tried to cram a ton of features into the iPad but all of them got irreparably mangled+1
@
Veho:
I get what they were trying to say but what the ad actually says is "we tried to cram a ton of features into the iPad but all of them got irreparably mangled+1
in the process." -
-
-
-
-
-