

This thread is split into several sub-tutorials, discussing some basic MK8 course modding. The tutorials will mostly use the Blender add-ons I wrote for doing it, but also focus other / previous methods.
What this tutorial (currently) covers:
What this tutorial (currently) covers:
- Change default properties of courses like lap count or if headlights are on.
- Add, remove, duplicate, move, scale, rotate, configure objects appearing on courses. This spans all animated objects (a cheering toad, cows walking on the street, thwomps, moving booster plates, a tree letting snow fall when you hit it, etc.), also including some inanimate / static ones (like skyboxes).
- Modifying collision flags to create things like boosters or stunt ramps or to remove them.
- A copy of the Mario Kart 8 files on your hard disk, or know how to dump them (especially for DLC files).
- Knowledge on how to replace files with Cafiine.
- My Mario Kart 8 Information Dump open, useful for this and that, mentioned in the following when required.
To mod the files, we surely need to know where they are stored first. Luckily for us, MK8 has a pretty clean directory structure, but it gets a little annoying with DLC files.
- All base game courses are stored under vol\content\course.
- DLC courses are (for their biggest part, see below) stored under vol\aoc0005000c1010e?00\.
- The question mark stands for your regional version. It is b for JAP, c for USA, and d for EUR.
- In that folder, there are subfolders specific to the GPs the course is part of. This is 0013 (Egg Cup), 0015 (Triforce Cup), 0017 (Crossing Cup) and 0019 (Bell Cup).
- The Animal Crossing course randomly selects one of the Gu_AnimalSpring, Gu_AnimalSummer, Gu_AnimalAutumn or Gu_AnimalWinter folders. To force a specific course for testing offline, you can hold down one of the following buttons to select the corresponding season, while you start the course:
- L = Spring
- R = Summer
- ZL = Autumn
- ZR = Winter
- The Animal Crossing course randomly selects one of the Gu_AnimalSpring, Gu_AnimalSummer, Gu_AnimalAutumn or Gu_AnimalWinter folders. To force a specific course for testing offline, you can hold down one of the following buttons to select the corresponding season, while you start the course:
- Then, there's just another course folder inside of that, which is the same as the one for the base game:
- Each course (for Animal Crossing: each season) has its own folder inside of course, following a set name schema:
- If it starts with D, it's a DLC course. If it starts with a G, it's a base game course.
- The acronym of the system follows. This is just u for Wii U. Other systems are 3ds, agb (Game Boy Advance), gc (GameCube), sfc (SNES), 64 (Nintendo 64), ds or wii.
- An underscore separates this prefix from the course name.
- The course name. These are sometimes not the final names, and even then mostly shortened Japanese ones. For example, Shy Guy Falls is called Gu_Expert, Mario Kart Stadium Gu_FirstCircuit and N64 Toad's Turnpike G64_KinopioHighway (Kinopio is Toad in Japanese). I collected all names here.
- Inside of the course folder are several files. These are always the same. I bolded the ones important for now:
- course.bgenv: This is the lighting and fog control of the course. It basically sets a day, evening or night mood. These cannot be edited directly yet, but exchanged with other courses. It's a SARC file.
- course.bglpbd: Unknown use.
- course.kcl: The collision map of the course. Basically defines where you can collide on the static course model (this is a simplified version of what you actually see) and how the game reacts to the collisions (e.g. if it's a booster plate, a sand road slowing you down, a wall triggering Lakitu to reset you back or just normal ground).
- course.ptcl: Said to be a graphic particle file. Not sure how it would be used.
- course_mapcamera.bin: Contains information on how drivers are projected on the 2D minimap on the gamepad (or TV since 2.0), since anti gravity doesn't make this trivial in some sections.
- course_maptexture.bflim: Contains the image of the 2D minimap itself.
- course_model.szs: This is a Yaz0 compressed BFRES model, containing the whole static course model. I uploaded several conversions for viewing purposes here. There are tutorials all around on how to convert BFRES if you wanna do it yourself. Since there is no BFRES exporter in the public yet, we cannot edit them or create new ones.
- course_muunt.byaml: This is like a configuration / course information file. It contains the number of laps, if headlights are on, gravity zones and absolutely all the animated objects on the course. It will be the main target of this tutorial.
- course_muunt_200.byaml: This is the same as course_muunt.byaml, but slightly modified to make driving the course in 200cc easier. It actually just additionally contains Adjuster200cc objects (more on them later) which increase gravity inside specific areas so karts don't fly away.
- For DLC courses, this file is always stored under vol\content\course like the rest of the files of the base game courses.
- battle_muunt.byaml: This is the same as the course_muunt.byaml, but takes effect only in battle mode. Thus, item boxes are probably placed differently. Of course it only exists for the 8 battle courses.
- SNDG_<courseName>.bars: Contains sounds exclusively played on this course. Tutorials on how to at least convert BARS into other formats are found all around here. It's a SARC file.
- vol\content\data\objflow.byaml: Course objects in the course_muunt.byaml files reference objects out of this file. Objects are accessible via name and number. This file contains mappings between those. You can either use information dump linked above, or find the information on your own in this file.
Since Blender is used for most of the modding tasks, let's quickly get an overview on this free, small, but really powerful 3D editor.
Installing Blender
While overwhelming and quite unusual (especially to 3DS Max users) at first, the Blender UI is really easy to understand after you grasped just basic concepts - they apply all over the program.
Installing Blender
- Go to the Blender homepage and download the latest version for your platform (BFRES texture import only works on Windows at the moment due to its dependency on TexConv2!).
- Install it with the setup or extract the ZIP file, then start blender.exe.
While overwhelming and quite unusual (especially to 3DS Max users) at first, the Blender UI is really easy to understand after you grasped just basic concepts - they apply all over the program.
- Editors
Blender separates the big main window into sub-sections, which are the so called "editors" of it. Each editor serves a specific purpose and has a unique name to which I will refer later on in the tutorials. Have a look at the editors in the default layout:
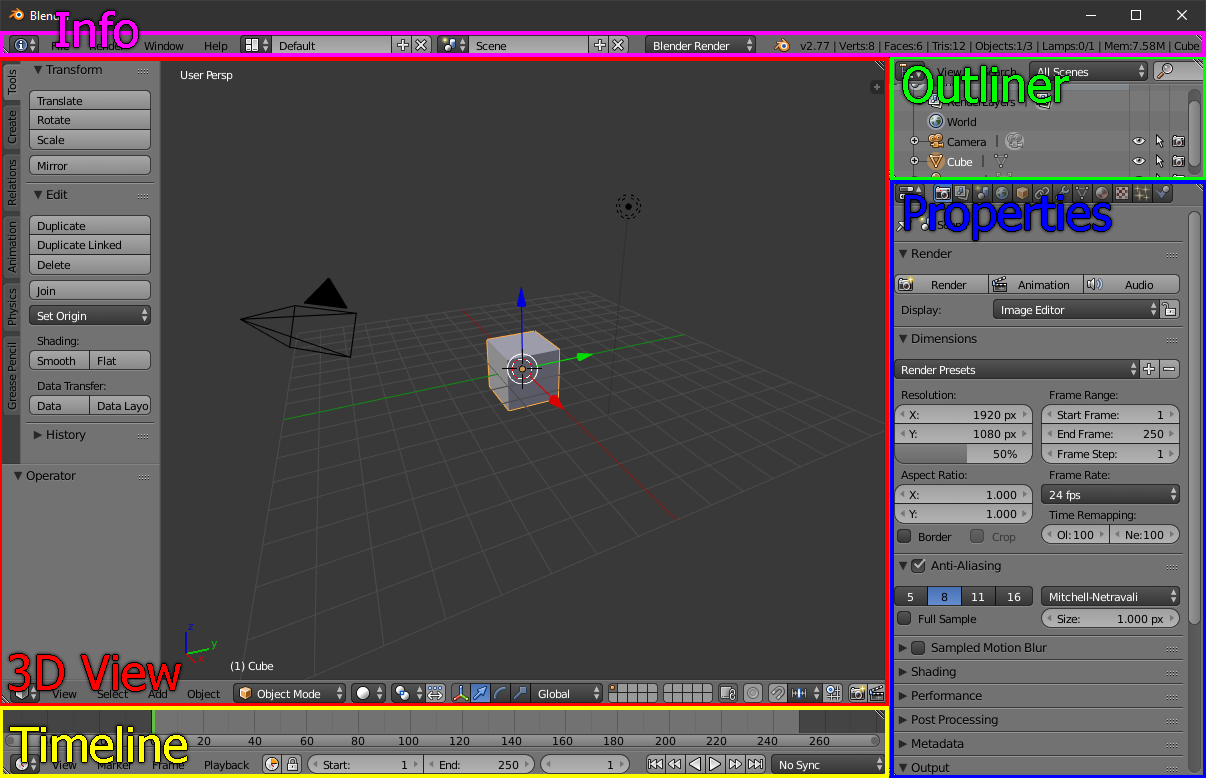
As you can see, each editor also has something like a "Toolbar" either at the top or bottom which hosts several menu-like items and a lot of buttons. This toolbar is called the header. Now, let's have a look what the different editors do:- Info: This is just the main menu of Blender. It is in fact an editor at a small height of just the header, but that fact doesn't matter for now.
- 3D View: Fairly similar to understand, this editor hosts the view on the current scene (there can be multiple, but you will normally only deal with one when modifying courses).
It has a set of tools in the bar on the left we won't really need, so we can hide it by dragging the left sidebar to a minimum width.
On the right side, there's another sidebar, but hidden yet, which can be revealed by clicking the tiny + icon at the top right of the 3D View editor. It displays information about the currently selected model sections. We need it for modifying KCL flags later on. - Timeline: Needed for editing animations, which we can't yet, so ignore it for now.
- Outliner: This is the hierarchy of the objects in the currrent scene. Each object in the scene has a row there, with three buttons at the right:
- Eye: Use this to hide or show the corresponding object.
- Arrow: Use this to make the corresponding object selectable in the scene with the mouse.
- Camera: Unimportant for us; hides or shows the object in the final render.
You can hold Ctrl when clicking one of the icons to also affect all children in the hierarchy.,
- Properties: This shows information of the current scene, selected objects in the scene, and more. There are a lot of buttons in its header which control what of that is displayed, and we only care about the Scene (the barrel / sphere / light icon) and Object (the cube icon) button for modding now.
- Panels
If you look closer into each editor, you see another recurring concept:

Each of the red outlined areas is a panel. Panels can be expanded or collapsed. Sometimes, not all fit into the editor, and you have to scroll. Each panel has a unique title, and I will refer to them by their title in the tutorials.
You luckily don't need to know about most of them as they're used to do other tasks with Blender (remember that Blender can be and has been used to create AAA 3D movies which require more tools than what we will need). I will explain panels when needed. Here are some general ones which always come in useful:- 3D View > Transform: This one allows you to numerically move, rotate and scale the currently selected object.
- 3D View > View: You need to set up some details here to make a Mario Kart 8 course correctly visible. More about that in the later tutorials.
- Controls
Most controls are self-explaining. Just some tips:- Hold your cursor above a control and a tooltip will pop up, explaining the setting in more detail (if available).
This is the visible, static model of the course as you see it in-game. This is not the collidable mesh of the model, that one is stored in the KCL.
BFRES is also used for any other models in the game, like course objects or characters. For course models, the BFRES file is always compressed inside an SZS file.
Viewing models with the Blender add-on
There is sadly no exporter yet, but you can import SZS and BFRES to have some quick looks at them with my io_scene_bfres Blender add-on for now.

Install the add-on from here. Here are installation instructions, and here how to use the add-on.
BFRES is also used for any other models in the game, like course objects or characters. For course models, the BFRES file is always compressed inside an SZS file.
Viewing models with the Blender add-on
There is sadly no exporter yet, but you can import SZS and BFRES to have some quick looks at them with my io_scene_bfres Blender add-on for now.
Install the add-on from here. Here are installation instructions, and here how to use the add-on.
These files contain lighting and fog information. Right now, you can only exchange it with the one of other courses. You can achieve the following effects:
Be aware that you should not use the *.bgenv files of the following courses on others, as they seem to crash the game:
- Change daytime to nighttime (e.g. by replacing the one of Gu_Airport (Sunshine Airport) with the one of G64_KinopioHighway (Toad's Turnpike)), or the other way round.
- Change the color in which objects in the far get tinted in (e.g. "fog", like a greenish tint on the haunted course), and how soon they get colorized like that.
Be aware that you should not use the *.bgenv files of the following courses on others, as they seem to crash the game:
- Rainbow Road
- 3DS Neo Bowser City
- SNES Rainbow Road
- Hyrule Circuit
These files contain mostly everything required to create a course other than the static BFRES model lit by a BGENV. In detail, the hold the following information, organized into sections with specific names:
- Main information: Sets the lap count, if head lights are on, and some more general stuff.
- Area: Controls behavior of some objects inside of specific regions, like pulling racers along a floating water path.
- Clip / ClipArea / ClipPattern: Controls which part of the course model is culled when a racer is at specific spots to speed up rendering. Was obviously auto-generated by official tools, and it's unclear how these sections would be edited correctly.
- EffectArea: Holds information about visual effects appearing inside a set region, like falling white leafs on Royal Raceway near the cherry trees.
- EnemyPath: The path the AI drives, splitting up for multiple paths, but joining back into one at the end.
- GlidePath: The path a glider is pulled towards.
- IntroCamera: Controls the paths the introductionary camera moves along. It is played when starting courses offline, normally consists of 2 cuts showing course scenery and one last showing the start with the waiting racers.
- ItemPath: The path items like shells or the bullet bill take.
- JugemPath: The paths Lakitu takes to reset you back on course to the points defined in LapPath > ReturnPoints.
- LapPath: The checkpoints the drivers have to pass to drive a lap, so that the game keeps course of their positions. The subelements ReturnPoints specifies the coordinates where Lakitu resets you back to. Probably also controls when Lakitu is triggered if you go too far out of bounds.
- Obj / MapObjIdList / MapObjResList: A list of dynamic / animated objects appearing on the courses. This spans everything like an ItemBox, Skybox, a tree losing snow when driving against it or the start line.
Note that I will always refer to these objects as "Objs", to keep a unique term for them when discussing Blender scene objects. - Path: A generic collection of paths used by specific objects to move along, like a Toad Harbor tram driving around the city.
- ReplayCamera: Controls the different views, cuts and follow modes the camera of the highlight reel takes.
- SoundObj: Static, invisible sound sources, like environmental noise, covering specific areas.
- Load them with my Blender add-on io_scene_mk8muunt. It is in the alpha stage and currently allows you to edit the main information, Area, EffectArea, Obj and SoundObj sections of a BYAML (more about those in a few). Combined with loading the BFRES model of a course, it is a perfect 3-dimensional way to edit course objects with it.
- Convert them to XML with YamlConv, edit them in a text editor, then convert them back to BYAML. This allows you access to absolutely all sections stored in a BYAML file, but only as plain text.
You can import, edit and export BYAML with my io_scene_mk8muunt add-on.

Install the add-on from here. Here are installation instructions and here how to use it.
Install the add-on from here. Here are installation instructions and here how to use it.
This should only be done by advanced users, as bad values quickly make the game crash. The Blender add-on is now the preferred (yet limited) way for beginners, which is also the reason why I removed the XML tutorial I had in here previously. Understanding the BYAML layout itself helps to understand what the Blender add-on is doing behind the scenes and how the game manages Obj relations and paths.
BYAML files have to be converted into XML first before we can edit them in Notepad++.
Open the BYAML in Notepad++. I recommend collapsing all XML elements by pressing Alt+3 and Alt+2. That reduces it to the following minimum main elements, each representing one of the sections mentioned before:
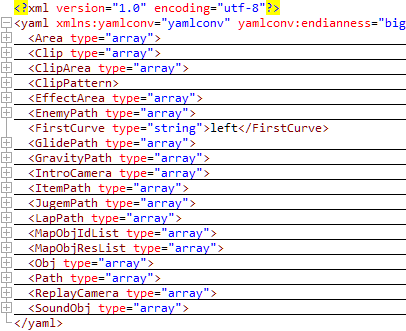
Main Information
Right in the top yaml element are the following known attributes (ignore the ones in the yamlconv namespace, they're only important to the YamlConv tool):
MapObjIdList / MapObjResList (telling the game to load objects)
The objects on the Mario Kart 8 courses are referenced by name (ResName) and number (ObjId). To make the game know which objects it should load for a course, their ObjId and ResName need to be added to these elements:
Here's how the game is told to load the ItemBox object:
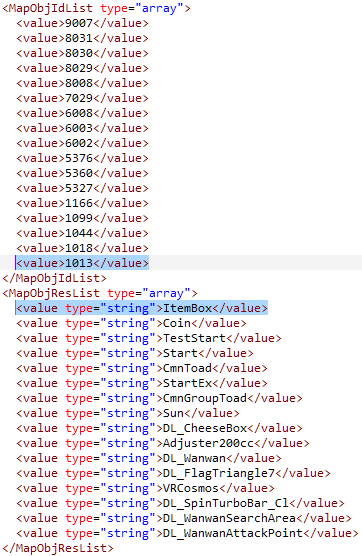
There are many interesting objects. I listed all 700 MK8 objects in my information dump (on the "Objects" sheet). Here are just a few important ones which are pretty common (I put the ObjId's into braces):
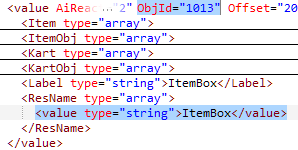
Obj (placing the loaded objects)
You finally got to the most interesting element. This element contains a value subelement for each object on the course. As you can guess, there must be quite a few of those, just thinking about the many ItemBox and Coin instances. Let's have a look at the basic anatomy of such an element:
As you might have guessed, you can just copy a value element around in files, remove it or just delete it to apply those operations to objects on courses. Eventually, don't forget to convert the XML back to BYAML to see it in MK8.
Shameless self-promotion: There are some examples in my Mario Kart 8 Playlist, I also sometimes stream such mods.
BYAML files have to be converted into XML first before we can edit them in Notepad++.
- Just drop the BYAML on top of YamlConv.exe, the program then writes an XML in the same directory (you can alternatively run it from the command prompt and just pass the filename of the BYAML to the tool).
- To convert it back to BYAML, drop the XML file on it (same goes for the command prompt again). It will overwrite a possible old BYAML in the directory, so make sure to have backups!
Open the BYAML in Notepad++. I recommend collapsing all XML elements by pressing Alt+3 and Alt+2. That reduces it to the following minimum main elements, each representing one of the sections mentioned before:
Main Information
Right in the top yaml element are the following known attributes (ignore the ones in the yamlconv namespace, they're only important to the YamlConv tool):
- HeadLight: Set it to 1 to enable head lights on all cars (for night course probably) or 0 to disable it. 2 enabled headlights only in specific regions, as set in the LapPath elements.
- IsFirstLeft: Probably controls if Lakitu appears on the other side when showing the lap count to not block the view, and mirroring the start positions. Must be in sync with the FirstCurve element or the game crashes!
- IsJugemAbove / JugemAbove / LapJugemPos: Jugem is Lakitu, but I'm unsure about which positional stuff it controls.
- LapNumber: This sets the total lap number you have to drive before finishing the course. Be aware of the following when changing it:
- If you set the lap number to any other than 3 or 7, Lakitu will always display "Lap 2/3" for any lap other than the final one, and "Lap 3/3" for the last one. Thus said, Lakitu correctly displays only 3 or 7 total laps.
- Setting the lap number above 7 crashes the game as soon as someone enters such high lap (or before? Just don't do it.). Before the Baby Park update, it might even crash at any lap count higher than 3 (Lakitu also didn't have 7 lap board textures back then).
- For N64 Rainbow Road, only the default value 1 works as intended. Values other than 1 make you drive the according number of full laps, but the CPU always drives just 1 lap and finishes then. You quickly fall back to place 12 as soon as the CPU enters section 2, as you don't (sections seem disabled for human players then).
- For Mount Wario and Big Blue being one-way courses, only the default value 0 works as intended. Other values crash the game!
MapObjIdList / MapObjResList (telling the game to load objects)
The objects on the Mario Kart 8 courses are referenced by name (ResName) and number (ObjId). To make the game know which objects it should load for a course, their ObjId and ResName need to be added to these elements:
- The ObjId is added in descending order to the MapObjIdList array.
- The ResName of the object goes into the MapObjResList array (in any order).
Here's how the game is told to load the ItemBox object:
There are many interesting objects. I listed all 700 MK8 objects in my information dump (on the "Objects" sheet). Here are just a few important ones which are pretty common (I put the ObjId's into braces):
- ItemBox (1013) / Coin (1018): Appear on every course (surprise). These are just what you expect.
- Sun (6004 as Sun, 6008 as SunInf, 6009 as SunInfY): This is the sun far up in the sky. If you want to change the day time, you should better replace this one with a moon!
- Moon (6005 as Moon, 6010 as MoonInf, 6011 as MoonInfY): As if you didn't guess it, this is a moon in the sky. You want to replace the corresponding numbers with the Sun ones for daytime mods.
- Adjuster200cc (8029): This only appears in course_muunt_200.byaml files. They are areas in which gravity is increased to prevent players from flying away after taking a ramp in the high 200cc speeds. They do not take effect when under the influence of thunder and vary in gravity strength.
- VR* (70??): All objects starting with VR* are the skyboxes (the DLC ones start with DL_VR*). Just replacing the *.bgenv file of a course is not enough to change the daytime, the sky will still look like before. You want to replace a VR* object with the one of another course, like VRAirport with VR64Highway (Toad's Turnpike) or VRCosmos (Music Park) to make Sunshine Airport a Moonshine Airport.
If you want to know how I created the object table linked throughout the article and find mappings yourself, this is how it was basically looked up by the dumping program I wrote for it:
You might remember vol\content\data\objflow.byaml. Make sure to have the DLC version of it to look up the new DLC objects (for the base game stuff, it's interchangeable). Convert it to XML as described above, and open it. I suggest pressing Alt+2 to collapse all areas.
You might remember vol\content\data\objflow.byaml. Make sure to have the DLC version of it to look up the new DLC objects (for the base game stuff, it's interchangeable). Convert it to XML as described above, and open it. I suggest pressing Alt+2 to collapse all areas.
- To find the ObjId to an object which ResName you have, copy the ResName from the course BYAML (in the MapObjResList array) and simply search for it.
- You will end up inside a Label or ResName element. Both is fine here (let me just tell you that there are some sub objects like colored toads having the same label all over, but different Label's). Just trace back to the parent value element and look at the ObjId attribute. That is the ID of the object.
- The same goes the other way round for searching ResName's to ObjId's (in case you want to look up an object from a Obj > value subelement). Search for the whole attribute, like ObjId="????". Then, just copy the ResName over to the course BYAML.
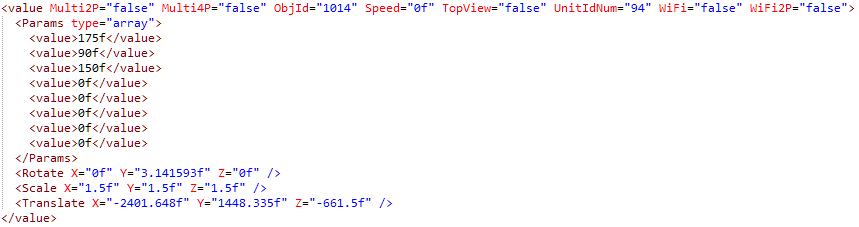
You finally got to the most interesting element. This element contains a value subelement for each object on the course. As you can guess, there must be quite a few of those, just thinking about the many ItemBox and Coin instances. Let's have a look at the basic anatomy of such an element:
- ObjId attribute: This is the ObjId as mentioned before! To instantiate an object you listed above, just write down the number into this attribute again, and that's it: You placed / replaced an object with another type. The structure of the value element is the same (but, read on!). You have to sort all Obj elements by their ObjId in a descending order (like MapObjIdList), so objects with a bigger ObjId come first!
- Multi2P, Multi4P, WiFi, WiFi2P attribute: This is set to true to exclude an object in the specific mode. This is normally done to decorative objects in multi player modes to decrease rendering time (as the game has to render multiple screens). It can be applied to any object however, even in online mode. (I have no clue why some objects are set true in every mode. They would go unused all the time then.)
- Obj_Path, Speed attribute: There are many objects which not just animate on one spot, but walk or roll around. Just imagine the cog wheels in Thwomp Ruins; they fall down on course, and roll all the way down into water.
- While the path itself cannot be edited easily in Notepad++ (have fun modifiying textual coordinates!), it is referenced by a path number, and that one can be set in the Obj_Path attribute.
- To control how fast the path is actually taken, you can modify the Speed attribute. It is a float value, so don't forget to add an f to the end of it.
- There are a lot of objects without the Obj_Path attribute and Speed="0f" as they don't take a path at all.
- Obj_EnemyPath?, Obj_ItemPath? attribute: I gotta look those up. They reference paths from the EnemyPath and ItemPath elements.
- UnitIdNum: This is unimportant and can be whatever value not bigger than 65535, ignore it.
- Params element: This is a list of 8 float values, which all sadly differ in meaning, depending on the ObjId. That said, if you replace an object, also copy the parameters.
- Most of the time, they are unused and just set to 0f.
- Low values often reference something by index. I mostly got crashes when setting them to high values. The thwomps on SNES Rainbow Road seem to control the part of the road they wobble when crashing down with this.
- High values are often frame delays. The thwomps on SNES Rainbow Road have an initial delay before they first come down, and then a delay in which they stay up before going down again. Set this to 0 to get some really ragy thwomps.
- In general, play around with values not being 0f. Make it extreme values. If you noticed changed behavior, document it: Since it's XML, you can put in comments with <!-- Bla -->. I did this everywhere I found something and also documented the original value, in case I fucked up too much and wanted to go back.
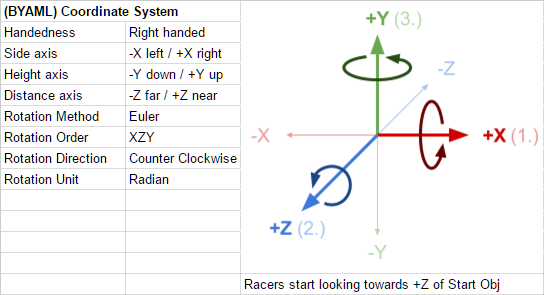
- Rotate element: This controls how the object is initially rotated. X stores the pitch (as if you'd bow forth and back), Y the yaw (as if you'd turn left and right) and Z the roll (as if you'd fall over sideways). The rotation is stored in radian, using XZY euler angles. This image demonstrates the BYAML coordinate system, taken from my info dump sheet:
- Scale element: Controls the scale of an object. X is width, Y height and Z depth.
- This is mostly 1f since the objects are prescaled.
- If you can collide with objects, make sure to uniformly scale them (e.g. on the same dimensions on X, Y and Z). MK8's engine (like many other game engines) does not support non-uniform collisions and always uses the lowest common uniform scale, and if you do a scale like X="3f" Y="2f" Z="2f" you will collide with it as if X is 2f. So make it X="3f" Y="3f" Z="3f".
- Translate element: This is the absolute position on the course. X is left / right, Y is up / down (bigger values are up), Z is near / far. While it is hard to figure out where X and Z go since the course can start in different orientations, Y is pretty clear.
As you might have guessed, you can just copy a value element around in files, remove it or just delete it to apply those operations to objects on courses. Eventually, don't forget to convert the XML back to BYAML to see it in MK8.
Shameless self-promotion: There are some examples in my Mario Kart 8 Playlist, I also sometimes stream such mods.
With all your knowledge, it will be easy to replace an object with another. Since daylight mods are liked so much, let's replace Sunshine Airport's daytime skybox and sun with the nighty skybox and moon of Toad's Turnpike.
Preparing the course files
Also apply changes to battle_muunt.byaml in case the course is a battle course.
Additional steps for a daytime mod
Preparing the course files
- Find the internal course names of Sunshine Airport and Toad's Turnpike in my info dump.
- You'll see that Sunshine Airport is Gu_Airport, and Toad's Turnpike G64_KinopioHighway. Open the corresponding folders of the courses under /vol/content/course.
- Convert the course_muunt.byaml files in both folders to XML with YamlConv and open them in Notepad++. Collapse all regions with Alt+3 and Alt+2.
- Since you know that the skybox ResName's are all starting with VR*, we try to find the full names in the MapObjResList element. Expand it, and you will see that the names are VRAirport in Sunshine Airport, and VR64Highway in Toad's Turnpike. You can already replace the name of VRAirport with VR64Highway.
- We also need to replace the ObjId's of the skyboxes in the MapObjIdList element. For skyboxes, you might remember that they are all in the 7000-7099 range. When expanding MapObjIdList, you quickly find that Sunshine Airport's skybox ObjId is 7015 and Toad's Turnpike's one is 7005. Replace the ID in Sunshine Airport accordingly.
For other objects which ID is not in a set range, simply look it up in my info dump, which provides the ObjId's for the ResName's. - Right now we just told the game to load a different skybox - but the old one is still placed on the course, referenced by the ObjId. To change it, open the Obj element and look for a value element with the ObjId attribute having a value of 7015. Replace the value with 7005.
- Store the XML, convert it back to BYAML, and test it.
Also apply changes to battle_muunt.byaml in case the course is a battle course.
Additional steps for a daytime mod
- Repeat these steps with the Sun object, replacing it with Moon.
- Turn headlights on. This is stored in one of the main attributes of a course XML. Scroll up to the yaml element and set HeadLight to 1, which turns them on.
- Exchange the *.bgenv file of Sunshine Airport with the one of Toad's Turnpike to get some nice twilight lighting.
The course.kcl file of each course contains a simplified model of the course_model.szs you see in the game. It is not visible, and is only used to check the collisions of your kart with the ground, walls, sand roads, or Lakitu reset triggers, which is stored for each polygon / triangle / face of the model.
To know which face is what, the game stores a number for each, the so called "Collision Flag". For example, 0 is normal road, 10 is a booster, 297 heavy offroad, and so on.
To know which face is what, the game stores a number for each, the so called "Collision Flag". For example, 0 is normal road, 10 is a booster, 297 heavy offroad, and so on.
Right now, it is not possible to export new KCL models (there's just a tiny bit missing for it though), but you can change the collision flags for the faces to create boost courses or other interesting things.

This can be done with my io_scene_kcl Blender add-on. Here are installation instructions and here how to use it.
This can be done with my io_scene_kcl Blender add-on. Here are installation instructions and here how to use it.
Last edited by Deleted member 370174,


")


