Hi there, I've been repairing a couple of 2DS consoles over the last couple of days and one of them refused to work without being permanently plugged in. Thanks to this forum I discovered that one of them was in fact a kiosk unit.
Since it had a sticker on that said hardware modified and I had another unit in pieces to compare to i went on a hunt for the modification.
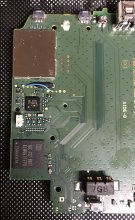
Thankfully Nintendo were kind enough to forget to clean up the flux from the mod so I was able to find the spot fairly quickly.
What they had done was remove a resistor from one spot and put a resistor to bridge some pads next to it.
I measured the resistor that had been put in and it came in at 100ohm the one that was on the original retail motherboard was 10k.
I figured it would't do any harm as long as there was some kind of resistance so I moved it from where it had been placed to make it look like the retail unit.
I powered it up and it works just like a normal unit.
It's an "easy" fix in that you only need to move one single resistor, but it IS a tiny tiny resistor so a good soldering iron and a steady hand is needed.
I hope this helps. I've attached a visual guide.
Oh and one more thing the Start and Select buttons had been disabled by replacing the rubber pads underneath the buttons with non moving ones. So to return it to full functionality you need to source some replacements. Sadly you'll probably have to buy a complete set of button pad replacements but I'm sure the other parts would be useful for other repairs.

Since it had a sticker on that said hardware modified and I had another unit in pieces to compare to i went on a hunt for the modification.
Thankfully Nintendo were kind enough to forget to clean up the flux from the mod so I was able to find the spot fairly quickly.
What they had done was remove a resistor from one spot and put a resistor to bridge some pads next to it.
I measured the resistor that had been put in and it came in at 100ohm the one that was on the original retail motherboard was 10k.
I figured it would't do any harm as long as there was some kind of resistance so I moved it from where it had been placed to make it look like the retail unit.
I powered it up and it works just like a normal unit.
It's an "easy" fix in that you only need to move one single resistor, but it IS a tiny tiny resistor so a good soldering iron and a steady hand is needed.
I hope this helps. I've attached a visual guide.
Oh and one more thing the Start and Select buttons had been disabled by replacing the rubber pads underneath the buttons with non moving ones. So to return it to full functionality you need to source some replacements. Sadly you'll probably have to buy a complete set of button pad replacements but I'm sure the other parts would be useful for other repairs.
Last edited by Matthew_P,