Tutorial Homebrew Emulation
Updated
How to use Single ROM Loaders for make your own Wii VC channels of your favorite retro games :D - Wii
How to make & use custom Single ROM Loaders (SRLs) for make your own Wii Virtual Console (Wii VC) channels of your favorite old retro games!
Made by saulfabreg (@SaulFabre)

 This thread was made for celebrate my 1000th message on the entire GBAtemp.net forum.
Thanks to everyone for letting me stay in this great GBAtemp forum!
Made by saulfabreg (@SaulFabre)
This thread was made for celebrate my 1000th message on the entire GBAtemp.net forum. Thanks to everyone for letting me stay in this great GBAtemp forum!
Hello to all GBAtemp!!!
In this tutorial I will teach you how to make a complete custom Wii Virtual Console iNJECTiON (forwarding) by using a custom Single ROM Loader (SRL) of a Wii homebrew emulator of your game system of your game, a DOL forwarder (a DOL for load the emulator’s DOL file and read the meta.xml file and its arguments) and a forwarder WAD which is compatible with AHBPROT.
As some of you know, I've started making/creating custom Single ROM Loaders (SRLs) for some of the best homebrew emulators made for the Nintendo Wii since I got so tired about incompatibility with some games with the default Virtual Console (VC) emulators (such most Nintendo 64 games but also some NES, SNES & SEGA Genesis games) and unplayable games due to incompatible mappers or peripherals (such NES Zapper, SNES Super Scope, Satellaview) but also some other great old game systems are not brought to Wii by Nintendo and I want to get my games run automatically in the emulators as if they were Wii VC channels but without having to go to the Homebrew Channel and access the emulator's menu (I just want to skip the emulator menu).
Special thanks goes to users @libertyernie, @G0dLiKe, @SuperrSonic, @XFlak, @FIX94, @Wiimpathy, @Tetsuo Shima, @Exidous, @RunningSnakes, all the developers and hackers of the Wii and contributors to the Wii scene, but also i have to do a honorifical mention to user @mrt84 and specially my friend @Zorg1996 for pushing me to do this very interesting project.
-------------------------------------------------------------------------
WARNING WARNING WARNING!!!!!!!!!!!!!!!!
-------------------------------------------------------------------------
Unproperly following these instructions and/or unproperly packing the 00000000.app file CAN HARD-BRICK YOUR Wii!!!!!! DO NOT ATTEMPT TO CREATE CUSTOM Wii VC WADS unless you REALLY know what are you doing!!!!!! It's highly recommendable that you have installed in your Wii any brick protection such as BootMii as boot2, and Priiloader!
NOTE: This tutorial is maybe a bit unclear, but it SHOULD be understandable for everyone who reads this tutorial in this thread. If you have any question, feel free to write me in this thread.
With no other thing to say, let’s start with the tutorial!
What you need:
- A Single ROM Loader (SRL) / individual game loader of an homebrew emulator for the game you want to make its VC forwarder channel. Here in this thread made by me (@SaulFabre) you can get one for your favorite homebrew emulator for Wii: https://gbatemp.net/threads/my-coll...-for-some-best-wii-homebrew-emulators.591509/
- The ROM file of the game you want to use in your custom Single ROM Loader (SRL).
- A forwarder WAD which is compatible with AHBPROT (AHBPROT-enabled or AHBPROT supported). You can get one in this thread by @XFlak: https://gbatemp.net/threads/x-flaks-top-wii-channels.205622/
- An original Wii VC WAD file of the system you want to make the VC forwarder channel of the SRL of a homebrew emulator. (It’s required to extract the original 0000000.app and use it on our forwarder WAD, which this will be explained later.) Don’t ask me where you can find one.
- @XFlak’s ModMii tool (it’s required for use the ModMii Forwarder Builder for make the required DOL forwarder for load the emulator DOL and read the meta.xml arguments, it’s based in @FIX94’s Forwarder with meta.xml support.) Download it here in this link.
- fxxkmii's wwPacker (download link).
- @Leathl’s CustomizeMii (download link).
- @HowardC’s Wii VC WAD Editing Tools (download link). These tools require the Microsoft Forms 2.01, all the required Microsoft Visual C++ Redistributables, Microsoft ActiveX Control Pad and other required plug-ins to be installed, if you don’t know how to prepare your PC for these tools, here’s a tutorial for it in this link.

Procedure:
FIRST STEP – TAKING A SCREENSHOT OF YOUR GAME
- Get your ROM of your game you want to make autoload in a custom Single ROM Loader. Then emulate it using your favorite emulator on your PC (it depends of your game console).
- Take a snapshot of your game. Use Snipping Tool to do it.
- Click in 'New' and use the mouse to take it.
- Save the snapshot in a folder with the name of the game.
- Continue with the SECOND STEP.
IMPORTANT WARNING: DO NOT DO THIS STEP UNLESS YOU REALLY KNOW WHAT ARE YOU DOING!!! If you don’t know what I am speaking about 00000000.app replacing, then DO NOT DO THIS STEP and skip to THIRD STEP. However, skipping this step (SECOND STEP) you are not able to replace the VCPic.tpl and IconVCPic.tpl (but also LogoXXX.tpl) files with your game’s image in the SIXTH STEP, but you still can inject the forwarder DOL, edit the Channel name, the title ID, and the IOS used.
- First, grab the Wii VC WAD of the game’s system you want to use for take the VC banner of the game system
- Then unpack it with wwPacker tool (download link). Drag your WAD file you want to extract its 00000000.app file for use it in the DOL base WAD and drop it into __wwunpacker.bat batch file.
- Rename the new folder of the unpacked VC WAD as “VC_banner_unpack”
- Now, grab the DOL base WAD you want to use for make for the game, which you got in this link https://gbatemp.net/threads/x-flaks-top-wii-channels.205622/
- Then unpack it with wwPacker tool (download link). Drag your WAD file you want to replace its original 00000000.app file with the new one and drop it into __wwunpacker.bat batch file.
- Rename the new folder of the unpacked DOL base WAD as “base_WAD_SRL_unpack”
- Now, go to the “VC_banner_unpack” folder and then copy its 00000000.app file
- Then, go to the “base_WAD_SRL_unpack” folder and then paste the new 00000000.app file you have copied replacing the old one
- Return to the “wwPacker” folder, delete the “VC_banner_unpack” folder, then drag the “base_WAD_SRL_unpack” folder (where are the files of the new DOL base WAD with your custom 00000000.app file) and drop it into __wwpacker-NoMod.bat batch file.
- Once finished packing the new WAD, you will see a new DOL base WAD called “base_WAD_SRL_unpack [NoMod].wad”. Continue with the THIRD STEP.
In this part of this tutorial, we will use the ModMii Forwarder Builder function/section/tool from @XFlak’s greatest (and awesome) tool ModMii, for make the required SD/USB Forwarder DOL with meta.xml arguments support for our custom SRL and VC forwarder channel, basing in the great work in the Forwarder with meta.xml support from @FIX94.
- Download and install ModMii by @XFlak here in this link. (IMPORTANT NOTE: download the English version since it’s the most updated)
- Once installed ModMii, launch ModMii (or ModMii Classic) from the Start Menu (NOT ModMii Skin, it’s different from ModMii Classic).
- When the DISCLAIMER screen appears, write “I Agree” (without quotes), then press Enter. Then let check for updates (if update prompt appears, then update ModMii and let it restart again ModMii) and pass to the main menu screen.
-

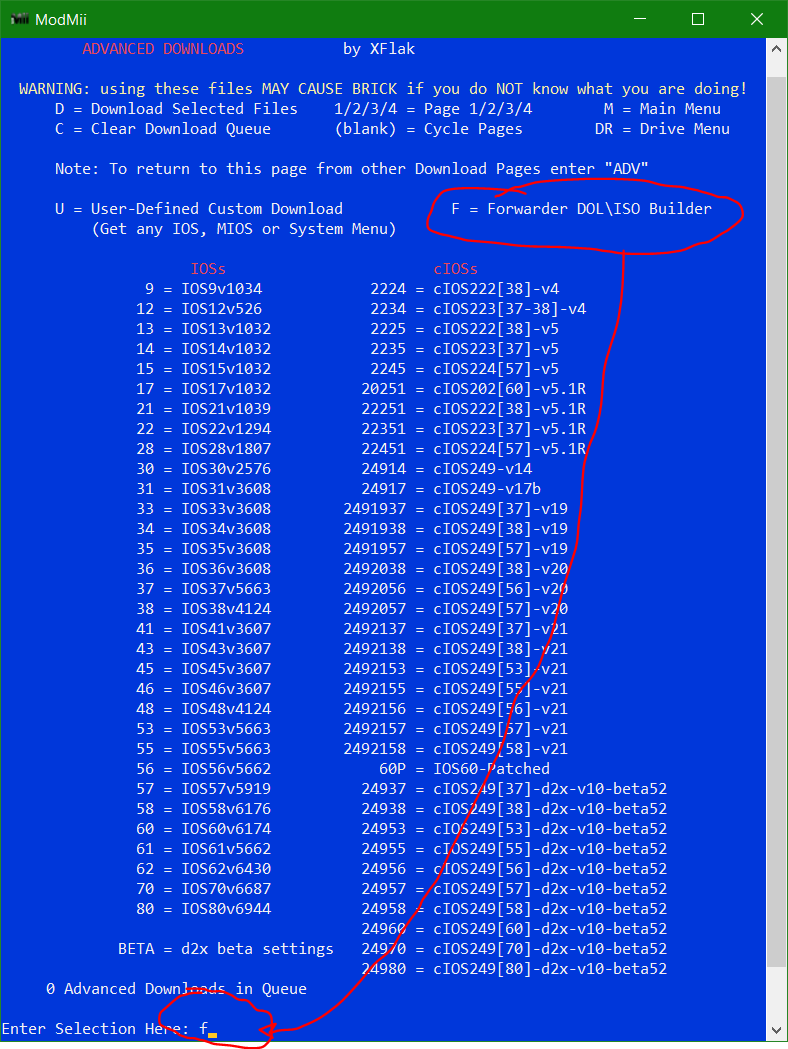
- When the main menu screen appears, type the A letter for choose "Advanced Downloads and Forwarder DOL/ISO Builder", then press Enter. The “Advanced Downloads” section appears.

- When the “Advanced Downloads” menu appears, type the F letter for choose "Forwarder DOL/ISO Builder", then press Enter. The “Forwarder DOL/ISO Builder” menu appears.
- When the “Forwarder DOL/ISO Builder” menu appears, type the 1 number for choose “DOL”, then press Enter for go to the next step.

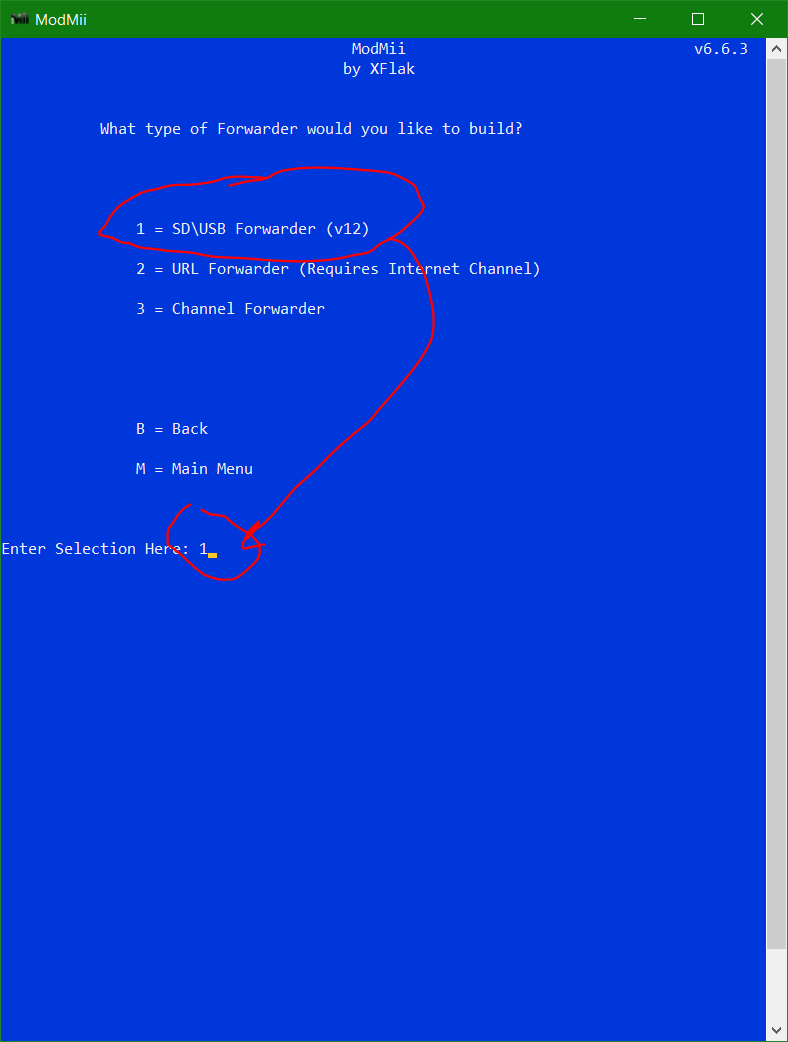
- When the “Type of Forwarder” question appears, type the 1 number for choose “SD/USB Forwarder (v12)”, then press Enter. This will allow us to build the required Forwarder with meta.xml support from @FIX94.
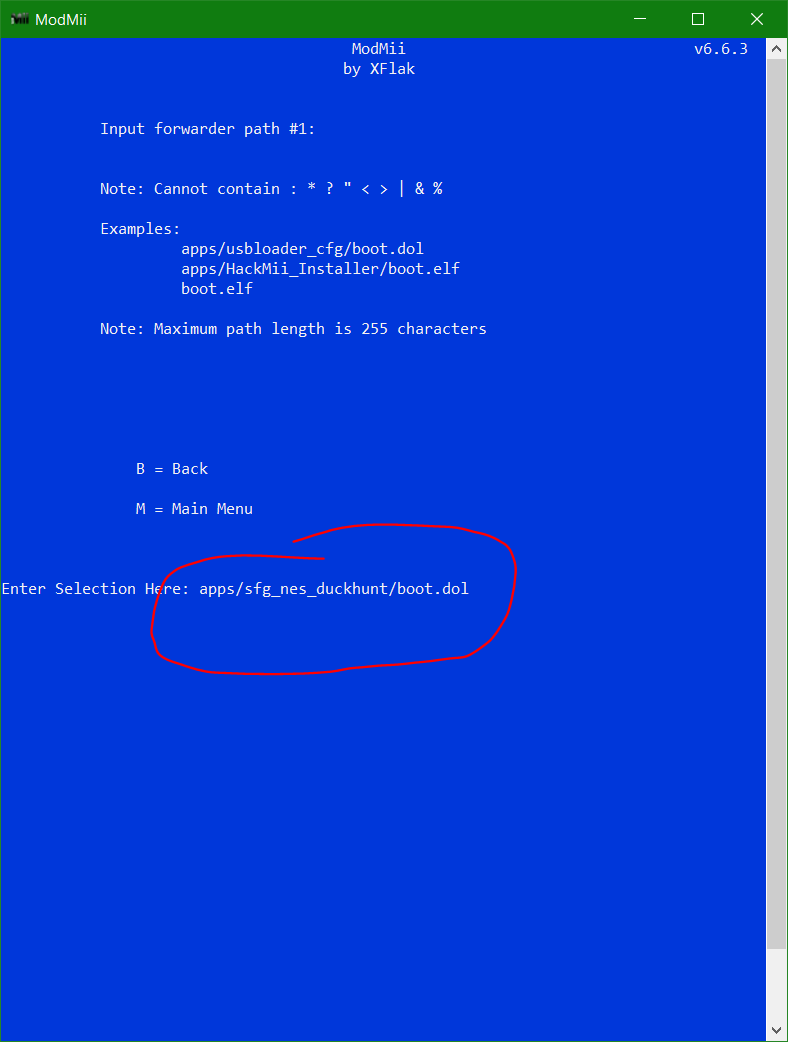
- When the “Input forwarder path” question appears, type the path of the boot.dol of the SRL you want to load (apps/your_game_SRL/boot.dol), then press Enter. The max limit of characters for your path is 255 characters. Example: apps/sfg_nes_duckhunt/boot.dol
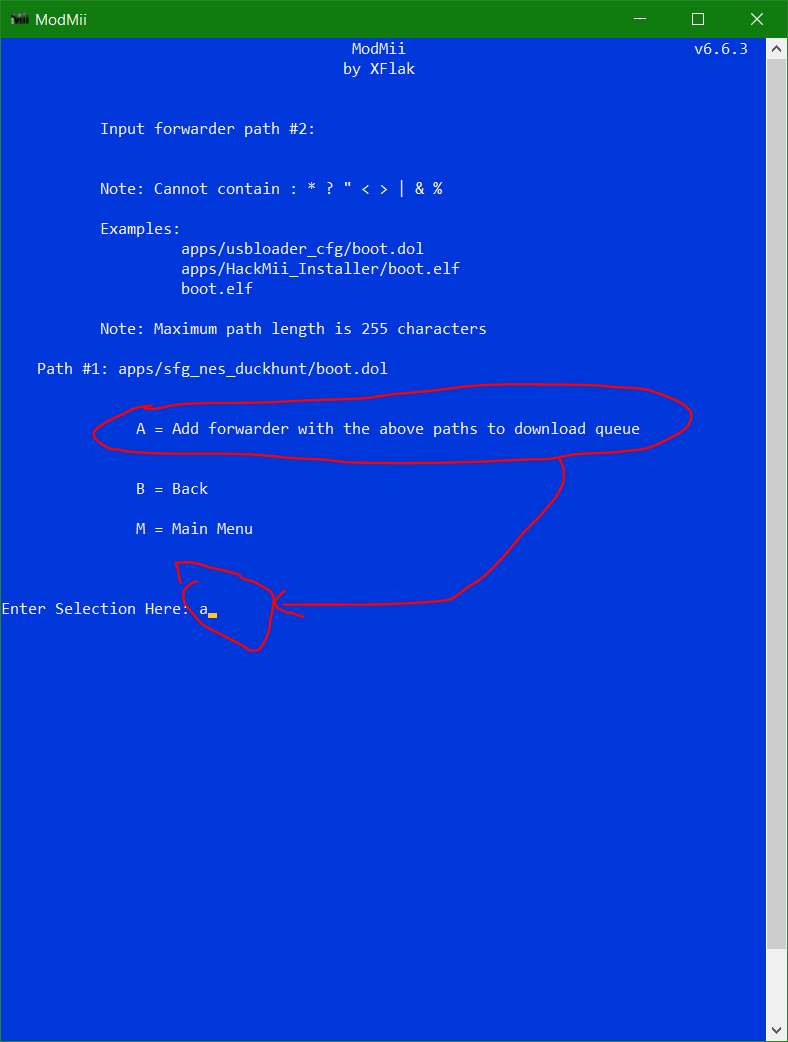
- When the desired path that you specified appears as “Path # 1”, type the A letter for choose "Add forwarder with the above paths to downloads queue", then press Enter for go to the next step.
- When the “Name of the forwarder” question appears, type a name for the new forwarder DOL file (without any spaces), then press Enter for add your forwarder to the Downloads Queue and return to the Main Menu. Example: FCEUXTX_DuckHunt
- AN IMPORTANT HINT: For avoid confusion, it is recommendable to put as name the folder you written in the path for the forwarder, for example: if path is apps/sfg_nes_duckhunt, then the forwarder DOL file should be called sfg_nes_duckhunt

- When the main menu screen appears again (after doing the previous steps), type the D letter for choose "Download Selected Files", then press Enter. The “Download Confirm” screen appears.

- When the “Download Confirm” screen appears, type the Y letter for select "Yes, Begin Downloading", then press Enter.

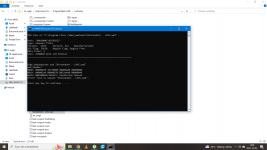
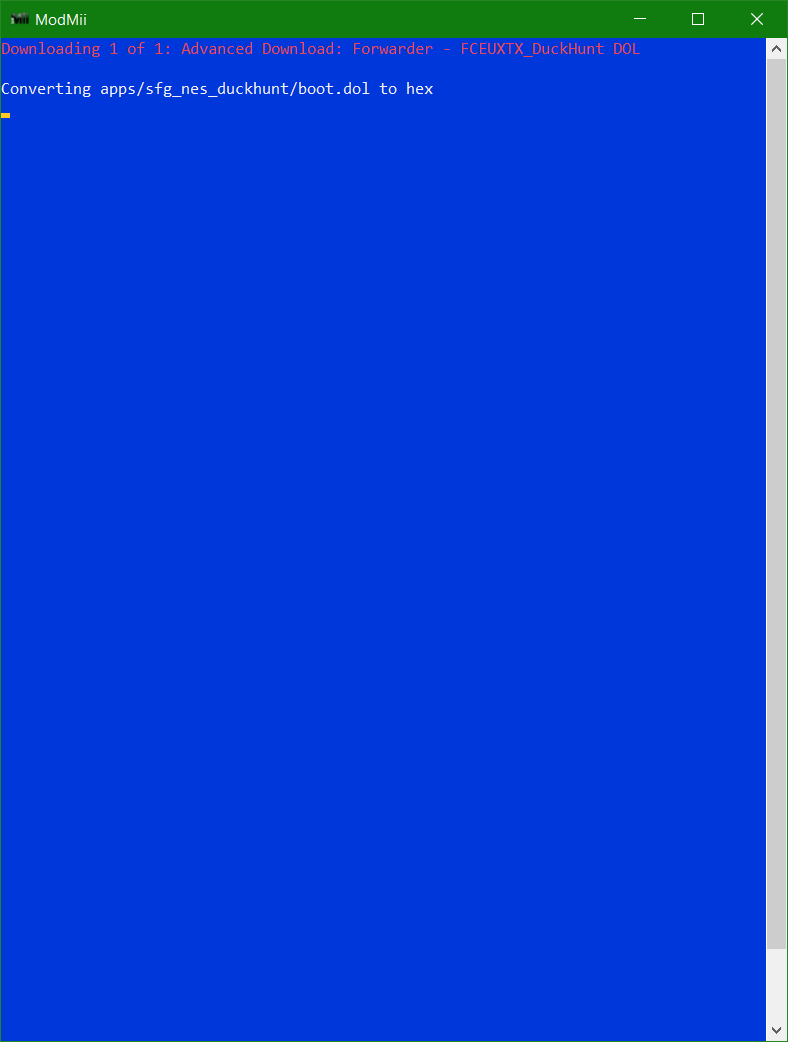
- ModMii Forwarder Builder is making your DOL forwarder with meta.xml support, please wait for a while…
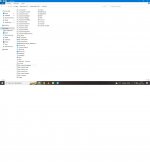
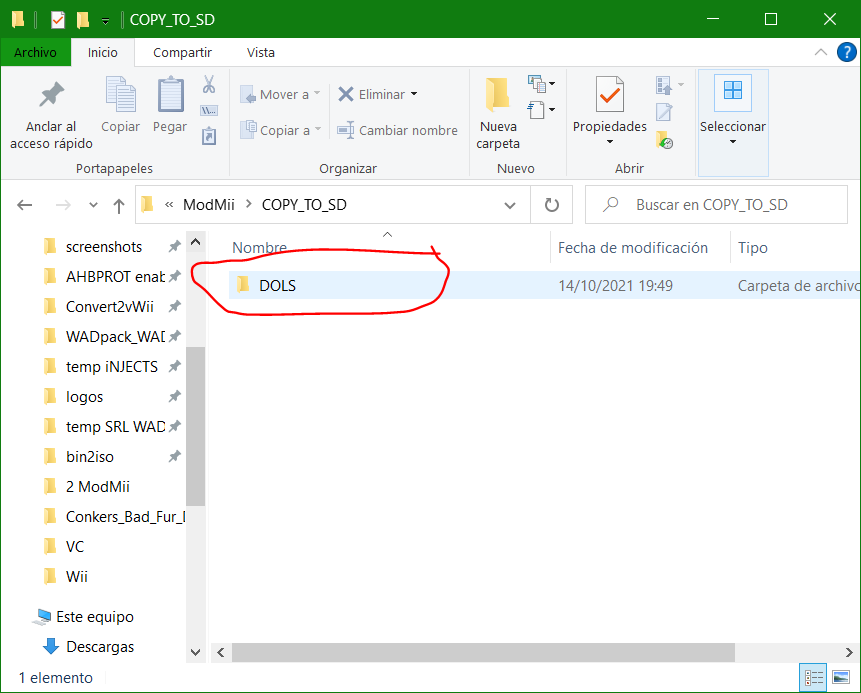
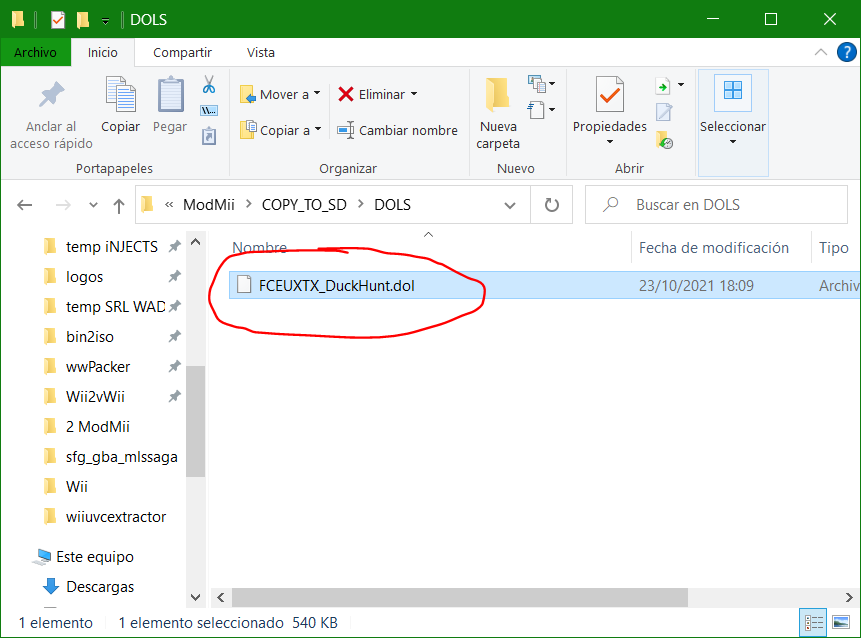
- When it’s finished, the “Successful” screen appears. Type the O letter for choose "Open File Location "COPY_TO_SD"", then press Enter for open the “COPY_TO_SD” folder from ModMii.

- When the “ModMii/COPY_TO_SD” folder appears, open the “DOLS” folder.
- Your DOL forwarder with meta.xml support was created, ready for inject. Now let’s go to configure the SRL for load your game. Save this DOL forwarder into the same folder where you found it, we will need it later for make the Wii/vWii and Wii U forwarder channels. Continue with the FOURTH STEP.
This part is so one of the more interesting steps in this tutorial, because we are now going to configure the Single ROM Loader (SRL) of our chosen Wii homebrew emulator for load (open) & start automatically the game ROM you want to play on startup. For do this, follow these steps:
- Download the custom Single ROM Loader (SRL) of your desired emulator in my thread: https://gbatemp.net/threads/my-coll...-for-some-best-wii-homebrew-emulators.591509/
- Extract the contents of the custom SRL in a new folder with the name of your game.
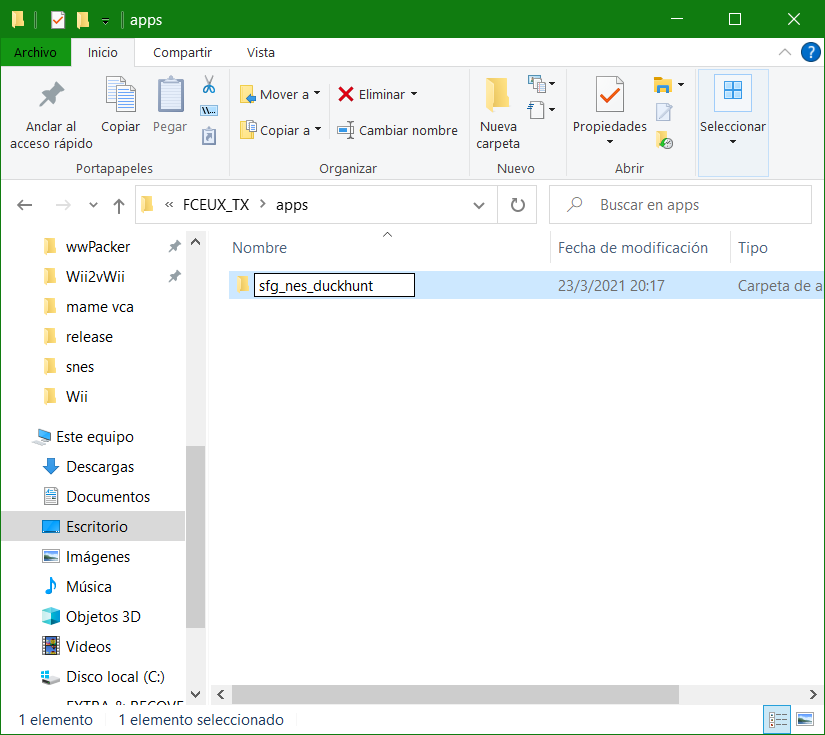
- Now go to the folder with the name of your game (where you extracted the contents of your SRL), then open the “apps” folder.

- In the “apps” folder, there’s the emulator folder (in my example for the FCEUX TX SRL, the folder is “nessinglerom”. Depending of the SRL, it can have a different folder name, but it’s for avoid confusion between emulators.)
- Rename the folder of the custom SRL found in the “apps” folder with the name of the folder you specified in the path when you were creating the DOL forwarder in the THIRD STEP, without any spaces. Example: If the specified path in the DOL forwarder you made is “apps/sfg_nes_duckhunt/boot.dol”, then the folder of the emulator SRL must be renamed as “sfg_nes_duckhunt”.
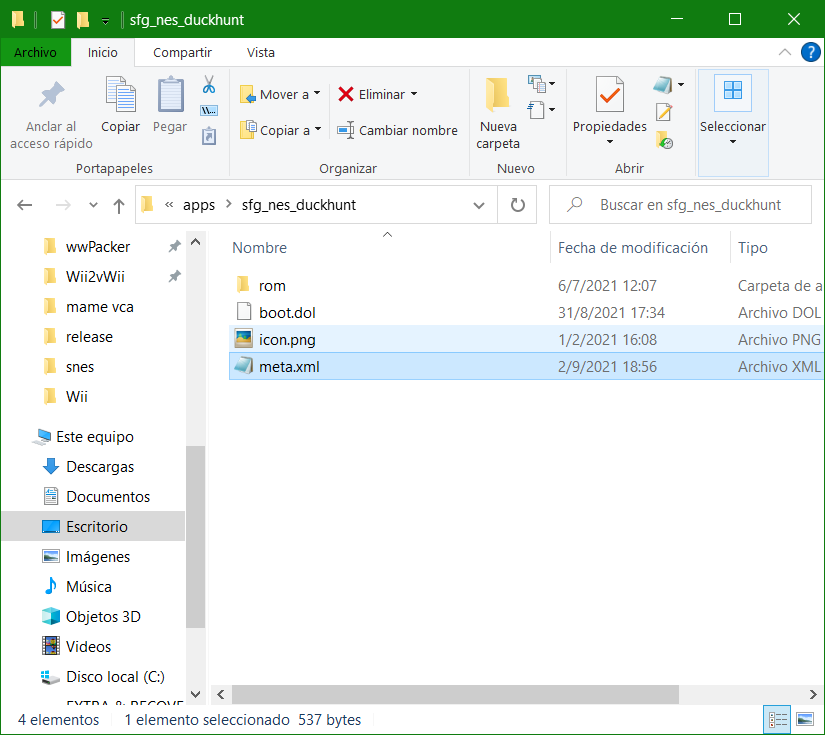
- Now open that folder that you renamed for match the path of your DOL forwarder. Then, open the “rom” folder (or the “game” folder).

- When the “rom” folder (or “game” folder) has opened, copy the ROM file of your game you want to load in the SRL and the paste it in the “rom” (or “game”) folder.

- Rename the ROM file you pasted with a short name (ex. If ROM name was “Duck Hunt (W) [!].nes”, then rename it to just “DuckHunt.nes”.

- Return to the SRL folder, then open the meta.xml file with a text editor (example, Notepad).
- When the meta.xml file opens, it’s time for do some adjustments for make it load the game. NOTE: The following procedure applies to most SRLs, but some SRLs have different arguments, which I will explain later in the “Single ROM Loaders with different arguments” tab.
- Let’s do the first thing: edit the folder path of the game you want to load. First of all, select the old path and delete the old folder path.

- First, put the name of the device from where you want to load (sd:/ for SD card, usb1:/ for USB device), then write the path for load the SRL folder, but it must match the folder of the SRL you renamed, and without the boot.dol word, but with the folder that you pasted the ROM for load the game (sd:/apps/your_game/rom or usb1:/apps/another_game/game). Example: if for the DOL forwarder we are using the path “apps/sfg_nes_duckhunt/boot.dol”, the stored ROM for load is in the “rom” folder and we are loading from the SD card, then we will write sd:/apps/sfg_nes_duckhunt/rom as the folder path.
- NOTE: I don’t know if for USB it’s usb:/ or usb1:/ , so you have to test with these and see in what type of USB prefix it works.
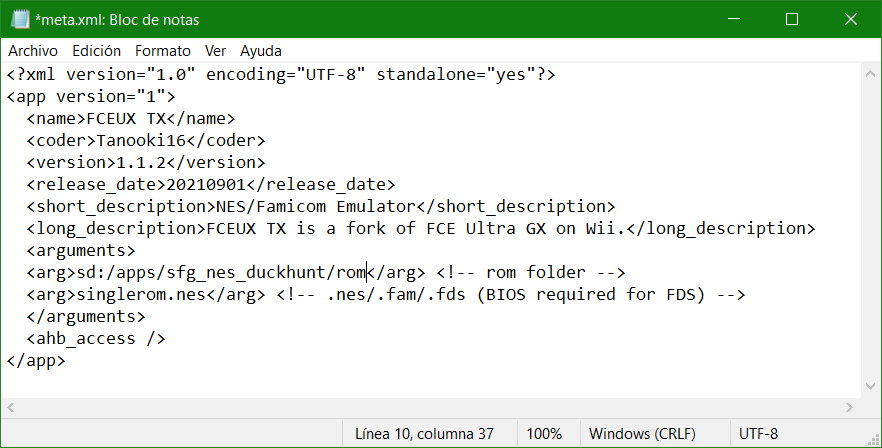
- Now, let’s go to the “ROM file to load” part. First delete the old file name specified in the SRL.

- Now, enter the file name of the ROM you renamed previously when you pasted and renamed your ROM into the “rom” (or “game”) folder in the SRL. Example: if you renamed the ROM as “DuckHunt.nes”, then the ROM file to load is “DuckHunt.nes”.

As I explained in the FOURTH STEP, there are Single ROM Loaders (SRL) with different arguments, which are different than regular ones found in most SRLs, so I will explain a bit how to use these arguments correctly in some emulators.
Not64 Second Edition (N64 Emulator) (@Extrems)
<arg>SkipMenu=1</arg> <!-- This is for skip the emulator menu and autoload & autostart the rom, DO NOT DO ANYTHING HERE! -->
<arg>rompath=“sd:/apps/not64_SRL/rom/my_game_rom.z64”</arg> <!-- Put the full path of the ROM file you want to load on startup. Example: sd:/apps/sfg_n64_banjok/rom/BanjoKazooie.z64 -->
RA-SS / RA-HEXAECO cores (@SuperrSonic)
<arg>sd:/apps/ra_mgba_srl/game</arg> <!-- Path of the folder where is the stored the ROM -->
<arg>game.gba</arg> <!-- ROM of the game system emulated (depends of the RA core) -->
<arg>sd:/apps/ra_mgba_srl/config.cfg</arg> <!-- Full path where will store/load the config.cfg (core settings) file -->
RetroArch Wii cores (@LibretroRetroArc)
<arg>sd:/apps/ra_mgba_srl/game</arg> <!-- Path of the folder where is the stored the ROM -->
<arg>game.gba</arg> <!-- ROM of the game system emulated (depends of the RA core) -->
mGBA Wii - Official standalone Wii port
<arg>sd:/apps/mGBA_srl/game/game.gba</arg> <!-- Complete path of the GBA ROM file to load -->
DeSmuME Wii (@Maxternal)
<arg>sd:/apps/desmume_srl/game/game.nds</arg> <!-- Complete path of the NDS ROM file to load -->
<arg>2</arg> <!-- Argument for enable software rendering (Soft) instead of hardware rendering (GX), use only if the hardware rendering (GX) has problems -->
Mupen64GC-FIX94 (@FIX94)
<arg>sd:/apps/mupen64gc/game</arg> <!-- Path of the folder where is the stored the ROM -->
<arg>game.z64</arg> <!-- ROM of the game to load -->
<arg>loader</arg> <!-- required argument for make this magic work -->
- Now, edit the name of the game for the SRL. Between the <name> and </name> tabs, here’s the name of the emulator. Delete that old name.
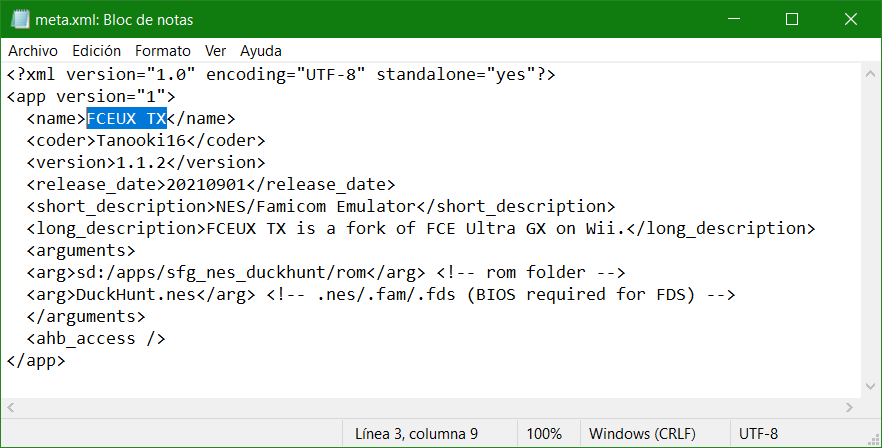
- Now enter the name of the game you want to load. Example: If the game you want to load in the SRL is Duck Hunt, then type “Duck Hunt” (without any quotes).

- One you have finished editing your meta.xml file of your SRL, save the changes made to the meta.xml file.
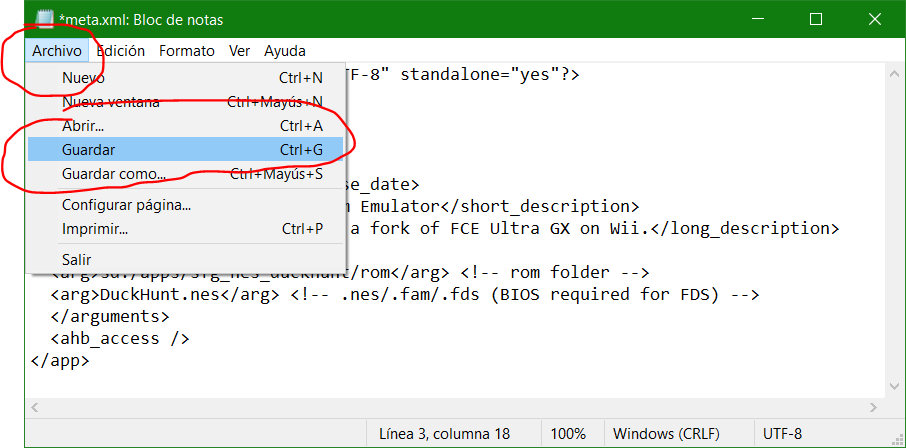
- Continue with the FIFTH STEP.
In order for be able to use the SRL in your Wii (for be able to be loaded from the Homebrew Channel and also from your forwarder DOL/forwarder WAD), you need to copy the contents of your custom SRL in the SD card or USB device. For do this, follow these steps:
- Now, once finished putting the ROM file for load and configuring the SRL, you need to copy all the contents of it in your SD card or USB device. (In case you want to install your custom SRL on Dolphin Emulator, check this guide for put the files in the virtual SD card: https://gbatemp.net/threads/how-to-...h-imdisk-and-how-to-use-it-on-dolphin.602677/)
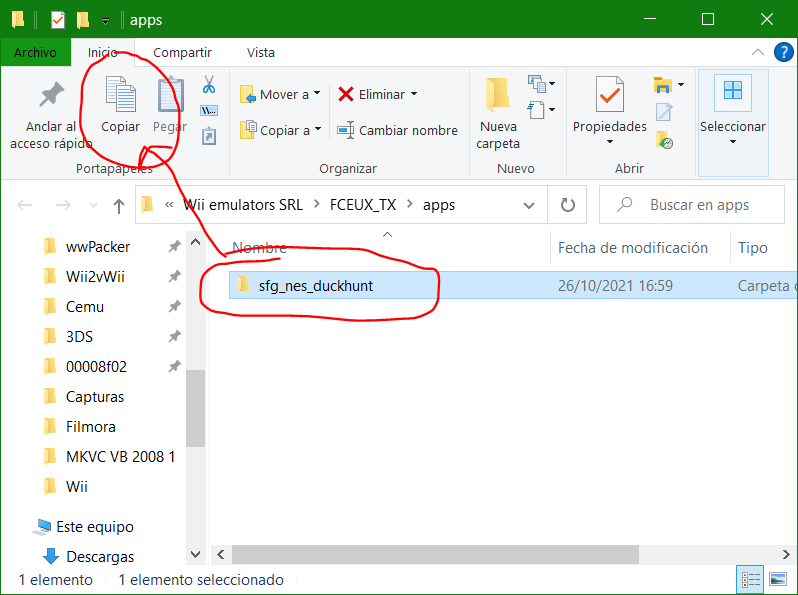
- First, go to the “apps” folder of your SRL (come back to “apps” folder from your SRL’s folder).
- Then, copy your custom SRL folder and paste it into the “apps” folder in the device you chosen to load (ex. If the folder is sfg_nes_duckhunt, and the chosen device is SD, then copy the SRL folder to sd:/apps/, and the resulting folder must be shown as sd:/apps/sfg_nes_duckhunt/) If you don’t understand, first copy your custom game SRL folder, then open your SD card or USB device, then open the “apps” folder and paste the SRL folder in here.


- Your SRL files are ready to use. Now, let’s now insert the DOL forwarder we made in the forwarder WAD we chosen and replaced its 00000000.app and customize it.
- Continue with the SIXTH STEP.
Now we have finished making your own custom Single ROM Loader (SRL) for your game on your chosen homebrew emulator in the FOURTH STEP, and the required SD/USB Forwarder dol with meta.xml support in the THIRD STEP, let's inject the DOL forwarder on our custom forwarder WAD made in the THIRD STEP, and what about also some customization for make it look like a true professional VC-looking channel? For do these, follow the following steps:
- Download CustomizeMii from this link, then extract its contents in a folder called "CustomizeMii" your C:/ drive
- Now run CustomizeMii.exe as administrator
- In Source Wad box, select the forwarder WAD that you prepared for DOL forwarder injection (the WAD file called base_WAD_SRL_unpack [NoMod].wad that you made with wwPacker in the SECOND STEP), then click in "Open".
- Click in the 'Title' tab, delete the translations, and write the name of the game you want to inject in the "All Languages" box.
- Click in the ‘Options’ Tab, then edit the ID in the "Title ID" box. If necessary, change the IOS used in the "Startup IOS" box to IOS58 (recommended) or IOS35.
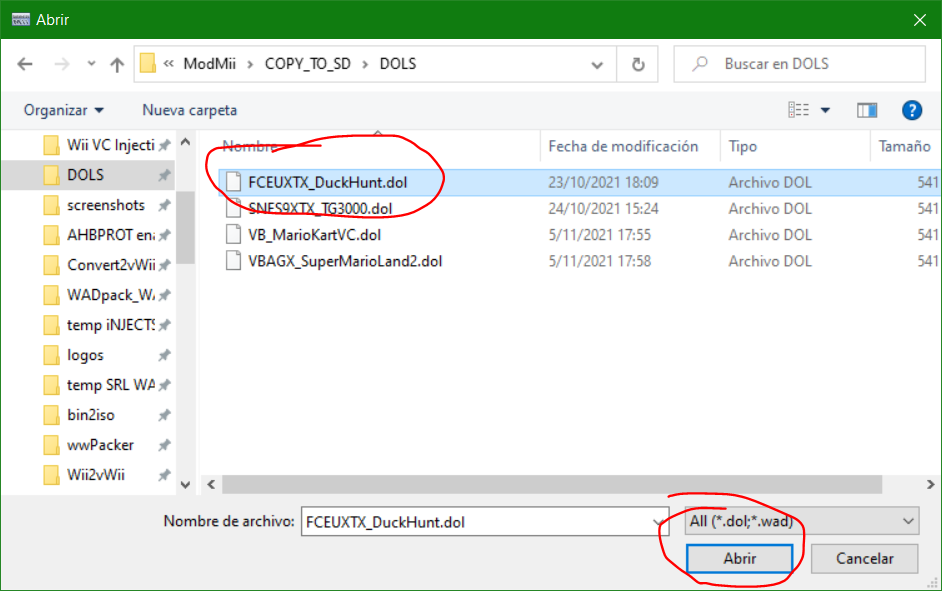
- Now, inject the forwarder DOL that you made with ModMii in the THIRD STEP. For this, in the “New DOL” box, click in the “Browse…” button, then select “Load DOL File”.

- Go to the C:/ModMii/COPY_TO_SD/DOLS/ folder, then select the forwarder DOL you made for your game’s SRL, then click in "Open". The path of your selected forwarder DOL appears in the “New DOL” box.
- Now, in the “NAND Loader” option, leave the chosen Nandloader option to “comex”. NOTE: If with comex Nandloader the emulator crashes or throws DSI exception / code dump error (“Exception (DSI) occurred!”), such on WiiMednafen, then try using “Waninkoko” as NAND Loader.

- Click in the 'Banner' tab, and select the 'VCPic.tpl' file.
- Click in the 'Preview' button
- In 'Banner', select again 'VCPic.tpl', then click in 'Replace', and select 'RGBA8'
- Select the screen capture file of your game that you maked in Snipping Tool
- If the system you want to make the SRL is different from the system you took, then edit also the my_BackXXX_a.tpl (for example, my_BackNES_a.tpl). First, in ‘Banner’, select ‘my_BackXXX_a.tpl’, then click in ‘Replace’, select ‘I4’ and choose an image of the logo of the system you want to make the forwarder channel.
- Now, in 'Icon', select 'IconVCPic.tpl', then click again in 'Replace', and select 'RGBA8'
- Select the screen capture file of your game again that you maked in Snipping Tool
- If the system you want to make the SRL is different from the system you took, then edit also the LogoXXX.tpl (for example, LogoNES.tpl). First, in ‘Icon’, select ‘LogoXXX.tpl’, then click in ‘Replace’, select ‘RGBA8’ and choose an image of the logo of the system you want to make the forwarder channel.
- Close the Preview window
- Go to the 'Layout' tab
- In 'Banner', select the 'banner.brlyt' file and extract it

- Save in a folder called “brlyt”, then minimize CustomizeMii
- Now open the HowardC tools folder, then open the 'VCbrlyt9.0' folder, and run vcbrlyt.exe as administrator
- Click in the '...' button to localize the banner.brlyt file, and select the 'banner.brlyt' file that you extracted with CustomizeMii
- Edit the banner.brlyt file as shown:
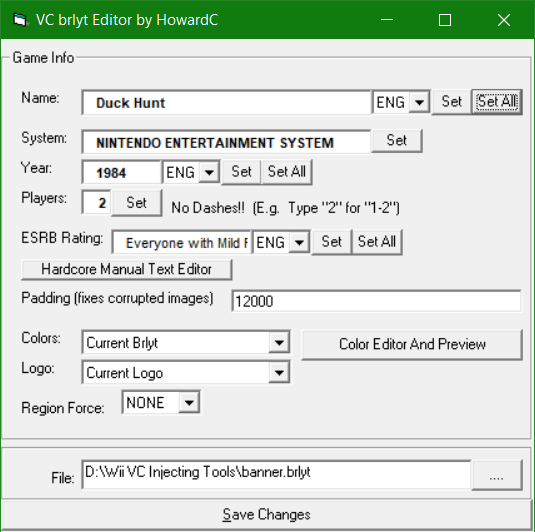
- Name: [Game Name]
- System: [system that was released the game] (ONLY IF THE SYSTEM’S NAME IS DIFFERENT)
- Year: [year that was released the game]
- Players: [# of allowed players], NO DASHES!!!! (Ex., write '2' for '1-2')
- ESRB Rating: [ESRB age rating of the game] (only if required)
- Then follow the following steps:
- Click in ‘Set All’ in each box you edited (except System & Players that you must click in ‘Set’), then click in 'Save Changes', then close the VC brlyt Editor
- In CustomizeMii, select again the 'banner.brlyt' file and click in 'Replace'

- Select the 'banner.brlyt' file that you edited, then click in 'Create WAD'. If the 'You changed the brlyt file, but you didn't change the brlan file. Are you sure this is correct?' window shown, select 'Yes' or 'OK'.
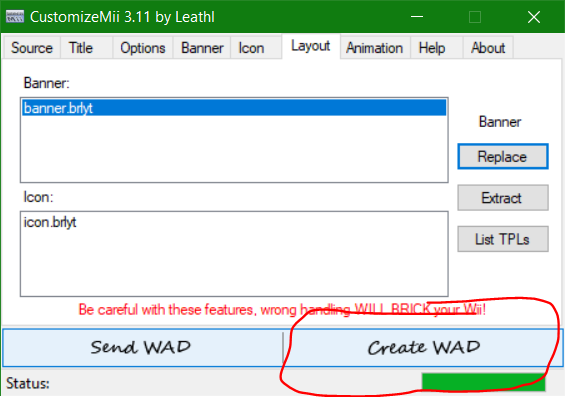
- Save the WAD as [game_name]_[system]_SRL_forwarder.wad - Example: DuckHunt_NES_SRL_forwarder.wad
- Close CustomizeMii, and you’re done.
- Copy the resulting Wii forwarder WAD to the “WAD” folder of your SD card or USB device (sd:/WAD/ or usb:/WAD/), then connect to your Wii, install the forwarder WAD and enjoy!
- IMPORTANT NOTE: If you're using the forwarder WAD of your SRL in the vWii (virtual Wii) mode of Wii U, please read the EXTRA STEP 1 below. As an alternative, if you prefer to launch the SRL irectly from the Wii U Menu (homescreen), read the EXTRA STEP 2 below.
If you're going to install and use your SRL (Single ROM Loader) in the vWii (virtual Wii) mode of the Wii U, then you need to do this EXTRA STEP, because the original Wii version forwarder won't run on vWii of Wii U, and viceversa (the vWii version can't be run on original Wii)).
For convert your Wii forwarder WAD for be able to use it with vWii (virtual Wii mode) of Wii U, then follow these steps:
- Download my WiiForwarder2vWii tool made by me (@SaulFabre) here in this link: https://gbatemp.net/download/wiifor...-wii-u-forwarder-converter-beta-version.37254
- Extract the contents of WiiForwarder2vWii in any folder on your C:/ hard disk drive.
- Take your forwarder WAD made in the SIXTH STEP, copy it and paste into the folder "WAD_INPUT" in the WiiForwarder2vWii (Wii2vWii) folder
- Launch (open) WiiForwarder2vWii_WiiU.exe, then follow the instructions on-screen. If any prompts to change title ID or IOS base to load to outputed vWii WAD, then follow the instructions for change them.
- When the WiiForwarder2vWii tool shows the "All done!" ("Success!") screen, close WiiForwarder2vWii.
- Go to the WAD_OUTPUT folder, then copy the resulting vWii forwarder WAD to the "WAD" folder of your SD card or USB device (sd:/WAD/ or usb:/WAD/), then connect to your Wii U, launch the vWii mode, install the forwarder WAD and enjoy!
EXTRA STEP 2: MAKING A Wii U CHANNEL FORWARDER FOR YOUR SRL (LAUNCH YOUR SRLS DIRECTLY FROM THE Wii U MENU)
For make a Wii U channel forwarder (a forwarder channel that you can launch directly from the Wii U Menu, without having to go to the vWii mode) for your custom SRL for your game, follow these steps:
(Guide for making Wii U forwarders to vWii SRLs provided by @AdamCatalyst)
For TeconMoon's Wii VC Injector users:
- Download TeconMoon's WiiVC Injector Mod by timefox. Once you have downloaded it, launch the application.
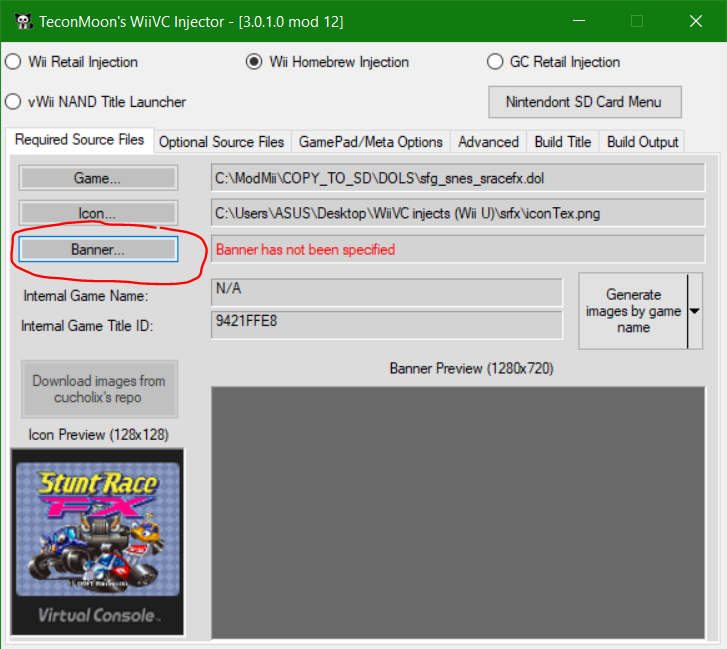
- At the top centre of the screen, select "Wii Homebrew Injection."

- On the left side of the screen, click on “Game…” and select the forwarder DOL file you have created earlier with ModMii on the THIRD STEP.

- On the left side of the screen again, click on “Icon…” and select a 128 px x 128 px image. This is the icon that will show up in the Wii U menu. You can use the añternative images provided in AdamCatalyst's Wii U forwarder resource pack, but i'd make my own Wii U VC banner & icon images using UWUVCI AIO by @NicoAICP.

- On the left side of the screen again, click on “Banner…” and select a 1280 px x 720 px image. This is the image that will show up on the TV when the Wii U channel is launched. Again, images are provided in AdamCatalyst's resource pack in the previous step, or use your own images (i use Wii U VC ones).
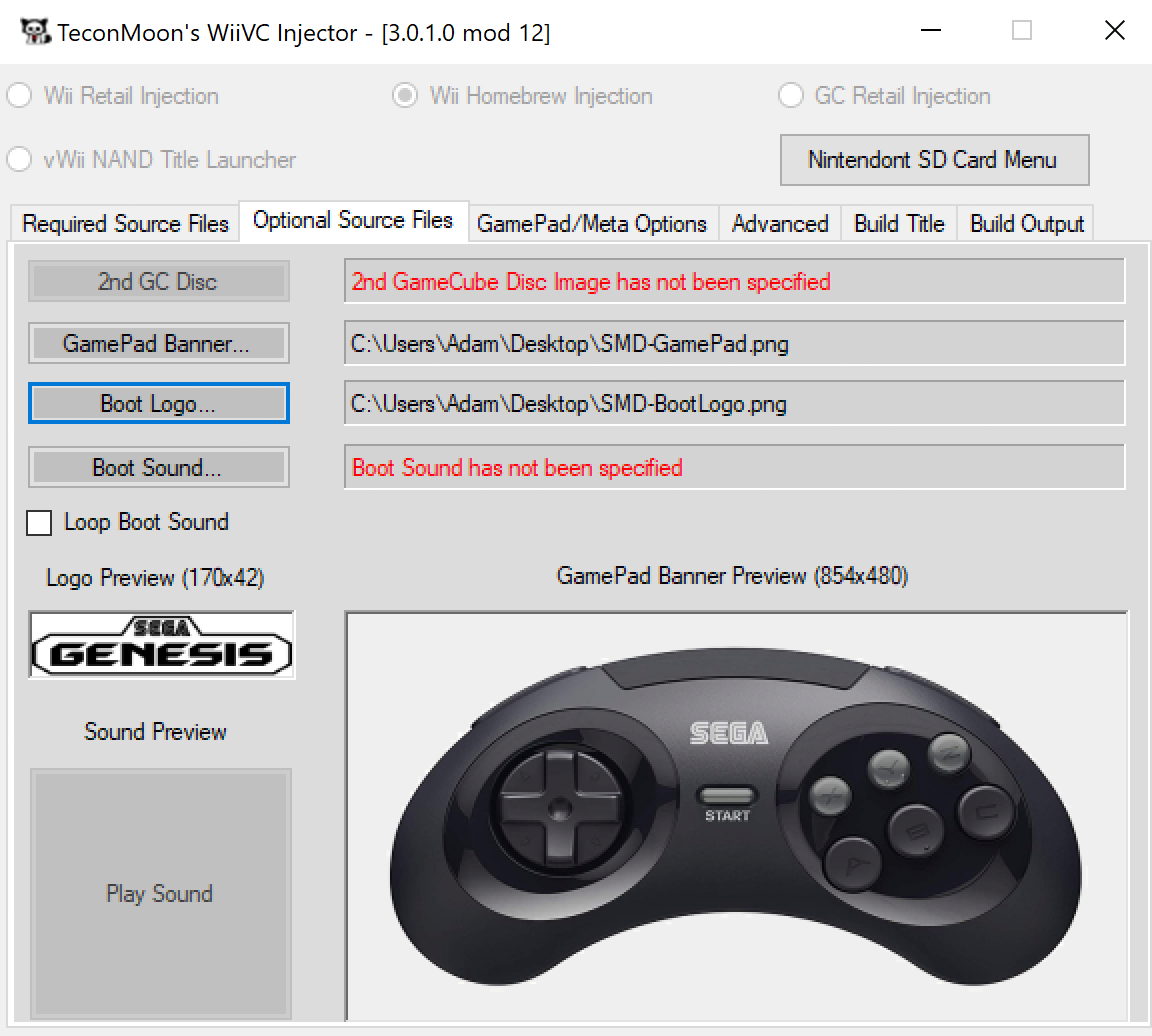
- OPTIONAL, but recommended: Navigate to the second tab of options, titled “Optional Source Files.” Here you can specify the 854 px x 480 px image that shows up on the GamePad after launching the channel, and the 170 px x 42 px image that appears briefly on the GamePad in the top left corner while loading. It is highly recommend to use an image with a transparent background for this smaller Boot Logo, because of the way the image is composited against the background. Again, you can use the images provided in AdamCatalyst's resource pack. You can also specify a loading sound here as well. But in my case i will leave this unmodified.
- Navigate to the third tab of options, titled “GamePad/Meta Options.”

- Specify the “Name to use for the package Title…” which sets the name that will show up in the Wii U Menu.
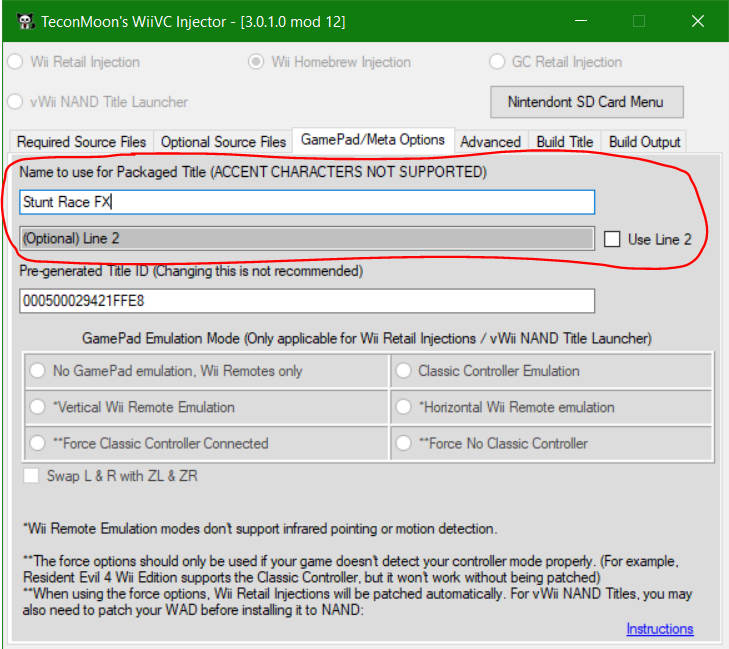
- IMPORTANT. Now you must set a unique, valid, Title ID in the “Pre-generated Title ID” field. If you are not sure how to do that, here is the method we will use.
9.1 Method # 1: Using the IDs of the Wii/vWii WAD for give a ID for the Wii U WUP
9.1.1 Take the 4-digit Title ID you gave to the original Wii/vWii WAD in the SIXTH STEP. Examples:
9.1.2 Now convert your title ID you have to hex numbers Use this online tool: https://www.rapidtables.com/convert/number/ascii-to-hex.html Converting our examples, so that gives us…Code:FDHE JY1S NV4S QGDS EPCM
Code:FDHE → hex → 46444845 JY1S → hex → 4A593153 NV4S → hex → 4E563453 QGDS → hex → 51474453 EPCM → hex → 4550434D
9.1.3 Combine the digits after the base number 00050002. This prefix code is the valid Wii U code for a Demo or Kiosk title. There were not a lot of these titles released, so very few of the numbers in this series are taken. So for example…
Code:0005000246444845 000500024A593153 000500024E563453 0005000251474453 000500024550434D
That’s how Imake my Wii U Title IDs for my Wii U channel forwarder for SRLs using Wii/vWii Title ID.
9.2 Method # 2: Making a Title ID using the name of the game loaded in the SRL
9.2.1 Take the full name of the target game SRL or app you are forwarding to. Examples:
9.2.2 Reduce the name to a three character contraction, with the following rules…Code:FCEUX TX Genesis Plus GX Snes9x RX Wii64 WiiMednafen
- the first character is the first character in the first word.
- second character is the first character in the second word. If no second word exists, use the second last letter in the word.
- third character is the first character in the third word. If no third word exists, use the last letter in the last (or only) word.
Code:FUT GPG S9R W64 WMN
9.2.3 Convert each letter to it's number value in the alphabet, with two digits. So A=1, B=1, etc., while numbers stay as themselves. So that gives us…
Code:062120 071607 190918 230604 231514
9.2.4 Combine the digits after the base number 00050002. This prefix code is the valid Wii U code for a Demo or Kiosk title. There were not a lot of these titles released, so very few of the numbers in this series are taken. So for example…
Code:00050002062120 00050002071607 00050002190918 00050002230604 00050002231514
9.2.5 Add a two-digit serial number to the end. Start with 00 and increase by 1 to resolve any conflicts.
Code:0005000206212000 0005000207160700 0005000219091800 0005000223060400 0005000223151400
So that means If I had a second installation of an app with the exact same name initials as one of these (an alternate Wii64?), the last two digits of that would be 01:
Code:0005000223060401
That’s how I keep my fake but valid Title IDs unique.
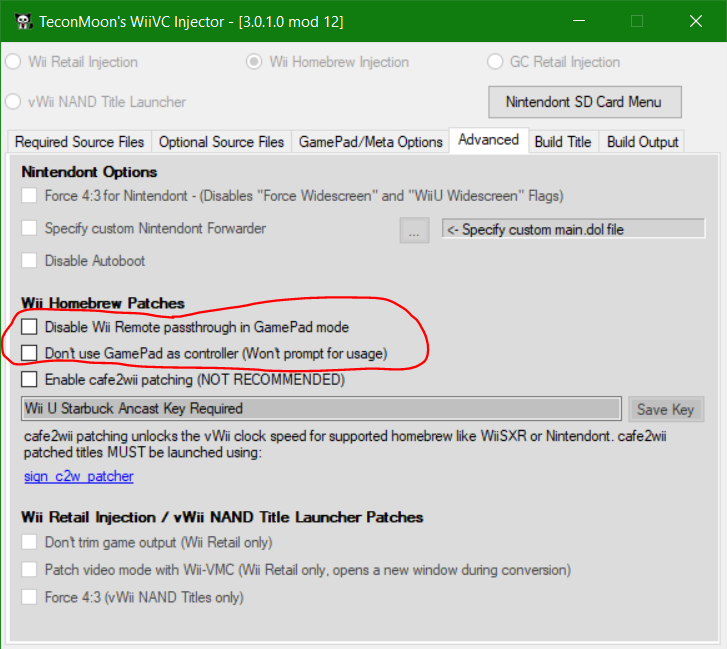
- OPTIONAL STEP 1: If you are making a SRL forwarder which uses WiiSX-RX, Wii64, Nintendont or some other homebrew that benefits from cafe2wii (C2W) patches (vWii overclocking), navigate to the fourth tab, titled “Advanced”. Continue with the OPTIONAL STEP 2.

- OPTIONAL STEP 2: In the "Advanced" tab, here you tell the forwarder to disable the Wiimote passthrough (pairing, connecting) when on GamePad mode, and/or don't ask for GamePad usage. But by default, the forwarders will work fine without messing with these settings, so don't use them if you have no idea about these. Continue with the OPTIONAL STEP 3.
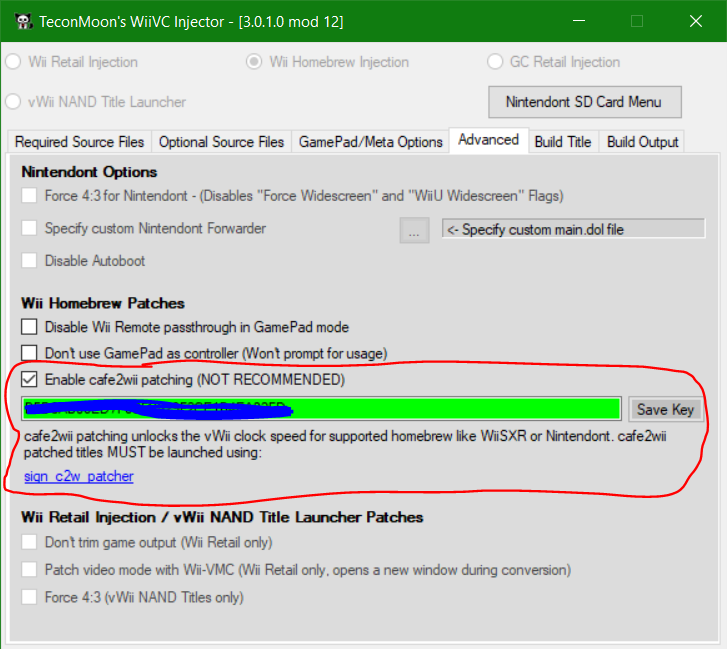
- OPTIONAL STEP 3: In the "Advanced" tab, here you can also specify the loading of c2w patches, etc. For enable vWii overclocking, tick (check) the "Enable cafe2wii patching" box. Then provide the Wii U Starbuck Ancast Key for enable cafe2wii patching (Do not ask for these here, you must find them on your own. Just use your favourite search engine.)
- FINALLY… Navigate to the fifth tab, titled “Build Title.”

- And check to make sure there are no warnings or errors (usually indicated in red). If you have not already, you will need to provide the Wii U Common Key and the Rhythm Heaven Fever (USA) Title Key. (Do not ask for these here, you must find them on your own. Just use your favourite search engine.)
If everything looks good like in the image above, click the BUILD button at the bottom, and wait for the process to complete.
- OPTIONAL, but recommended: You can rename the outputted WUP folder name, and I highly recommend you do this if you are going to create any more than a single forwarder. Otherwise it gets easy to forget which is which when the only difference is the Title ID.
- Profit, go test it out on your Wii U and enjoy! Hopefully everything is good.
----------------
For UWUVCI AIO users (since version v3.99.0): Coming soon!
INSTALLING YOUR FORWARDER WAD AND PLAYING YOUR CUSTOM SRL (on Wii/vWii):
Remember, you must have installed any brick protection such as BootMii as boot2, and Priiloader, as well as having a NAND backup of your Wii/vWii BEFORE INSTALLING ANY WAD!!!!!!! For install Wii/vWii WADs, you must have the Homebrew Channel installed on your Wii and one of the following homebrew apps:
- Wii Mod Lite (released by RiiConnect24 bashed on jskyboo's WiiMod)
- Multi-Mod Manager (released by Wiiwu)
- YAWMM (Yet Another Wad Manager Mod) (released by Leathl, WiiShizzza and Cwstjdenobs)
- WAD Manager (released by Waninkoko)
- Pimp my Wii (released by Attila and distributed by wii-info.fr)
Remember, you must have any brick protection, and a NAND backup of your Wii U BEFORE INSTALLING ANY WUP!!!!!!! For install Wii U WUPs, you must have the Homebrew Launcher installed on your Wii U and one of the following homebrew apps:
- WUP Installer GX2 (released by djskual)
- WUP Installer - Mod Y (released by Yardape8000 based on crediar's & Dimok789's WUP Installer)
- When installing the forwarder WAD in original Wii, install the WAD previously made in the SIXTH STEP.
- In case you want to install and use your custom SRL on the vWii mode of Wii U, then install the vWii version of your VC channel forwarder previously made in the EXTRA STEP 1, instead of the normal Wii version forwarder. (Remember that the original Wii version forwarder won't run on vWii of Wii U, and viceversa (the vWii version can't be run on original Wii)).
- In case you want to install and use your custom SRL on your Wii U Menu, then install the Wii U channel forwarder WUP previously made in the EXTRA STEP 2.
- In case you want to install your custom SRL on Dolphin Emulator, check this guide for put the files in the virtual SD card: https://gbatemp.net/threads/how-to-...h-imdisk-and-how-to-use-it-on-dolphin.602677/
- Before installing the forwarder WAD of your SRL in Dolphin Emulator, make sure you have the Wii Menu installed on Dolphin (by going to Dolphin Emulator, clicking in Tools > Perform Online System Update > your desired region and letting it download for a few minutes.).
- For install the forwarder WAD of your SRL in Dolphin Emulator, go to Tools > Install WAD, then select your forwarder WAD (the Wii version forwarder made in the SIXTH STEP, not the vWii one) you made, let it install on your Wii Menu and ready, your forwarder WAD was installed in the Wii Menu in Dolphin!
- Even when you can use the SRLs on your USB (having the SRL files on your USB), you MUST install the Wii U channel forwarder to the NAND (internal memory) of the Wii U and not to a USB (external storage). You could get issues trying to use Wii U forwarders if you have installed them in USB instead of NAND.
- If your forwarder uses vWii overclocking (cafe2wii patches), be aware that they only work when you have the SRL files on the SD card, and these won't work if they are in an USB drive.
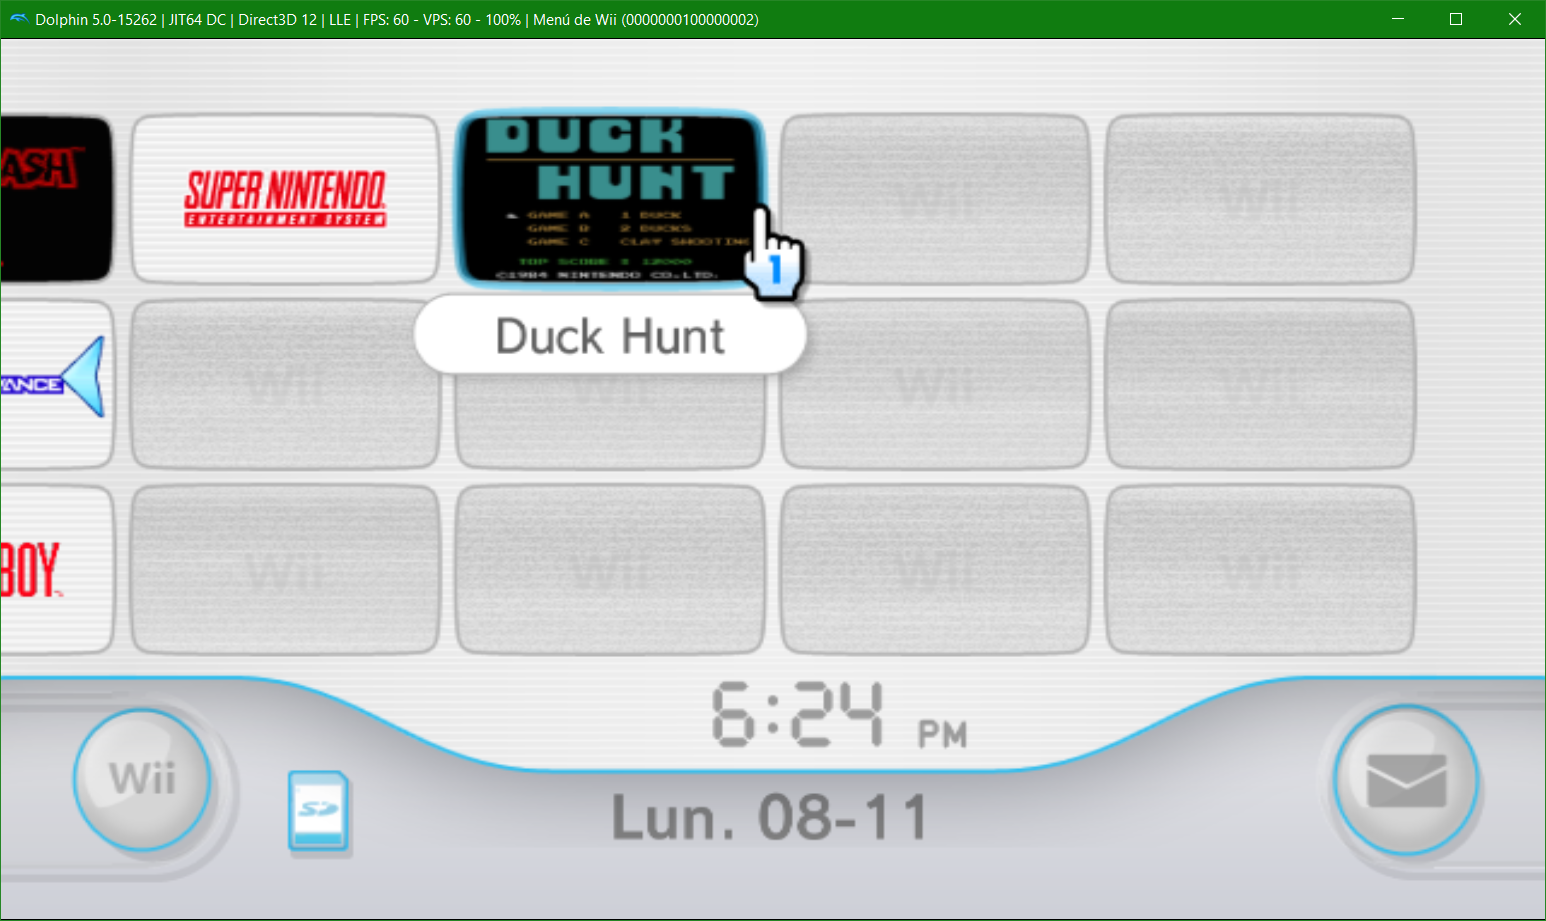
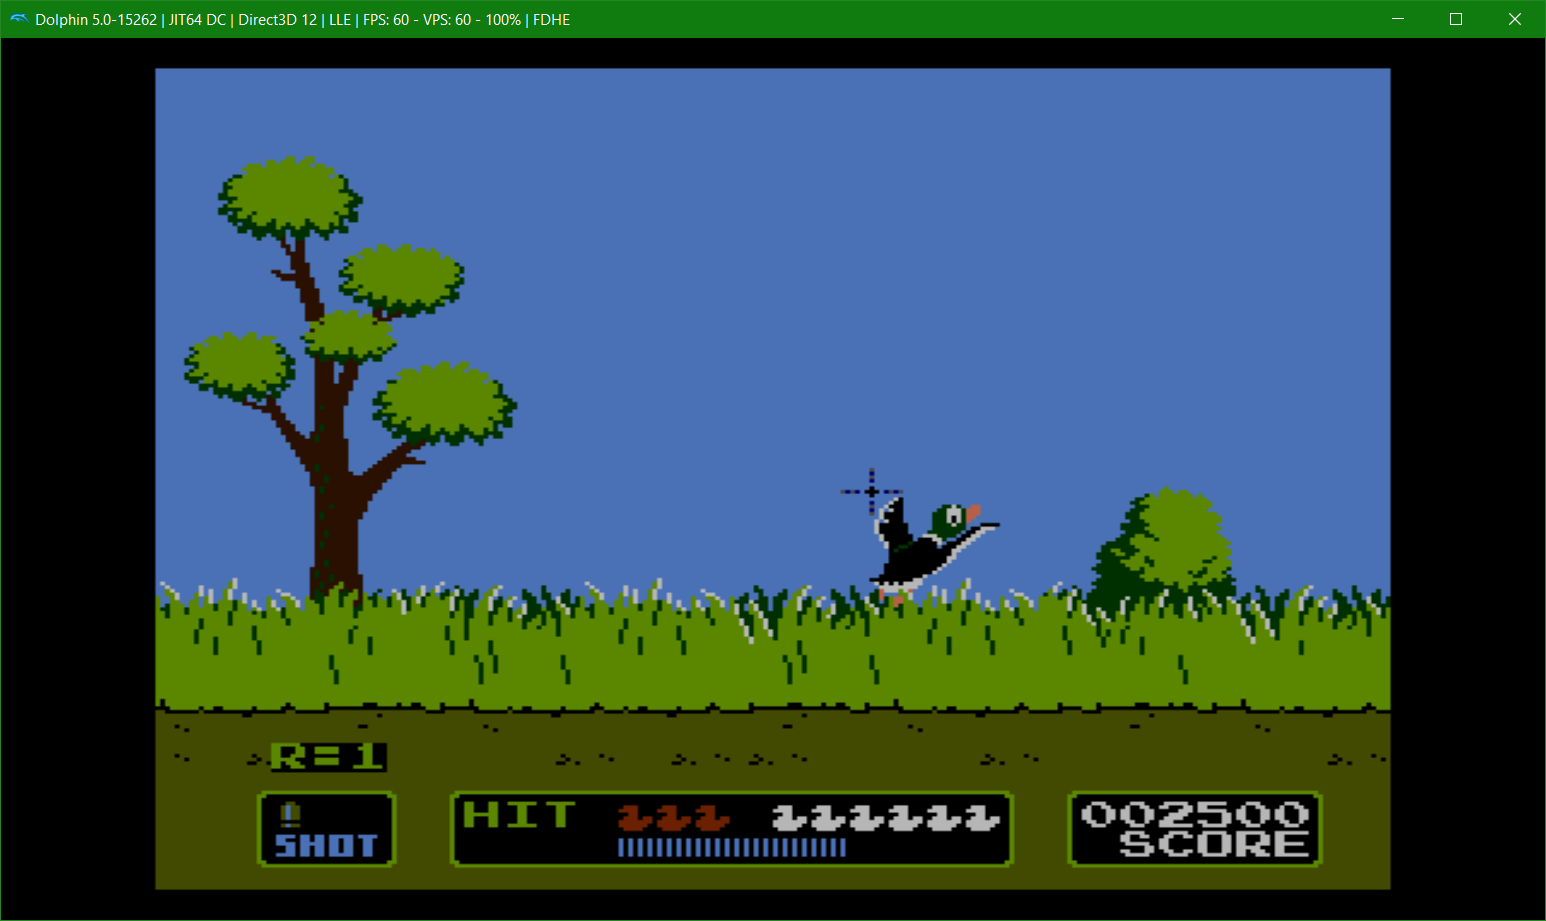
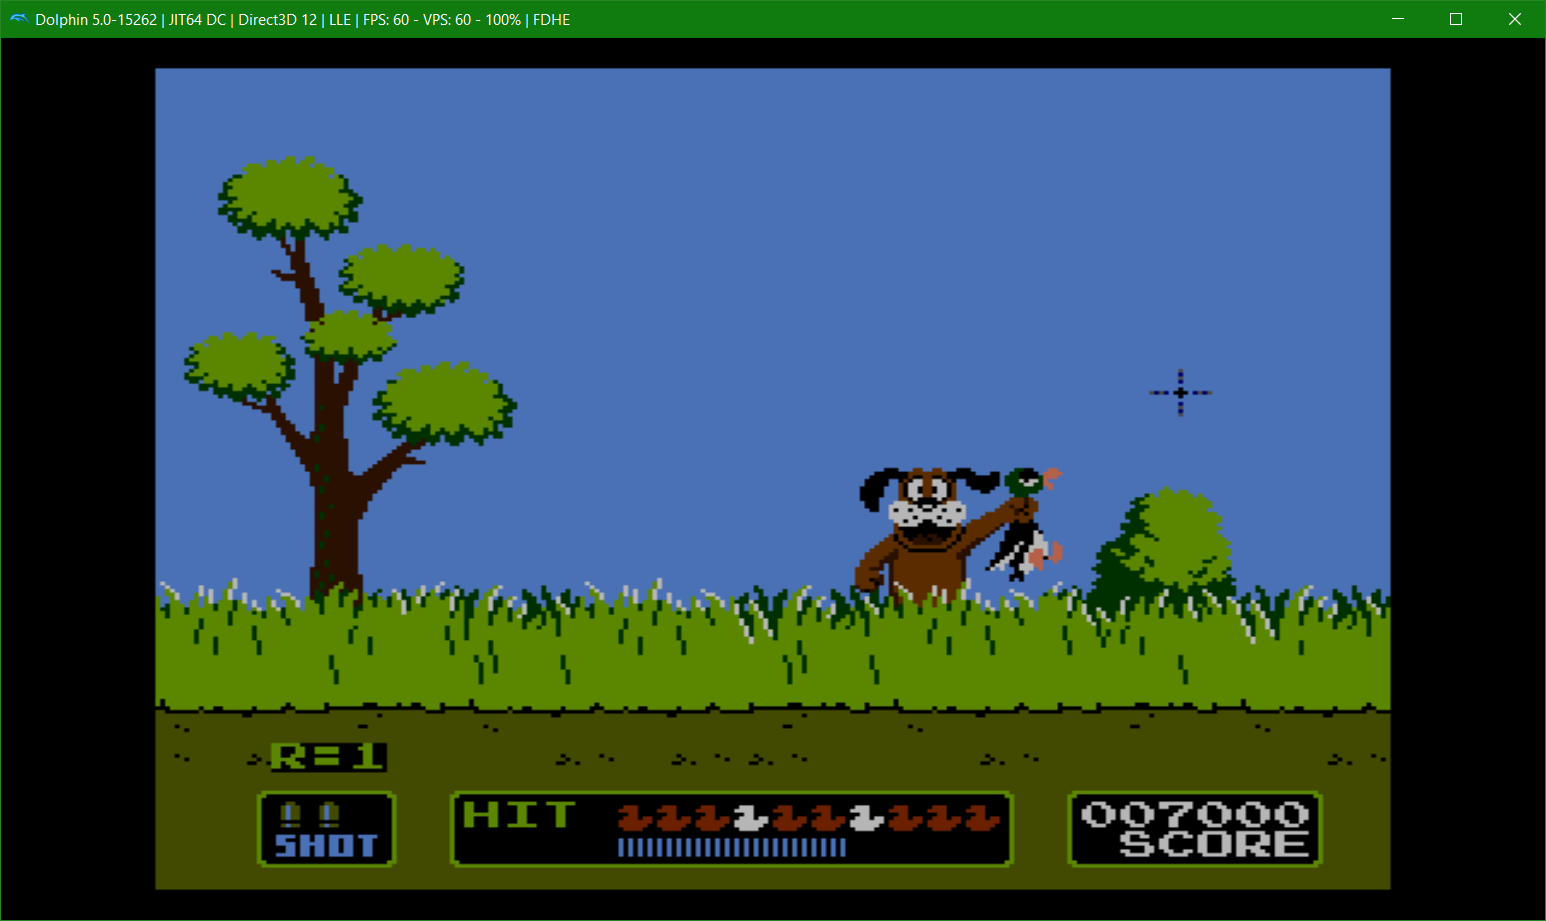
On Dolphin, start the Wii Menu by clicking Tools > Load Wii System Menu X.XX (where X.XX isthe version of your Wii System Menu, in my case is Load Wii System Menu 4.3U), start the SRL from its installed forwarder WAD the Wii Menu and play!!!
Here’s some screenshots taken with Dolphin Emulator of Duck Hunt (NES) custom Single ROM Loader (SRL) running in FCEUX TX by @Tanooki16 as if it were a Wii Virtual Console game channel: (some settings, such using the Wiimote as the NES Zapper, had to configure manually in the SRL before playing)


Hope you enjoyed this tutorial, so now, your only limit is your thinkings about what classic retro games do you want to have as Wii VC Channels!
See you in a next thread on Wii scene!
Happy injecting!
saulfabreg - @SaulFabre
-----------------------------------------
© 2021-2022 saulfabreg Wii VC Project. Wii and Wii U are trademarks of Nintendo.
All other trademarks shown in this tutorial are trademarks of their respective owners.
If you want to adapt this tutorial for make it more understandable or translate it to another language, please give credit to saulfabreg, the original author of this tutorial.
Last edited by SaulFabre,