Hacking WIP D.I.Y Payload/Dongle/Modchip Injector Thread.

mrdude

Developer
Developer
Joined
Dec 11, 2015
Messages
3,071
Trophies
1
Age
56
XP
8,227
That's not how it works, unless there is IC which turns it off (closes power to it or idk how to say that).
The chip is constantly on and only goes to deep sleep when not pushing the payload (so after success or fail). Reset resets it and spike (high idk) on pin 4 wakes it up.

I'm pretty sure I know how it works as I've been working with frep to design it, and also I have a rev 1 board he made. You don't need an IC to turn it off, the circuit is using a latch and if you look at what pin D4 does to the transistor it's connected too - just saying!
 

Kubas_inko

"Something funny goes here."
Member
Joined
Feb 3, 2017
Messages
6,324
Trophies
1
Age
24
Location
I gues on earth.
XP
5,215
Country
Czech Republic
I'm pretty sure I know how it works as I've been working with frep to design it, and also I have a rev 1 board he made. You don't need an IC to turn it off, the circuit is using a latch and if you look at what pin D4 does to the transistor it's connected too - just saying!
See it now.
 

frep

Well-Known Member
Newcomer
Joined
Jul 7, 2018
Messages
52
Trophies
0
Age
42
XP
474
Country
Switzerland
That's not how it works, unless there is IC which turns it off (closes power to it or idk how to say that).
The chip is constantly on and only goes to deep sleep when not pushing the payload (so after success or fail). Reset resets it and spike (high idk) on pin 4 wakes it up.
In general, you are correct. But in this case, the board behaves like @mrdude said. The powering of the board is controlled by the enable pin of the voltage regulator. The input voltage is permanently connected to the battery voltage, but the board is only powered, once the enable pin is set to high. This can either be achieved by pressing the two buttons or by connecting the usb. Compare for that the schematic, or tell me if I haven’t explained it well (english is not my native language), then I can try to explain it again.
 

Kubas_inko

"Something funny goes here."
Member
Joined
Feb 3, 2017
Messages
6,324
Trophies
1
Age
24
Location
I gues on earth.
XP
5,215
Country
Czech Republic
In general, you are correct. But in this case, the board behaves like @mrdude said. The powering of the board is controlled by the enable pin of the voltage regulator. The input voltage is permanently connected to the battery voltage, but the board is only powered, once the enable pin is set to high. This can either be achieved by pressing the two buttons or by connecting the usb. Compare for that the schematic, or tell me if I haven’t explained it well (english is not my native language), then I can try to explain it again.
Yea, I noticed then.
 

Eduba

Member
Newcomer
Joined
Aug 7, 2018
Messages
18
Trophies
0
Age
36
XP
211
Country
Germany
@mattytrog THANKS for sharing the ItsyBitsy Files!

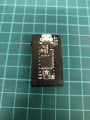
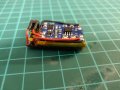
finished my ItsyBitsyTinyPayloadThingy ^_^

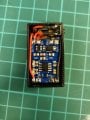
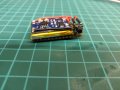
i took a broken bluetooth controller and salvaged its 180mah battery (yeah i know its complete overkill), sandwiched it between a charging board and the itsy bitsy, connected a switch in between the charging board Output and the BAT Pin. The Charging Board gets its Power from the USB Pin. I Also only had to connect the charging Boards GND to G on the ity bitsy. Normaly i would use the GND Wire to put a switch in between but this way i would have had to press the Button all the time for charging... pretty inconvinient :unsure: 
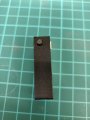
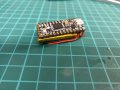
aaand of course designed and printed a "case" for it. I like the "DIY" look so i dont put lids on both sides (only a little bit on the itsy bitsy side to keep it in place) the rest of the case is a pretty tight fit. didnt had to glue except for the tactile switch.

I ordered some USB-C male breakout boards and will add a proper connection to it as soon as they arive. there is a little space between the wires of the switch. i will try to keep it as compact as possible.

Hope to see some more updates for it :yay: and sorry for bad english :teach:

as i came across this whole diy payload injector stuff with this thread... here is my own quote in another thread.
 

Attachments

  • IMG_20180826_161116.jpg
    IMG_20180826_161116.jpg
    2.3 MB · Views: 369
  • IMG_20180826_161129.jpg
    IMG_20180826_161129.jpg
    1.9 MB · Views: 349
  • IMG_20180826_161226.jpg
    IMG_20180826_161226.jpg
    2.3 MB · Views: 333
  • IMG_20180826_162423.jpg
    IMG_20180826_162423.jpg
    1.7 MB · Views: 338
  • IMG_20180826_162428.jpg
    IMG_20180826_162428.jpg
    2.6 MB · Views: 337
  • IMG_20180826_162432.jpg
    IMG_20180826_162432.jpg
    2.1 MB · Views: 326
  • Like
Reactions: Canna

Canna

Bad Ass Poisonous Mushroom
OP
Member
Joined
Jul 14, 2018
Messages
1,396
Trophies
0
Age
36
Location
AZ
XP
1,539
Country
United States
I don't want pay 15 euro just for a trinket m0 :(


then use your android phone. pc, or laptop to send payload via tegra...

There are plenty of options make your own or buy a cheap one.. there is plenty of information on here and members @MatinatorX and @electronrancher are or have made some lovely payload injectors /dongles...

If you dont pay you do not get simple as that..
 

gianm93

Well-Known Member
Newcomer
Joined
Jun 15, 2018
Messages
66
Trophies
0
Age
31
XP
361
Country
Italy
then use your android phone. pc, or laptop to send payload via tegra...

There are plenty of options make your own or buy a cheap one.. there is plenty of information on here and members @MatinatorX and @electronrancher are or have made some lovely payload injectors /dongles...

If you dont pay you do not get simple as that..

I use my smartphone but I like diy, so...
 

BL4Z3D247

GBAtemp Stoner
Member
Joined
Oct 22, 2008
Messages
1,942
Trophies
0
Age
39
Location
I'm so high, I don't even know!
XP
1,229
Country
United States
Jesus Christ, if you're going to say "no" at least give reasoning as to why you're saying no.

@gianm93, I see it has USB interface and 5v hookup for a external battery, if using a disposable battery that and a female USB to male USB type C should be all that's needed(hardware-wise), if using a lipo rechargable battery you might need a seperate microcontroller for charging the battery(unless you can charge it via USB from the DigiSpark itself?). To me it looks like you can use this for what it needs to do. Someone correct me if I'm wrong though.
 

mrdude

Developer
Developer
Joined
Dec 11, 2015
Messages
3,071
Trophies
1
Age
56
XP
8,227
Jesus Christ, if you're going to say "no" at least give reasoning as to why you're saying no.

That attiny85 chip doesn't have usb controller capabilities, unlike the atsamd21, also it has less flash memory for storing payloads. That's why I'm saying NO - also this question has previously been asked and answered.
 

BL4Z3D247

GBAtemp Stoner
Member
Joined
Oct 22, 2008
Messages
1,942
Trophies
0
Age
39
Location
I'm so high, I don't even know!
XP
1,229
Country
United States
That attiny85 chip doesn't have usb controller capabilities, unlike the atsamd21, also it has less flash memory for storing payloads. That's why I'm saying NO - also this question has previously been asked and answered.
OK, that's good to know but not everyone will know that question was answered before so it would've been nice if you could've elaborated on your answer or quoted the post with the answer, that's all. Thanks for the explanation though.
 
  • Like
Reactions: gianm93 and Eduba

Drillakilla

Well-Known Member
Newcomer
Joined
Sep 15, 2018
Messages
90
Trophies
0
Age
43
Location
London, England
XP
276
Country
United Kingdom
Hi guys. I'm fairly new to this all and just trying to find my feet.

I've purchased a switchme.

This is the instructions I got from the site:

Auto RCM Strapping – 5-6 wire install
Software Auto RCM – 4 wire install
Normal Mode – 4 wire install
Auto Payload injection after reboot – 5-6 wire install

If no Auto RCM Software or Strapping used you will either need to use a jig or solder pin 1-10 on the right joycon.


It looks like it can do 4,5,6 wire install

Do you have a link to the 5 and 6 wire install?


When it says auto RCM not required , is that a setting to be adjusted when adding payload?

If I do a 4 wire install. Will I need to reload payload after switch goes to sleep?
 
Last edited by Drillakilla,

Canna

Bad Ass Poisonous Mushroom
OP
Member
Joined
Jul 14, 2018
Messages
1,396
Trophies
0
Age
36
Location
AZ
XP
1,539
Country
United States
Hi guys. I'm fairly new to this all and just trying to find my feet.

I've purchased a switchme.

This is the instructions I got from the site:

Auto RCM Strapping – 5-6 wire install
Software Auto RCM – 4 wire install
Normal Mode – 4 wire install
Auto Payload injection after reboot – 5-6 wire install

If no Auto RCM Software or Strapping used you will either need to use a jig or solder pin 1-10 on the right joycon.


It looks like it can do 4,5,6 wire install

Do you have a link to the 5 and 6 wire install?


When it says auto RCM not required , is that a setting to be adjusted when adding payload?

If I do a 4 wire install. Will I need to reload payload after switch goes to sleep?

I've had a look on this page here:

https://gbatemp.net/threads/interna...ybitsy-m0-express-guide-files-support.508068/

Method 2 doesn't appear to go to the joycon part as used on jig, but a pin on main circuit, is my understanding correct?
@mattytrog. @mrdude @electronrancher @MatinatorX @Kubas_inko
Ideas boys ?
 
  • Like
Reactions: mattytrog

Site & Scene News

Popular threads in this forum

General chit-chat
Help Users
    K3Nv2 @ K3Nv2: The update actually made zoom better