_____________________________________________
En français : Fais un peu d'effort et envoies des messages en anglais.
Pour ce qui concerne ta question, tu peux ajouter la ligne rouge où tu veux, dans la section "control" du fichier "ventoy.json"
In English :
Make an effort and send messages in English.
Regarding your question, you can add the red line where you want, in the "control" section of the "ventoy.json" file.
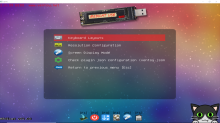
The F2, F4 and F5 menus have no icons. So I tried to put some in too. As I am not good at image processing, I used some of the many icons in the Medicat /Icons folder. With this option you can also change the texts of all Ventoy submenus, including the parameters. Look at the pictures to see the results! If you want to do the same, follow the instructions below!
Reminder: The boot test software that I used during the screenshots distorts the icons. In normal legacy or uefi mode, the icons will be normal and perfectly adapted!
Submenu F2
Submenu F4
Submenu F5
Keyboard Layouts
Screen Display Mode
Check Plugin Configuration
To install the icons, download the attached \submenu folder and copy all its contents into the "\ventoy\theme\uefi\icons" and "\ventoy\theme\legacy\icons" folders.
Then replace the file "\ventoy\ventoy_grub.cfg" by the one in the attachment or add the code below.
And voila, the new icons will magically appear in the Ventoy menu!
Code:
submenu "Screen Display Mode" --class=debug_screen_mode {
    menuentry 'Force Text Mode' --class=debug_text_mode {
        terminal_output console
    }
    menuentry 'Force Graphics Mode' --class=debug_gui_mode {
        terminal_output gfxterm
    }
    menuentry 'Return to previous menu [Esc]' --class=vtoyret VTOY_RET {
        echo 'Return ...'
    }
}
if [ "$grub_platform" != "pc" ]; then
    submenu 'Ventoy UEFI Utilities' --class=debug_util {
        menuentry 'Fixup Windows BlinitializeLibrary Failure' --class=debug_util_blinit {
            chainloader ${vtoy_path}/vtoyutil_${VTOY_EFI_ARCH}.efi env_param=${env_param} ${vtdebug_flag} feature=fix_windows_mmap
            boot
            echo -e "\npress ENTER to exit ..."
            read vtInputKey
        }
        menuentry 'Return to previous menu [Esc]' --class=vtoyret VTOY_RET {
            echo 'Return ...'
        }
    }
fi
submenu 'Check plugin json configuration (ventoy.json)' --class=debug_json {
    menuentry 'Check global control plugin configuration' --class=debug_control {
        set pager=1
        vt_check_plugin_json $vt_plugin_path control $vtoy_iso_part

        echo -e "\npress ENTER to exit ..."
        read vtInputKey
        unset pager
    }

    menuentry 'Check theme plugin configuration' --class=debug_theme {
        set pager=1
        vt_check_plugin_json $vt_plugin_path theme $vtoy_iso_part

        echo -e "\npress ENTER to exit ..."
        read vtInputKey
        unset pager
    }

    menuentry 'Check auto install plugin configuration' --class=debug_autoinstall {
        set pager=1
        vt_check_plugin_json $vt_plugin_path auto_install $vtoy_iso_part

        echo -e "\npress ENTER to exit ..."
        read vtInputKey
        unset pager
    }

    menuentry 'Check persistence plugin configuration' --class=debug_persistence {
        set pager=1
        vt_check_plugin_json $vt_plugin_path persistence $vtoy_iso_part

        echo -e "\n############### dump persistence ###############"
        vt_dump_persistence

        echo -e "\npress ENTER to exit ..."
        read vtInputKey
        unset pager
    }

    menuentry 'Check menu alias plugin configuration' --class=debug_menualias {
        set pager=1
        vt_check_plugin_json $vt_plugin_path menu_alias $vtoy_iso_part

        echo -e "\npress ENTER to exit ..."
        read vtInputKey
        unset pager
    }

    menuentry 'Check menu class plugin configuration' --class=debug_menuclass {
        set pager=1
        vt_check_plugin_json $vt_plugin_path menu_class $vtoy_iso_part

        echo -e "\npress ENTER to exit ..."
        read vtInputKey
        unset pager
    }
    menuentry 'Check injection plugin configuration' --class=debug_injection {
        set pager=1
        vt_check_plugin_json $vt_plugin_path injection $vtoy_iso_part

        echo -e "\npress ENTER to exit ..."
        read vtInputKey
        unset pager
    }
    menuentry 'Check auto memdisk plugin configuration' --class=debug_automemdisk {
        set pager=1
        vt_check_plugin_json $vt_plugin_path auto_memdisk $vtoy_iso_part

        echo -e "\npress ENTER to exit ..."
        read vtInputKey
        unset pager
    }
    menuentry 'Check image list plugin configuration' --class=debug_imagelist {
        set pager=1
        vt_check_plugin_json $vt_plugin_path image_list $vtoy_iso_part

        echo -e "\npress ENTER to exit ..."
        read vtInputKey
        unset pager
    }

    menuentry 'Check image blacklist plugin configuration' --class=debug_imageblacklist {
        set pager=1
        vt_check_plugin_json $vt_plugin_path image_blacklist $vtoy_iso_part

        echo -e "\npress ENTER to exit ..."
        read vtInputKey
        unset pager
    }

    menuentry 'Check boot conf replace plugin configuration' --class=debug_bootconf_replace {
        set pager=1
        vt_check_plugin_json $vt_plugin_path conf_replace $vtoy_iso_part

        echo -e "\npress ENTER to exit ..."
        read vtInputKey
        unset pager
    }

    menuentry 'Check dud plugin configuration' --class=debug_dud {
        set pager=1
        vt_check_plugin_json $vt_plugin_path dud $vtoy_iso_part

        echo -e "\npress ENTER to exit ..."
        read vtInputKey
        unset pager
    }

    menuentry 'Check password plugin configuration' --class=debug_pwd {
        set pager=1
        vt_check_plugin_json $vt_plugin_path password $vtoy_iso_part

        echo -e "\npress ENTER to exit ..."
        read vtInputKey
        unset pager
    }

    menuentry 'Check custom boot plugin configuration' --class=debug_custom_boot {
        set pager=1
        vt_check_plugin_json $vt_plugin_path custom_boot $vtoy_iso_part

        echo -e "\npress ENTER to exit ..."
        read vtInputKey
        unset pager
    }
To change the icons, you must choose a .png file. Then, you have to delete the old icon (for example vtoyret.png).
Finally, rename the new icon using the name of the old one. Don't forget to modify the icons in Legacy AND Uefi! And voila, the new icons will magically appear in the Ventoy menu!
Hi, Jayro.
I see that the Medicat VHD is .vhd type... I found out that the .vhdx type is a better option because there is also protection against data corruption and better alignment.
The F2, F4 and F5 menus have no icons. So I tried to put some in too. As I am not good at image processing, I used some of the many icons in the Medicat /Icons folder. With this option you can also change the texts of all Ventoy submenus, including the parameters. Look at the pictures to see the results! If you want to do the same, follow the instructions below!
Reminder: The boot test software that I used during the screenshots distorts the icons. In normal legacy or uefi mode, the icons will be normal and perfectly adapted!
To install the icons, download the attached \submenu folder and copy all its contents into the "\ventoy\theme\uefi\icons" and "\ventoy\theme\legacy\icons" folders.
Then replace the file "\ventoy\ventoy_grub.cfg" by the one in the attachment or add the code below.
And voila, the new icons will magically appear in the Ventoy menu!
Code:
submenu "Screen Display Mode" --class=debug_screen_mode {
    menuentry 'Force Text Mode' --class=debug_text_mode {
        terminal_output console
    }
    menuentry 'Force Graphics Mode' --class=debug_gui_mode {
        terminal_output gfxterm
    }
    menuentry 'Return to previous menu [Esc]' --class=vtoyret VTOY_RET {
        echo 'Return ...'
    }
}
if [ "$grub_platform" != "pc" ]; then
    submenu 'Ventoy UEFI Utilities' --class=debug_util {
        menuentry 'Fixup Windows BlinitializeLibrary Failure' --class=debug_util_blinit {
            chainloader ${vtoy_path}/vtoyutil_${VTOY_EFI_ARCH}.efi env_param=${env_param} ${vtdebug_flag} feature=fix_windows_mmap
            boot
            echo -e "\npress ENTER to exit ..."
            read vtInputKey
        }
        menuentry 'Return to previous menu [Esc]' --class=vtoyret VTOY_RET {
            echo 'Return ...'
        }
    }
fi
submenu 'Check plugin json configuration (ventoy.json)' --class=debug_json {
    menuentry 'Check global control plugin configuration' --class=debug_control {
        set pager=1
        vt_check_plugin_json $vt_plugin_path control $vtoy_iso_part

        echo -e "\npress ENTER to exit ..."
        read vtInputKey
        unset pager
    }

    menuentry 'Check theme plugin configuration' --class=debug_theme {
        set pager=1
        vt_check_plugin_json $vt_plugin_path theme $vtoy_iso_part

        echo -e "\npress ENTER to exit ..."
        read vtInputKey
        unset pager
    }

    menuentry 'Check auto install plugin configuration' --class=debug_autoinstall {
        set pager=1
        vt_check_plugin_json $vt_plugin_path auto_install $vtoy_iso_part

        echo -e "\npress ENTER to exit ..."
        read vtInputKey
        unset pager
    }

    menuentry 'Check persistence plugin configuration' --class=debug_persistence {
        set pager=1
        vt_check_plugin_json $vt_plugin_path persistence $vtoy_iso_part

        echo -e "\n############### dump persistence ###############"
        vt_dump_persistence

        echo -e "\npress ENTER to exit ..."
        read vtInputKey
        unset pager
    }

    menuentry 'Check menu alias plugin configuration' --class=debug_menualias {
        set pager=1
        vt_check_plugin_json $vt_plugin_path menu_alias $vtoy_iso_part

        echo -e "\npress ENTER to exit ..."
        read vtInputKey
        unset pager
    }

    menuentry 'Check menu class plugin configuration' --class=debug_menuclass {
        set pager=1
        vt_check_plugin_json $vt_plugin_path menu_class $vtoy_iso_part

        echo -e "\npress ENTER to exit ..."
        read vtInputKey
        unset pager
    }
    menuentry 'Check injection plugin configuration' --class=debug_injection {
        set pager=1
        vt_check_plugin_json $vt_plugin_path injection $vtoy_iso_part

        echo -e "\npress ENTER to exit ..."
        read vtInputKey
        unset pager
    }
    menuentry 'Check auto memdisk plugin configuration' --class=debug_automemdisk {
        set pager=1
        vt_check_plugin_json $vt_plugin_path auto_memdisk $vtoy_iso_part

        echo -e "\npress ENTER to exit ..."
        read vtInputKey
        unset pager
    }
    menuentry 'Check image list plugin configuration' --class=debug_imagelist {
        set pager=1
        vt_check_plugin_json $vt_plugin_path image_list $vtoy_iso_part

        echo -e "\npress ENTER to exit ..."
        read vtInputKey
        unset pager
    }

    menuentry 'Check image blacklist plugin configuration' --class=debug_imageblacklist {
        set pager=1
        vt_check_plugin_json $vt_plugin_path image_blacklist $vtoy_iso_part

        echo -e "\npress ENTER to exit ..."
        read vtInputKey
        unset pager
    }

    menuentry 'Check boot conf replace plugin configuration' --class=debug_bootconf_replace {
        set pager=1
        vt_check_plugin_json $vt_plugin_path conf_replace $vtoy_iso_part

        echo -e "\npress ENTER to exit ..."
        read vtInputKey
        unset pager
    }

    menuentry 'Check dud plugin configuration' --class=debug_dud {
        set pager=1
        vt_check_plugin_json $vt_plugin_path dud $vtoy_iso_part

        echo -e "\npress ENTER to exit ..."
        read vtInputKey
        unset pager
    }

    menuentry 'Check password plugin configuration' --class=debug_pwd {
        set pager=1
        vt_check_plugin_json $vt_plugin_path password $vtoy_iso_part

        echo -e "\npress ENTER to exit ..."
        read vtInputKey
        unset pager
    }

    menuentry 'Check custom boot plugin configuration' --class=debug_custom_boot {
        set pager=1
        vt_check_plugin_json $vt_plugin_path custom_boot $vtoy_iso_part

        echo -e "\npress ENTER to exit ..."
        read vtInputKey
        unset pager
    }
To change the icons, you must choose a .png file. Then, you have to delete the old icon (for example vtoyret.png).
Finally, rename the new icon using the name of the old one. Don't forget to modify the icons in Legacy AND Uefi! And voila, the new icons will magically appear in the Ventoy menu!
Wow, you really put a lot of work into this, and it looks fantastic! I've integrated this into the latest development build of MediCat USB v31.04, and you're credited in the changelog!
For the many French people who follow this thread, here is mini windows 10 from Jayro! I set the French time and the keyboard to AZERTY (no other modifications)!
I modified the registry with NTlite and changed the time settings with DISM commands after mounting the boot.wim file!
For the many French people who follow this thread, here is mini windows 10 from Jayro! I set the French time and the keyboard to AZERTY (no other modifications)!
I modified the registry with NTlite and changed the time settings with DISM commands after mounting the boot.wim file!
For the many French people who follow this thread, here is mini windows 10 from Jayro! I set the French time and the keyboard to AZERTY (no other modifications)!
I modified the registry with NTlite and changed the time settings with DISM commands after mounting the boot.wim file!
If Ventoy fails every time, then you need to do a low-level "FULL" format of the disk. (Not "Quick format".) I typically use a partition manager to wipe all the drive's partitions, and then create a single NTFS partition on the drive. That usually allows Ventoy to write to the drive. and the second issue you have is you need to take everything out of that folder. I didn't zip the files in a folder, so I'm not sure why that folder is even there. You must have extracted the zip files wrong on the drive. Rufus won't help you get the drive booting properly, because Ventoy installs it's own secret partition to the end of the drive with it's own boot files. Make sure you're running Ventoy2Disk with admin priveledges as well.
UPDATE: You know what? After reading your log file, you may want to try using Ventoy's boot CD to install Ventoy to the drive. It looks like Windows isn't allowing it for some reason.
You say that because you've tried and it didn't work or because you believe Ventoy doesn't have support for it? I ask this because in ventoy's docs says there is support, although I have never tried
You say that because you've tried and it didn't work or because you believe Ventoy doesn't have support for it? I ask this because in ventoy's docs says there is support, although I have never tried
Today, April 8th, 2024, at 4PM PT, marks the day in which Nintendo permanently ends support for both the 3DS and the Wii U online services, which include co-op play...
A new Nintendo Switch firmware update is here. System software version 18.0.1 has been released. This update offers the typical stability features as all other...
With Apple having recently updated their guidelines for the App Store, iOS users have been left to speculate on specific wording and whether retro emulators as we...
The time has finally come, and after many, many years (if not decades) of Apple users having to side load emulator apps into their iOS devices through unofficial...
The highly popular and accurate FPGA hardware, MisterFGPA, has received today a brand new update with a long-awaited feature, or rather, a new core for hardcore...
Nintendo might just as well be a law firm more than a videogame company at this point in time, since they have yet again issued their now almost trademarked usual...
TheFlow has done it again--a new kernel exploit has been released for PlayStation 4 consoles. This latest exploit is called PPPwn, and works on PlayStation 4 systems...
Another video game prototype has been found and preserved, and this time, it's none other than the game that spawned an entire franchise beloved by many, the very...
Anbernic is back with yet another retro handheld device. The upcoming RG28XX is another console sporting the quad-core H700 chip of the company's recent RG35XX 2024...
Nintendo has recently announced through their social media accounts that a new Indie World stream will be airing tomorrow, scheduled for April 17th, 2024 at 7 a.m. PT...
Today, April 8th, 2024, at 4PM PT, marks the day in which Nintendo permanently ends support for both the 3DS and the Wii U online services, which include co-op play...
Nintendo might just as well be a law firm more than a videogame company at this point in time, since they have yet again issued their now almost trademarked usual...
With Apple having recently updated their guidelines for the App Store, iOS users have been left to speculate on specific wording and whether retro emulators as we...
The time has finally come, and after many, many years (if not decades) of Apple users having to side load emulator apps into their iOS devices through unofficial...
A new Nintendo Switch firmware update is here. System software version 18.0.1 has been released. This update offers the typical stability features as all other...
TheFlow has done it again--a new kernel exploit has been released for PlayStation 4 consoles. This latest exploit is called PPPwn, and works on PlayStation 4 systems...
Two classic titles join the Nintendo Switch Online Expansion Pack game lineup. Available starting April 24th will be the motorcycle racing game Extreme G and another...
The highly popular and accurate FPGA hardware, MisterFGPA, has received today a brand new update with a long-awaited feature, or rather, a new core for hardcore...
Nintendo has recently announced through their social media accounts that a new Indie World stream will be airing tomorrow, scheduled for April 17th, 2024 at 7 a.m. PT...
In 2017, the United States Federal Communications Commission (FCC) repealed net neutrality. At the time, it was a major controversy between internet service providers...
@SylverReZ I've never used a disposable, seems like a waste. kinda cool idea tho. It would be nice to have vape built in to a cell phone even. "The iVape"
only ps5 updated to latest firmware can go on psn, jailbroken ones just don't use psn or they risk getting flagged or banned, altho spouting profanity in online play alredy does that