Gaming Beware Retro CNC Metal Buttons

JoKoKilla

Well-Known Member
OP
Newcomer
Joined
Apr 7, 2020
Messages
60
Trophies
0
Age
44
XP
352
Country
United States
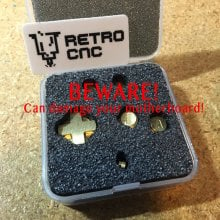
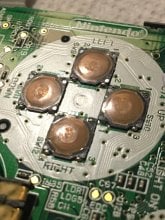
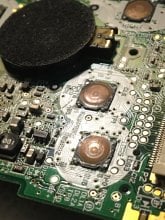
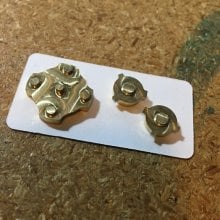
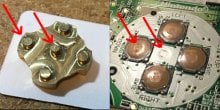
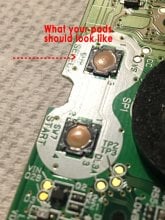
Hey all, I want to warn everyone about these metal CNC buttons. If you're familiar with them, perhaps you know these buttons are NOT to be installed with the silicone button pads. However, without that silicone protection, the metal CNC buttons scratch your motherboard. Look at my photos, this is after second day of install (actual time button mashing and having fun; probably less than 10 hours, realistically). Can you imagine what a month or year of usage would do? Look further, I've taken images of the buttons underside, you can see the pegs are the exact size and spacing as the scratch marks on my motherboard. If you've installed these, and you care about preserving your Gameboy, you might want to check your unit.

Also, these metal buttons rattle in the shell, ALSO because there is no membrane to keep them in place. You'll definitely hear them rattle, because it's metal on plastic. Both Retro CNC nor Retro Lame Repair Shop won't provide any solutions, nor will they return my purchase. These buttons look awesome, but it's not worth damage to the unit, in my opinion. If that's not your concern, at least know what you're getting into. Perhaps these are for display units that you don't intend to play. Otherwise don't be like me and get stuck with this expensive fail. Yippeee! Maybe I can turn them into lapel pins. lol
 

Attachments

  • Retro CNC Beware 1.JPG
    Retro CNC Beware 1.JPG
    356.9 KB · Views: 247
  • Retro CNC Beware 2.JPG
    Retro CNC Beware 2.JPG
    244.5 KB · Views: 227
  • Retro CNC Beware 3.JPG
    Retro CNC Beware 3.JPG
    267.8 KB · Views: 225
  • Retro CNC Beware 5.JPG
    Retro CNC Beware 5.JPG
    288.1 KB · Views: 240
  • Retro CNC Beware 6.jpg
    Retro CNC Beware 6.jpg
    167.6 KB · Views: 253
  • Retro CNC Beware 7.JPG
    Retro CNC Beware 7.JPG
    238.6 KB · Views: 225
Last edited by JoKoKilla,
  • Like
Reactions: E1ite007

JoKoKilla

Well-Known Member
OP
Newcomer
Joined
Apr 7, 2020
Messages
60
Trophies
0
Age
44
XP
352
Country
United States
That sucks. But I'd still put some kind of protection between the buttons and the board, even if only electrical tape.

Thanks for the suggestion. I tried that, but electrical tape is too thick and doesn't allow for any button play. I was thinking of shaving down the pegs on the back, and trying some liquid rubber, but I don't want to ruin these in case someone actually wants to buy them.
 
  • Like
Reactions: Jayro

xinchao22

Member
Newcomer
Joined
Mar 2, 2021
Messages
8
Trophies
0
Age
36
XP
34
Country
United States
Do you have any pictures showing the condition of the switches before using the metal buttons?

Nintendo used a couple different types of switches over the years and these dark brown ones are softer than the silver ones. Even the original pads and buttons left marks on them.

If you’re worried about that scuff on the PCB I would just put some Kapton tape over it, not electrical tape. Electrical tape would probably do more damage than the buttons ever will.
 
  • Like
Reactions: JoKoKilla

JoKoKilla

Well-Known Member
OP
Newcomer
Joined
Apr 7, 2020
Messages
60
Trophies
0
Age
44
XP
352
Country
United States
Do you have any pictures showing the condition of the switches before using the metal buttons?

Nintendo used a couple different types of switches over the years and these dark brown ones are softer than the silver ones. Even the original pads and buttons left marks on them.

If you’re worried about that scuff on the PCB I would just put some Kapton tape over it, not electrical tape. Electrical tape would probably do more damage than the buttons ever will.

That's interesting to know,. Thanks for the insight. Is there a way to identify switch type (dark brown or silver) from the outside of the unit? Perhaps something on the back sticker?

Although I had my concerns about this install, I didn't take before pictures of the d-pad, B, or A button switches. I should clarify that I never installed the metal buttons on the start and select switches. The last image (of the start and select button switches) shows how the d-pad, B, and A button switches looked before install. I don't have proof of that, but I know my dark brown switches did not have any scuff marks, as they were the same condition as the start and select switches. But to further support my claim, how else would I have scuff marks identical to the pegs (in size and position) on the backside of the metal buttons? Besides that, I remember what I saw.

I might try that Kapton tape. Thank you for the suggestion.
 
Last edited by JoKoKilla,

xinchao22

Member
Newcomer
Joined
Mar 2, 2021
Messages
8
Trophies
0
Age
36
XP
34
Country
United States
That's interesting to know,. Thanks for the insight. Is there a way to identify switch type (dark brown or silver) from the outside of the unit? Perhaps something on the back sticker?

Although I had my concerns about this install, I didn't take before pictures of the d-pad, B, or A button switches. I should clarify that I never installed the metal buttons on the start and select switches. The last image (of the start and select button switches) shows how the d-pad, B, and A button switches looked before install. I don't have proof of that, but I know my dark brown switches did not have any scuff marks, as they were the same condition as the start and select switches. But to further support my claim, how else would I have scuff marks identical to the pegs (in size and position) on the backside of the metal buttons? Besides that, I remember what I saw.

I might try that Kapton tape. Thank you for the suggestion.

No, there's no way to tell what switches it has without opening it afaik. Some have full brown switches, some are full silver, some have brown for the A + B but the D-pad is all silver. I would guess it depends on the year the board was manufactured.

Do you have any calipers to give us some measurements? For instance, I am willing to bet that those pegs on the metal d-pad are the same diameter as the nubs that make contact with the switches on OEM pads, around 2.8mm. That's why the marks you are seeing are the same size. The entire surface area of the start/select switch is only about 3mm so it would be difficult to see any rings from the contact pads as any marks would be about the same size as the switch.

I was curious so I just checked on one of my boards with silver switches and they have similar rings on them (No metal buttons used). In your photos you can see what looks like 2 separate rings, inner and outer. This is the same ring that the button pads themselves leave due to the fact that they have an "O" shaped contact area with the switch.

Without seeing any before photos it's hard to say, but I'm not sure how a flat metal peg would leave that type of mark tbh.

Again, I would just put a small piece of kapton tape in the center of the D-pad to help prevent scuffing your PCB if you really care about it that much.

Good luck!

Retro CNC Beware 2.JPG File_000 (16).jpeg
 
  • Like
Reactions: JoKoKilla

FAST6191

Techromancer
Editorial Team
Joined
Nov 21, 2005
Messages
36,798
Trophies
3
XP
28,348
Country
United Kingdom
They didn't even polish up the faces? Can still see what looks like fly cutter marks in the dpad. Granted polishing is not that hard for the end user and might spare them a step (nothing in this world for free and all that) but does speak to something.

Granted if I am going to the effort of replacing this sort of thing then I will also be desoldering those switches and putting nice microswitches in instead.
 
  • Like
Reactions: JoKoKilla

ghjfdtg

Well-Known Member
Member
Joined
Jul 13, 2014
Messages
1,362
Trophies
1
XP
3,295
Country
Who would have thought metal does make scratches to softer material? :rolleyes:Even polished it would eventually wear down the top of the switches. Everything that isn't using the membranes i would not use. It changes the feel of the buttons too.
 
  • Like
Reactions: JoKoKilla

JoKoKilla

Well-Known Member
OP
Newcomer
Joined
Apr 7, 2020
Messages
60
Trophies
0
Age
44
XP
352
Country
United States
No, there's no way to tell what switches it has without opening it afaik. Some have full brown switches, some are full silver, some have brown for the A + B but the D-pad is all silver. I would guess it depends on the year the board was manufactured.

Do you have any calipers to give us some measurements? For instance, I am willing to bet that those pegs on the metal d-pad are the same diameter as the nubs that make contact with the switches on OEM pads, around 2.8mm. That's why the marks you are seeing are the same size. The entire surface area of the start/select switch is only about 3mm so it would be difficult to see any rings from the contact pads as any marks would be about the same size as the switch.

I was curious so I just checked on one of my boards with silver switches and they have similar rings on them (No metal buttons used). In your photos you can see what looks like 2 separate rings, inner and outer. This is the same ring that the button pads themselves leave due to the fact that they have an "O" shaped contact area with the switch.

Without seeing any before photos it's hard to say, but I'm not sure how a flat metal peg would leave that type of mark tbh.

Again, I would just put a small piece of kapton tape in the center of the D-pad to help prevent scuffing your PCB if you really care about it that much.

Good luck!

View attachment 249554 View attachment 249555

Thanks for the response and your questions. Can you include pictures of your pads (if you haven't already put your Gameboy back together)?

Just to clarify, that membrane pad goes on the other side you pictured. The side your red arrow is pointing toward, is the side that touches the d-pad button itself.

IMG_4588.JPG

IMG_4589.JPG

Below is the side that touches the motherboard. I've placed that piece side by side with the underside of the metal buttons.

IMG_4590.JPG

You can tell from looking at the image; the metal pegs have a larger surface diameter, similar to the marks on my motherboard. My motherboard did not have scuff marks previous to install of the metal buttons. The scuff was created by metal friction.

--------------------- MERGED ---------------------------

Who would have thought metal does make scratches to softer material? :rolleyes:Even polished it would eventually wear down the top of the switches. Everything that isn't using the membranes i would not use. It changes the feel of the buttons too.

That was my thinking before I installed the metal buttons. I had a nagging voice in my head telling me this might not be a good idea. But I tried it for two days. You're right, it does change the feel of the buttons. They look great, but that's all that's good about them.

--------------------- MERGED ---------------------------

Granted if I am going to the effort of replacing this sort of thing then I will also be desoldering those switches and putting nice microswitches in instead.

Interesting idea! Sounds like that's what I need.
 
Last edited by JoKoKilla,

Site & Scene News

Popular threads in this forum

General chit-chat
Help Users
    The Real Jdbye @ The Real Jdbye: 4th wife