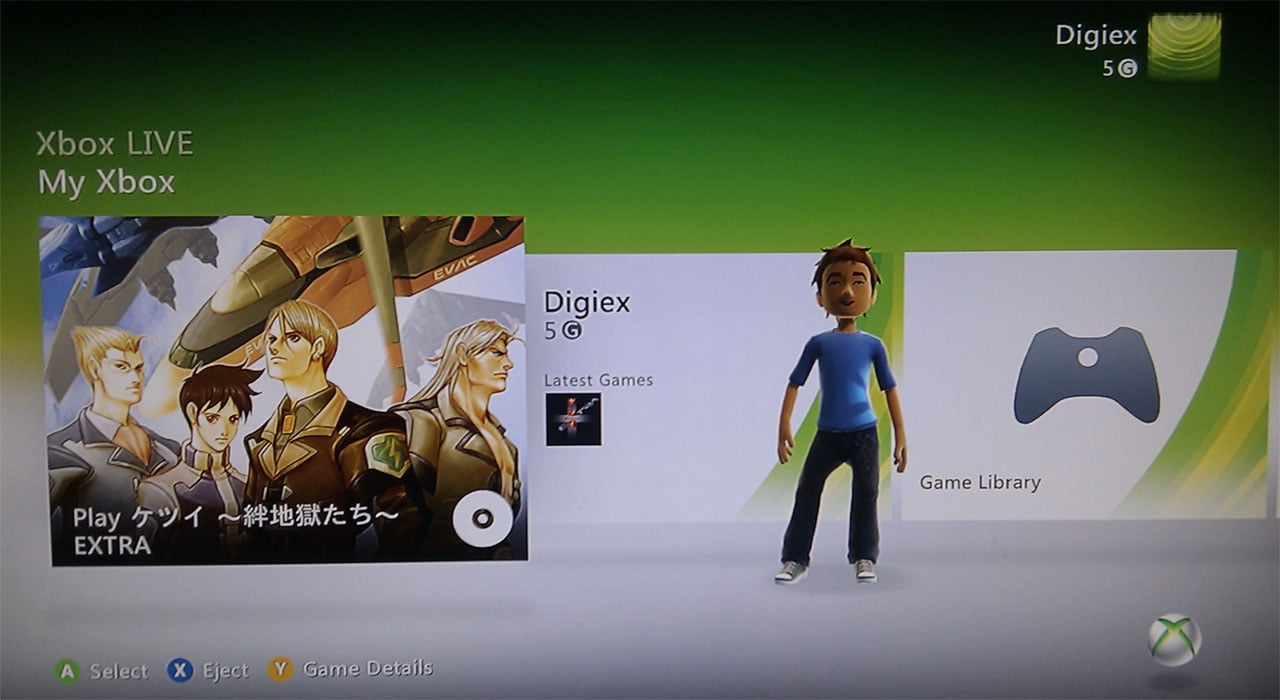
Hi, new owner of an Xbox 360 Slim here, a Corona model with dashboard 17526 as of today.
How can I best go around modding this console if all I want to do is run games and dlc from external storage without a disc? The internal storage is only 4 GB so it is basically only there for updates and stuff.
You can upgrade internal with 2TB max 2.5 inch sata laptop hard drive or 2TB usb max (Some older 4TB drives that let you format entire 4TB to fat32 will also work)
You will need to rgh - Since its a corona 4GB you will need R/W adapter for coronas, Quick solder board or home made reader etc
RGH with Xace 360 and you can achieve insta boot times
Is the Xace 360 just for speeding up boot times or is it an RGH method?
Also, what are my options considering a RGH? This would be the only Xbox 360 that I am modding.
Is the Xace 360 just for speeding up boot times or is it an RGH method?
Also, what are my options considering a RGH? This would be the only Xbox 360 that I am modding.
Ace will handle the rgh side (You will most likely have to try diff timing files to get better boot times. Will need a form to program ace in case boot times are horrible with stock timing file. (I use jr programmer or my nandx with cable set that matches ace programming headers) - Nand x or jr proigrammer can also be used to read/write any 16MB nand.
Ace will handle the rgh side (You will most likely have to try diff timing files to get better boot times. Will need a form to program ace in case boot times are horrible with stock timing file. (I use jr programmer or my nandx with cable set that matches ace programming headers) - Nand x or jr proigrammer can also be used to read/write any 16MB nand.
Besides purchasing the Xace chip, what else do I need to get before performing the RGH hack? I can source some solder, soldering iron, and specialized screwdrivers. I am very new to tinkering like this, and have some friends willing to help me out. However, I am very confused as to what I need to perform this hack from soldering the chip in, all the way to using an external hdd to play games. Can someone please help me?
Hey guys! Sorry for the long time inbetween asking for help. I received the wires I talked about a few pages back right after christmas, and I changed the wires I had already soldered to the console, I tried different routings, and different timing files, but to no avail. I gave up on the Matrix Glitcher, and I bought an X360 Ace (rev 2), and tried to glitch with the the dynamic timing file, but it still doesn't boot xell. Right before posting, I tried to flash the stock NAND, just to check if the board was fried, and that boots fine, no problems. Does anyone know what can cause it to not glitch?
Hey guys! Sorry for the long time inbetween asking for help. I received the wires I talked about a few pages back right after christmas, and I changed the wires I had already soldered to the console, I tried different routings, and different timing files, but to no avail. I gave up on the Matrix Glitcher, and I bought an X360 Ace (rev 2), and tried to glitch with the the dynamic timing file, but it still doesn't boot xell. Right before posting, I tried to flash the stock NAND, just to check if the board was fried, and that boots fine, no problems. Does anyone know what can cause it to not glitch?
Dynamic files doesn't always work. You have to try "ALL" timings when you get a stubborn mobo. Ive had Jaspers where only a few timing files would glitch it.
Dynamic files doesn't always work. You have to try "ALL" timings when you get a stubborn mobo. Ive had Jaspers where only a few timing files would glitch it.
Well, that sucks. I guess I'll try that then. Do I need to solder the resistor back on? And how about the 1.8V point, do I still need that? And the clock point, do I use the ones from this guide, or do I still rely on the X360 Ace's own clock?
Edit: Almost forgot, how about the 22k resistor for the PLL point, is that still necessary?
By the end of this year, this guide will be finalized. I will try and make the RGH section as simplified as possible but I'll base it off off one chip (due to the amount of clones and knock offs, I can't do all) JTAG/KK hack will also be updated and finalized.
So you want to hack your 360.
Have no idea where to start?
This thread should give you a general idea on what you can do with your 360.
Lets get started.
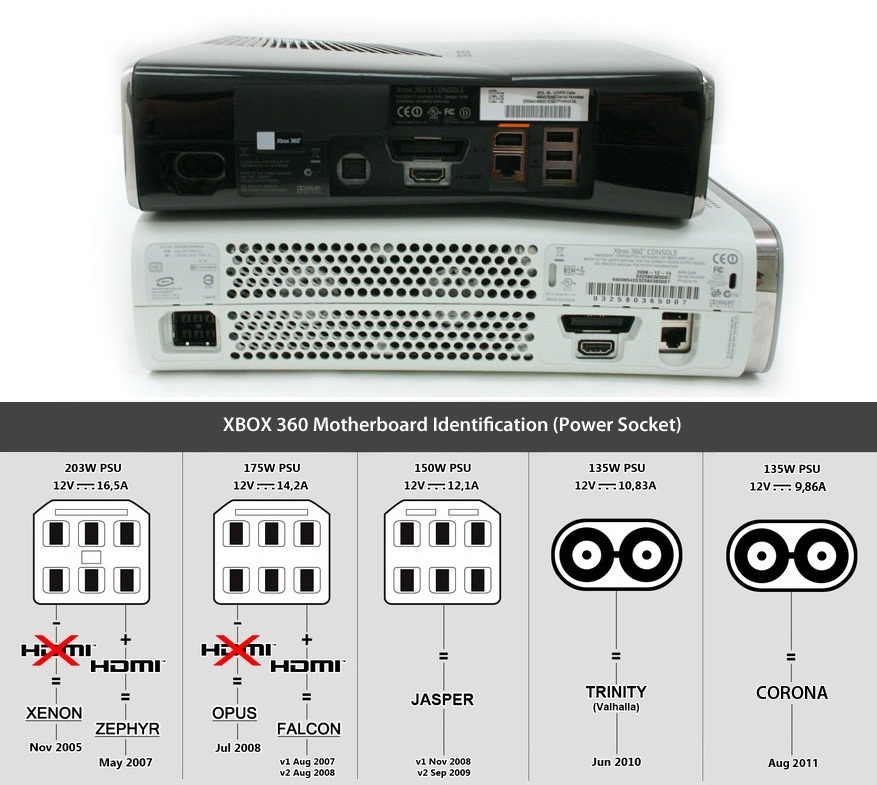
First of all you'll need to determine the age of your console.
This will give you a general idea of what hack you can apply.
On the back of the 360 there is a sticker near the AV port (Phat*&Slim*)
On that you'll find the MFR date as well as the Console Serial and Product ID.
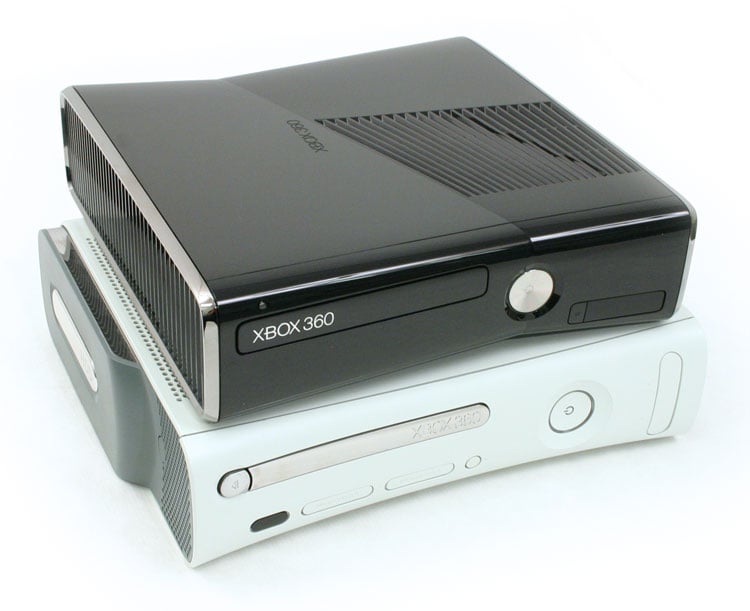
Determining the age of the 360
You'll need to write down your MFR date.
This will roughly tell you what board you have in your 360.
Xenon: 2005 - 2007 203w power supply, can be JTAGged and RGH'd (14699 only) & R-JTAGged.
Zephyr: 2007 - 2008 203w power supply, can be JTAGged and RGH'd (Hard to achieve) & R-JTAGged.
Opus: Only from RRoD Repairs from MS (rare revisions) 203/175w power supply, can be JTAGged and RGH'd & R-JTAGged.
Falcon: 2007 - 2009 175w power supply, can be JTAGged and RGH'd & R-JTAGged.
Jasper: 2008 - 2010 150w power supply, can be JTAGged and RGH'd & R-JTAGged .
Trinity: 2010 - 2011 135w power supply, can be RGH'd
Corona: 2011 - on going 115w power supply, can be RGH'd
Currently there are 6 versions of the Corona.
The following guide will tell you what type of Corona you have (you will need to disassemble your 360 for this)
If you have a Redesigned Slim then you have a Corona v5 (250GB) or v6 (4GB)
Corona: 2013 - on going 115w power supply, can be RGH'd.
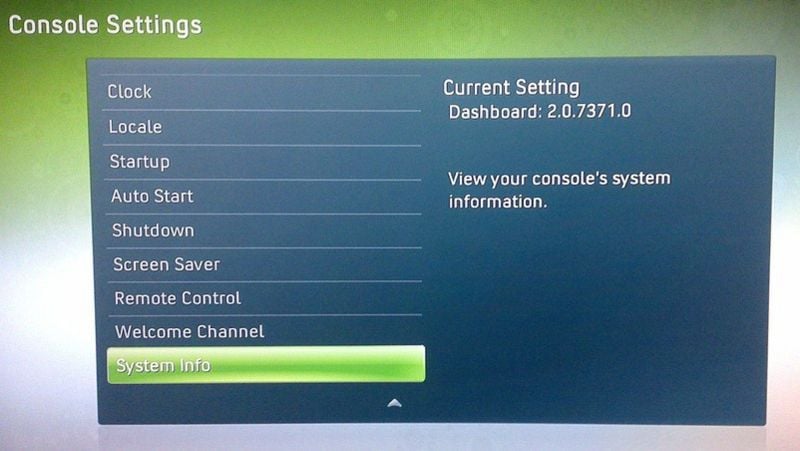
Next up, Determining your Kernel + Dashboard.
Dashboard 1888 is the first dashboard ever released, it's very unlikely you'll have this dash installed (unless you have a launchday console still in it's plastic wrapper)
Dashboard 2241 was directly available on the 360's launchday so as soon as you've connected it to XBLive you would have received an update notice.
Dashboard 4532 and 4548 are vulnerable to the KingKong Exploit, chances of you having a 360 with such a low dashboard are astronomically low.
Dashboard 7371 and lower are vulnerable to the JTAG hack, if you wish to JTAG it then DO NOT UPDATE IT!
Dashboard 14699 and lower are vulnerable to the RGH* hack
Dashboard 14717, 14719 are vulnerable to the RGH2, this method uses the Slim style hack.
Dashboard 15572 and above are hackable with the newly released ECC files.
They use the same method as the RGH2 or the R-JTAG chip (for Phatties)
The CR4 XL is the preffered chip for these dashboards. I STILL ADVISE YOU TO NOT UPDATE TO ANY DASH AFTER 14717 IF YOU WANT TO GLITCH YOUR 360, it's cheaper and RGH1 (for dashes below 14717) has far better boot times.
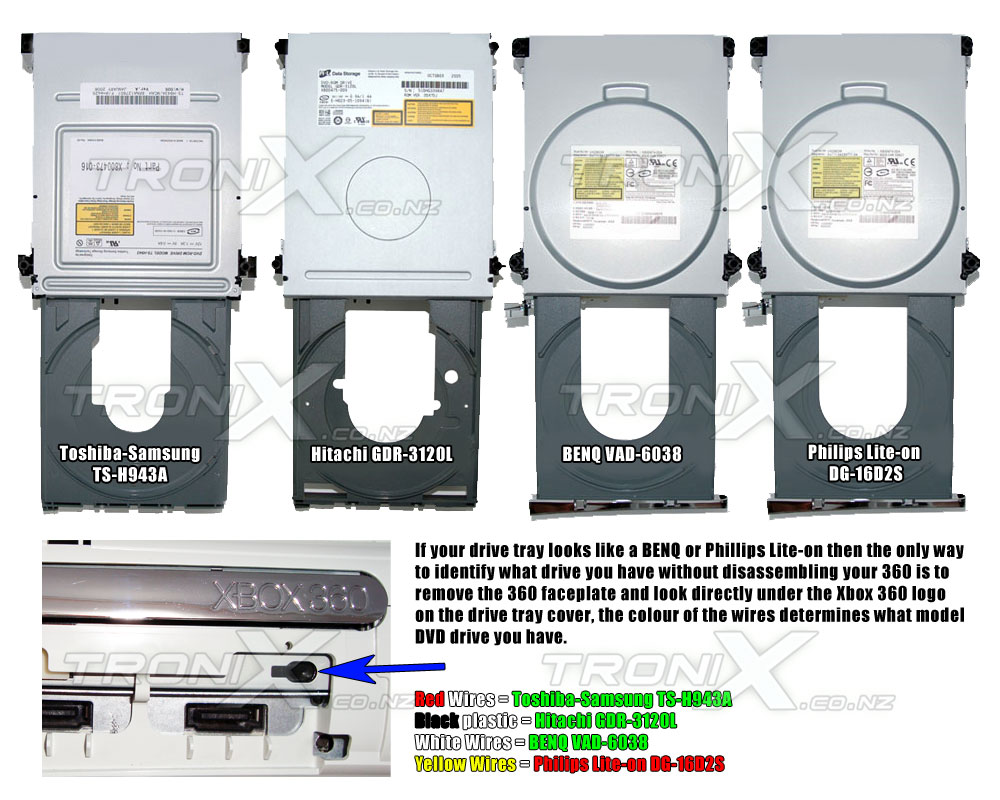
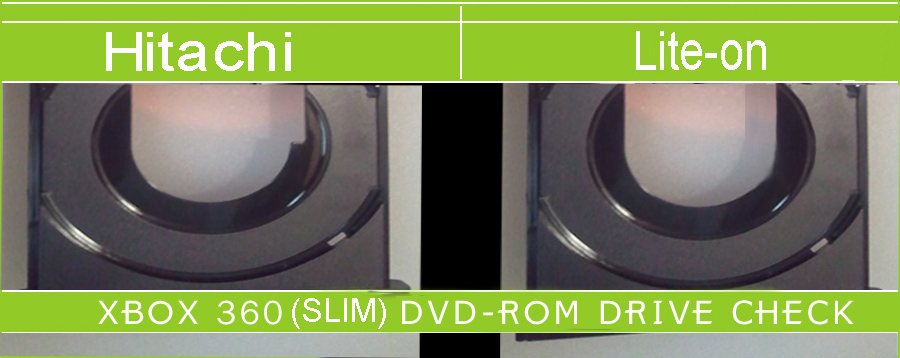
And finally, Visually determining your DVD drive.
After the visual inspection you'll roughly know what you're up against.
Xenon/Zephyr boards usually have a Sammy/Hitachi
Some have a Benq (mine did)
Falcons usually have either a Benq or Liteon.
Jaspers pretty much only have a Liteon in it.
Slims are mostly Liteon ones, Hitachi drives are pretty rare.
Early slims have a Liteon for sure, late slims can have both (Liteon 1214,1532 are both quite rare as of the time of writing)
Liteon FW: 9504/0272, 0225, 0401, 1071, 1175, 1214 and 1532 (1532 are always in the redesigned Slim)
Hitachi FW: 0500, 0502
DVD flashing.
This type of hack is most conventional for most people.
In short:
You flash your DVD drive with a custom firmware.
This will allow you to play back upped games from a DVD.
Currently all Phat 360's are hackable.
Most of the older ones can be dumped without a PMT (Probe 3)
Liteons need a Probe 3 to retrieve the DVD key from.
Slim 360's are hackable but require either a replacement PCB (expensive), a small hardware hack or a risky hack that involves drilling into the controller chip.
All Slim 360 drives can be "flashed"
LTU 1.2 has been released which is a firmware designed for all Slim drives (for use with a replacement PCB only)
If you do flash your DVD drive, you'll want to burn your XGD3 games (8.5 GB backups) with an Liteon iHAS drive. This eBay seller has those drives for a cheap price.
I'm keeping it rather simple and short since Jungleflasher comes with a complete manual.
I'm using a Liteon 9x from a Phat as an example.
First things first you'll need to get a X360USBPro and a CK3i or a X360 USBPro v2 + a Probe 3 for connecting the drive to the Powersource.
(VIA SATA cards also work as well as some SATA chipsets but for the sake of simplicity I'll go with the above)
Once you have the hardware you'll have to disassemble your 360.
Connect your DVD drive to the X360 USBPro and CK3i and start Jungleflasher.
Grab your DVD key by going to the DVDKey 32 tab, make sure you've set the correct IO port and hit PhatKey.
Press the switch on the probe and then probe MPX01 on your DVD PCB and release the switch to extract your DVD key.
Then if everything went alright, Jungleflasher should pop up a message which lets you save your DVD drive firmware.
This small firmware file contains your DVD keys and is pretty much the second holy grail of your 360 (first being the CPU key) SO SAVE IT TWICE!
Use this small FW file to build a CFW for your drive on the Firmwaretool 32 tab.
Load your firmware as Source and LT+ 3.0 as the Target.
Click on Spoof source to target and ensure both DVD keys correspond with each other.
To flash it, head to MTKFlash 32.
Click on Liteon Erase to send the Erase command to your drive.
Then powercycle your drive by switching the CK3i on and off quickly.
Then if all went well your drive should return with Status 0x72.
Now proceed to click on the Write button.
Once this has completed click on Outro/ATA reset.
If everything goes well your drive should now contain LT+ 3.0 and you can reassemble your 360 and enjoy your backups.
AGAIN!
I advise you to read the Jungleflasher manual for further help.
I can't possibly shorten everything in there and post it here.
ODDE*.
This is pretty much the same as DVD flashing but it has a few advantages.
Mainly:
You can use an external HDD to store your game ISO's on.
It also allows you to play mulleted xbox 1 games*.
However this requires you to purchase some hardware.
Currently all Phat 360's are emulated.
Pretty much every Slim 360 is emulated for it but some drives require extra steps.
Liteon 1175 and Hitachi 0500/0502 both need you to RGH your 360 to obtain your CPU key + FCRT.bin in order to emulate the drive.
Installing an ODDE is pretty straight forward.
You'll have to dump your DVD key so refer to the flashing section to dump your key.
Some DVD drives can't be dumped and need the CPU key + FCRT.bin from the NAND so those will need to refer to the RGH section.
Phat DVD dumps:
DVD dumps from Phat needs to be "converted" to firmware.bin.
Load your DVD dump as source in Jungleflasher and load a stock firmware as the target.
Spoof the keys and save your target firmware.
Name it "firmware.bin" and save it to your microSD.
Slim DVD dumps:
DVD dumps from the slim don't need conversion of any kind.
Just dump the DVD FW and save it as dummy.bin on your microSD.
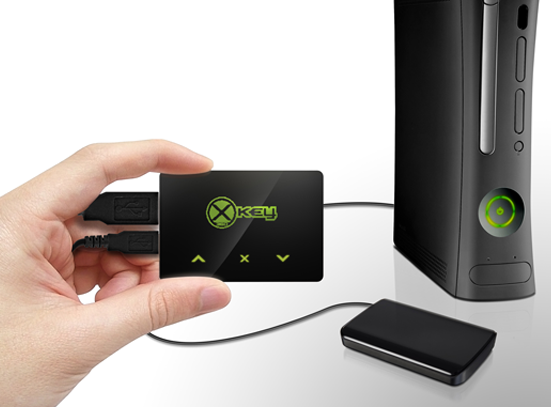
Installing the ODDE itself (I will take an Xkey as an example)
You'll need to disassemble your 360 completely.
Disconnect your DVD drive from the Mobo and connect the Xkey PCB to the Mobo.
Now connect the cables from the Xkey to the DVD drive.
They should connect like this
Once that is all done then feed the flatcable through the chassis near the Ethernet port.
Connect it to the small USB adapter thingy with the blue tab to the outside of the console.
Once it's all seated together, reassemble your 360 and boot it.
Wait for the Xkey firmware to be updated and shut it down.
Then connect your HDD with your backups to the Xkey.
It can take a while for the HDD to be fully recognized (depening on the amount of games you have on it)
Games should be in a folder called GAMES on the root of the HDD.
Along with the xkey.cfg, which holds your Xkey settings.
ISOmenu:
ISOMenu is a small feature that exploits the picture viewer/MP3 player in the 360's dash.
You can select a game by pressing the Guide button and going to picture viewer.
Go to the game you want and select the map.
Once a white image appears and says: Press Eject to play (something silimar) then continue pressing B until you're back on the main dash.
Press Eject on the DVD drive tab and wait for the game to be loaded.
JTAG.
This one is sweet for people with REALLY old 360's or people that just recovered a old one from RRoD.
You can basically play every game you want.
Xbox 360, Xbox 1, XBLArcade and XBLindie (as of Dashlaunch 3.0) as well as run Linux distro's and homebrew.
However you cannot connect to XBLive ever!
If you want to JTAG your 360 then you'll have to make sure it's on Dashboard 2.0.7371.0 OR LOWER.
Any dashboard above will not work and you'll need to refer to the RGH.
Added to a JTAG you'll probably want to prevent it from dieing quickly so setting the fans to a minimum of 75-80% in FSD*
COMING SOON
RGH.
This is pretty much the same as the JTAG.
However it has some differences.
First of all this hack is achieved with a special modchip that glitches the 360's boot process.
Then once it's "glitched" you can do everything a JTAG can do.
You can optionally also install a couple of switches and set up a so called Dual NAND.
This will allow you to retain your Live enabled state of the 360.
If you want to RGH your 360 then you'll have to know your dashboard first.
If you're on 14699 and below on Phats then you can use RGH1 (RGH1 is much more stable and quicker on boot then RGH2)
If you're on 14717 or above then you'll have to resort to RGH2.
Dashes 15xxx and above use a new set of timing files but they still use the wiring of RGH2.
Xboxes that are great to glitch: Opus, Falcon, Jasper/Kronos, Trinity, Corona/Corona V2.
Xboxes that also work are Xenons (14699 only) and Zephyrs, but their a pain to glitch and some don't glitch at all.
Corona V2 needs a special method of dumping the 4GB NAND.
You can dump it partially (48 MB iirc) or the full 3.8 GB.
The full 3.8 GB is rather slow but if you want to do it right the first time then dump the full 4GB.
Currently the same rules apply to both JTAG and RGH machines regarding XBLive and the fans.
RGHing your 360 comes with a few extra steps.
First of all, determine what RGH type you'll need to use by your Dash version.
RGH1:
RGH1 is used for Phats with a dashboard equal or lower then 14699.
RGH1 uses only a few wires and is faster then RGH2.
RGH2:
This hack is designed for the Slim, but is also used on 14717/14719 and 15572+ Phatty 360's.
DGX:
This method is only used to retrieve CPU keys from Slim consoles that have been updated to 15572 or higher.
If you want to glitch your box with this other then rescuing DVD keys then I advice you to convert it into a RGX.
*This one is outdated, I will write some info over it but pay no attention to this*
RGX:
This a newly released hack.
Users which have a DGX can convert their DGX to the RGX with a couple of caps/wires.
More info is coming soon on this.
*this one is outdated, I will write some info over it but pay no attention to this*
After that you'll need to dump your NAND.
You can do that with a NAND-X/JRunner programmer or an SD based NAND dumper for Corona's
R-JTAG
RJTAG is a hacking method developed by Team Xecuter which utilized a JTAG image through a glitching method. It was a very promising development, however due to problems after release of the CR4XL with phat console compatability, and the abandonment of the original RJTAG chip, it has been abandoned in favor of RGH 1.2 by most, if not all Xbox 360 hackers.
RGH 1.2
RGH 1.2 is a method of hacking phat Xbox 360's created by Russian hacker 15432. It utilizes the original wiring of RGH 1.0 while also enabling RGH 2.0 Nand images. This means it will work an any Phat Xbox 360 console regardless of current dashboard. It is suggested you be on at least 17150, as that was the dash it was created on, though in theory it will work on any RGH2 dash.
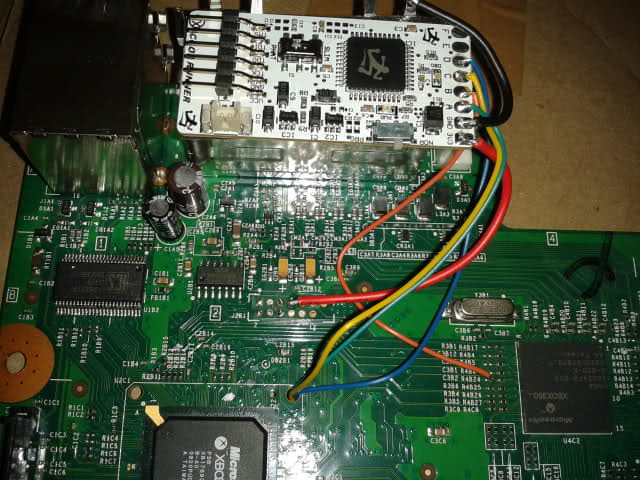
This method requires custom programming of the used modchip, and we will detail the process below. The most utilized modchips in this process are the Matrix Glitcher V1,
The Xecuter Coolrunner Rev C, And the Ace V3 although it requires some modification to be used. The Ace does have a special feature which auto-tunes itself when the self-timing file is used. In this tutorial we will be using a Matrix Glitcher V1 modchip.
Supplies: A PHAT Xbox 360 console(preferably Jasper or Falcon Mobo, Xenons and Zephyrs have a low successful glitch rate), Jrunner program, RGH 1.2 timing files, a compatible modchip, 26-30ga wiring, solid strand preferred for bottom points, JRProgrammer V2 kit,
25-35W soldering iron, flux, thermal paste, 91% IPA or MEK, office tape, and Qtips. A hot glue gun is also highly suggested.
Preparation: Disassemble phat Xbox 360 down to the bare mobo with Xclamps removed, clean old TIM off of CPU, GPU(not necessary but highly recommended) and heatsinks, clean soldering points well, might as well clean the whole board if you can at least with a can of duster, tin(pre-solder) your modchip pads(including xilink connections on modchip if using Matrix) and soldering points on mobo, attach nand wiring to mobo, attach xilink connection wires to modchip, program modchip with file 19 for Falcon mobos and 21 for Jasper mobos.
Programming the modchip is done through the "Advanced" tab in Jrunner. Click it, and navigate over to "Custom Nand/CR functions. You'll see a tab pop up. Click the browse box, and navigate to where you've stored the 15432 timing file pack.
In this instance, we're programming a Matrix Glitcher for a Falcon mobo, so we'll use file 19 from the RGH1.2 pack. You'll have to navigate to the "if you mad" folder. Find file 19, and click "Run"
Soldering points: All of your points will be on the bottomside, other than GND and VCC(3.3v)
PLL/RST-View attachment 122864
(Note, these points are especially difficult as they're quite small, located very close to other components, and will RROD the console if damaged. Be very cautious and be sure to tin the points before attaching wire)
Dumping the Nand: First, you'll want to attach your JR Programmer V2 to the Nand connection wires and your PC. Make sure you have the console plugged in, but NOT ON. Dumping the Nand is quite simple with Jrunner. It was created to be linear so obviously, click "Read Nand." This will read the Nand twice and automatically compare to verify a good read.
Creating/writing the ECC: After you've backed up the 2 Nand reads which are located in the output folder of Jrunner to another folder, move immediately to the right and you'll notice a button that says "Create Xell Reloaded." This is for JTAG or RJTAG so we dont want this option. Simply clitch "Glitch 2" over in the xebuild options, and click "Create ECC" where "Create Xell Reloaded" was previously.
Now, with your programmer connected, go ahead and click "Write ECC" which is also immediately to the right. Jrunner will now write the program you need to retrieve your CPU key to the console.
Booting Xell and retrieving CPU key: After the ECC is written to the Nand, unplug the JRProgrammer V2 from the console, reattach the heatsinks with new TIM, pop the fan out of the cage, and place it blowing towards the heatsinks. Plug in the RF board, your A/V cable(it can be HDMI), and power supply. Press the little button in the middle and if all is well, Xell will boot and display your keys. Take a pic of your keys or write them down.
Tuning the chip timing: This is a good time to tune your chip timing if you're not satisfied with the boot times thus far, or if you cannot achieve Xell at all. Simply go through the chip writing process again, methodically selecting different timing files and attempting bootup until you reach your desired results. The files I've found to work best are 19, 20, and 21.
Creating image: Going back to Jrunner, type in your CPU key. As soon as its completely written in correctly, Jrunner will automatically decrypt the Nand and its contents and move the output to a folder in its directory which will be named as the serial of your console. It will also try to go back to JTAG/RJTAG settings. Again, click "Glitch 2." Now, immediately to the right(notice the pattern) you'll see a button that says "Create XeBuild Image." Click it and watch Jrunners magic. It will completely build the hacked dashboard for you.
Writing image: At this point you can hook your console back into the JRProgrammer V2 which should still be plugged into your PC. Again, plug the console in BUT DO NOT TURN IT ON/IT MUST BE OFF. Click "Write Nand," and it will begin writing the hacked dashboard image to the console. After it's completed, unplug the console, and programmer. Plug the console back in with the A/V cable and boot it up a few times to make sure the boot times are still good. You will also want to place it back in the cage, with the DVD drive connected and fan back in to verify a few more times.
Wrapping up: If you've achieved a successful hack, congrats. Now it's time to reassemble but first, I'd highly suggest using the hot glue gun to lock the wiring in place. You should also clean up any flux residue left over.
CR4XL By Team Xecuter
The CR4XL modchip was developed by Team Xecuter. It is an excellent, albeit more pricey option for hacking either Phat or Slim Xbox 360 consoles. It should be noted that the Phat version typically utilizes RJTAG methods rather than RGH 2.0 and has bricked consoles in the past possibly due to bad production runs. RGH 2.0 can be used on Phats, but again, bricked consoles. This chip however, is a great option for any Slim console. Most Slim consoles glitched with the CR4XL have an excellent, consistent boot time. This is a good choice for someone who wants to just solder in a chip and go step-by-step in Jrunner and not worry about timing files and programming modchips.
KingKong exploit *This is purely for legacy purposes*
So, you have a 360 with Kernel 4548 or lower and wish to do this in order to boot Linux.
Requirements:
Kernel 4548 or update to 4548 found here (link will be added soon)
Peter Jacksons King Kong the video game.
Flashed DVD drive.
The KingKong exploit can technically been seen as a "softmod" type of exploit.
But it needs a flashed DVD drive which is in itself isn't really achieved with software.
COMING SOON
So in short:
There is no real softmod and there will much likely never be one for the 360, so you're out of luck for that.
It's pretty much all hardware based (flashing can with luck be achieved with software only, provided you have the correct SATA chipset)
You can hack both Phat, Slim and redesigned Slim 360's with all of the above regardless of your Dash version.
If you ONLY want to play games and have XBLive access, then I'd suggest you get an ODDE or flash your drive.
A RGH can be used for Live but you'll need to invest in some expensive hardware.
Besides it's extremely risky if you accidentally boot homebrew/FSD/XeXMenu, your console+profile will get banned from live if they detect you!
You cannot play XBLA/XBLIndie/DLC or use Avatar items downloaded from the web on a retail 360, if it's not released on disc then you're only able to boot that stuff on hardware hacked consoles!
Explanation of some of the words. Mulleted xbox 1 games - This is a special method to convert normal Xbox 1 games to 7.4 GB ISO images playable on flashed/ODDE consoles. ODDE - Optical Disc Drive Emulator, This is a small piece of hardware that emulates the 360's DVD drive. KV - This is your KeyVault, it holds all the data of the 360 such as your DVD Key, CPU Key and various other data regarding your consoles region and settings. RGH - Reset Glitch hack FSD - This is FreeStyle Dash, a neat little replacement dash that resembles the old NXE* from Microsoft.
It has a lot to offer. NXE - This is the second dashboard from MS, (dashboards 7357 to 9199) MS - Microsoft. Phat - Original Xbox 360. Slim - Second 360 version. E slim- Third 360 version.
Credits:
DinohScene and brickmii82 for the general thread.
GBAtemp for the awesome community
And all the great people who have made progress in the 360 scene!
I can't give individual credits because the list would be to long then.
Hey guys, I finally got it working! Had to use one of 15432's wire routings to make it boot. Anyway, I wanted to thank @ModderFokker619 and @brickmii82 for your help along the way, and thanks to @DinohScene for the tutorials you've written on XBOX360 hacking!
Hey guys, I finally got it working! Had to use one of 15432's wire routings to make it boot. Anyway, I wanted to thank @ModderFokker619 and @brickmii82 for your help along the way, and thanks to @DinohScene for the tutorials you've written on XBOX360 hacking!
I've finally decided to go with a Dual NAND setup. I don't trust myself enough to do the hardmodding myself. What are some trustworthy US based mod shops that I can send my xbox 360 off to? I see Sharky's Customs and Dope Customs from a few searches, plus another one in Canada.
Also, when going dual NAND, is it best to keep all the mod files on an external hard drive and keep the internal hard drive clean for when playing real NAND?
Using an RGH console, is it possible to install game dumps s.t. they show up correctly in the default MS launcher? Or is an alternative launcher absolutely required?
Using an RGH console, is it possible to install game dumps s.t. they show up correctly in the default MS launcher? Or is an alternative launcher absolutely required?
A new Nintendo Switch firmware update is here. System software version 18.0.1 has been released. This update offers the typical stability features as all other...
With Apple having recently updated their guidelines for the App Store, iOS users have been left to speculate on specific wording and whether retro emulators as we...
The time has finally come, and after many, many years (if not decades) of Apple users having to side load emulator apps into their iOS devices through unofficial...
TheFlow has done it again--a new kernel exploit has been released for PlayStation 4 consoles. This latest exploit is called PPPwn, and works on PlayStation 4 systems...
Nintendo might just as well be a law firm more than a videogame company at this point in time, since they have yet again issued their now almost trademarked usual...
While rumors had been floating about rampantly as to the future plans of Nintendo, the President of the company, Shuntaro Furukawa, made a brief statement confirming...
Another video game prototype has been found and preserved, and this time, it's none other than the game that spawned an entire franchise beloved by many, the very...
Anbernic is back with yet another retro handheld device. The upcoming RG28XX is another console sporting the quad-core H700 chip of the company's recent RG35XX 2024...
Two classic titles join the Nintendo Switch Online Expansion Pack game lineup. Available starting April 24th will be the motorcycle racing game Extreme G and another...
Nintendo has recently announced through their social media accounts that a new Indie World stream will be airing tomorrow, scheduled for April 17th, 2024 at 7 a.m. PT...
Nintendo has officially announced that a successor to the beloved Switch console is on the horizon. As we eagerly anticipate what innovations this new device will...
While rumors had been floating about rampantly as to the future plans of Nintendo, the President of the company, Shuntaro Furukawa, made a brief statement confirming...
Nintendo might just as well be a law firm more than a videogame company at this point in time, since they have yet again issued their now almost trademarked usual...
With Apple having recently updated their guidelines for the App Store, iOS users have been left to speculate on specific wording and whether retro emulators as we...
The time has finally come, and after many, many years (if not decades) of Apple users having to side load emulator apps into their iOS devices through unofficial...
A new Nintendo Switch firmware update is here. System software version 18.0.1 has been released. This update offers the typical stability features as all other...
TheFlow has done it again--a new kernel exploit has been released for PlayStation 4 consoles. This latest exploit is called PPPwn, and works on PlayStation 4 systems...
After rumour got out about an upcoming NES Edition release for the famed Nintendo World Championships, Nintendo has officially unveiled the new game, titled "Nintendo...
DOOM is well-known for being ported to basically every device with some kind of input, and that list now includes the old retro game console in Persona 5 Royal...
The number of layoffs and cuts in the videogame industry sadly continue to grow, with the latest huge layoffs coming from Microsoft, due to what MIcrosoft calls a...