Tutorial Project
Updated
How to set up ISFShax + Stroopwafel
Special Thanks to @rw-r-r_0644 for finding and implementing ISFShax.
Although this is in use by many users and has proven itself as safe and reliable, you still use this at your own risk. Messing with the isfs superblocks is dangerous and can brick your Wii U. The superblock linked here was tested and confirmed working. Installing an broken superblock will brick your Wii U.
Also keep in mind: if you are restoring a old SLC backup, which was taken before installing ISFShax, ISFShax will be removed by restoring that backup. Newer versions of minute try to preserve ISFShax when restoring the SLC.
To protect against Nintendo pushing a boot1 update (very unlikely, but you newer know), which would brick a console with ISFShax, boot1 updates get blocked by the 5isfshax.ipx plugin. Older versions did block system updates in general. If you need to do a system update, make sure you have the latest version of said plugin.
To install Aroma DO NOT use wiiu.hacks.guide, follow the Instructions in the "Installing Aroma" section instead to install Aroma after you installed ISFShax. If you already installed Aroma using wiiu.hacks.guide, it's fine, but make sure to still follow the "Installing Aroma" section.
If you came here to change the region, make sure you are using https://gbatemp.net/threads/region-changing-the-wii-u.650802/ and NOT wiki.hacks.guide
If you run into problems with this guide, please use this Thread for help.
28.02.2026 - Replace GUIFormat with Rufus because of this: https://github.com/hacks-guide/Guide-WiiU/issues/283
02.02.2025 - isfsh.ax website
26.01.2025 - Remove updatre block
20.01.2025 - Removed encrypted fw.img due to update fw_img_loader and changed file names
13.07.2024 - No longer require the
04.04.2024 - Add Fastboot
13.03.2024 - System updates now get blocked by the wafel_isfshax_patch.ipx plugin.
29.12.2023 - Standby Services are now supported. For that to work you need to have the latests ISFShax superblock installed and need to use the latest minute fw.img and wafel_core.ipx. Also autoboot needs to be enabled.
ISFShax exploits boot1 with specially crafted ISFS (the filesystem of the SLC) superblock. Once installed, ISFShax provides similar capabilities to defuse. Since it launches before IOSU, it can be used to apply early patches to IOSU and can be used to fix most bricks. But it won't protect you of bricks caused by: breaking boot1, seeprom bricks or installing a broken ISFShax superblock. ISFShax also doesn't help you if you already bricked the Wii U.
Use cases are:
As a alternative to following this manual guide, you can now use the wafel installer. It guides you through the setup of ISFShax, Stroopwafel and optinally Aroma.
If your console already has problems and you need ISFShax to deal with a error, then I strongly suggest you use the manual guide below.
If you want to follow the manual setup, skip to the next section (Choosing the Exploit).
If you are already using Aroma, put the wafel_installer.wuhb into your wiiu/apps folder on the SD. You find the download here: https://github.com/zer00p/wafel_installer/releases
If you haven't modded your console yet, or lost the SD or SD content, just go to https://wafel.xyz on the Wii U web browser (Internet applet) and you can launch the wafel installer directly from that website.
Don't forget to download the files below, before jumping to the exploit specific instructions.
There are multiple ways to launch the ISFShax installer:
If you already have Tiramisu or Aroma installed and can launch it follow the Instructions for Aroma
If you already have Haxchi or CBHC installed follow Instructions for Haxchi
If the Browser still works and you can launch the browser exploit u.wiidb.de follow the Instructions for Browser
If you can't access the Browser, but Settings still work follow Instructions for DNSpresso
If you your Wii U crashes in the initial setup on Mii creation follow Instructions for DNSpresso
If your Wii U can't launch the browser anymore or can't connect to the internet follow the Instructions for UDPIH
If none of the other exploits work, use Paid The Beak (PTB)
Windows hides file name extension by default. I highly recommend turning this feature off to avoid confusion (also it's a good idea in general to see what type of you are dealing with): https://www.howtogeek.com/205086/beginner-how-to-make-windows-show-file-extensions/
Make sure the SD card is formatted to FAT32 (already the case if you are using it for Homebrew).
Cards up to 32GB come already with FAT32 from the factory. If you need to reformat them, I recommend using the offical formatter: Windows / Mac or Linux
For cards above 32GB you can't use the official formatter: On Linux you can use gparted, on mac the built in DiskUtility. On Windows, you have to use a third party tool like Rufus or if you have the latest Windows 11 you can use the command prompt (launch as Admin):
A zip archive with all the files required can be downloaded here: https://isfsh.ax/
Extract it and move everything inside the
If you are upgrading an existing ISFShax setup: make sure to clean out the
You can a also download all the files manually from the git repos:
The structure on the SD should look like this:
This step heavily depends on the used Exploit.
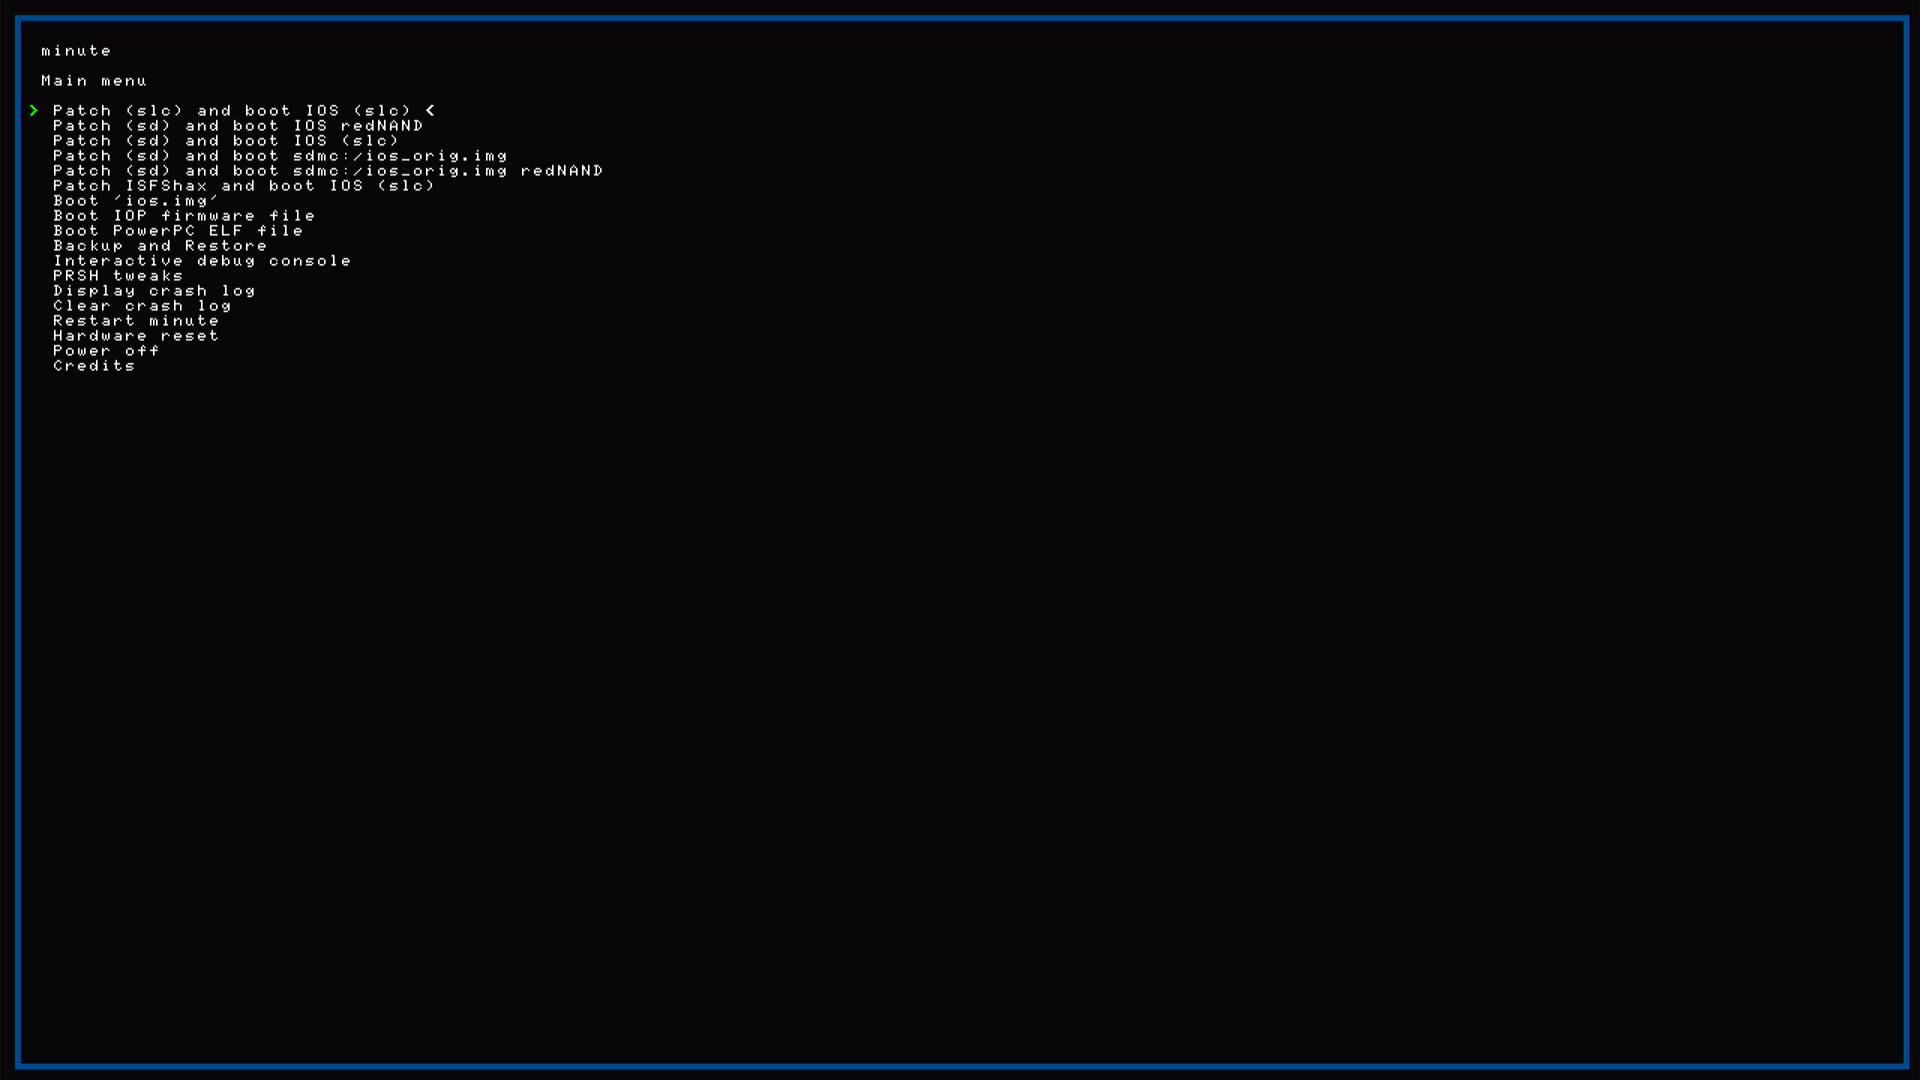
Now you should see the minute main menu. If not, something went wrong. Make sure you have the correct fw.img file on the SD.
In minute you move the cursor with the power button and enter with the eject button (swapped compared to the recovery menu).
ISFShax isn't installed yet! minute is just loaded temporarily and gone after a reboot.
Note: minute only outputs 1080p through HDMI, no picture on the gamepad, and nothing on the analog outputs.
Some people reported that the screen output is not working for them when minute was loaded from the recovery_menu. If you made sure nothing else is the problem (right fw.img, TV supports 1080p HDMI), you can try following along blindly by pressing the appropriate buttons. Make sure to wait long enough between the presses, so the system has time to load. Without display output skip the first backup and go directly to Installing ISFShax.
If you already have an SLC backup or it is inconvenient for you to do one (no screen output), then you can skip this.

Dump the SLC.RAW again. This will overwrite the previous SLC.RAW file on the SD. This is required if you need to restore the SLC for unbricking, without loosing ISFShax. Keep that backup in a safe place.
If you skipped the first Backup also backup OTP and SEEPROM now.
If you came here from the redNAND, the MLC rebuild or the Region Change guide continue with that tutorial now.
For now your Wii U loads minute (fw.img), which then applies the required patches from SD card. (IOSU needs to be patched, so it doesn't fall over the ISFShax superblock).
To boot into the Wii U OS select
If your console just bootloops through minute over and over again, you are probably coldbooting Aroma and replaced the
To make the Wii U booting automatically, without you having to press any buttons in the minute menu, you have to complete the "Autobooting with SD" section further down.
To make the Wii U autoboot with an SD card inserted you need to create the file
The attached isfshax.zip file contains a few example minute.ini files for autobooting slc, sd or rednand. You can copy and rename the appropriate one. The files in the zip already have the .ini file name extension. if you don't see it, then DO NOT add it, as Windows is hiding it.
You can adjust the timeout (in seconds) to your liking. The
As an Alternative check out the Fastboot option below.
Now the Wii U will boot like normal without the SD. To achieve that ISFShax applies a minimal set of patches to the system (to tolerate the ISFShax superblock). Since these patches kept minimal, they are not optimized and some things like leaving the settings will take longer.
To make the full minute+stroopwafel run from the internal memory we can install minute
Now the Wii U should autoboot with the installed plugins if no SD card is inserted.
If a SD card with a fw.img is inserted, that will be loaded instead of the installed. So if you want to make sure the fw.img from the slc is used, rename or remove the fw.img from SD. You can also boot the plugins from SLC by booting the first option
Since ISFShax v5.0 the Wii U will first try to load the fw.img from the SD and if that fails it will try to load it from SLC.
Previous versions of ISFShax will first try to load the fw.img from the SLC and if that fails it falls back to the SD.
If you installed a broken fw.img which doesn't load, you can force isfshax to load the fw.img from sd by repeatedly pressing the power button till the menu shows up.
Warning: A factory reset will delete the hax folder. Without the fw.img on the SD the Wii U will then just have a black screen with a orange LED with the latest ISFShax it will apply minimal patches to boot and it will still block updates, but some things like leaving the settings might me slower. It's recommended to setup minute and stroopwafel again.
To make the Wii U boot as fast as possible, without showing minute, you can now use the fw_fastboot.img. This won't work with redNAND.
It is hardcoded to go straight to the first option (booting the slc, with patches from SLC) when loaded from slc or the third option when loaded from SD. It won't display anything and ignore any autoboot configuration in the minute.ini.
If you used haxcopy with the hax folder from the isfsh.ax download or the download script, then the fastboot minute is already installed.
To install it manually replace the the fw.img in the hax folder on the SLC with the fw_fastboot.img (renamed to fw.img)
In case you ever get stuck and need to load the full minute from SD you can do this:
To update ISFShax replace the files on the SD card. While doing this make sure to clean out the
To update the installed ISFShax superblock, you need to go trough the installer again (Boot ios.img) but generally you don't need to, if everything works. DON'T uninstall it, just install the new superblock, it will overwrite the old one.
If you installed files to the SLC, you can use haxcopy to update those. All plugins (like SDSUSB) that are not in the
If you are redNAND user, remove the hax folder and creare a new one and copy the fw.img from the root of the SD into there, before running haxcopy. The hax folder form the download contains the fastboot fw.img, which doesn't work with redNAND. By installing the normal minute and not having the ios_plugins folder on the menu, the Wii U will display the minute menu.
To protect against Nintendo pushing a boot1 update (very unlikely, but you newer know), which would brick a console with ISFShax, boot1 updates get blocked by the 5isfshax.ipx plugin. Older versions of the plugin did block system updates in general. If you need to do a system update, make sure you have the latest version of said plugin.
To install a system update (e.g. for vWii Decaffinator), make sure you have the latest version of the plugin (and stroopwafel). To do this just replace the
If you have Aroma or Tiramisu, you also need to remove the
If you installed the the files to the SLC, then you don't need to keep any files on the SD, but I would still recommend keeping the hax folder to make future updates easier (so you have all the plugins you installed).
For SD booting / redNAND you just need to keep the
Also if you are using Aroma, you want to keep the
The otp.bin / seeprom.bin and SLC.RAW should be copied to a safe place and can also be removed from the SD.
The ios.img would only be needed for uninstalling ISFShax, so if you don't plan on doing that, you can remove it too.
But there is no harm in just leaving all the files on the SD.
DON'T just restore an older SLC backup, as that would break SCFM!
You DON'T need to uninstall ISFShax to update it. Also uninstalling and reinstalling it won't fix anything. Just installing the new superblock over the old replaces it completely.
Here is a list of currently available stroopwafel plugins, you can use with ISFShax:
In case you are interrested in how all the files work together and which you need to keep, you can keep reading on:
superblock.img
This contains the actual ISFShax. It is a specially crafted superblock for the SLC File System (ISFShax) to exploit a vulnerability in boot1 and give us arbiary code excution. It also contains a mini version of minute, which will be executed to load the full minute (fw.img) from SD or SLC.
superblock.img.sha
This is the checksum for the superblock, to make sure it didn't corrupt along the way, as a bad superblock would lead to a brick.
fw.img
this contains the full minute, which gives you the menu after turning on. It can be used for creating and restoring backups and similar tasks and it acts as a bootloader stroopwafel. When selecting one of the First 3 Boot options, it will load IOSU (the OS/Firmware that runs on the ARM processor) and also loads the plugins from the ios_plugins folder. It will then patch IOSU to first execute the first plugin, which should be stroopwafel, before launching IOSU. At that point you see the GO GO GO message, as IOSU takes over.
00core.ipx
This is stroopwafel. It contains a patches for handeling IOSU reloads (so these go through minute, to apply the patches again), redNAND and to facilliate a framwork for other plugins to apply patches and also exports functions to be used by plugins.
5isfshax.ipx
This plugin patches IOSU to ignore the ISFShax superblock and use the normal superblocks instead. (A superblock contains the file system meta data, like folder structure and used blocks. The SLC has 64 superblocks (to spread the wear), which are written in round robbin, whenever something is change don the slc. ISFShax is installed to 4 superblocks for reduandency)
5payloader.ipx
This redirects the men.rpx (the Wii U Menu) to the root.rpx of aroma, so Aroma gets loaded on boot. If the root.rpx is missing it will load the menu normally.
ios.img
This is the ISFShax installer. It installs the superblock.img to 4 of the superblocks, and marks these superblocks as bad in the normal superblock, so they won't be overwritten.
wiiu/payload.elf
This file gets loaded by most exploits (Like the Browser exploit or the Aroma Payloadloader). In this case it contains the menu, that comes up by holding b and letting you select another payload. By default it would load the Environmentloader for Aroma, if installed.
wiiu/payloads/fw_img_loader/payload.elf
This patches IOSU to load the fw.img from SD and then tells it to reload. This is used to initially load minute, before ISFShax is installed.
wiiu/apps/fw_img_loader/fw_img_loader.elf
This is the a version of the fw_img_loader that can be loaded as an app from the Homebrew Launcher. (Haxchi)
launch.rpx
This is loaded by DNSpresso and loads the
recovery_menu
The recovery menu is loaded by UDPIH. It has some options to fix certain problems, but we are just using it to load minute. If the recovery_menu sees the boot1now.img, It will skipp the menu and after a countdown use PRSHhax to reset the Wii U into boot1now.img
boot1now.img
SInce PRSHhax exploits boot1 early, many hardware initilizations still needed to be done. This is done by boot1now, which is a mini version of minute, similar to the one embedded in the ISFShax superblock. It will then load the fw.img from the sd.

This means after ISFShax is setup, you only need to keep the fw.img, wiiu/ios_plugins and your config in the minute folder. If you are fastbooting from the SLC, then you don't need anything on the SD.
Warning
Although this is in use by many users and has proven itself as safe and reliable, you still use this at your own risk. Messing with the isfs superblocks is dangerous and can brick your Wii U. The superblock linked here was tested and confirmed working. Installing an broken superblock will brick your Wii U.
Also keep in mind: if you are restoring a old SLC backup, which was taken before installing ISFShax, ISFShax will be removed by restoring that backup. Newer versions of minute try to preserve ISFShax when restoring the SLC.
To protect against Nintendo pushing a boot1 update (very unlikely, but you newer know), which would brick a console with ISFShax, boot1 updates get blocked by the 5isfshax.ipx plugin. Older versions did block system updates in general. If you need to do a system update, make sure you have the latest version of said plugin.
To install Aroma DO NOT use wiiu.hacks.guide, follow the Instructions in the "Installing Aroma" section instead to install Aroma after you installed ISFShax. If you already installed Aroma using wiiu.hacks.guide, it's fine, but make sure to still follow the "Installing Aroma" section.
If you came here to change the region, make sure you are using https://gbatemp.net/threads/region-changing-the-wii-u.650802/ and NOT wiki.hacks.guide
If you run into problems with this guide, please use this Thread for help.
Update
28.02.2026 - Replace GUIFormat with Rufus because of this: https://github.com/hacks-guide/Guide-WiiU/issues/283
02.02.2025 - isfsh.ax website
26.01.2025 - Remove updatre block
20.01.2025 - Removed encrypted fw.img due to update fw_img_loader and changed file names
13.07.2024 - No longer require the
wiiu/root.rpx. Replace Tiramisu with Aroma as default. Add Haxchi as Entry Exploit.04.04.2024 - Add Fastboot
13.03.2024 - System updates now get blocked by the wafel_isfshax_patch.ipx plugin.
29.12.2023 - Standby Services are now supported. For that to work you need to have the latests ISFShax superblock installed and need to use the latest minute fw.img and wafel_core.ipx. Also autoboot needs to be enabled.
What is this for?
ISFShax exploits boot1 with specially crafted ISFS (the filesystem of the SLC) superblock. Once installed, ISFShax provides similar capabilities to defuse. Since it launches before IOSU, it can be used to apply early patches to IOSU and can be used to fix most bricks. But it won't protect you of bricks caused by: breaking boot1, seeprom bricks or installing a broken ISFShax superblock. ISFShax also doesn't help you if you already bricked the Wii U.
Use cases are:
- Rebuilding / upgrading the MLC
- Removing 64GB MLC limit and disabling SCFM
- Brick protection (e.g. before doing region change)
- Cold booting redNAND (useful when when the eMMC is failing)
- Use partitioned HDDs
- Install Wii U games to the SD card
- It gives a minimal CFW, which can launch old homebrew using the homebrew launcher (not sure how useful since we have Aroma and Tiramisu)
- Stop the Wii U from turning the Tablet on during boot (using a stroopwafel plugin)
Wafel Installer
As a alternative to following this manual guide, you can now use the wafel installer. It guides you through the setup of ISFShax, Stroopwafel and optinally Aroma.
If your console already has problems and you need ISFShax to deal with a error, then I strongly suggest you use the manual guide below.
If you want to follow the manual setup, skip to the next section (Choosing the Exploit).
If you are already using Aroma, put the wafel_installer.wuhb into your wiiu/apps folder on the SD. You find the download here: https://github.com/zer00p/wafel_installer/releases
If you haven't modded your console yet, or lost the SD or SD content, just go to https://wafel.xyz on the Wii U web browser (Internet applet) and you can launch the wafel installer directly from that website.
Choosing the Exploit
Don't forget to download the files below, before jumping to the exploit specific instructions.
There are multiple ways to launch the ISFShax installer:
If you already have Tiramisu or Aroma installed and can launch it follow the Instructions for Aroma
If you already have Haxchi or CBHC installed follow Instructions for Haxchi
If the Browser still works and you can launch the browser exploit u.wiidb.de follow the Instructions for Browser
If you can't access the Browser, but Settings still work follow Instructions for DNSpresso
If you your Wii U crashes in the initial setup on Mii creation follow Instructions for DNSpresso
If your Wii U can't launch the browser anymore or can't connect to the internet follow the Instructions for UDPIH
If none of the other exploits work, use Paid The Beak (PTB)
Preparing the SD card
Windows hides file name extension by default. I highly recommend turning this feature off to avoid confusion (also it's a good idea in general to see what type of you are dealing with): https://www.howtogeek.com/205086/beginner-how-to-make-windows-show-file-extensions/
Make sure the SD card is formatted to FAT32 (already the case if you are using it for Homebrew).
Cards up to 32GB come already with FAT32 from the factory. If you need to reformat them, I recommend using the offical formatter: Windows / Mac or Linux
For cards above 32GB you can't use the official formatter: On Linux you can use gparted, on mac the built in DiskUtility. On Windows, you have to use a third party tool like Rufus or if you have the latest Windows 11 you can use the command prompt (launch as Admin):
Bash:
format /FS:FAT32 X: (replace X with the letter of the SD card!)A zip archive with all the files required can be downloaded here: https://isfsh.ax/
Extract it and move everything inside the
sd folder to the root of the SD card. If asked, merge folders and replace existing files.If you are upgrading an existing ISFShax setup: make sure to clean out the
ios_plugins directory, since file names did change. These files need to be deleted, if they exist: wafel_core.ipx,wafel_isfshax_patch.ipx, 0core.ipx, 6isfshax.ipx.You can a also download all the files manually from the git repos:
Get the following files and put them in the root of the SD. Choose the release tagged with "Latest" for each.
Instead of downloading all the files manually, you can now use the isfsh-downloader script from the attached isfshax.zip file to download all files automatically.
If you have already ISFShax files from a previous install on the SD, make sure you clean out wiiu/ios_plugins before, some file names changed and you don't want duplicates
[TABLE=full]
[TR]
[td width="16.6667%"]Method[/td][td width="16.6667%"]Name[/td][td width="16.6852%"]filename[/td][td width="16.6852%"]Path on SD[/td][td width="16.6667%"]Link[/td][td width="16.6667%"]Comment[/td]
[/TR]
[TR]
[td width="16.6667%"]All[/td][td width="16.6667%"]ISFShax installer[/td][td width="16.6852%"]ios.img[/td][td width="16.6852%"]ios.img[/td][td width="16.6667%"]https://github.com/isfshax/isfshax_installer/releases[/td][td width="16.6667%"][/td]
[/TR]
[TR]
[td width="16.6667%"]All[/td][td width="16.6667%"]ISFShax superblock[/td][td width="16.6852%"]superblock.img
superblock.img.sh[/td][td width="16.6852%"]superblock.img
superblock.img.sh[/td]
[td width="16.6667%"]https://github.com/isfshax/isfshax/releases[/td][td width="16.6667%"][/td]
[/TR]
[TR]
[td width="16.6667%"]All[/td][td width="16.6667%"]stroopwafel[/td][td width="16.6852%"]00core.ipx[/td][td width="16.6852%"]wiiu/ios_plugins/00core.ipx[/td][td width="16.6667%"]https://github.com/StroopwafelCFW/stroopwafel/releases[/td][td width="16.6667%"][/td]
[/TR]
[TR]
[td width="16.6667%"]All[/td][td width="16.6667%"]ISFShax patch[/td][td width="16.6852%"]5isfshax.ipx[/td][td width="16.6852%"]wiiu/ios_plugins/5isfshax.ipx[/td][td width="16.6667%"]https://github.com/isfshax/wafel_isfshax_patch/releases[/td][td width="16.6667%"][/td]
[/TR]
[TR]
[td width="16.6667%"]All[/td][td width="16.6667%"]minute[/td][td width="16.6852%"]fw.img[/td][td width="16.6852%"]fw.img[/td][td width="16.6667%"]https://github.com/StroopwafelCFW/minute_minute/releases[/td][td width="16.6667%"][/td]
[/TR]
[TR]
[td width="16.6667%"]Browser DNSpresso Aroma[/td]
[td width="16.6667%"]fw.img loader[/td][td width="16.6852%"]payload.elf[/td][td width="16.6852%"]wiiu/payloads/fw_img_loader/payload.elf[/td][td width="16.6667%"]https://github.com/wiiu-env/fw_img_payload/releases[/td][td width="16.6667%"]extract zip[/td]
[/TR]
[TR]
[td width="16.6667%"]Browser DNSpresso
Aroma[/td]
[td width="16.6667%"]PayloadLoaderPayload[/td][td width="16.6852%"]payload.elf[/td][td width="16.6852%"]wiiu/payload.elf[/td][td width="16.6667%"]https://github.com/jan-hofmeier/PayloadLoaderPayload/releases[/td][td width="16.6667%"][/td]
[/TR]
[TR]
[td width="16.6667%"]DNSpresso[/td][td width="16.6667%"]PayloadFromRPX[/td][td width="16.6852%"]root.rpx[/td][td width="16.6852%"]launch.rpx[/td][td width="16.6667%"]https://github.com/wiiu-env/PayloadFromRPX/releases[/td][td width="16.6667%"]extract zip[/td]
[/TR]
[TR]
[td width="16.6667%"]UDPIH[/td][td width="16.6667%"]minute boot1[/td][td width="16.6852%"]boot1.img[/td][td width="16.6852%"]boot1now.img[/td][td width="16.6667%"]https://github.com/jan-hofmeier/minute_minute/releases[/td][td width="16.6667%"][/td]
[/TR]
[TR]
[td width="16.6667%"]UDPIH[/td][td width="16.6667%"]recovery menu[/td][td width="16.6852%"]recovery_menu[/td][td width="16.6852%"]recovery_menu[/td][td width="16.6667%"]https://github.com/GaryOderNichts/recovery_menu/releases[/td][td width="16.6667%"][/td]
[/TR]
[TR]
[td width="16.6667%"]Haxch[/td][td width="16.6667%"]fw.img loader[/td][td width="16.6852%"]wiiu/apps/fw_img_loader/*[/td][td width="16.6852%"]wiiu/apps/fw_img_loader[/td][td width="16.6667%"]https://github.com/jan-hofmeier/unencrypted_fw_img_payload/releases[/td][td width="16.6667%"]extract fw_img_loader_hbl.zip and keeps structure[/td]
[/TR]
[/TABLE]
/ is the path seperator wiiu/payload.elf for example means: have a folder wiiu and put the file payload.elf inside.Instead of downloading all the files manually, you can now use the isfsh-downloader script from the attached isfshax.zip file to download all files automatically.
If you have already ISFShax files from a previous install on the SD, make sure you clean out wiiu/ios_plugins before, some file names changed and you don't want duplicates
[TABLE=full]
[TR]
[td width="16.6667%"]Method[/td][td width="16.6667%"]Name[/td][td width="16.6852%"]filename[/td][td width="16.6852%"]Path on SD[/td][td width="16.6667%"]Link[/td][td width="16.6667%"]Comment[/td]
[/TR]
[TR]
[td width="16.6667%"]All[/td][td width="16.6667%"]ISFShax installer[/td][td width="16.6852%"]ios.img[/td][td width="16.6852%"]ios.img[/td][td width="16.6667%"]https://github.com/isfshax/isfshax_installer/releases[/td][td width="16.6667%"][/td]
[/TR]
[TR]
[td width="16.6667%"]All[/td][td width="16.6667%"]ISFShax superblock[/td][td width="16.6852%"]superblock.img
superblock.img.sh[/td][td width="16.6852%"]superblock.img
superblock.img.sh[/td]
[td width="16.6667%"]https://github.com/isfshax/isfshax/releases[/td][td width="16.6667%"][/td]
[/TR]
[TR]
[td width="16.6667%"]All[/td][td width="16.6667%"]stroopwafel[/td][td width="16.6852%"]00core.ipx[/td][td width="16.6852%"]wiiu/ios_plugins/00core.ipx[/td][td width="16.6667%"]https://github.com/StroopwafelCFW/stroopwafel/releases[/td][td width="16.6667%"][/td]
[/TR]
[TR]
[td width="16.6667%"]All[/td][td width="16.6667%"]ISFShax patch[/td][td width="16.6852%"]5isfshax.ipx[/td][td width="16.6852%"]wiiu/ios_plugins/5isfshax.ipx[/td][td width="16.6667%"]https://github.com/isfshax/wafel_isfshax_patch/releases[/td][td width="16.6667%"][/td]
[/TR]
[TR]
[td width="16.6667%"]All[/td][td width="16.6667%"]minute[/td][td width="16.6852%"]fw.img[/td][td width="16.6852%"]fw.img[/td][td width="16.6667%"]https://github.com/StroopwafelCFW/minute_minute/releases[/td][td width="16.6667%"][/td]
[/TR]
[TR]
[td width="16.6667%"]Browser DNSpresso Aroma[/td]
[td width="16.6667%"]fw.img loader[/td][td width="16.6852%"]payload.elf[/td][td width="16.6852%"]wiiu/payloads/fw_img_loader/payload.elf[/td][td width="16.6667%"]https://github.com/wiiu-env/fw_img_payload/releases[/td][td width="16.6667%"]extract zip[/td]
[/TR]
[TR]
[td width="16.6667%"]Browser DNSpresso
Aroma[/td]
[td width="16.6667%"]PayloadLoaderPayload[/td][td width="16.6852%"]payload.elf[/td][td width="16.6852%"]wiiu/payload.elf[/td][td width="16.6667%"]https://github.com/jan-hofmeier/PayloadLoaderPayload/releases[/td][td width="16.6667%"][/td]
[/TR]
[TR]
[td width="16.6667%"]DNSpresso[/td][td width="16.6667%"]PayloadFromRPX[/td][td width="16.6852%"]root.rpx[/td][td width="16.6852%"]launch.rpx[/td][td width="16.6667%"]https://github.com/wiiu-env/PayloadFromRPX/releases[/td][td width="16.6667%"]extract zip[/td]
[/TR]
[TR]
[td width="16.6667%"]UDPIH[/td][td width="16.6667%"]minute boot1[/td][td width="16.6852%"]boot1.img[/td][td width="16.6852%"]boot1now.img[/td][td width="16.6667%"]https://github.com/jan-hofmeier/minute_minute/releases[/td][td width="16.6667%"][/td]
[/TR]
[TR]
[td width="16.6667%"]UDPIH[/td][td width="16.6667%"]recovery menu[/td][td width="16.6852%"]recovery_menu[/td][td width="16.6852%"]recovery_menu[/td][td width="16.6667%"]https://github.com/GaryOderNichts/recovery_menu/releases[/td][td width="16.6667%"][/td]
[/TR]
[TR]
[td width="16.6667%"]Haxch[/td][td width="16.6667%"]fw.img loader[/td][td width="16.6852%"]wiiu/apps/fw_img_loader/*[/td][td width="16.6852%"]wiiu/apps/fw_img_loader[/td][td width="16.6667%"]https://github.com/jan-hofmeier/unencrypted_fw_img_payload/releases[/td][td width="16.6667%"]extract fw_img_loader_hbl.zip and keeps structure[/td]
[/TR]
[/TABLE]
The structure on the SD should look like this:
Code:
boot1now.img (UDPIH Only)
recovery_menu  (UDPIH Only)
launch.rpx (DNSpresso Only)
fw.img
ios.img
superblock.img
superblock.img.sha
wiiu
    payload.elf (Browser, DNSpresso, and Aroma Only)
    payloads (Browser, DNSpresso, and Aroma Only)
        fw_img_loader
            payload.elf
    ios_plugins
         00core.ipx
         5isfshax.ipx
    apps
        fw_img_loader (Haxchi Only)
            fw_img_loader.elf
            icon.png
            meta.xml
Launching into minute
This step heavily depends on the used Exploit.
- Hold B on the Gamepad while booting (if coldboot is enabled) or launching the H&S app
- A black and white menu should show up asking you to choose a payload.
- Select
fw_img_loader
- Load the Homebrew Launcher
- Start the fw.img loader app
- Open the Browser and browse to u.wiidb.de
- Click on "HAXX"
- Immediately hold B until you see the payload menu
- select the fw_img_loader
If you can a access the settings:
If you are stuck on the Mii creation in the Inital setup:
- just follow these instructions to trigger the exploit (you already have the right files on the SD): https://gbatemp.net/threads/dnspresso-a-wii-u-dns-exploit.642123/
- Immediately hold B after starting the test until you see the payload menu
- select the fw_img_loader
If you are stuck on the Mii creation in the Inital setup:
- If you already connected your Wii U to your AP / Router, turn the AP / Router or the Wifi on it off.
- When the setup asks you if you already have a NNID, say yes (even if you don't have one)
- Now it tries to connect to the Internet, but will fail and ask you to take you back to the Wifi settings, follow back to thge settings.
- Turn your Router / AP on again and give it time to start.
- If you don't already have your Wifi configured there, connect to it now, but enter a wrong password.
- Edit your wifi connection and configure 85.215.57.182 as Primary DNS, if you entered a wrong password before set the right one now.
- Press (B) Back and select Connection Test.
- Immediately hold B after starting the test until you see the payload menu
- select the fw_img_loader
- Load the recovery using UDPIH: https://gbatemp.net/threads/udpih-usb-host-stack-exploit-recovery-menu.613369/ (don't replace the recovery_menu)
- The LED should turn purple and a countdown timer for loading boot1now.img should appear, wait the 5 seconds
- Unplug the Pico
Follow the instructions for PTB: https://gbatemp.net/threads/how-to-use-paid-the-beak-wii-u-unbricking-without-soldering.673686/
Now you should see the minute main menu. If not, something went wrong. Make sure you have the correct fw.img file on the SD.
In minute you move the cursor with the power button and enter with the eject button (swapped compared to the recovery menu).
ISFShax isn't installed yet! minute is just loaded temporarily and gone after a reboot.
Note: minute only outputs 1080p through HDMI, no picture on the gamepad, and nothing on the analog outputs.
Some people reported that the screen output is not working for them when minute was loaded from the recovery_menu. If you made sure nothing else is the problem (right fw.img, TV supports 1080p HDMI), you can try following along blindly by pressing the appropriate buttons. Make sure to wait long enough between the presses, so the system has time to load. Without display output skip the first backup and go directly to Installing ISFShax.
minute main menu
Backup
If you already have an SLC backup or it is inconvenient for you to do one (no screen output), then you can skip this.
- Navigate to
Backup and Restore Dump SEEPROM & OTP(This will be needed for redNAND / region changing)Dump SLC.RAW- Return to Main Menu
Installing ISFShax
- Choose
Boot `ios.img`(6x Power, 1x Eject) - Now the ISFShax installer should launch (this takes a few seconds)
- Follow the Instructions on the screen, the buttons are the same as in minute. (3x Eject, 1x Power, 3x Eject)
- The console should now turn off.
- If the install was successful the Wii U should directly start into minute and the power LED on the console will be purple, once you turn it on.
successful isfshax install
Backup ISFShax (Optional)
Dump the SLC.RAW again. This will overwrite the previous SLC.RAW file on the SD. This is required if you need to restore the SLC for unbricking, without loosing ISFShax. Keep that backup in a safe place.
If you skipped the first Backup also backup OTP and SEEPROM now.
Booting
If you came here from the redNAND, the MLC rebuild or the Region Change guide continue with that tutorial now.
For now your Wii U loads minute (fw.img), which then applies the required patches from SD card. (IOSU needs to be patched, so it doesn't fall over the ISFShax superblock).
To boot into the Wii U OS select
Patch (sd) and boot IOS (slc) <-- This is the third option, not the first!If your console just bootloops through minute over and over again, you are probably coldbooting Aroma and replaced the
wiiu/payload.elf with the fw_img loader. Just replace the wiiu/payload.elf again with the Aroma one (applies to Tiramisu too).To make the Wii U booting automatically, without you having to press any buttons in the minute menu, you have to complete the "Autobooting with SD" section further down.
Autobooting with SD
To make the Wii U autoboot with an SD card inserted you need to create the file
sd:/minute/minute.ini (you might need to create the minute folder) with the following content:
Code:
[boot]
autoboot=3
autoboot_timeout=0You can adjust the timeout (in seconds) to your liking. The
autoboot option specifies which entry from the minute menu will be loaded. 1 corresponds to Patch (slc) and boot IOS (slc), which loads the ios_plugins from the SLC (see below for how to setup the files on SLC). If you haven't installed them to the SLC or want to load them from the sd for another reason you can change that value to 3 which corresponds to Patch (sd) and boot IOS (slc)As an Alternative check out the Fastboot option below.
Installing Aroma / Tiramisu
- To install Aroma or Tiramisu put the corresponding files on the SD.
Tiramisu: https://tiramisu.foryour.cafe/
Aroma: https://aroma.foryour.cafe/ (You don't need to have install Tiramisu to have Aroma, also the FTPiiU plugin will become handy later) - Put the
5payldr.ipxin theios_pluginsfolder https://github.com/jan-hofmeier/wafel_payloader/releases (if you used the downloader, the plugin is already installed)
Optional: Installing Plugins to SLC (instead of SD)
Now the Wii U will boot like normal without the SD. To achieve that ISFShax applies a minimal set of patches to the system (to tolerate the ISFShax superblock). Since these patches kept minimal, they are not optimized and some things like leaving the settings will take longer.
To make the full minute+stroopwafel run from the internal memory we can install minute
fw.img and the ios_plugins to the SLC. This can be accomplished using FTPiiU Everywhere / the Aroma ftp plugin, which can be launched from Tiramisu and is already part of the Aroma Package (enable Everywhere in the settings) or you can use the haxcopy homebrew. Using haxcopy is recommended for most users.If you are using haxcopy to update an existing install, make sure that the plugins have the same file name as before, else you might get duplicates, which can cause problems
If you are redNAND user, remove the hax folder and creare a new one and copy the fw.img from the root of the SD into there, before running haxcopy. The hax folder form the download contains the fastboot fw.img, which doesn't work with redNAND. By installing the normal minute and not having the ios_plugins folder on the menu, the Wii U will display the minute menu.
If you downloaded the files from isfsh.ax or used the download script, all the files where already put in the hax folder, so you can skip 1-5. Note that the download uses the fastboot minute (explained below).
If you are redNAND user, remove the hax folder and creare a new one and copy the fw.img from the root of the SD into there, before running haxcopy. The hax folder form the download contains the fastboot fw.img, which doesn't work with redNAND. By installing the normal minute and not having the ios_plugins folder on the menu, the Wii U will display the minute menu.
If you downloaded the files from isfsh.ax or used the download script, all the files where already put in the hax folder, so you can skip 1-5. Note that the download uses the fastboot minute (explained below).
- create a folder
haxon the SD card (this will be copied to the slc) - copy the
fw.imgto thehaxfolder - create a subfolder
ios_pluginsin thehaxfolder - copy
00core.ipxit to thehax/ios_pluginsfolder - copy
5isfshax.ipxto thehax/ios_pluginsfolder - if you want to coldboot aroma or tiramisu, copy the
5payldr.ipxtohax/ios_pluginsfolder - If you need any other plugins like the
wafel_unlimit.ipx, you have to rename and copy it to thehax/ios_pluginsfolder - Copy the haxcopy app to the
wiiu/appsfolder (like you usually install homebrew) - Put the SD in the Wii U and run haxcopy to copy the hax folder to the slc.
On Aroma you have to make sure access to system files is enabled:
Uploading the files:
If you are redNAND user only upload the fw.img and skip the ios_plugins. Also make sure to use the full minute and not the fastboot minute.
- Open the Aroma Plugin Configuration Menu using L + Down + SELECT (-) on the GamePad or Pro Controller (or B + Down + Minus (-) for WiiMotes)
- Open the FTPiiU option, then settings and set ‘Allow access to system files’ to ‘true’ by pressing A
Uploading the files:
If you are redNAND user only upload the fw.img and skip the ios_plugins. Also make sure to use the full minute and not the fastboot minute.
- (Tiramisu only) Make sure FTPiiU Everywhere is running on the Wii U
- Using a FTP client on the PC browse to
/storage_slc/ - If you see a
scfm.imgfile andsysfolder go into thesysfolder. If you see a bunch of folders (config import logs proc rights security title tmp) just go to the next step. - create a subfolder
haxand enter it - Make sure your FTP client is in binary mode (not ASCII mode)
- upload the minute
fw.imgto the/storage_slc/sys/haxfolder - create another subfolder
ios_pluginsin/storage_slc/sys/hax - enter that
/storage_slc/sys/hax/ios_pluginsfolder - upload
00core.ipx - upload
5isfshax.ipx - upload
5payldr.ipx - If you need other plugins like the
wafel_unlimit.ipx, you have to rename and upload them too
If a SD card with a fw.img is inserted, that will be loaded instead of the installed. So if you want to make sure the fw.img from the slc is used, rename or remove the fw.img from SD. You can also boot the plugins from SLC by booting the first option
Patch (slc) and boot IOS (slc) from the minute menu.Since ISFShax v5.0 the Wii U will first try to load the fw.img from the SD and if that fails it will try to load it from SLC.
Previous versions of ISFShax will first try to load the fw.img from the SLC and if that fails it falls back to the SD.
If you installed a broken fw.img which doesn't load, you can force isfshax to load the fw.img from sd by repeatedly pressing the power button till the menu shows up.
Warning: A factory reset will delete the hax folder. Without the fw.img on the SD
Optional: Fastbooting (Advanced)
To make the Wii U boot as fast as possible, without showing minute, you can now use the fw_fastboot.img. This won't work with redNAND.
It is hardcoded to go straight to the first option (booting the slc, with patches from SLC) when loaded from slc or the third option when loaded from SD. It won't display anything and ignore any autoboot configuration in the minute.ini.
If you used haxcopy with the hax folder from the isfsh.ax download or the download script, then the fastboot minute is already installed.
To install it manually replace the the fw.img in the hax folder on the SLC with the fw_fastboot.img (renamed to fw.img)
In case you ever get stuck and need to load the full minute from SD you can do this:
- Place the minute fw.img on the SD card
- repeatedly press the power button until the minute menu shows up on the screen. (Since ISFShax v5.0 you don't have to do this, since it will try the SD first by default)
Updating ISFShax
To update ISFShax replace the files on the SD card. While doing this make sure to clean out the
wiiu/ios_plugins and hax/ios_plugins directory, since file names did change. These files need to be deleted, if they exist: wafel_core.ipx,wafel_isfshax_patch.ipx, 0core.ipx.To update the installed ISFShax superblock, you need to go trough the installer again (Boot ios.img) but generally you don't need to, if everything works. DON'T uninstall it, just install the new superblock, it will overwrite the old one.
If you installed files to the SLC, you can use haxcopy to update those. All plugins (like SDSUSB) that are not in the
hax/ios_plugins folder will be removed in the process, so make sure you have them there, if you use them.If you are redNAND user, remove the hax folder and creare a new one and copy the fw.img from the root of the SD into there, before running haxcopy. The hax folder form the download contains the fastboot fw.img, which doesn't work with redNAND. By installing the normal minute and not having the ios_plugins folder on the menu, the Wii U will display the minute menu.
Installing System Updates
To protect against Nintendo pushing a boot1 update (very unlikely, but you newer know), which would brick a console with ISFShax, boot1 updates get blocked by the 5isfshax.ipx plugin. Older versions of the plugin did block system updates in general. If you need to do a system update, make sure you have the latest version of said plugin.
To install a system update (e.g. for vWii Decaffinator), make sure you have the latest version of the plugin (and stroopwafel). To do this just replace the
5isfshax.ipxin the wiiu/ios_plugins folder with the lastes one.If you have Aroma or Tiramisu, you also need to remove the
5payldr.ipx to prevent Aroma from loading, since Aroma also comes with it's own update block.Which files can be removed?
If you installed the the files to the SLC, then you don't need to keep any files on the SD, but I would still recommend keeping the hax folder to make future updates easier (so you have all the plugins you installed).
For SD booting / redNAND you just need to keep the
fw.img, the wiiu/ios_plugins and your config int the minute folder.Also if you are using Aroma, you want to keep the
wiiu/payload.elf (and the other Aroma files) of course.The otp.bin / seeprom.bin and SLC.RAW should be copied to a safe place and can also be removed from the SD.
The ios.img would only be needed for uninstalling ISFShax, so if you don't plan on doing that, you can remove it too.
But there is no harm in just leaving all the files on the SD.
Uninstalling ISFShax
DON'T just restore an older SLC backup, as that would break SCFM!
You DON'T need to uninstall ISFShax to update it. Also uninstalling and reinstalling it won't fix anything. Just installing the new superblock over the old replaces it completely.
- Make sure your Wii U doesn't depend on any patches (linke wafel_unlimit_mlc.ipx or redNAND). You can check that by booting the
Patch ISFShax and boot IOS (slc)option in minute and check if it boots fully and works correctly. - Delete the
/storage_slc/sys/haxfolder if you set up the slc booting - run the ISFShax installer again from minute and follow the on-screen instructions to uninstall.
Plugins
Here is a list of currently available stroopwafel plugins, you can use with ISFShax:
- wafel_noinit_tablet - Don't run on the Tablet controller on boot
- SDUSB - Run Wii U games from the SD Card
- USB Partition - Use partitioned USB HDDs with the Wii U
- wafel_setup_mlc - Rebuild / Upgrade the MLC
Description of the Files
In case you are interrested in how all the files work together and which you need to keep, you can keep reading on:
superblock.img
This contains the actual ISFShax. It is a specially crafted superblock for the SLC File System (ISFShax) to exploit a vulnerability in boot1 and give us arbiary code excution. It also contains a mini version of minute, which will be executed to load the full minute (fw.img) from SD or SLC.
superblock.img.sha
This is the checksum for the superblock, to make sure it didn't corrupt along the way, as a bad superblock would lead to a brick.
fw.img
this contains the full minute, which gives you the menu after turning on. It can be used for creating and restoring backups and similar tasks and it acts as a bootloader stroopwafel. When selecting one of the First 3 Boot options, it will load IOSU (the OS/Firmware that runs on the ARM processor) and also loads the plugins from the ios_plugins folder. It will then patch IOSU to first execute the first plugin, which should be stroopwafel, before launching IOSU. At that point you see the GO GO GO message, as IOSU takes over.
00core.ipx
This is stroopwafel. It contains a patches for handeling IOSU reloads (so these go through minute, to apply the patches again), redNAND and to facilliate a framwork for other plugins to apply patches and also exports functions to be used by plugins.
5isfshax.ipx
This plugin patches IOSU to ignore the ISFShax superblock and use the normal superblocks instead. (A superblock contains the file system meta data, like folder structure and used blocks. The SLC has 64 superblocks (to spread the wear), which are written in round robbin, whenever something is change don the slc. ISFShax is installed to 4 superblocks for reduandency)
5payloader.ipx
This redirects the men.rpx (the Wii U Menu) to the root.rpx of aroma, so Aroma gets loaded on boot. If the root.rpx is missing it will load the menu normally.
ios.img
This is the ISFShax installer. It installs the superblock.img to 4 of the superblocks, and marks these superblocks as bad in the normal superblock, so they won't be overwritten.
wiiu/payload.elf
This file gets loaded by most exploits (Like the Browser exploit or the Aroma Payloadloader). In this case it contains the menu, that comes up by holding b and letting you select another payload. By default it would load the Environmentloader for Aroma, if installed.
wiiu/payloads/fw_img_loader/payload.elf
This patches IOSU to load the fw.img from SD and then tells it to reload. This is used to initially load minute, before ISFShax is installed.
wiiu/apps/fw_img_loader/fw_img_loader.elf
This is the a version of the fw_img_loader that can be loaded as an app from the Homebrew Launcher. (Haxchi)
launch.rpx
This is loaded by DNSpresso and loads the
wiiu/payload.elfrecovery_menu
The recovery menu is loaded by UDPIH. It has some options to fix certain problems, but we are just using it to load minute. If the recovery_menu sees the boot1now.img, It will skipp the menu and after a countdown use PRSHhax to reset the Wii U into boot1now.img
boot1now.img
SInce PRSHhax exploits boot1 early, many hardware initilizations still needed to be done. This is done by boot1now, which is a mini version of minute, similar to the one embedded in the ISFShax superblock. It will then load the fw.img from the sd.
This means after ISFShax is setup, you only need to keep the fw.img, wiiu/ios_plugins and your config in the minute folder. If you are fastbooting from the SLC, then you don't need anything on the SD.
Credits
- @rw-r-r_0644 for finding and implementing isfshax
- @GaryOderNichts for their direct contributions, help and two of the exploits (UDPIH and DNSpresso)
- @vgmoose for all the support and for the Wii U that replaced the one Idestroyed during early isfshax testing
- @Maschell for his help and all other contributions to the Wii U scene
- hexkyz for the warmboot boot1 exploit which made all of this possible
- @shinyquagsire23 for de_Fuse, minute and stroopwafel
- Salt Team for the original minute CFW
- dimok789, FIX94 and others for the iosuhax CFW
- fail0verflow for mini
- @skawo screenshots
- and all other contributors to the Wii U scene!
Attachments
Last edited by SDIO,