Hacking Hardware HWfly-shaped Picofly boards start shipping in China

  • Thread starter Thread starter qhurc
  • Start date Start date
  • Views Views 83,430
  • Replies Replies 240
  • Likes Likes 11
Hi, I bought this chip for my mariko core v2 switch but I can't figure out if the installation is as simple as for the old hwfly or are there more soldering to do like for the regular picofly. Can someone give me a diagram? thanks
I have yet to get the chip and I hope it's working
Unfortunately, I have contacted the seller but he keeps giving me links to the installation of the old hwfly and, seeing other posts, it seems that this one needs additional soldering instead
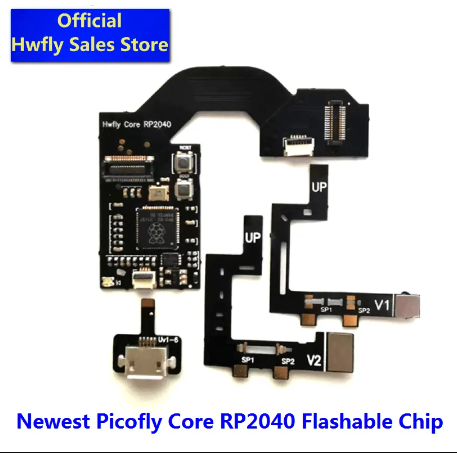
immagine_2023-05-30_131429125.png
 
Hi, I bought this chip for my mariko core v2 switch but I can't figure out if the installation is as simple as for the old hwfly or are there more soldering to do like for the regular picofly. Can someone give me a diagram? thanks
I have yet to get the chip and I hope it's working
Unfortunately, I have contacted the seller but he keeps giving me links to the installation of the old hwfly and, seeing other posts, it seems that this one needs additional soldering instead
View attachment 374872
it installs the same as the old HWFLY CORE chip. no extra wiring and soldering
 
it installs the same as the old HWFLY CORE chip. no extra wiring and soldering
Are you sure? Because it's true that 99% of those who bought a picofly got the plain version, not this one that I got, but I saw a guy who on his oled had connected other wires to the motherboard. Now I don't know if that was something that was also done with the old hwfly. Can you confirm that there is no need to connect additional wires to parts of the motherboard?
a932dcdc-5e26-4a6c-b21e-3388561220bc.jpg
 
Are you sure? Because it's true that 99% of those who bought a picofly got the plain version, not this one that I got, but I saw a guy who on his oled had connected other wires to the motherboard. Now I don't know if that was something that was also done with the old hwfly. Can you confirm that there is no need to connect additional wires to parts of the motherboard?View attachment 375005

I will just assume that you never did installs a CORE chip or OLED chip before
 
Last edited by voidz9,
I will just assume that you never did installs a CORE chip or OLED chip before
Exactly, that's why I'm trying to figure out how to do it to be sure I'm not wrong. I repeat, most of whom I have seen using the picofly have the basic version, not this "mod". Then I won't be the one to mount it but a friend who has made other switch encodings but never with this chip
 
Exactly, that's why I'm trying to figure out how to do it to be sure I'm not wrong. I repeat, most of whom I have seen using the picofly have the basic version, not this "mod". Then I won't be the one to mount it but a friend who has made other switch encodings but never with this chip

Core chip no extra wiring and soldering needed
Oled chip need extra wiring and soldering as your provided picture.

Your installer will know which is which
 
Are you sure? Because it's true that 99% of those who bought a picofly got the plain version, not this one that I got, but I saw a guy who on his oled had connected other wires to the motherboard. Now I don't know if that was something that was also done with the old hwfly. Can you confirm that there is no need to connect additional wires to parts of the motherboard?View attachment 375005
I can confirm this is the standard Oled wiring.
I've run into many headaches using those emmc flex cables I'd recommend wiring it up manually like this one pictured.
36awg ftw
 
  • Like
Reactions: ash_ketchup
gbtemp.JPG


Does anyone know why by factory setting has this RP2040 by Team HWFLY at Point C (DAT0) 200 Ohm and RST 47 Ohm extra added ? Also is someone know where I can connect alternative CPU wire (Without Flex) ?

Thx
 
Last edited by rogras,
Since today I was not aware that the HWfly Rp2040 are kind of 'incomplete' - so even in the latest revision the 47R resistors are missing or in the wrong place ?

I have updated one HWfly Rp2040 with 3x 47R - assuming that they are needed.

Great if someone can confirm that this is how it should look like.
 

Attachments

  • HWFly_RP2040.jpg
    HWFly_RP2040.jpg
    264.3 KB · Views: 116
Since today I was not aware that the HWfly Rp2040 are kind of 'incomplete' - so even in the latest revision the 47R resistors are missing or in the wrong place ?

I have updated one HWfly Rp2040 with 3x 47R - assuming that they are needed.

Great if someone can confirm that this is how it should look like.

The points must all without any resistor but if you got this after installation and booting a CFW

pk1.JPG


Then you ran into the "Slow EMMC" Problem.

- Pull out QSB-Flex from the chip
- Remove possible resistors on the points or leave the resistors with 470
- Add 47 Ohm (470) to DAT0 (C)
- Add 47 Ohm (470) to CMD (A)
- Solder the connections directly to the points/resistors
- Tape the contacts of the QSB-Flex Cable
 
Last edited by rogras,
The points must all without any resistor but if you got this after installation and booting a CFW

this I cannot understand completely - the original PicoFly needs these 3x47R - the Hwfly2040 seems so be technical identical. So wouldn't it be wise to add also the 3x47R to these chips ?
 
this I cannot understand completely - the original PicoFly needs these 3x47R - the Hwfly2040 seems so be technical identical. So wouldn't it be wise to add also the 3x47R to these chips ?

The 3x 470 Resistors allready added here:

pk2.JPG


but for the "Slow EMMC" Problem - You need additional 470 Resistors on A and C

pk2.JPG
 
Are you sure? Because it's true that 99% of those who bought a picofly got the plain version, not this one that I got, but I saw a guy who on his oled had connected other wires to the motherboard. Now I don't know if that was something that was also done with the old hwfly. Can you confirm that there is no need to connect additional wires to parts of the motherboard?View attachment 375005

How to update this chip please?
Same Firmware like the standard picofly firmware (lastest = 2.74 currently)?
I have got it in my Oled, but the picofly toolbox doesn't recognize this chip. No chip info, even I tried to flash the chip.

Tried to flash by USB but no Folder pops up, while pressing boot while attaching the USB. Tried the cable with an Pico raspberry and there comes the folder.
Can be my usb adapter wrong?? It's from the original hwfly/SX batch...

Thanks
 

Attachments

  • IMG_0811.jpg
    IMG_0811.jpg
    1.9 MB · Views: 110
  • IMG_0806.jpg
    IMG_0806.jpg
    3 MB · Views: 100
Last edited by URBANsUNITED,
I stand corrected. This came with 2.61 flashed. I just flashed to 2.67 using picofly toolbox with no problem.

However didnt manage to do drag and drop because the chip is not detected in my laptop (holding boot button and plug in the usb)
Post automatically merged:


It installs as you install a hwfly core/oled/lite one. For bugs, didnt notice any yet but glitching time is quite fast from hwfly
Does this chip show chip info using the picofly toolbox payload?
 
How to update this chip please?
Same Firmware like the standard picofly firmware (lastest = 2.74 currently)?
I have got it in my Oled, but the picofly toolbox doesn't recognize this chip. No chip info, even I tried to flash the chip.

Tried to flash by USB but no Folder pops up, while pressing boot while attaching the USB. Tried the cable with an Pico raspberry and there comes the folder.
Can be my usb adapter wrong?? It's from the original hwfly/SX batch...

Thanks
Frist time seeing someone pouring hotglue on the board...

Just curious why do you want to update if your chip is working?
 
How to update this chip please?
Same Firmware like the standard picofly firmware (lastest = 2.74 currently)?
I have got it in my Oled, but the picofly toolbox doesn't recognize this chip. No chip info, even I tried to flash the chip.

Tried to flash by USB but no Folder pops up, while pressing boot while attaching the USB. Tried the cable with an Pico raspberry and there comes the folder.
Can be my usb adapter wrong?? It's from the original hwfly/SX batch...

Thanks

I am answering my own questions:

The chip is as expected, fully updateable! All you need is the proper USB adapter. The old one with micro USB is not working anymore, you need the USB-C version!
Post automatically merged:

Does this chip show chip info using the picofly toolbox payload?
After flashed with the latest firmware, it also shows details under "Chip Info"!
Post automatically merged:

Frist time seeing someone pouring hotglue on the board...

Just curious why do you want to update if your chip is working?

As I didn't install the chip by myself, I have no idea why the guy used hot glue to fix the fix and secured the wires.
Are there any problems when doing so?

I wanted to have the latest firmware on the chip as I had an unkown version installed, not updateable by software.
The chip worked fine, but it looks like that the chip boots faster into Hekate now with 2.74. As it should by reading the changelog of the picofly firmware...
Btw. The chip bootlogo, whithout sd card inserted, was ealier like the one from the HWfly firmware, now it is the picofly screen in my case.
 
Last edited by URBANsUNITED,
  • Like
Reactions: w0nd3rb0yfx

Site & Scene News

Popular threads in this forum