Hardware nand flash dump (3ds xl)

mvmiranda

Well-Known Member
Member
Joined
Oct 29, 2013
Messages
1,457
Trophies
1
Location
Brazil, Sao Paulo
Website
www.gamemod.com.br
XP
1,673
Country
Brazil
Hello everyone!

I've been following this thread for quite some time now (also found gbatemp through google searching for 3DS related information).
First of all: Thanks!!! For your great work and all the info you provided here.

Yesterday I got my first 3DS (first Nintendo colsole for me) and I modded it following the guides / infos of Gonzo and n1ghty - THANKS you two!

The soldering of the SD Adapter was a bit tricky, because I was confused about the pins and soldered GND to CLK in my first attempt, which caused

00F800FE
00000000 00000000
00000400 00000000

and

00F800FE
00000000 00000000
00000200 00000000

errors and the card was not detected. I even resoldered my pinouts on the 3DS *g* - but it looks even nicer now, so it's okay.

After fixing this I have now:

00F800FE
00000000 00000000
00000002 00000000

and

00F800FE
00000000 00000000
00000003 00000000

which works perfectly for me.

Checking the connectors with a multimeter (the SD adapter one) made me realize my mistake and then the whole thing worked perfectly.

-> Dumped 4.2.0 several times, flashed it back
-> Upgraded to 6.3.13 and duped that 2 times and flashed 4.2.0 back

Today I bought some very fine 0,05 qmm copper wire isolated with "finish"/"paint" -> no idea what this is really called in English.
I plan to solder that to female micro USB type B sockets and fit that into one of the "holes" on the left and right front side of the 3DS.

I plan to provide pictures and some notes of what I did in case this works out as I plan it to.


Nice!
Is it an original 3DS or a 3DS XL?
What "holes" are you talking about?

Congratulations!
 

Gildoniel

Member
Newcomer
Joined
Nov 14, 2013
Messages
14
Trophies
0
Age
46
Location
Ansfelden
XP
104
Country
Australia
It is a 3DS XL - and it has some *phew* ... holes with "pins", where you can attach strings/straps - no idea how that is called. Anyway if I remove the thing where you can attach the straps, there is some empty space. I'll make a photo documentation later tonight, after hopefully successfuly soldering this:

$(KGrHqRHJFMFIDZ0SlL7BSEQ,nKcmg~~60_35.JPG
 

mvmiranda

Well-Known Member
Member
Joined
Oct 29, 2013
Messages
1,457
Trophies
1
Location
Brazil, Sao Paulo
Website
www.gamemod.com.br
XP
1,673
Country
Brazil
It is a 3DS XL - and it has some *phew* ... holes with "pins", where you can attach strings/straps - no idea how that is called. Anyway if I remove the thing where you can attach the straps, there is some empty space. I'll make a photo documentation later tonight, after hopefully successfuly soldering this:

View attachment 5034

Oh! Now I know what you're talking about :)
Nice!
Try to make the way you're telling and, if it's successful, post some pics. :)

Cheers!
 

mvmiranda

Well-Known Member
Member
Joined
Oct 29, 2013
Messages
1,457
Trophies
1
Location
Brazil, Sao Paulo
Website
www.gamemod.com.br
XP
1,673
Country
Brazil
Guys, I have a general question about 3DS NANDs...
What exactly is stored in the NAND regarding the user "preferences and setup"? Like the user itself, configurations, coins?

Also, I know the saves are stored in the carts, right?! (talking about actual cart games) But what about the games you buy from the eShop?

In a nutshell, what exactly you backup when you dump your near 1Gb of NAND?

Cheers!
 

Gildoniel

Member
Newcomer
Joined
Nov 14, 2013
Messages
14
Trophies
0
Age
46
Location
Ansfelden
XP
104
Country
Australia
So as promised my Mod + step by step what I did:

My Mod:

P1030538.JPG P1030537.JPG

Instructions to get that:

What you need:
1. 3DS XL
2. Soldering iron(s) / Soldering Station
3. micro USB type B male and female parts
4. a (preferably shielded) cable with 4 wires
5. a knife
6. (optional) a magnifying glass and "helping hands"
7. screw drivers - PH 00 "X" (necessary) and maybe a "T" one (optional)
8. Flux and Soldering Grease
9. (recommended) insulating tape and or insulating "finish" (maybe spray) and or heat-shrink-tube
10. (optional) a lamp, so you have good light conditions (very helpful for this work)
11. (optional) a "power distributor" so you can plug in several plugs at your working place
12. (important) a multimeter or circuit-indicator
13. Hot-Plastic Glue
14. (recommended) side-cutter, pincettes or pincers
15. (optional) a block of insulating screw-joints (4 joints)

-> PLEASE NOTE:
I don't consider myself very experienced in soldering or modding etc. There are certainly people with higher skills around. I just want to share what I did - and what worked for me - with you (as some kind of "give back" for the valuable hints I received here myself).

(some) tools that I used:

P1030534.JPG

1. Disassemble the 3DS XL, find the pinouts and match them with this picture (taken from n1ghty):
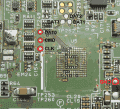
XL Layout.png

2. Get a suitable cable (wires preferably with different colored insulations) - not too long - and solder the wires to the pinouts as shown in the pic above.
-> If you are not experienced with soldering (and have a good feeling for your tools) I recomend to use a soldering station with temperature scale.
set that scale to roughly 320°C - 340°C, so you don't accidently damage your board.

P1030544.JPG

3. Create an 3DS-SD Adapter, using a Micro-SD to SD Adapter, open it, remove unneeded pins and solder the rest according to Gonzo's Schematics:

mmc_adapter.jpg 2013-11-14 20.03.04.jpg

CHECK! If your wires REALLY connect to the correct pads with a Muilti-Meter or a Circuit-Indicator. This took me hours of searching for my "card was not showing in my system" problem.

4. Make the first check if your work so far was successful or not. I used a block of insulating screw-joints to connect my 3DS-SD Adapter to the cables, soldered to the pinouts.

-> Connect the corresponding wires CLK, DATA0, GND and CMD (be very precise to use the right ones).
-> Plug the Adapter into a Card-Reader (that is NOT plugged into your PC) and power up the 3DS
-> You should get a blue screen with error messages at this point.
-> Connect the Card-Reader to the PC - you should get a new drive letter now.
-> For Windows you can use win32diskimager, for Linux dd to read (dump) your current firmware. (do several dumps and compare md5 hash)
-> If this works, you are good to continue, otherwise try to check your soldering (test both: Adapter and 3DS pinouts).

(Thanks to Gonzo for explaining this process in his post!)

2013-11-14 20.32.42.jpg

5. Now we will deal with the micro - usb male and female parts:

2013-11-14 20.22.00.jpgP1030536.JPG

For the female USB element (which has TINY connectors) I recommend to "thin out" the wire (remove some copper "threads" from the wire - and cut them), so it roughly matches the connector size of the element and to cover the wire with soldering-tin (dip it into soldering grease and get it in contact with the wire so it "sucks" it in). Cut the prepared wires to a suitable size and carefully solder them to the connectors.

The male element is easier to handle - it has larger connectors. Solder it to the 3DS-SD Adapter (the thing you made before). Be careful to use the right pins (check with multimeter or circuit-indicator) so the colors / signals match for both.

I used the insulating "finish" spray at this point - just be certain to have both, female and male elements connected (and be additionaly careful), when you spray, so you don't accidently insulate contacts you want to conduct. Immediately wipe off the elements (male/female) and let the wires dry. You can and should additionally add some insulating tape, to really make sure there are no "short contacts".

-> Test the wires of the female USB element against the pads of the Adapter (circuit-indicator/multimeter) to see, if everything works as expected.

6. Remove the "strap-pin-thing" from the hole on the right-front side of your 3DS (looking at the bottom / board).

2013-11-14 20.35.54.jpg

This is where the female USB element will go - but right now it does not YET fit and there is another problem: The hole is too deep.
-> I used my larger soldering iron here to "widen" the hole with heat, so the female USB element would fit (just try to insert it from outside - inside is harder). Just be careful and clean your soldering iron while it is still hot, so you don't get problems with its solder-tin acceptance. (when it is covered with a thin plastic film from burning the case of the 3DS).

Once it fits from the outside, you can begin cutting a slice of hot plastic glue to fill the hole to a level, that your female USB element can sit perfectly from the inside.

2013-11-14 20.39.14.jpg 2013-11-14 20.39.32.jpg

Shape that piece of plastic glue, so it can easily fit into the bottom of the hole (you need to cut it into another shape, matching the hole).
-> Now use your solder-iron to melt that, so it fills the bottom to exactly the level that you need.

2013-11-14 20.43.30.jpg

Now you can insert the female USB element, be careful with your wires so they don't break!

2013-11-14 20.50.57.jpg 2013-11-14 20.50.48.jpg


After you inserted the female USB element and checked that the solder-joints still look good and no parts are touching, you can put the rest of the glue-piece you cut off on top and use a solder iron to melt it down. The USB socket is now firmly in place, once the plastic-glue hardens. If the contacts are well covered with plastic, it should be possible to safely move/bend the wires - you may heat up the surface a little if they are stuck in wrong positions.

P1030545.JPG

I used some additional insulation tape here to safely separate the wires.

7. Test, if your wires (connected to the USB socket) work together with your Adapter as they should. If they are fine you are almost there!
Connect your wires with the wires you soldered to the 3DS before (you may want to shorten them to a convenient length). Solder them together and insulate them with insulation tape.

P1030544.JPG

8. Arrange the wires, so you are able to close the cover (nothing "hangs around") - be careful the wires don't "stack" or it will be hard to close.
I only used 2 screws, so I could insert the battery and test the whole thing. For me, after it did NOT work, I reopened and insulated DATA0 and CMD, which were touching and slightly conducting in spite of the insulation finisher.

9. Once everything works, you can re-assemble your 3DS again and grab a glass of whatever you feel like to celebrate!

P1030538.JPG

Good Luck!
I hope this tutorial helped you / will help you in some way.

Gildoniel
 

Duo8

Well-Known Member
Member
Joined
Jul 16, 2013
Messages
3,613
Trophies
2
XP
3,047
Country
Vietnam
Guys, I have a general question about 3DS NANDs...
What exactly is stored in the NAND regarding the user "preferences and setup"? Like the user itself, configurations, coins?

Also, I know the saves are stored in the carts, right?! (talking about actual cart games) But what about the games you buy from the eShop?

In a nutshell, what exactly you backup when you dump your near 1Gb of NAND?

Cheers!

  • The firmware
  • Settings
  • eShop account
  • Friends
  • Data of built-in apps
  • Keys
 
  • Like
Reactions: pelago

tyons

Well-Known Member
Member
Joined
Jul 11, 2012
Messages
657
Trophies
1
XP
282
Country
Italy
guys, what are those "holes" on the sides of the 3ds xl meant for? everybody sacrifices them to put there the connectors.
 

Gildoniel

Member
Newcomer
Joined
Nov 14, 2013
Messages
14
Trophies
0
Age
46
Location
Ansfelden
XP
104
Country
Australia
guys, what are those "holes" on the sides of the 3ds xl meant for? everybody sacrifices them to put there the connectors.​
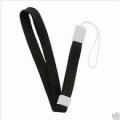
These holes have "pins" in them or small metal "staffs" where you can attach straps. Like a wrist strap.
 

Gildoniel

Member
Newcomer
Joined
Nov 14, 2013
Messages
14
Trophies
0
Age
46
Location
Ansfelden
XP
104
Country
Australia
lol I mean the holes in the 3ds case, not what you put there.

Well according to the 3DS XL manual (English version on page 24) the marked holes here

images.jpg

are used for wrist-straps

images_strap.jpg

a safety measure that the 3DS does not fall and gets damaged when it slips your hand.

If these are the "holes" you are refering to, then - yes they are exactly intended for that use.

In my mod I used one as place for my micro USB connector, leaving the right wrist-strap anchor intact.

If you were refering to something else, please clarify your question.

Cheers,
Gildoniel
 

Kane49

Well-Known Member
Member
Joined
Nov 4, 2013
Messages
446
Trophies
0
Age
36
XP
343
Country
Gambia, The
After fixing the pinouts (flathead screwdriver) i now arrived at this error code

Bootrom 8046
00F800EF
FFFFFFFF FFFFFFFF
0000008 00C0000

Anyone know what that means :) ?
 

Gildoniel

Member
Newcomer
Joined
Nov 14, 2013
Messages
14
Trophies
0
Age
46
Location
Ansfelden
XP
104
Country
Australia
After fixing the pinouts (flathead screwdriver) i now arrived at this error code

Bootrom 8046
00F800EF
FFFFFFFF FFFFFFFF
0000008 00C0000

Anyone know what that means :) ?

I believe you should be good with that one. Have you tried to connect your card reader to your PC?
Does it give you a drive?

There are a couple of "error codes" that actually work. When you get a drive and are able to successfully dump your firmware several times with the same hash, you should be on the safe side. (When you get a drive and are able to successfully dump it once you can consider your work successful.) Several dumps (and their verification with hashes) are more to check if the mod is stable - there can be problems with interference when your wires are too long for instance.
 

Kane49

Well-Known Member
Member
Joined
Nov 4, 2013
Messages
446
Trophies
0
Age
36
XP
343
Country
Gambia, The
I believe you should be good with that one. Have you tried to connect your card reader to your PC?
Does it give you a drive?

There are a couple of "error codes" that actually work. When you get a drive and are able to successfully dump your firmware several times with the same hash, you should be on the safe side. (When you get a drive and are able to successfully dump it once you can consider your work successful.) Several dumps (and their verification with hashes) are more to check if the mod is stable - there can be problems with interference when your wires are too long for instance.

Thanks, Unfortunately no drive on linux or windows :/
Ill just redo it ^^
 

Gildoniel

Member
Newcomer
Joined
Nov 14, 2013
Messages
14
Trophies
0
Age
46
Location
Ansfelden
XP
104
Country
Australia
Thanks, Unfortunately no drive on linux or windows :/
Ill just redo it ^^

Just to be sure:

You connected your Adapter (that you've tested to have the correct wire to pad connection) to the 3DS -> when you turn that on as it it, it should NOT give you a blue screen with an error -> if you get one here, you have a problem either with the Adapter or the pinout on the board.
So in short: You should get the usual 3DS screen.

When you plug the Adapter (attached to the 3DS) while TURNED OFF into the card reader (which is NOT connected to the PC) and then turn it ON -> then you should get the blue screen with error information.

Then you can plug the card reader into the PC and this should give you a drive letter.

PS: If I remember correctly:

Bootrom 8046
00F800EF
FFFFFFFF FFFFFFFF
0000008 00C0000

Should be a "valid" error code -> I was able to dump with that. I also got working dumps and flashes with
0000003 0000000 and 0000002 0000000 in the last line.
 

tyons

Well-Known Member
Member
Joined
Jul 11, 2012
Messages
657
Trophies
1
XP
282
Country
Italy
Well according to the 3DS XL manual (English version on page 24) the marked holes here

View attachment 5069

are used for wrist-straps

View attachment 5070

a safety measure that the 3DS does not fall and gets damaged when it slips your hand.

If these are the "holes" you are refering to, then - yes they are exactly intended for that use.

In my mod I used one as place for my micro USB connector, leaving the right wrist-strap anchor intact.

If you were refering to something else, please clarify your question.

Cheers,
Gildoniel

aaaaaaaaahhhhhhhh I completely misunderstood lol. ok, thanks.
 

tyons

Well-Known Member
Member
Joined
Jul 11, 2012
Messages
657
Trophies
1
XP
282
Country
Italy
ok, someday I'll try to make Gildoniel's mod with pogo pins >_>
but, of course, I won't permanently fix the micro USB thing. the whole purpose of using pogo pins is to not nullify the warranty, after all.
 

Site & Scene News

Popular threads in this forum

General chit-chat
Help Users
    Xdqwerty @ Xdqwerty: @DolphinCube, no problem ^_^