

- Joined
- Sep 23, 2006
- Messages
- 4,134
- Solutions
- 1
- Reaction score
- 147
- Trophies
- 2
- Age
- 58
- Location
- Sitting by computer
- Website
- www.youtube.com
- XP
- 1,398
- Country

OK I promised someone I'll do a tutorial in another thread - so here it is.
You can see what skins I've done (so far) over at this thread
Firstly: you'll need one of the skin editors from the Acekard website
Tutorial
 In this example I've copied acekard 'black' skin and renamed it 'working'
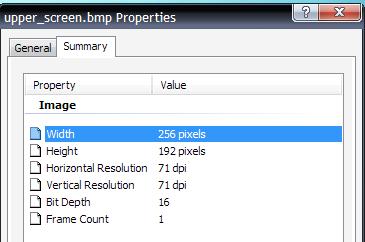
Make a note of the 'Width' and 'Height' as you'll need this when you create your new graphic
> When selecting your new skin you may find the name been truncated - so instead of seeing 'Blue XMB Skin' you may just see 'BLUEXM~1'
> You may find that some text may not appear exactly where you wanted it when it's used on the DS - this is a problem with AK Edit 'preview', so you'll need to do a little fine tuning within AK Edit to get it in place
Some Useful (!) Tips:
You can see what skins I've done (so far) over at this thread
Firstly: you'll need one of the skin editors from the Acekard website
- Skin Editor for Acekard RPG and Acekard2
- AK Edit: A Skin Editor from Dan Taylor (for this tutorial I'm going to use this one)
Tutorial
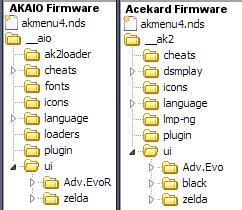
- Depending on whether you're using Acekard official firmware or AKAIO unofficial firmware, copy any of the folders inside the '/__aio/ui/' or'/_ak2/ui' folder onto your PC Desktop
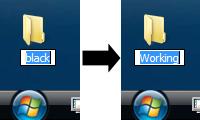
- Rename the folder on your desktop - this will be your 'working' folder & will prevent any accidental over-writing
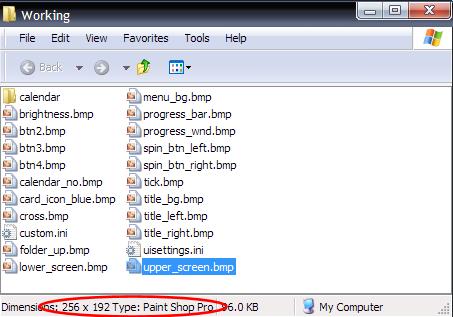
- Open the 'working' folder & click on one of the graphics you wish to change
Make a note of the 'Width' and 'Height' as you'll need this when you create your new graphic
- Obtain a graphic you like to use in your skin from google images (or wherever) & load that into your art package. Alternatively - try & make your own
- Using the tools in your art package (Crop/Resize/Clone etc) alter your 'new' graphic so that it's the same size as the graphic you are replacing
- Now save your new graphic into your 'working' folder using the EXACT SAME NAME and File type as the one you you're replacing - over-writing the existing graphic
- Repeat this for all the graphics you want to change
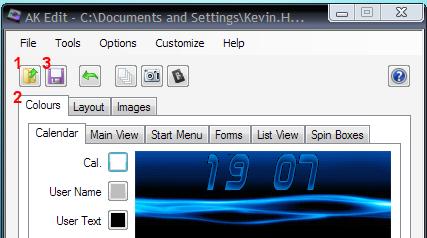
- When AK Edit has started - click on the [Open] icon ( [1] in the picture) & browse/select your 'working' folder - then click [OK]
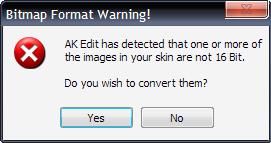
^ If you get an error message - click [YES] to fix
It's been brought to my attention that AKEdit will ask to convert to 16-bit even if all images are already 16-bit
When you are asked to convert to 16 bit, each time you click [Yes] the program will apply its conversion filter to all the images, even those that are 16 bit & as a result the images will become grainier each time
A tip is that IF your graphics program can save in 16-bit, do so & to click [No] when told by AKEdit - Once the graphics have been loaded, use the tabs along the top ( [2] in picture above ) & alter Positions/Change text colours etc until you're happy with it
- Click on the 'Save' icon ( [3] in picture above ) to save any & all modifications
- Now copy your 'working' folder BACK onto your MicroSD card (rename it if you like), place back into your Acekard/DS & try it out using [Start] > [System Properties]
> When selecting your new skin you may find the name been truncated - so instead of seeing 'Blue XMB Skin' you may just see 'BLUEXM~1'
> You may find that some text may not appear exactly where you wanted it when it's used on the DS - this is a problem with AK Edit 'preview', so you'll need to do a little fine tuning within AK Edit to get it in place
Some Useful (!) Tips:
- When making 'Split-Screen' background:
There may be a time you'd like to create a larger background (one that covers both screens) - here's a tip
> In your art package, make the overall wallpaper a size of 256 wide by 476 height - & NOT 256 x 384, as you would expect (use 'rescale'/'crop' functions should do the trick)
> Using your art package selection tool - copy the area starting at x=0, y=0 down to x=256, y=192 (it may be shown in your art package status bar) & paste/save this as 'upper_screen.bmp'
> Copy the area starting from x=0,y=284 down to x=256,y=476 - Once again paste/save this but save it as 'lower_screen.bmp'
The reason for this is if you do the 'split-in'half' method - your screen background will look very 'odd' on the DS because of the space made by the hinge
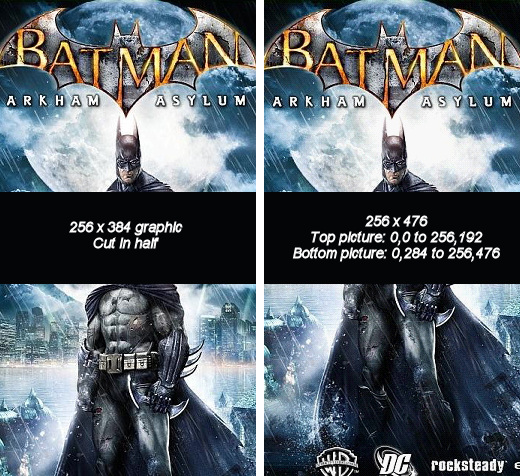
Notice on the 'cut in half' that Batman's head seems seperated from his shoulder, while on the right his head seems more naturally placed - In AK Edit: - If you want an Animated screenshot of your skin to show off your skills (See the Spoiler below for an example)
- > Click on the small 'Camera' icon in 'AK Edit' toolbar
> In the next window click on the '[ ] All' box down the bottom & also make sure the '[ ] Animate' is ticked
> Click on [OK] and a set of graphics will be created in a folder called 'screenshots' stored in your 'working' folder
> You can then upload the 'preview.gif' file to Flickr (or whatever online photo storage site you have) to be used in forums


