

Tutorial
Updated
a9lh Boot Animations

Welcome to another kick-ass guide by cots. In this guide we're going to cover creating animating and static boot animations for the custom firmware loader that's all the rage - arm9loaderhax (a9lh). a9lh hijacks the arm9 chip during boot which allows 100% boot rate of the CFW Luma3DS, but you already knew that. Well, did you know you that you can create a custom boot animation that will load when you boot your console? It's also pretty easy to create and configure. So let's dive into it.
Requirements
Static Image(s) and/or Video(s)
Arm9LoaderHax Installed on your Nintendo 3DS (screeninit version)
BootAnim9 - https://github.com/Wolfvak/BootAnim9
makeanim - https://github.com/Docmudkipz/makeanim
ffmpeg - https://ffmpeg.org
imagemagick - http://www.imagemagick.org
Optional: ban9comp - https://github.com/d0k3/ban9comp
In this guide we'll be using 'C:\anim9' as the main folder where we'll work our magic. So extract makeanim and ffmpeg into this directory and then install imagemagick. If you're planning on building ban9comp to compress the output animations (if you're using a small sd card you might want to do this) then also copy ban9comp.exe into the folder.
Once this is done it's time to prepare the image/video file(s). The image/video file(s) will be automatically reduced in size (dimensions), but if you're creating them from scratch you'll want to keep the sizes listed below in mind. The color depth and number of colors are not limited in any fashion. Also note that both videos must have the same frame rate.
Top Screen - 400x240
Bottom Screen - 320x240
One major problem I ran into with creating boot animations using the included batch file was that it would not handle single images without first using ffmpeg to make them a video. In theory it should ask you how many seconds you want the single image to appear for, but it fails to do so. The workaround is to use ffmpeg to create an animation/video file out of your single image. So drop to a CMD prompt and run the following;
ffmpeg -framerate 1/5 -i image.png -c:v libx264 -r 30 -pix_fmt yuv420p output.mp4
This will convert 'image.png' into a video (framerate of 30 frame per second).
Once you have your video file(s) you'll want to drag them (one at a time) onto the 'makeanim.bat' in the 'C:\anim9' folder.
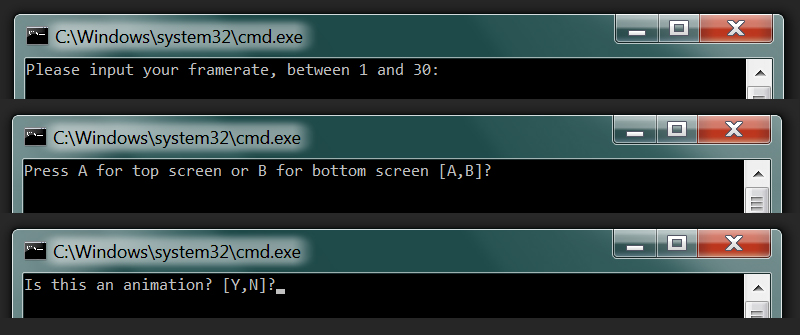
The first thing it will ask is the frame rate of the video. If you have no idea what the frame rate is you can use mediainfo (link - https://mediaarea.net/en/MediaInfo) to find out. So type in your videos frame rate and then press enter.
The next thing it will prompt you to press 'A' for the top screen or 'B' for the bottom. The script will then ask you if this is an animation or not. In theory it should then prompt you for how many seconds to display the static image for (if you pressed N), but it fails to do so.
The script will then process the video and then finally will ask you if you want to compress it using 'ban9comp.exe'.
If you selected the top screen you will now have a file with no extension named 'anim' in the 'C:\anim9' folder and if you selected the bottom screen you will find a file with also no extension named 'bottom_anim ' in the 'C:\anim9' folder. There will also be a 'config' file with no extension. You can create a boot animation(s) for the top, bottom or both screens.
The first thing you're going to need to do to use the animation(s) is to rename your 'arm9loaderhax.bin' (yes, we're working with the Nintendo 3DS sd card now) to 'arm9payload.bin' and then copy the contents of the BootAnim9 archive into the root of your card.
You should now have a folder on the root of your card named 'anim'. Move 'arm9payload.bin' into the '\anim' folder. Inside of the '\anim' folder create a folder named '0' and place the 'anim', 'bottom_anim' and 'config' files (from 'C:\anim9') in the '0' folder (it's okay if you don't use both 'anim' and 'bottom_anim'). You can also create nine more folders named 1, 2, 3, 4, 5, 6, 7, 8 and 9 and place separate boot animations in each, but don't skip numbers (that means don't create a folder named 2 before creating a folder named 1).
Now you can boot your Nintendo 3DS and if all went well you'll be welcomed by your boot animation(s)! Enjoy!

Last edited by cots,


