I got a good deal on this Clear Blue PS2 which arrived from Japan. But it had one issue. It would not read disks. So i took up the challenge and ordered it. It arrived a couple of months later since this arrived in Pal territories. I had to also pick up a step down converter from 220v to 120v.

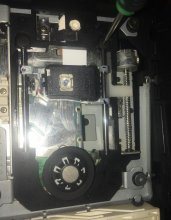
I tested all of my Japanese Region games and none of them worked so I started with replacing the laser with this new KHS 400C laser i had laying around. I removed the old laser


And unscrewed the plastic part that works with the rail. And screwed it onto the new laser.

I cleaned off the old grease and applied some new grease.

I desoldered the anti-static protection from the new laser.

Installed it


But it did not work

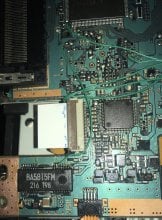
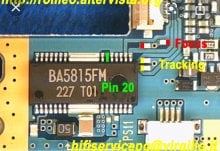
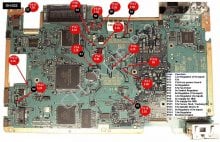
I tore it down to the motherboard since i’m going to install a modchip. And i found this. The chip that controls the DVD Drive. Which had this mod. Looks like an attempt at some kind of mod. Perhaps a Romeo Mod which is only done on later revisions of the PS2’s to prevent the laser from burning out when playing backups. But this earlier revision PS2 doesn’t have this security implementation and has a different drive chip. There is probably a chance that this chip has shorted out or is faulty. So i’m going to replace it just in case. Double-checking to see if there are any bridges. I replaced the old broken dried out thermal pads on these drive chips with some new ones and made sure that i got the thickness of the pads right. I had to replace some of the old ribbon cables. Such as ones for the controller port and the power and eject ribbon. Since the blue cards attached to the ribbon cables came off. The same happened with my DVD drive ribbons. I cannot find replacement ribbons for those. So i applied a thin layer of double-sided tape and stuck the card back on. I made sure the ribbon cables were plugged in properly. And screwed everything back together.


I also installed a 750 Modbo and replaced the CR2032 Battery to allow for region free support and the ability to play backups but i will be using OPL on this system for the most part. Loading games off the harddrive using an Official Sony hdd adaptor with a Sata mod.


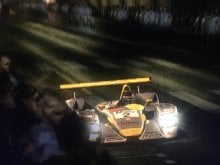
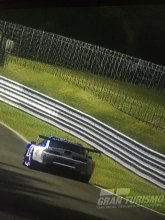
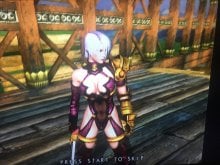
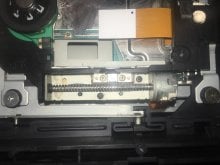
Since the PS logo was damaged. I replaced the damaged logo with another spare i had laying around and i had to glue the tray cover back on, as it broke off. After all that it would only play PS1 games and PS2 Blue Disks. Had to go back in. I adjusted the DVD potentiometer underneath the laser a tiny bit, cleaned the laser with a qtip dipped in isopropyl alcohol 99%, and let it dry. But it did not make a difference. I found this guide: https://arstechnica.com/gaming/2003/11/ps2-repair-guide/ and i was able to fix it. There is a white gear behind the laser which adjusts the position of the laser. So i adjusted that couple of times. Tested it and got it working but audio, the video would stutter, and load times were slow. Adjusted it some more and it was working perfectly. No stutter, games would load up fast. Here is the Laser tweaking guide: https://iswtc.wordpress.com/2016/07...-2-disc-read-errors-laser-voltage-method/amp/
I tested all of my Japanese Region games and none of them worked so I started with replacing the laser with this new KHS 400C laser i had laying around. I removed the old laser
And unscrewed the plastic part that works with the rail. And screwed it onto the new laser.
I cleaned off the old grease and applied some new grease.
I desoldered the anti-static protection from the new laser.
Installed it
But it did not work
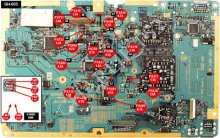
I tore it down to the motherboard since i’m going to install a modchip. And i found this. The chip that controls the DVD Drive. Which had this mod. Looks like an attempt at some kind of mod. Perhaps a Romeo Mod which is only done on later revisions of the PS2’s to prevent the laser from burning out when playing backups. But this earlier revision PS2 doesn’t have this security implementation and has a different drive chip. There is probably a chance that this chip has shorted out or is faulty. So i’m going to replace it just in case. Double-checking to see if there are any bridges. I replaced the old broken dried out thermal pads on these drive chips with some new ones and made sure that i got the thickness of the pads right. I had to replace some of the old ribbon cables. Such as ones for the controller port and the power and eject ribbon. Since the blue cards attached to the ribbon cables came off. The same happened with my DVD drive ribbons. I cannot find replacement ribbons for those. So i applied a thin layer of double-sided tape and stuck the card back on. I made sure the ribbon cables were plugged in properly. And screwed everything back together.
I also installed a 750 Modbo and replaced the CR2032 Battery to allow for region free support and the ability to play backups but i will be using OPL on this system for the most part. Loading games off the harddrive using an Official Sony hdd adaptor with a Sata mod.
Since the PS logo was damaged. I replaced the damaged logo with another spare i had laying around and i had to glue the tray cover back on, as it broke off. After all that it would only play PS1 games and PS2 Blue Disks. Had to go back in. I adjusted the DVD potentiometer underneath the laser a tiny bit, cleaned the laser with a qtip dipped in isopropyl alcohol 99%, and let it dry. But it did not make a difference. I found this guide: https://arstechnica.com/gaming/2003/11/ps2-repair-guide/ and i was able to fix it. There is a white gear behind the laser which adjusts the position of the laser. So i adjusted that couple of times. Tested it and got it working but audio, the video would stutter, and load times were slow. Adjusted it some more and it was working perfectly. No stutter, games would load up fast. Here is the Laser tweaking guide: https://iswtc.wordpress.com/2016/07...-2-disc-read-errors-laser-voltage-method/amp/