


Alright, to start off, this guide will ONLY work if you own a PSP-1000 (the original PSP "Phat" model) or an early PSP-2000 (aka "Slim and Lite"). Newer PSP-2000s and PSP-3000s have a different motherboard known as Ta088v3, which prevents this method from working, so before proceeding, you should check that you have a PSP that this method will work with.
For this method, you will need:
Contents:
1. Making/Buying a pandora battery
2. Making the "Magic Memory Stick"
3. Installing CFW
4. Video tutorial
1. Making/Buying a pandora battery
When installing CFW with this method, a pandora battery is used to bypass the OFW that is already installed to your PSP, and load the service mode that is often used when making repairs to the PSP system. These batteries are quite simple to find with a quick search; DealExtreme currently sells these batteries, though delivery times from this supplier can be rather long.
It is possible to create a pandora battery by hardmodding a standard official PSP battery, though this can be quite difficult, so if you are inexperienced with this, then it would be prudent to simply buy one of these batteries.
2. Making the "Magic Memory Stick"
To make an MMS, I recommend using a program called PSP Grader. The latest version at the time of writing is v008. Once this is downloaded, extract the .zip archive using a program such as WinZIP or WinRAR.
For the next step, you will need the OFW 5.00 EBoot file. Once downloaded, rename the file to 500.PBP. Put the Memory Stick inside your PSP, plug the PSP into your computer via the USB port and run PSP Grader. (You will need 7-zip to extract the .7z archive this file was uploaded in.)
NOTE: It is recommended that you backup any files on your Memory Stick as during the MMS creation process, a format is recommended.
Ensure that after PSP Grader is started, it knows the location of your PSP (E:\ or F:\, for example). Tick Format Memory Stick, and press Load 5.00 Official eBoot. Check which trigger button is selected to the right of the application. The default trigger is the Left Trigger, though this can be changed if you wish. This will be important later. Click Create Pandora Stick and allow the process to complete. After this, you can close the program.
3. Installing CFW
Now, this is the fun part. First of all, insert your pandora battery with the MMS still inserted, whilst holding down the trigger that was configured during the making of the MMS. After a menu is loaded, it's recommended that you plug the PSP in, to ensure that power is not lost during the process.
At the menu, select NAND Operations and choose Dump NAND. The NAND takes up at least 66MB, plus the additional installation files, which is why it is necessary to have a Memory Stick larger than 64MB, otherwise the Memory Stick can be corrupted. After the dump, the PSP will turn off, and you can plug the Memory Stick into the computer to backup the NAND.
Put the Memory Stick back into the PSP, make sure the PSP is unplugged from the power, reinsert the battery while holding the trigger to load the service mode again, and press X to install the CFW. After this installation you can remove the battery and plug the PSP back in (or use a normal battery) and it should have 5.00 M33-4 installed.
From this point, you should upgrade to either 5.00 M33-6 or 5.50 GEN-D3. You may also now be interested in using a Prometheus firmware. 5.50 Prometheus-4 can be found here.
4. Video tutorial
Rydian has created a video tutorial for use with this guide, seen below:
P.S.: Feel free to give constructive feedback, I may update this guide at points with new information, updates and additional links.
For this method, you will need:
- A PlayStation Portable (either the original "1000" or a compatible "2000" model. The "3000" model is not supported)
- A "pandora battery"
- A Memory Stick Duo, larger than 64MB but 4GB or under.
Contents:
1. Making/Buying a pandora battery
2. Making the "Magic Memory Stick"
3. Installing CFW
4. Video tutorial
1. Making/Buying a pandora battery
When installing CFW with this method, a pandora battery is used to bypass the OFW that is already installed to your PSP, and load the service mode that is often used when making repairs to the PSP system. These batteries are quite simple to find with a quick search; DealExtreme currently sells these batteries, though delivery times from this supplier can be rather long.
It is possible to create a pandora battery by hardmodding a standard official PSP battery, though this can be quite difficult, so if you are inexperienced with this, then it would be prudent to simply buy one of these batteries.
Turning a Sony battery into a pandora battery involves severing the lower right leg on the IC04 chip located on the circuit board inside the battery. It is important that this is the only leg that is cut, as cutting other legs may cause unexpected malfunctions.
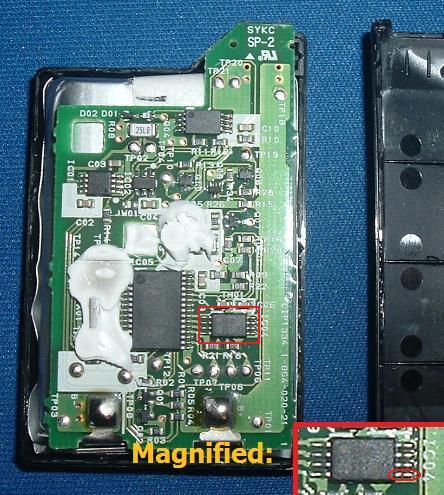

When using a PSP-2000, there is a light green track (shown in blue on the picture below) that can be cut instead of the processor leg itself. This is a reversible process, as the cut can be filled using graphite from an ordinary pencil, to act as a semiconductor.

2000 battery image taken from the former CFW guide: HERE
2000 battery image taken from the former CFW guide: HERE
2. Making the "Magic Memory Stick"
To make an MMS, I recommend using a program called PSP Grader. The latest version at the time of writing is v008. Once this is downloaded, extract the .zip archive using a program such as WinZIP or WinRAR.
For the next step, you will need the OFW 5.00 EBoot file. Once downloaded, rename the file to 500.PBP. Put the Memory Stick inside your PSP, plug the PSP into your computer via the USB port and run PSP Grader. (You will need 7-zip to extract the .7z archive this file was uploaded in.)
NOTE: It is recommended that you backup any files on your Memory Stick as during the MMS creation process, a format is recommended.
Ensure that after PSP Grader is started, it knows the location of your PSP (E:\ or F:\, for example). Tick Format Memory Stick, and press Load 5.00 Official eBoot. Check which trigger button is selected to the right of the application. The default trigger is the Left Trigger, though this can be changed if you wish. This will be important later. Click Create Pandora Stick and allow the process to complete. After this, you can close the program.
3. Installing CFW
Now, this is the fun part. First of all, insert your pandora battery with the MMS still inserted, whilst holding down the trigger that was configured during the making of the MMS. After a menu is loaded, it's recommended that you plug the PSP in, to ensure that power is not lost during the process.
At the menu, select NAND Operations and choose Dump NAND. The NAND takes up at least 66MB, plus the additional installation files, which is why it is necessary to have a Memory Stick larger than 64MB, otherwise the Memory Stick can be corrupted. After the dump, the PSP will turn off, and you can plug the Memory Stick into the computer to backup the NAND.
Put the Memory Stick back into the PSP, make sure the PSP is unplugged from the power, reinsert the battery while holding the trigger to load the service mode again, and press X to install the CFW. After this installation you can remove the battery and plug the PSP back in (or use a normal battery) and it should have 5.00 M33-4 installed.
From this point, you should upgrade to either 5.00 M33-6 or 5.50 GEN-D3. You may also now be interested in using a Prometheus firmware. 5.50 Prometheus-4 can be found here.
4. Video tutorial
Rydian has created a video tutorial for use with this guide, seen below:
[youtube]http://www.youtube.com/watch?v=o1ydzaf0OZk[/youtube]
P.S.: Feel free to give constructive feedback, I may update this guide at points with new information, updates and additional links.


