


THIS GUIDE IS OUTDATED AND NO LONGER MAINTAINED
It does however still contain a lot of useful information.
EXPECT changes in folder structures, naming schemes and other MAJOR differences.
For the latest info on SNEEK, please visit here or here
How to compile the Latest SNEEK(+DI) & UNEEK(+DI) source using Windows OS.
How to use the SNEEKInstaller by crediar
Build a NAND for use with SNEEK
Setting up an SD/USB for SNEEK
File Structure for SNEEK, SNEEK+DI, UNEEK and UNEEK+DI.
Wii Game File and Folder Structure & Identifying required IOS.
Backup your discs with SNEEK:
Accessing the SNEEK+DI Menu and the SNEEK configuration options:
How to install HBC 1.0.7 to SNEEK NAND
For some SNEEK2 Homebrew and SNEEK2 MODS
Other Valuable Downloads
Troubleshooting and errors
What is SNEEK and How does it do what it does
For the latest info on SNEEK, please visit here.
Again, this IS NOT a Definitive, Ultimate, Total, Ultra Guide and I don't know everything and CAN NOT answer all your questions.
I apologize if I missed something or made a mistake, please correct me.
Thanks in no particular order
crediar (SNEEK2 source and tools)
Det1re (SNEEK+DI FAQ)
tj_cool (region.bin maker and info)
Wilsoff (links and info)
FenrirWolf (links and info)
SanGor (Font.bin and info)
xfcrowman (links and info)
bula (SNEEK+DI file Structure and info)
RussSteele82 (virgin NAND using showmiiwads)
joda (SNEEK+DI Image Unpacker and info)
mousex (Game File and Folder Structure)
chevelle (links and info)
giantpune (mods and info)
thegood (a SNEEK menu mod)
pepxl (icons)
fogbank (puneek file structure)
Phylos (info)
Cyan (info)
XFlak (ModMii)
longtom1 (info)
Hope this helps someone,
ChokeD
It does however still contain a lot of useful information.
EXPECT changes in folder structures, naming schemes and other MAJOR differences.
For the latest info on SNEEK, please visit here or here
How to compile the Latest SNEEK(+DI) & UNEEK(+DI) source using Windows OS.
Required:
* sliksvn
* devkitProUpdater-1.5.0
* Latest build of Python
* Microsoft Visual C++ 2010 Redistributable Package (needed to avoid possible msvcr100.dll error)
* NUS Downloader
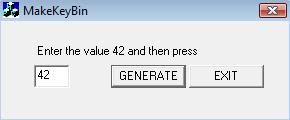
* MakeKeyBin1.1
Links:
sliksvn: http://www.sliksvn.com/en/download/
devkitProUpdater-1.5.0: http://sourceforge.net/projects/devkitpro/...ed%20Installer/
Latest build of Python: http://www.python.org/download/
Microsoft Visual C++ 2010 Redistributable Package: http://www.microsoft.com/downloads/details...;displaylang=en
NUS Downloader: http://wiibrew.org/wiki/NUS_Downloader
MakeKeyBin1.1 http://www.mediafire.com/?tizymvwrkhm
Install all the above programs to C:/
After installing all the programs above, Follow the guide below.
Guide:
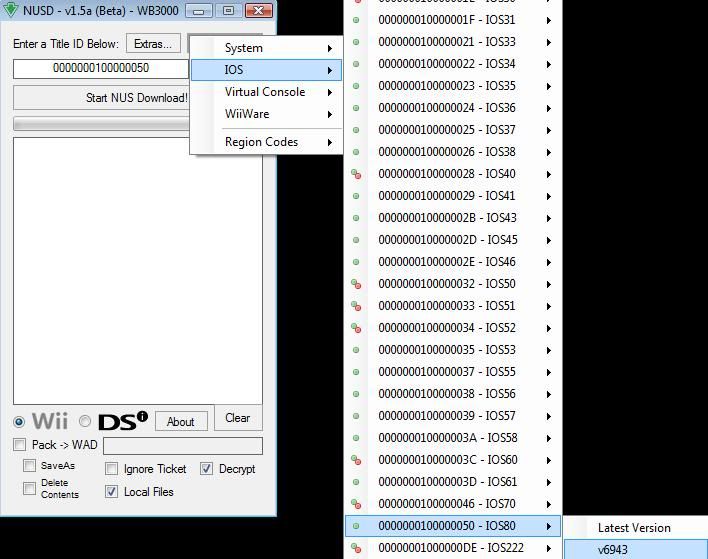
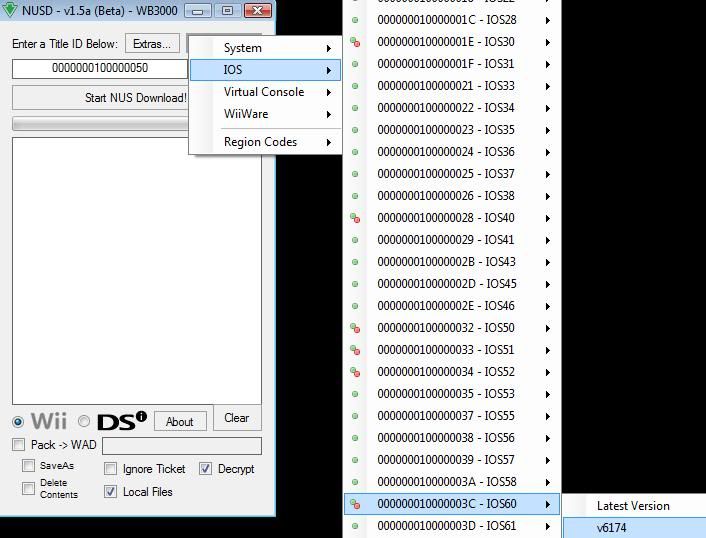
1. Acquire the IOS80-v6943 0000000e.app and IOS60-v6174 00000001.app files using NUS Downloader and the key.bin file
1a. Use MakeKeyBin to generate a key.bin and place it in the same directory as NUS Downloader.

1b. Place the key.bin in the same directory as NUSD
2. Open NUSD
2a. Make sure in NUSD you have the Decrypt box checked, (if it does not give you a decrypt box you do not have a proper key.bin or the key.bin is not in the
proper directory with NUSD)
2b. Go to the Database box to find the specific IOS you need as stated above or as in the pics below.
2c. Click "Start NUS Download"
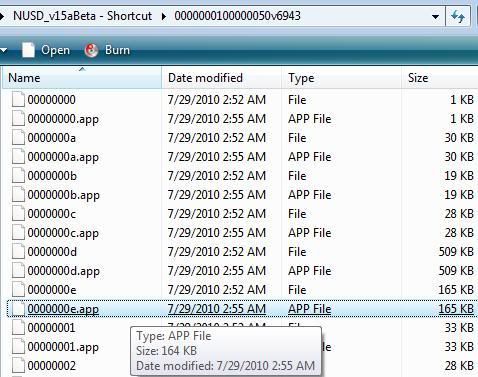
3. Place the 0000000e.app and 00000001.app files located below, in the c:\sneek folder before attempting to compile SNEEK.

4. Find a command prompt
4a. Go to start --> Run --> Type: cmd and hit enter, this will bring up a command prompt it should read:
c:\user\nameofurcpu> NOTE: If it has a different letter there, just type in c: and hit enter
5. Type this in the command prompt
cd c:\
5a. Hit enter, your command prompt should read:
c:\>
6. Downloading SNEEK source
6a. Type in the command prompt or copy and paste this in the window:
CODE
svn checkout http://sneek.googlecode.com/svn/trunk/ sneek
6b. Hit enter and wait.
You will now have a copy of SNEEK2 source located at c:/sneek
-----------------------------------------------------------------------------------------------------------------
This is Not a requirement
If you choose not to do this you can proceed to step 8. found below.
However, if you would like to compile your own armboot.bin proceed to step 7.
-----------------------------------------------------------------------------------------------------------------
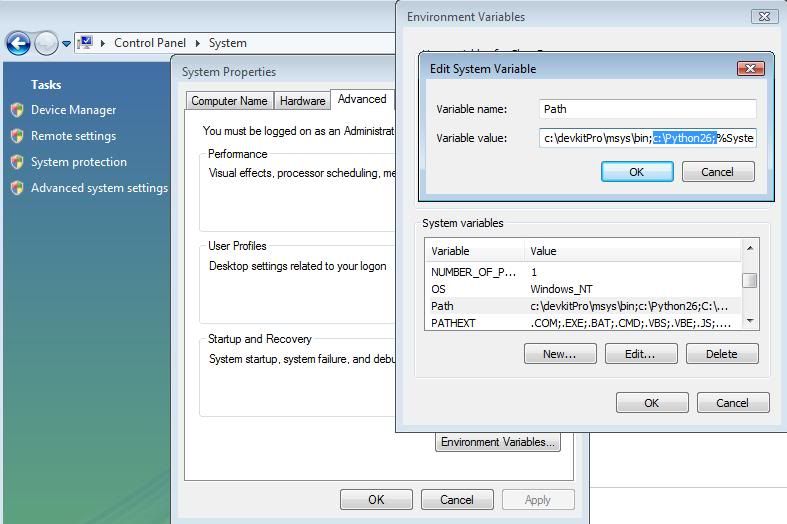
7. Go to your Control Panel --> System --> Advanced System Settings --> Environment Variables
7a. Scroll down and highlight "Path", then click "Edit".
7b. Enter in the list after any ";"
c:\Python26;
example:
c:\devkitPro\msys\bin;c:\Python26;C:\Program Files\SlikSvn\bin\
7c. The armboot.bin will now be found in the \sneek\mini-tree-mod folder after compiling sneek
8. Grab the armboot.bin from here if you didn't perform the above steps
Download armboot.bin: http://code.google.com/p/sneek/downloads/list
8a. Place it in the x:/bootmii folder
9. Compiling SNEEK
9a. Type in the command prompt:
cd sneek
9b. Hit enter,
your command prompt should now read c:\sneek>
10. Type in the command prompt
build_boot2.cmd
10a. Hit enter and wait patiently .
If all goes well you should have your SNEEK2 files in the c:\sneek folder
Congradulations

Files created in the c:\sneek folder:
boot2_di.bin = sdcard as nand (with DI module)(NO DVD DRIVE SUPPORT)(165KB) SNEEK+DI
boot2_sd.bin = sdcard as nand (no DI)(DVD DRIVE SUPPORT)(165KB) SNEEK
boot2_usb.bin = USB as nand (no DI)165KB) UNEEK
boot2_usb.bin = USB as nand (with DI module)(165KB) UNEEK+DI
di.bin = (usb module)(used for SNEEK+DI & UNEEK+DI)(33KB)
Files created in the c:\sneek\sneek\mini-tree-mod folder:
armboot.bin = All forms of SNEEK has same use in the same place with the same name.
* sliksvn
* devkitProUpdater-1.5.0
* Latest build of Python
* Microsoft Visual C++ 2010 Redistributable Package (needed to avoid possible msvcr100.dll error)
* NUS Downloader
* MakeKeyBin1.1
Links:
sliksvn: http://www.sliksvn.com/en/download/
devkitProUpdater-1.5.0: http://sourceforge.net/projects/devkitpro/...ed%20Installer/
Latest build of Python: http://www.python.org/download/
Microsoft Visual C++ 2010 Redistributable Package: http://www.microsoft.com/downloads/details...;displaylang=en
NUS Downloader: http://wiibrew.org/wiki/NUS_Downloader
MakeKeyBin1.1 http://www.mediafire.com/?tizymvwrkhm
Install all the above programs to C:/
After installing all the programs above, Follow the guide below.
Guide:
1. Acquire the IOS80-v6943 0000000e.app and IOS60-v6174 00000001.app files using NUS Downloader and the key.bin file
1a. Use MakeKeyBin to generate a key.bin and place it in the same directory as NUS Downloader.
1b. Place the key.bin in the same directory as NUSD
2. Open NUSD
2a. Make sure in NUSD you have the Decrypt box checked, (if it does not give you a decrypt box you do not have a proper key.bin or the key.bin is not in the
proper directory with NUSD)
2b. Go to the Database box to find the specific IOS you need as stated above or as in the pics below.
2c. Click "Start NUS Download"
3. Place the 0000000e.app and 00000001.app files located below, in the c:\sneek folder before attempting to compile SNEEK.
4. Find a command prompt
4a. Go to start --> Run --> Type: cmd and hit enter, this will bring up a command prompt it should read:
c:\user\nameofurcpu> NOTE: If it has a different letter there, just type in c: and hit enter
5. Type this in the command prompt
cd c:\
5a. Hit enter, your command prompt should read:
c:\>
6. Downloading SNEEK source
6a. Type in the command prompt or copy and paste this in the window:
CODE
svn checkout http://sneek.googlecode.com/svn/trunk/ sneek
6b. Hit enter and wait.
You will now have a copy of SNEEK2 source located at c:/sneek
-----------------------------------------------------------------------------------------------------------------
This is Not a requirement
If you choose not to do this you can proceed to step 8. found below.
However, if you would like to compile your own armboot.bin proceed to step 7.
-----------------------------------------------------------------------------------------------------------------
7. Go to your Control Panel --> System --> Advanced System Settings --> Environment Variables
7a. Scroll down and highlight "Path", then click "Edit".
7b. Enter in the list after any ";"
c:\Python26;
example:
c:\devkitPro\msys\bin;c:\Python26;C:\Program Files\SlikSvn\bin\
7c. The armboot.bin will now be found in the \sneek\mini-tree-mod folder after compiling sneek
8. Grab the armboot.bin from here if you didn't perform the above steps
Download armboot.bin: http://code.google.com/p/sneek/downloads/list
8a. Place it in the x:/bootmii folder
9. Compiling SNEEK
9a. Type in the command prompt:
cd sneek
9b. Hit enter,
your command prompt should now read c:\sneek>
10. Type in the command prompt
build_boot2.cmd
10a. Hit enter and wait patiently .
If all goes well you should have your SNEEK2 files in the c:\sneek folder
Congradulations
Files created in the c:\sneek folder:
boot2_di.bin = sdcard as nand (with DI module)(NO DVD DRIVE SUPPORT)(165KB) SNEEK+DI
boot2_sd.bin = sdcard as nand (no DI)(DVD DRIVE SUPPORT)(165KB) SNEEK
boot2_usb.bin = USB as nand (no DI)165KB) UNEEK
boot2_usb.bin = USB as nand (with DI module)(165KB) UNEEK+DI
di.bin = (usb module)(used for SNEEK+DI & UNEEK+DI)(33KB)
Files created in the c:\sneek\sneek\mini-tree-mod folder:
armboot.bin = All forms of SNEEK has same use in the same place with the same name.
Required:
* Latest SNEEKInstaller by crediar: http://code.google.com/p/sneek/downloads/list
* SD/USB which ever you are installing to.
Guide:
1. Download the latest SNEEKInstaller and extract the contents to your desktop.
2. Make a "New Folder" on your desktop.
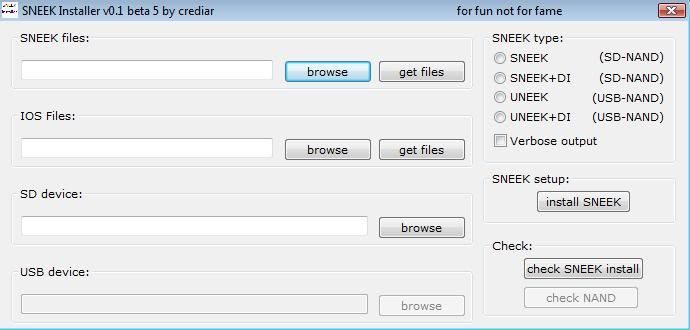
3. Click on SNEEKInstaller, and when it opens,
4. Click the first "Browse" button and direct it to the "New Folder" you created.
5. Click the "Get Files" next to that "Browse" button on the left.
6. Click the 2nd "Browse" button below the first and direct it to the "New Folder" you created.
7. Click the "Get Files" next to that button.
8. Next, below that, you can either browse to the same "New Folder" or you can browse to where your SD is located, your choice.
9. Next, below that, if you are wanting to install UNEEK or UNEEK+DI, browse to the USB drive you will be using
10. On the right choose which SNEEK you would like to make
11. Next, click install.
SNEEK(DI)/UNEEK(DI) files can now be found in the "New Folder" or the SD/USB which ever you directed it to.
* Latest SNEEKInstaller by crediar: http://code.google.com/p/sneek/downloads/list
* SD/USB which ever you are installing to.
Guide:
1. Download the latest SNEEKInstaller and extract the contents to your desktop.
2. Make a "New Folder" on your desktop.
3. Click on SNEEKInstaller, and when it opens,
4. Click the first "Browse" button and direct it to the "New Folder" you created.
5. Click the "Get Files" next to that "Browse" button on the left.
6. Click the 2nd "Browse" button below the first and direct it to the "New Folder" you created.
7. Click the "Get Files" next to that button.
8. Next, below that, you can either browse to the same "New Folder" or you can browse to where your SD is located, your choice.
9. Next, below that, if you are wanting to install UNEEK or UNEEK+DI, browse to the USB drive you will be using
10. On the right choose which SNEEK you would like to make
11. Next, click install.
SNEEK(DI)/UNEEK(DI) files can now be found in the "New Folder" or the SD/USB which ever you directed it to.
How to get a virgin NAND using ModMii
Required:
* ModMii
Links:
ModMii: http://gbatemp.net/t207126-nus-auto-downloader-for-windows
Guide:
1. Download "ModMii" and extract to you desktop.
2. Click on ModMii.exe and type "I Agree" and hit enter when it opens.
3. Type "S" and hit enter.
4. Type "2" hit enter.
5. Click "Enter"
6. Click "Enter"
7. Choose what region of NAND you would like to have "U" "E" "J" or "K" and click enter.
8. Choose which System Menu you would like to have "4.2" or "4.3" and click enter.
9. Type D and click enter (unless you would like to use your own setting.txt in which case either choice will work)
10. Choose whether to download Wii channels
10a. If you choose "Y" it will give you the option of which to download
10b. If you choose "N" none will be downloaded
11. After typing "N" in step "10" or after choosing which channels to download in step "10" type "Y" and hit enter.
12. When ShowMiiWads pops up, type "45e" and click "ok"
13. After ModMii is done your brand new nand is built and in the ModMii folder on your desktop.
14. Copy the four folders: title, ticket, sys, shared1 to the root of whatever device you are going to be using to host your NAND.
15. When you launch SNEEK/UNEEK it will be as if it is the first time you started your wii (you will have to wait a couple minutes the first time you boot it up this time only)
NOTE: You will be presented with a black screen for approximately 3-5 minutes upon first boot only.
-------------------------------------------------------------------------------
Alternative method below:
-------------------------------------------------------------------------------
Extract a Bootmii NAND dump for use with SNEEK:
Required:
* Bootmii NAND.bin
* ShowMiiWads
Links:
ShowMiiWads: http://code.google.com/p/showmiiwads/
Guide:
1. Dump your Wii NAND with Bootmii.
2. Place the nand.bin in a folder on your desktop
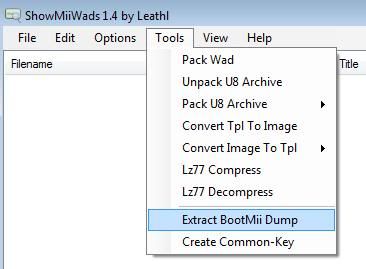
3. Open "ShowMiiWads"
4. Select "Options" --> "Change NAND Backup Path"
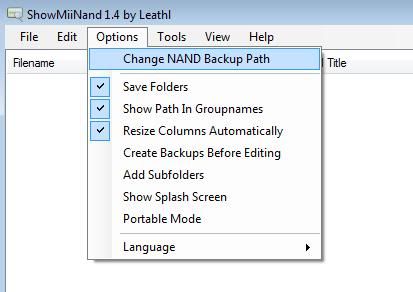
5. Select "Tools" --> "Extract Bootmii Dump" and browse to the nand.bin.
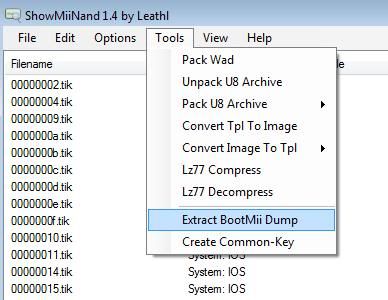
6. Copy all the folders in the nand-extracteda folder over to your SD/USB.
Required:
* ModMii
Links:
ModMii: http://gbatemp.net/t207126-nus-auto-downloader-for-windows
Guide:
1. Download "ModMii" and extract to you desktop.
2. Click on ModMii.exe and type "I Agree" and hit enter when it opens.
3. Type "S" and hit enter.
4. Type "2" hit enter.
5. Click "Enter"
6. Click "Enter"
7. Choose what region of NAND you would like to have "U" "E" "J" or "K" and click enter.
8. Choose which System Menu you would like to have "4.2" or "4.3" and click enter.
9. Type D and click enter (unless you would like to use your own setting.txt in which case either choice will work)
10. Choose whether to download Wii channels
10a. If you choose "Y" it will give you the option of which to download
10b. If you choose "N" none will be downloaded
11. After typing "N" in step "10" or after choosing which channels to download in step "10" type "Y" and hit enter.
12. When ShowMiiWads pops up, type "45e" and click "ok"
13. After ModMii is done your brand new nand is built and in the ModMii folder on your desktop.
14. Copy the four folders: title, ticket, sys, shared1 to the root of whatever device you are going to be using to host your NAND.
15. When you launch SNEEK/UNEEK it will be as if it is the first time you started your wii (you will have to wait a couple minutes the first time you boot it up this time only)
NOTE: You will be presented with a black screen for approximately 3-5 minutes upon first boot only.
-------------------------------------------------------------------------------
Alternative method below:
-------------------------------------------------------------------------------
Extract a Bootmii NAND dump for use with SNEEK:
Required:
* Bootmii NAND.bin
* ShowMiiWads
Links:
ShowMiiWads: http://code.google.com/p/showmiiwads/
Guide:
1. Dump your Wii NAND with Bootmii.
2. Place the nand.bin in a folder on your desktop
3. Open "ShowMiiWads"
4. Select "Options" --> "Change NAND Backup Path"
5. Select "Tools" --> "Extract Bootmii Dump" and browse to the nand.bin.
6. Copy all the folders in the nand-extracteda folder over to your SD/USB.
Required:
*A compatible SD/USB
*EASEUS Partition Master Home Edition: http://www.partition-tool.com/download.htm (FREE and highly recommended)
Guide:
1. Download and install EASEUS Partition Master Home Edition.
2. Locate the SD/USB
3. Right click on the drive choose "Format"
4. In the box choose "FAT32" for the "File System" and "32KB" for the "Cluster Size" and click "OK"
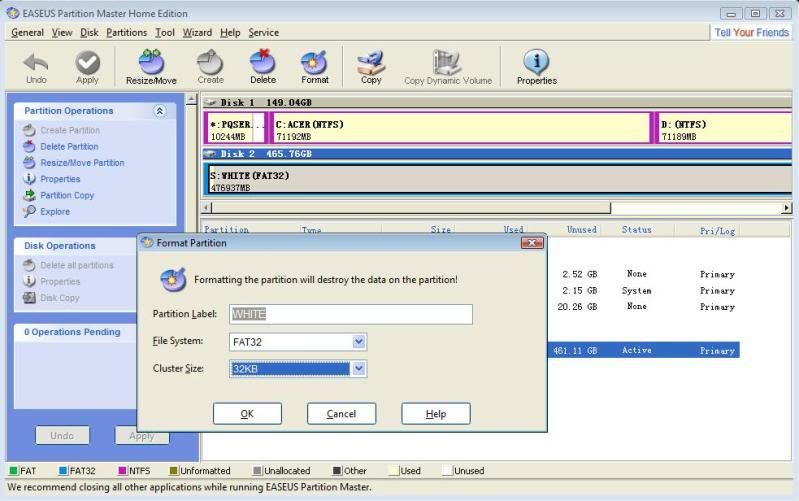
5. Right click the drive again and go to the "Advanced" tab and choose "Set Active"
6. In the bottom left corner of EASEUS click "Apply"
7. When EASEUS is done, your drive should be ready.
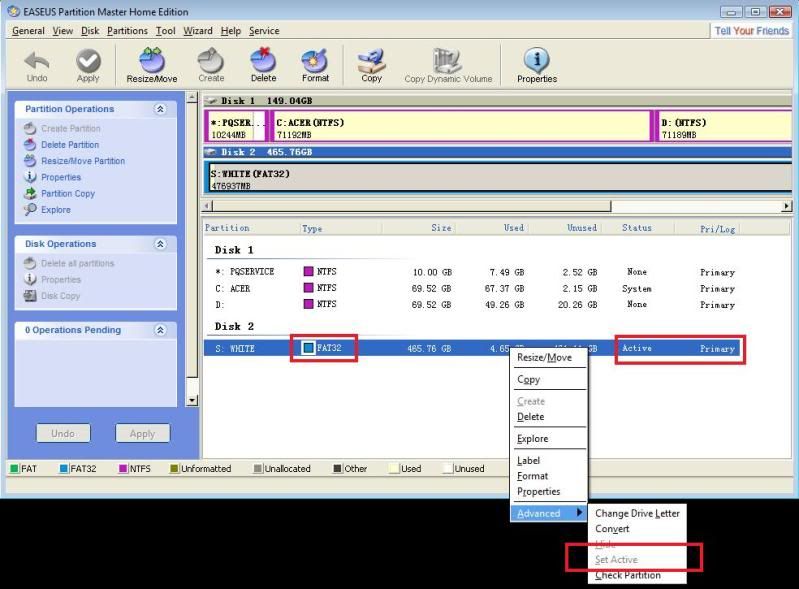
If your USB device has multiple partitions, the partition with the games for SNEEK on it must be the PRIMARY and ACTIVE partition formatted with 32KB or below Clusters.
*A compatible SD/USB
*EASEUS Partition Master Home Edition: http://www.partition-tool.com/download.htm (FREE and highly recommended)
Guide:
1. Download and install EASEUS Partition Master Home Edition.
2. Locate the SD/USB
3. Right click on the drive choose "Format"
4. In the box choose "FAT32" for the "File System" and "32KB" for the "Cluster Size" and click "OK"
5. Right click the drive again and go to the "Advanced" tab and choose "Set Active"
6. In the bottom left corner of EASEUS click "Apply"
7. When EASEUS is done, your drive should be ready.
If your USB device has multiple partitions, the partition with the games for SNEEK on it must be the PRIMARY and ACTIVE partition formatted with 32KB or below Clusters.
Filestructure for SNEEK DI:
sd:\bootmii\armboot.bin
sd:\sneek\di.bin
sd:\sneek\kernel.bin (renamed boot2_di.bin)
sd:\sneek\font.bin
NAND
sd:\import
sd:\meta
sd:\shared1
sd:\shared2
sd:\temp
sd:\title
sd:\ticket
sd:\sys
usb:\games\a_game example: usb:\games\RMGE01
----------------------------------------------------------------
Filestructure for SNEEK:
sd:\bootmii\armboot.bin
sd:\sneek\kernel.bin (boot2_sd.bin)
NAND
sd:\import
sd:\meta
sd:\shared1
sd:\shared2
sd:\temp
sd:\title
sd:\ticket
sd:\sys
usb:\games\a_game example: usb:\games\RMGE01
-----------------------------------------------------------------
Filestructure for UNEEK:
sd:\bootmii\armboot.bin
sd:\sneek\kernel.bin (boot2_usb.bin)
usb:\sneek\kernel.bin (boot2_usb.bin)
NAND
usb:\import
usb:\meta
usb:\shared1
usb:\shared2
usb:\temp
usb:\title
usb:\ticket
usb:\sys
usb:\games\a_game example: usb:\games\RMGE01
-----------------------------------------------------------------
Filestructure for UNEEK+DI:
sd:\bootmii\armboot.bin
sd:\sneek\kernel.bin (renamed boot2_usb.bin)
usb:\sneek\di.bin
usb:\sneek\kernel.bin (renamed boot2_usb.bin)
usb:\sneek\font.bin
NAND
usb:\import
usb:\meta
usb:\shared1
usb:\shared2
usb:\temp
usb:\title
usb:\ticket
usb:\sys
usb:\games\a_game example: usb:\games\RMGE01
Place files respectively and boot your wii
NOTE: You must have a game in the /games folder for UNEEK+DI to boot.
sd:\bootmii\armboot.bin
sd:\sneek\di.bin
sd:\sneek\kernel.bin (renamed boot2_di.bin)
sd:\sneek\font.bin
NAND
sd:\import
sd:\meta
sd:\shared1
sd:\shared2
sd:\temp
sd:\title
sd:\ticket
sd:\sys
usb:\games\a_game example: usb:\games\RMGE01
----------------------------------------------------------------
Filestructure for SNEEK:
sd:\bootmii\armboot.bin
sd:\sneek\kernel.bin (boot2_sd.bin)
NAND
sd:\import
sd:\meta
sd:\shared1
sd:\shared2
sd:\temp
sd:\title
sd:\ticket
sd:\sys
usb:\games\a_game example: usb:\games\RMGE01
-----------------------------------------------------------------
Filestructure for UNEEK:
sd:\bootmii\armboot.bin
sd:\sneek\kernel.bin (boot2_usb.bin)
usb:\sneek\kernel.bin (boot2_usb.bin)
NAND
usb:\import
usb:\meta
usb:\shared1
usb:\shared2
usb:\temp
usb:\title
usb:\ticket
usb:\sys
usb:\games\a_game example: usb:\games\RMGE01
-----------------------------------------------------------------
Filestructure for UNEEK+DI:
sd:\bootmii\armboot.bin
sd:\sneek\kernel.bin (renamed boot2_usb.bin)
usb:\sneek\di.bin
usb:\sneek\kernel.bin (renamed boot2_usb.bin)
usb:\sneek\font.bin
NAND
usb:\import
usb:\meta
usb:\shared1
usb:\shared2
usb:\temp
usb:\title
usb:\ticket
usb:\sys
usb:\games\a_game example: usb:\games\RMGE01
Place files respectively and boot your wii
NOTE: You must have a game in the /games folder for UNEEK+DI to boot.
Required:
* The Latest DiscEX by crediar
* Wii game in ISO format
Links:
Latest DiscEX by crediar: http://code.google.com/p/sneek/downloads/list
Guide:
1. Download the latest DiscEX by crediar and extract to c:/DiscEX
2. Find a command prompt (Start --> Run --> Type: cmd and press enter.
3. Change the directory to where DiscEX is located. (For me it is on the root of my "C" drive) Therefore, I would type this:
cd c:\
4. Then type this to change the directory to DiscEx,
cd DiscEX
5. Make sure you have a game, example: ssbb.iso in the same folder as /DiscEX and type,
DiscEx ssbb.iso
6. Hit enter and wait.
7. When complete copy the folder to where your games will be and place it in the /games folder.
example: On a FAT32, 32KB or below Clusters, Primary, Active SD/USB.
usb:/games/SSBB12/files/ (a lot of files....)
usb:/games/SSBB12/sys/main.dol
usb:/games/SSBB12/sys/apploader.img
usb:/games/SSBB12/sys/fst.bin
usb:/games/SSBB12/sys/boot.bin
usb:/games/SSBB12/sys/bi2.bin
usb:/games/SSBB12/ticket.bin
usb:/games/SSBB12/cert.bin
usb:/games/SSBB12/tmd.bin
--------------------------------------------------------------------
Identifying required IOS for sneek per Wii game.iso
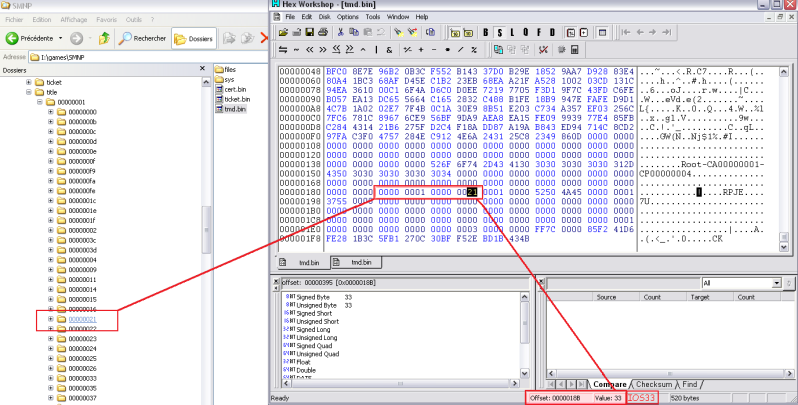
1. Open tmd.bin in a hex editor
2. Look at offset 0x018B.
3. Convert the value from hexadecimal to decimal to obtain the IOS number.
You can verify in sneek nand, by looking at the same folder name 00000001/000000xx/
--------------------------------------------------------------------
Alternative Method Below
--------------------------------------------------------------------
Or use wit:
1. Download WIT
2. Place a copy of tmd.bin from the game in the WIT directory.
2. Type in the command line:
wit dump tmd.bin
It prints something like:
CODE
Dump of file tmd.bin
Real path: .../tmd.bin
ID & type: RTYP, TMD.BIN
File size: 208/hex = 520 = 0 MiB
Issuer: Root-CA00000001-CP00000004
Signature type: 10001/hex = 65537
Version: 0
CA version: 0
Signer version: 0
System version: 00000001 00000023 = IOS 35 = IOS 0x23
Title ID: 00010000 52545950 = '....RTYP'
Title type: 1/hex = 1
Group ID: 3031/hex = 12337
Access rights: 0/hex = 0
Title version: 0/hex = 0
Boot index: 0/hex = 0
N(content): 1/hex = 1
Content #0, ID: 0/hex = 0
Content #0, index: 0/hex = 0
Content #0, type: 3/hex = 3
Content #0, size: ff7c0000/hex = 4286316544
Content #0, hash: 144e3e81 47c6ab29 2190b5a8 c4b1ccc9 633ed047
* The Latest DiscEX by crediar
* Wii game in ISO format
Links:
Latest DiscEX by crediar: http://code.google.com/p/sneek/downloads/list
Guide:
1. Download the latest DiscEX by crediar and extract to c:/DiscEX
2. Find a command prompt (Start --> Run --> Type: cmd and press enter.
3. Change the directory to where DiscEX is located. (For me it is on the root of my "C" drive) Therefore, I would type this:
cd c:\
4. Then type this to change the directory to DiscEx,
cd DiscEX
5. Make sure you have a game, example: ssbb.iso in the same folder as /DiscEX and type,
DiscEx ssbb.iso
6. Hit enter and wait.
7. When complete copy the folder to where your games will be and place it in the /games folder.
example: On a FAT32, 32KB or below Clusters, Primary, Active SD/USB.
usb:/games/SSBB12/files/ (a lot of files....)
usb:/games/SSBB12/sys/main.dol
usb:/games/SSBB12/sys/apploader.img
usb:/games/SSBB12/sys/fst.bin
usb:/games/SSBB12/sys/boot.bin
usb:/games/SSBB12/sys/bi2.bin
usb:/games/SSBB12/ticket.bin
usb:/games/SSBB12/cert.bin
usb:/games/SSBB12/tmd.bin
--------------------------------------------------------------------
Identifying required IOS for sneek per Wii game.iso
1. Open tmd.bin in a hex editor
2. Look at offset 0x018B.
3. Convert the value from hexadecimal to decimal to obtain the IOS number.
You can verify in sneek nand, by looking at the same folder name 00000001/000000xx/
--------------------------------------------------------------------
Alternative Method Below
--------------------------------------------------------------------
Or use wit:
1. Download WIT
2. Place a copy of tmd.bin from the game in the WIT directory.
2. Type in the command line:
wit dump tmd.bin
It prints something like:
CODE
Dump of file tmd.bin
Real path: .../tmd.bin
ID & type: RTYP, TMD.BIN
File size: 208/hex = 520 = 0 MiB
Issuer: Root-CA00000001-CP00000004
Signature type: 10001/hex = 65537
Version: 0
CA version: 0
Signer version: 0
System version: 00000001 00000023 = IOS 35 = IOS 0x23
Title ID: 00010000 52545950 = '....RTYP'
Title type: 1/hex = 1
Group ID: 3031/hex = 12337
Access rights: 0/hex = 0
Title version: 0/hex = 0
Boot index: 0/hex = 0
N(content): 1/hex = 1
Content #0, ID: 0/hex = 0
Content #0, index: 0/hex = 0
Content #0, type: 3/hex = 3
Content #0, size: ff7c0000/hex = 4286316544
Content #0, hash: 144e3e81 47c6ab29 2190b5a8 c4b1ccc9 633ed047
-dump mode can dump your discs in RAW format to HDD
-settings are now accessed via the PLUS(X) button
-dump mode is accessed via the MINUS(Y) button
Important notes on the dumping mode:
The dumping mode is still experimental!
The disc you want to dump must be in the Wii from start up!
It does NOT support changing the disc while running and dump another disc. You
have to restart the Wii for now.
As SNEEK is using FAT32 the files are splitting into 4GB chunks, every OS has a
copy command which is able to join files.
(Just assure you join the files on an HDD which supports large files)
During the dumping burn-in protection doesn't work!
During the dumping the SNEEK menu is not displayed please just wait until it
shows "Dumped: ....".
Approximate dumping times depending on your HDD speed!!
GC : 5mins
Wii-SL: 16mins
Wii-DL: 29mins
To get in SNEEK DI menu you can use a GC controller in port 1 or a Wii remote.
In the "SNEEK MENU" screen:
(using your GC controller) Press start -> select game using d-pad -> press A -> press start -> game will load now in Disc Channel
(using your Wii Remote) Press "1" -> select game using d-pad -> press A -> press start -> game will load now in Disc Channel
1. Press start on the GC controller or "1" on your Wii remote to access the game selection menu.
2. Use the d-pad to scroll through the games and press A to select the game.
2b. If using the GC controller, Press start again to return to the system menu.
3. If everything is working, whatever game is currently in the disc channel will disappear
(i.e. you'll see the eject disc animation)
4. The disc channel will then appear empty.
5. Click on the disc channel.
6. It will then load up the banner for whatever game you chose.
NOTE: Gamecube controller has to be plugged before booting the Wii. Connecting it once the system menu is showing doesn't work.
--------------------------------------------------------------------------------------
To access the SNEEK configuration:
1. Press "1" -> in the SNEEK game menu.
2. Press "B" to open the Configuration Menu.
3. Pressing "B" again closes the Configuration Menu.
Configuration References:
Video Patch Mode: referred to as the VI, patches the region of a game that does not match the region of the NAND being used.
Required:
* WadCreator v1.1: http://www.mediafire.com/?n5yzmqjmwzd
* ShowMiiWads: http://code.google.com/p/showmiiwads/downloads/list
* HackMii Installer v0.7
Google search for "HackMii Installer v0.7" and in 30 seconds I found it at the 2nd link..
I would get it for you, but we can't have that here at GBAtemp at the request of the devs who made it, srry.
Guide:
1. Install HBC 1.0.7 on your real nand 3.2x-4.3x
2. Use WadCreator v1.1 to extract HBC.wad from you Wii.
3. dump real nand using bootmii
4. Open showmiiwads, go to "tools/extract Bootmii nand" and select your nand.bin
5. Go back to your VIRGIN Sneek nand, by selecting your sneek drive letter in "Options/Change NAND backup path"
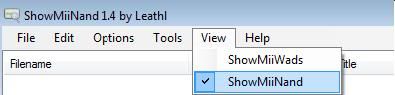
6. Go to "View/ShowmiiNand"
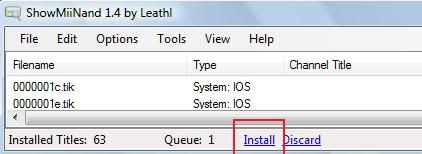
7. Drag and Drop HBC.wad then at the bottom click "Install", and once installed close ShowmiiWads.
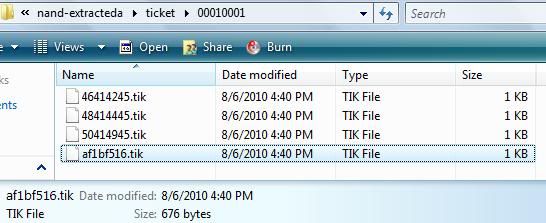
8. Then manually copy and replace your original Bootmii NAND/ticket/00010001/af1bf516.tik to Sneek NAND/ticket/00010001/af1bf516.tik
9. Your done. Test it on your Wii.
* WadCreator v1.1: http://www.mediafire.com/?n5yzmqjmwzd
* ShowMiiWads: http://code.google.com/p/showmiiwads/downloads/list
* HackMii Installer v0.7
Google search for "HackMii Installer v0.7" and in 30 seconds I found it at the 2nd link..
I would get it for you, but we can't have that here at GBAtemp at the request of the devs who made it, srry.
Guide:
1. Install HBC 1.0.7 on your real nand 3.2x-4.3x
2. Use WadCreator v1.1 to extract HBC.wad from you Wii.
3. dump real nand using bootmii
4. Open showmiiwads, go to "tools/extract Bootmii nand" and select your nand.bin
5. Go back to your VIRGIN Sneek nand, by selecting your sneek drive letter in "Options/Change NAND backup path"
6. Go to "View/ShowmiiNand"
7. Drag and Drop HBC.wad then at the bottom click "Install", and once installed close ShowmiiWads.
8. Then manually copy and replace your original Bootmii NAND/ticket/00010001/af1bf516.tik to Sneek NAND/ticket/00010001/af1bf516.tik
9. Your done. Test it on your Wii.
Take a look at SNEEKv2 Homebrew Compatibility
----------------------------------------------------------------------------------------------
Bootmii Configuration Editor: (Swap to UNEEK(+DI) and back again.)
1. Download BCE and extract to your "apps" folder on your SD.
2. Open the bce_settings.xml file in notepad, it's located in the "Bootmii_cfg_ed" folder and change
<update check="1" to <update check="0"
then save.
3. Make a new empty folder called "~bootmii" on your SD.
4. Boot to your REAL NAND or SNEEK+DI/UNEEK+DI nand.
5. Start HBC and go to the Bootmii Config Editor.
6. Press"A" on the wii remote and it will return to HBC.
7. Press your "Home" button in HBC and hit "Shutdown".
8. Boot your Wii with the power button on the Wii remote.
-------------------------------------------------------------
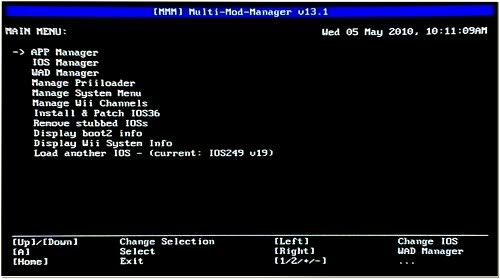
Multi-Mod Manager: (MMM)
Multi-Mod-Manager (MMM) is a multi-purpose all-in-one tool for the Wii.
Many useful functions are neatly integrated into a easy-to-use menu interface to enable and better support Wii homebrew.
Like a handy 'Swiss knife', it helps you avoid the hassle of dealing with different separate tools but does not compromise on its features or functionality.
Forum Link: http://gbatemp.net/index.php?showtopic=208281&hl=
Download Link: http://www.4shared.com/file/235955829/bb6c...nager_v128.html
--------------------------------------------------------------
Switch2Sneek:
SD must be enabled for this to work properly.
Switch2Sneek allows you to switch from real nand to Sneek nand with out taking the SD stick out of your Wii.
It can be used from HBC and/or also comes with a forwarder channel for easy access.
Download Link: http://code.google.com/p/gadget4sneek/downloads/list
YouTube Video:
--------------------------------------------------------------
----------------------------------------------------------------------------------------------
Bootmii Configuration Editor: (Swap to UNEEK(+DI) and back again.)
1. Download BCE and extract to your "apps" folder on your SD.
2. Open the bce_settings.xml file in notepad, it's located in the "Bootmii_cfg_ed" folder and change
<update check="1" to <update check="0"
then save.
3. Make a new empty folder called "~bootmii" on your SD.
4. Boot to your REAL NAND or SNEEK+DI/UNEEK+DI nand.
5. Start HBC and go to the Bootmii Config Editor.
6. Press"A" on the wii remote and it will return to HBC.
7. Press your "Home" button in HBC and hit "Shutdown".
8. Boot your Wii with the power button on the Wii remote.
-------------------------------------------------------------
Multi-Mod Manager: (MMM)
Multi-Mod-Manager (MMM) is a multi-purpose all-in-one tool for the Wii.
Many useful functions are neatly integrated into a easy-to-use menu interface to enable and better support Wii homebrew.
Like a handy 'Swiss knife', it helps you avoid the hassle of dealing with different separate tools but does not compromise on its features or functionality.
Forum Link: http://gbatemp.net/index.php?showtopic=208281&hl=
Download Link: http://www.4shared.com/file/235955829/bb6c...nager_v128.html
--------------------------------------------------------------
Switch2Sneek:
SD must be enabled for this to work properly.
Switch2Sneek allows you to switch from real nand to Sneek nand with out taking the SD stick out of your Wii.
It can be used from HBC and/or also comes with a forwarder channel for easy access.
Download Link: http://code.google.com/p/gadget4sneek/downloads/list
YouTube Video:
--------------------------------------------------------------
Other Valuable Downloads
Mirror for all legal files. Check here if any links are broken in this thread, I may have a backup of it stored here.
font.bin(needed to run SNEEK)
EASEUS Partition Master Home Edition (ALL-IN-ONE Partition Manager Software)(for use with your usb)
WADCreator v1 (used to dump a .wad to your SD stick)
font.bin(needed to run SNEEK)
EASEUS Partition Master Home Edition (ALL-IN-ONE Partition Manager Software)(for use with your usb)
WADCreator v1 (used to dump a .wad to your SD stick)
YOU SHOULD HAVE A LOOK HERE FOR MORE FAQ AND FOR TROUBLESHOOTING
crediar has added slot blinking on fatal errors:
1 short flash : The TMD of the requested title is missing
2 short flashes: The TMD of the IOS the current title uses is missing
3 short flashes: The kernel.bin is not found on sd and or usb
4 short flashes: Failed to load the requested IOS (missing IOS, missing TMD/Ticket/content)
5 short flashes: "Could not open or read sd:/sneek/kernel.bin"
----------------------------------------------------------------------
If you can't get UNEEK+DI to boot
Check to make sure you have a game in the /games folder as UNEEK+DI will not boot otherwise.
If you can't get a specific game to boot, but others do:
Check if you have the required IOS installed on your nand that the game needs.
A few games won't boot because they used the incorrect IOS or didn't have the correct version number of the ios installed.
See the " Wii Game File and Folder Structure & Identifying required IOS" part of the guide for help with identifying game IOS.
---------------------------------------------------------------------------------------------
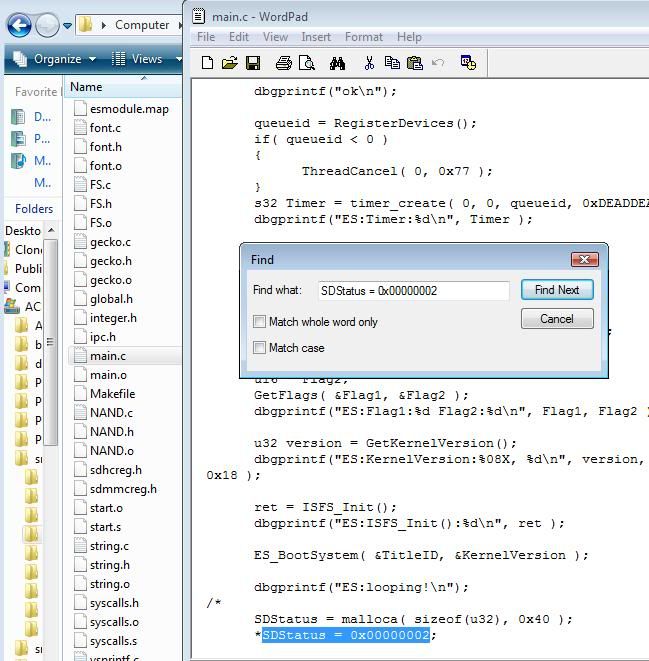
SD support for Wii applications is currently disabled by default,.
This may lead to a corrupt NAND, but you can still try to enable it by following these instructions:
1. Before compiling, search for this string in the main.c of the ES module
make a backup before using this feature!
Reading from SD has been told to work, but writing should be an issue.

crediar has added slot blinking on fatal errors:
1 short flash : The TMD of the requested title is missing
2 short flashes: The TMD of the IOS the current title uses is missing
3 short flashes: The kernel.bin is not found on sd and or usb
4 short flashes: Failed to load the requested IOS (missing IOS, missing TMD/Ticket/content)
5 short flashes: "Could not open or read sd:/sneek/kernel.bin"
----------------------------------------------------------------------
If you can't get UNEEK+DI to boot
Check to make sure you have a game in the /games folder as UNEEK+DI will not boot otherwise.
If you can't get a specific game to boot, but others do:
Check if you have the required IOS installed on your nand that the game needs.
A few games won't boot because they used the incorrect IOS or didn't have the correct version number of the ios installed.
See the " Wii Game File and Folder Structure & Identifying required IOS" part of the guide for help with identifying game IOS.
---------------------------------------------------------------------------------------------
SD support for Wii applications is currently disabled by default,.
This may lead to a corrupt NAND, but you can still try to enable it by following these instructions:
1. Before compiling, search for this string in the main.c of the ES module
- SDStatus = 0x00000002;
- SDStatus = 0x00000001;
make a backup before using this feature!
Reading from SD has been told to work, but writing should be an issue.
QUOTE
sneek is basically just a way to lie to the PPC in the wii. the wii has 2 processors ARM and PPC. games, the system menu, channels, most homebrew, and pretty much every other program that accepts user input and draws on the screen run on the PPC. when these programs want information from the wii's internal memory, internet, dvd, sd card, or pretty much anywhere else, they have to ask the program running on the ARM (an IOS usually) for it (except when the wii is in gamecube mode).
sneek runs on the ARM and it redirects where information comes from and in some cases, patches that information with false data. the end result is that the program running on the PPC asks for data from the wii's nand and it gets it from the sd card instead. if the PPC wants data from the dvd drive, sneek can give it data from a usb drive instead. when the system menu asks how much space is used for channels, sneek flat out lies about it and gives a low number so the system menu doesnt give the "system memory is full" message.
about cIOS and sneek, since IOS and sneek both run on the arm, there is a chance that they will not play nicely together. they are both trying to patch stuff and be smart, but they dont realize that each other is there and both are trying to be smart. the end result is that when sneek tries to load a cIOS, it doesnt load all of it and the parts of it that do load start doing their normal cIOS stuff and end up patching memory where sneek is and both of them end up not working right.
(Thanks giantpune)
For the latest info on SNEEK, please visit here.
Again, this IS NOT a Definitive, Ultimate, Total, Ultra Guide and I don't know everything and CAN NOT answer all your questions.
I apologize if I missed something or made a mistake, please correct me.
Thanks in no particular order
crediar (SNEEK2 source and tools)
Det1re (SNEEK+DI FAQ)
tj_cool (region.bin maker and info)
Wilsoff (links and info)
FenrirWolf (links and info)
SanGor (Font.bin and info)
xfcrowman (links and info)
bula (SNEEK+DI file Structure and info)
RussSteele82 (virgin NAND using showmiiwads)
joda (SNEEK+DI Image Unpacker and info)
mousex (Game File and Folder Structure)
chevelle (links and info)
giantpune (mods and info)
thegood (a SNEEK menu mod)
pepxl (icons)
fogbank (puneek file structure)
Phylos (info)
Cyan (info)
XFlak (ModMii)
longtom1 (info)
Hope this helps someone,
ChokeD
Last edited by ChokeD,


