Never mind I seemed to have got it working on windows again, I'm also working on a Homepass program for windows, hope to have done within next few days
Yes, really all that is left to do is write the tutorial (sorta started doing) and test it on versions other than Windows 7. There is one error check I'm trying to implement but am having some compiler issues if I can't get it to work by tomorrow I'll most likely leave it and try to get that working for a future release.
Yes, really all that is left to do is write the tutorial (sorta started doing) and test it on versions other than Windows 7. There is one error check I'm trying to implement but am having some compiler issues if I can't get it to work by tomorrow I'll most likely leave it and try to get that working for a future release.
I'm currently running Windows 10 if you need someone to help test. Which SSID's are you using? I managed to get NbaHomePass working after a lot of headache, but I'm not getting many streetpasses on the still working SSID's.
I'm currently running Windows 10 if you need someone to help test. Which SSID's are you using? I managed to get NbaHomePass working after a lot of headache, but I'm not getting many streetpasses on the still working SSID's.
I'm using the SSID NZ@McD, which like you said is pretty dead. Seems since the 11.1.0-34 update when they removed ConsoleNintendo3DS and NZ@McD1 homepass began dieing for Windows methods. If I need you to test I'll send you a pm I have a Windows 10 machine but we'll see, thanks for offering!
I'm using the SSID NZ@McD, which like you said is pretty dead. Seems since the 11.1.0-34 update when they removed ConsoleNintendo3DS and NZ@McD1 homepass began dieing for Windows methods. If I need you to test I'll send you a pm I have a Windows 10 machine but we'll see, thanks for offering!
Unfortunately attwifi doesn't work with windows, as the 3DS needs attwifi to have no password and you can't create a network on windows that is unprotected.
This is a Homepass method that works with Windows only. This method only works from Windows 7 to Windows 10 (Maybe Windows Vista too).
For this to work you will need a computer with at least wireless card. Having two ways to connect to internet would work best (eg. Ethernet and Wireless or Two Wireless Cards). As the wireless card needs to be reset to change MAC Address.
This Homepass method not only uses the original 160 MAC Addresses for Homepassing, but Streetpass locations in the real world!
First off we need to check you can change your wireless cards Mac Address to the Mac Addresses of the format X2:XX:XX:XX:XX:XX, X6:XX:XX:XX:XX:XX, XA:XX:XX:XX:XX:XX, and XE:XX:XX:XX:XX:XX (Where X is anything), the reason for these specific address with the 2nd bit being 2, 6, A or E is that since Windows 7, these are the only formats of MAC Addresses the Windows will allow.
After the Mac Address changed you can check that you can get hosted network working with your 3DS.
If your MAC Address can't change to one of the formats above message me!
Change MAC Address:
NOTE: This tutorial uses the MAC Address 4E:53:50:4F:4F:50, which checks that you can get the XE:XX:XX:XX:XX:XX format, you can also check your MAC Address changes with the MAC Addresses 42:53:50:4F:4F:50, 46:53:50:4F:4F:50 and 4A:53:50:4F:4F:50
First you will need to change your Mac Address. This can be done in many ways, some wireless cards allow this to be done straight through Windows GUI. You can change it through the registry, or you can use something like MAC Shift.
GUI METHOD:
First off we need to go to control panel and search for network, and click View network connections: http://imgur.com/hXdhOVe
Now when looking at your network connections find your Wireless Network Adapter you wish to use, this is mine: http://imgur.com/CDxxjVZ
Scroll through the list of options you have and try to find one called Network Address or Locally Administered MAC Address or something along these lines they seem to differ depending on brand (If you can't find an option that allows you to change MAC Address you will have to use Registry Method or MAC Shift) Check the box where you can type, and type 4E53504F4F50: http://imgur.com/a5WQGAb
Click OK and move onto Start hostednetwork and check MAC Address.
Registry Method (Longest and most tedious method):
NOTE: Please don't change anything you don't know what it does in the registry, can be harmful changing random things.
Open start and search for regedit: http://imgur.com/gdWtHan
It will ask for Administrator privileges click yes. (can't screenshot this)
Now this part is a bit tedious, there will be a list of folders with just random numbers and if you open these folders there will be a Connection folder. Just click on this one and on the right side of the folders there will be a little bit of information about a Network Adapter. Go through these until you find the Name that is equal to your Wireless Card Adapters name (This is mine: http://imgur.com/CDxxjVZ , so the name I am after is Wireless Network Connection 3) and here it is in the registry: http://imgur.com/sAG79Ac
After you have found yours you need to write down the folder name with all the numbers and letters in it, so from the image, http://imgur.com/sAG79Ac mine is http://imgur.com/4W05Fb3 (You can right click on the folder click rename and just copy it then paste into a notepad document or something)
So now we can close the Network folder and scroll up to the Class folder and expand it (the class folder is still within the Control folder): http://imgur.com/ZVHGLq9
Now this is where we need the folder name we took note of before. This part will also be tedious but go through and click on each of the folders 0000, 0001 and so on looking at the NetCfgInstanceID and if this matches the folder name you wrote down before you have found the registry settings for your Network Adapter! Here's mine: http://imgur.com/gRgkkvs and my already changed Network Address.
Now if you can see the NetworkAddress key right click on it and choose modify: http://imgur.com/6agq1JF
If you cannot see the NetworkAddress key you will need to make one. Right click on the right side and hover on new and click String Value, Call it NetworkAddress: http://imgur.com/a/ZsPJA
Now you can right click on it and choose modify like above
For example: Open Command Prompt, get Command Prompt directory to where you saved macshift ("cd C:\Users\Your Username\Downloads\" for example) and type. macshift 4E53504F4F50 -i "Wireless Network Connection". Where you replace Wireless Network Connection with your WiFi Card's name.
If all succeeds and it says done you can move onto Start hostednetwork and check MAC Address
Start hostednetwork and check MAC Address
To begin we need to open a Command Prompt as an admin. So go to start and search cmd right click and select Run as Administrator: http://imgur.com/BqOsopH
Now type netsh wlan set hostednetwork mode=allow ssid=3DS_Test key=3DS_Test , You can make the ssid and key equal to anything you want just remember the key: http://imgur.com/cdPSf7I
You should get this as a result: http://imgur.com/MTHsu90
Now we need to check the MAC Address changed correctly and give share the internet from some connection with our hostednetwork so it can access the internet! There are two ways to check your MAC Address, through the command prompt and through Windows GUI.
And you see some information about your hostednetwork, we are interested in the BSSID and if is equals the MAC Address we changed to before: http://imgur.com/tetElkY
As you can see in the picture mine is equal to 4E:53:50:4F:4F:50 which is what I changed it to before!
Windows GUI
Get to network connections through control panel and you should see the hostednetwork you made before: http://imgur.com/QDYMjYM
Another box will open and check that the Physical Address matches what you changed the MAC Address to before: http://imgur.com/1x5L5tR
As you can see in the picture mine is equal to 4E:53:50:4F:4F:50 which is what I changed it to before!
If your MAC Address does not equal what you changed to before contact me with what yours changed too. It is also worth trying different numbers/letters for the first value eg. 3E:53:50:4F:4F:50 worked for me with an old adapter I had. And even try changing the 2nd value if the E doesn't change correctly. Note MAC Addresses only Accept from 0-9 and A-E (hex).
But if yours did change correctly all you need to do is share the internet from a connection on your computer with the hostednetworks.
In the your Network Connections in the control panel find the connection you wish to share from (it has to be connected to the internet). I wish to share mine from an Ethernet connection: http://imgur.com/pK2OL8T
Check the box and select from the drop down the Network Connection Name of your hostednetwork (It wont be 3DS_Test): http://imgur.com/BFDdJ5r
Mine is Wireless Network Connection 6 so I click that: http://imgur.com/2v03ECF
And when you double click on your hostednetwork it should say Internet Access: http://imgur.com/tb0omKO (Note I only have IPv4 Connectivity as the computer I run this on isn't the greatest and I would get blue screens from it, so I turned everything off except IPv4: http://imgur.com/a/Tqacr)
Now you can go test if you can connect to this hostednetwork from your 3DS!
Check hostednetwork works with 3DS
This should be pretty self explanatory. Go to your 3DS add a Network look for SSID you used and enter the password you made when making the hostednetwork. Probably both 3DS_Test. And all you need to do is run a Connection Test and if it works you can delete it from your 3DS networks.
If you get Connection Successful your 3DS can connect with your Windows hostednetwork!
Okay so if that all worked for you and your MAC Address changed correctly and successfully you can use Homepass!
Here is my program for Homepass on Windows Machines
About:
It uses the SSIDs NZ@McD, NintendoSpotPass5, GameManiaZone, NintendoZone@gamelife, NintendoZone1, NintendoZone2, NintendoZone3 and NintendoZone4, with NZ@McD shuffling through the original 160 MACs and then moves onto real world Streetpasses!
It loops forever too, so it doesn't just stop when it reaches the last shuffled MAC in the list it will start again from the first MAC in the shuffled list.
The amount of time it takes to change MAC Address is up to the user, 3 minutes is the lowest time you can choose. As 3 minutes is the most time for 160 MAC Address to all be used in 8 hours for the 8 hour cool down Streetpass has.
The MAC Addresses were all gathered from https://wigle.net/ a really cool site that allows you to search for SSIDs (with an account) and contains the MAC Addresses for these SSIDs. You can look up on this site any of the SSIDs that are used by this program and find more MAC addresses to add to the txt files! Please share here if you do find some that I have not added. (I have added any since about November 2016). Or if you find a MAC Address that could work with an SSID I haven't added please let me know so that I can add it! (SSIDs that work with the latest 3DS systems can be found here: https://yls8.mtheall.com/ninupdates/3ds_nzonehotspots.php and the only SSIDs that work with Windows are those with SecurityMode being equal to 7).
How to use:
This program needs to be Run as Administrator, so you will need to start Command Prompt as Administrator.
You can either get to the directory where you save the program in Command Prompt or just type the path to where it was saved.
Once that is done type RhyzHomepass.exe "YOUR WIRELESS NETWORK ADAPTER" time to wait in minutes between switching MACs
Then hit enter to begin running! (To stop it from running open the command prompt window and just press ctrl+c on your keyboard)
This is a unified script you only need to make a hompass MAC change for:
- Windows 7 and above
- Ubuntu or Debian Linux (newer Ubuntu 14 still may have a problems?)
- routers with DD-WRT firmware (not supported by Ralink-based routers, and most probably micro builds and build older than 21xxx)
- routers with ASUS WL-5xx and RT-N1x custom firmware
- routers with OpenWrt (in debug phase, testing is appreciated)
Common part:
This script is stand-alone and fully automated once started. The only thing you may wish to change is the MAC address list to cycle through. All MAC lists are stored on a server and script gets an updated data from it periodically. To choose several MAC lists to cycle through you just need to use a comma-separated enumeration as a script parameter (see instructions section), if no MAC list specified BASE 16 is used by default
For now only these lists are available: BASE1 - the common prime "@SPOOF" address BASE16 - the common prime 16 addresses range BASE256 - the prime 256 addresses range 1 to 3 digit number - the Country Code for Nintendo Zone official hot spot MACs wid SSIDs. For now only available:
49 - USA
GBATEMP - custom addresses from GBATEMP users static MAC adresses (it is updated from the google doc several times a day, )
Because of the driver limitations in Windows script will get only a few compatible MACs from the GBATEMP and Nintendo Zone lists, whereas BASEx lists are not affected. It is highly recommended to use only BASExx lists in Windows for the moment.
The script creates a scheduled task which is launched every minute, but the actual MAC change period is calculated so every MAC address in the MAC lists are randomly selected only once during 8 hours StreetPass cooldown period. For example the MAC change period for BASE16 will be 30 minutes, but for BASE256 it will be 2 minutes, so choose wisely. Anyway you're free to modify a scheduled task parameters.
Windows (VMware) instructions: Warning: dedicated USB wireless adapter required
- download and install VMware Player
- download and unzip a Homepass preconfigured image (Debian Linux preinstalled)
- plug in wireless adapter
- click on the Homepass.vmx, VMware Player will start virtual machine
- in VMware Player menu select: Player - Removable Devices - <Your wireless adapter name> - Connect (Disconnect from host)
- most probably you was not so quick to connect wireless adapter before virtual machine starts, so just hit CTRL+ALT+INSERT to reboot a virtual machine with connected wireless adapter.
Virtual machine default console is tty8 with redirected syslog for easy monitoring. For debugging press ALT+F1 and login with homepass/homepass and run: modinfo | grep mac80211
Virtual machine is preconfigured to use BASE16,GBATEMP and all country lists. For advanced configuration refer to the Linux script version (see below)
Windows (native) instructions: Warning: if you have several wireless adapters, disable all but one
- check your wireless adapter actually support MAC change, navigate to http://nintendozone.dynu.net/maccheck.cmd (If you can't download, check your browser/antivirus security) and save maccheck.cmd script to the desired location (I'll use C:\ here and further for simplification)
- open Start -> Accessories -> Command Prompt <Right-click> -> Run as administrator
- in a Command prompt window execute: C:\maccheck.cmd
- in 2-3 minutes the script will perform a check with several wireless adapter disconnections, depending on the result you can proceed further on this instruction. In case the script reported all zeroes in a row below the wireless adapter info, your adapter can't change MAC. Anyway you may PM me the complete result, as we need more statistics to improve your possible homepass quality. Warning: Atheros-based wireless adapters driver may end up with the BSOD while starting hosted network with changed MAC
Warning: only BASE1,BASE16,BASE256 lists can be used with Windows script version
- navigate to http://nintendozone.dynu.net/install and save nzone.exe file to the desired location
- execute downloaded nzone.exe and follow directions from the appeared dialog box Warning: Web Browser service is not accessible with this Nintendo Zone access point
- wait for the Homepass
Warning: if you have several wireless adapters, disable all but one
- check your wireless adapter actually support MAC change, navigate to http://nintendozone.dynu.net/maccheck.cmd (If you can't download, check your browser/antivirus security) and save maccheck.cmd script to the desired location (I'll use C:\ here and further for simplification)
- open Start -> Accessories -> Command Prompt <Right-click> -> Run as administrator
- in a Command prompt window execute: C:\maccheck.cmd
- in 2-3 minutes the script will perform a check with several wireless adapter disconnections, depending on the result you can proceed further on this instruction. In case the script reported all zeroes in a row below the wireless adapter info, your adapter can't change MAC. Anyway you may PM me the complete result, as we need more statistics to improve your possible homepass quality. Warning: Atheros-based wireless adapters driver may end up with the BSOD while starting hosted network with changed MAC
Warning: only BASE1,BASE16,BASE256 lists can be used with Windows script version
- navigate to http://nintendozone.dynu.net/install and save nzone.exe file to the desired location (you can use a direct link http://nintendozone.dynu.net/nzone.exe to get the file in case your OS version not detected properly)
- open Start -> Accessories -> Command Prompt <Right-click> -> Run as administrator
- in a Command prompt window execute: C:\nzone.exe start BASE256 Warning: Web Browser service is not accessible with this Nintendo Zone access point
- wait for the Homepass
Warning: only BASE1,BASE16,BASE256 lists can be used with Windows script version
- navigate to http://nintendozone.dynu.net/nzone.vbs and save nzone.vbs script to the desired location
- open Start -> Accessories -> Command Prompt <Right-click> -> Run as administrator
- in a Command prompt window execute: C:\nzone.vbs start BASE256
- in your 3DS connection settings find a new access points with SSID "NZ@McD1" and register it with the password "nintendozone" (access point test must succeed, Internet access test may fail) Warning: eShop and Web Browser services are not accessible with SSID "NZ@McD1"
- check the Internet access by launching Nintendo Zone application, it must load Nintendo Zone web page (as for now it is the Pokemon ORAS demo download page with error in German)
- wait for the Homepass
The scheduled task will restore the AP after reboot or wakeup from sleep/hibernate, so you only need to do all of the above just once.
Linux instructions: Warning: for 3DS firmware version 11.1.0+ set SSID to attwifi and stay away of using BASE1,BASE16,BASE256 - you won't able to get streetpasses from Windows users anymore!
- for BASE1,BASE16,BASE256,GBATEMP lists SSID must be changed manually to NZ@McD1
- for 3DS firmware version 9.0.0-9.2.0 only BASE1,BASE16,BASE256,GBATEMP,78 lists can be used if wireless security is enabled
- for 3DS firmware version 9.3.0+ wireless security must be disabled
- open a Telnet/SSH client, login and change to system user with su (for Debian)
or sudo su (for Ubuntu)
- execute wget -O /tmp/nzone.sh http://nintendozone.dynu.net/install; chmod +x /tmp/nzone.sh; /tmp/nzone.sh BASE16,GBATEMP
- exit system user with exit
- wait for the Homepass
You can start/stop the AP respectively by command sudo /usr/local/sbin/nzone start
or sudo /usr/local/sbin/nzone stop
MAC lists can be altered by crontab, as well as a MAC change time period.
Router instructions: Warning: for 3DS firmware version 11.1.0+ set SSID to attwifi and stay away of using BASE1,BASE16,BASE256 - you won't able to get streetpasses from Windows users anymore!
- for BASE1,BASE16,BASE256,GBATEMP lists SSID must be changed manually to NZ@McD1
- for 3DS firmware version 9.0.0-9.2.0 only BASE1,BASE16,BASE256,GBATEMP,78 lists can be used if wireless security is enabled
- for 3DS firmware version 9.3.0+ wireless security must be disabled
- open a Telnet/SSH client and execute wget -O /tmp/nzone.sh http://nintendozone.dynu.net/install; chmod +x /tmp/nzone.sh; /tmp/nzone.sh BASE16,GBATEMP
(alternatively you can do this in a DD-WRT WEB GUI Administration - Commands or WL500G WEB GUI Setup - System Command)
- wait for the Homepass
If your WRT router have a WPS/SES/EZ-Setup button it will toggle cron job on and off every button press, this is also helpful if cron daemon falls asleep on several DD-WRT builds.
MAC lists can be altered by crontab, as well as a MAC change time period (alternatively you can use the DD-WRT WEB GUI at Administration - Management - Cron)
You can also start/stop the AP respectively by command /tmp/nzone start
or /tmp/nzone stop
(/usr/local/sbin/nzone for WL500G, /usr/sbin/nzone for OpenWrt)
the latter will also revert access point MAC and SSID to the selected in the WEB GUI settings.
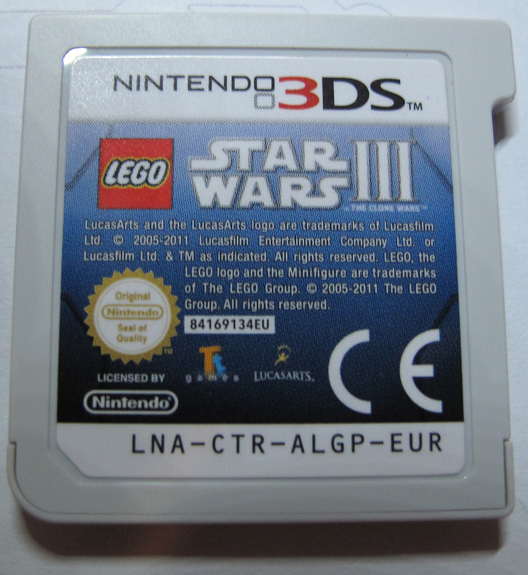
3 character game CTR code - to have a desired game title streetpass data. See example below or use my compilation of StreetPass CTR codes. Use only CTR codes for the games you have enabled streetpass!
StarWars III have a CRT code "ALG", it is displayed on a sticker in the middle of a character string below, and printed at the beggining of the string at the back of a gamecard:
[/COLOR]
and change script parameter. The script parameter (in example above is 49,BASE16) is a comma-separated address-list identifiers. This script will connect to my server and get your selected lists. For now only these lists are available: BASE1 - the common prime "@SPOOF" address BASE16 - the common prime 16 addresses range BASE256 - the prime 256 addresses range 1 to 3 digit number - the Country Code for Nintendo Zone official hot spot MACS. For now only "49" for USA is available. 3 character game CTR code - to have a desired game title streetpass data. See example below or use my compilation of StreetPass CTR codes. Use only CTR codes for the games you have enabled streetpass! GBATEMP - custom addresses from GBATEMP users static MAC adresses.
hit Apply Settings. Now your router will change to a random MAC from a selected list every 10 minutes starting from 1:00 to 7:50
Code:
#!/bin/sh
TITLES="OO@OOAOOBOOCOODOOEOOFOOGOOHOOIOOJOOKOOLOOMOONOOO"
BASE="NSP"
RANDOM=$(head /dev/urandom | hexdump -d | head -n 1 | cut -c 11-15)
CTR=$(($RANDOM%$(($(expr length $TITLES)/3))))
MAC=$(echo -e $BASE$TITLES | cut -c 1-3,$(($CTR*3+4))-$(($CTR*3+6)) | hexdump -e '6/1 "%02X:"' | cut -c 1-17)
WLINT=$(nvram get wl0_ifname)
APDCNF=/tmp/${WLINT}_hostap.conf
APDPID=/var/run/${WLINT}_hostapd.pid
if [ -e $APDCNF ]; then
kill $(cat $APDPID)
sleep 3
sed -ri s/bssid=.*/bssid=$MAC/ $APDCNF
hostapd -B -P $APDPID $APDCNF
else
ifconfig $WLINT down
ifconfig $WLINT hw ether $MAC
ifconfig $WLINT up
fi
Code:
*/10 1-7 * * * root /tmp/nzone
16.09.2016 new nzone.exe version with fw 11.1 compatible SSID used and Windows 8.1/10 compatibility issues fixed
15.09.2016 removed obsolete country codes for fw 11.1 update
24.04.2014 4.0 script is the main now. Stability fixes and more
05.09.2013 v3.4 beta with Ubuntu support, SES/WPS buton cron job toggle and stability fixes for DD-WRT
27.08.2013 compatibility with old DD-WRT builds improved
23.08.2013 v.3. script updated - compatibility with WL500G custom firmware checked and fixed
22.08.2013 v.3. script updated, MAC time change bug fixed
20.08.2013 v3.1 script is the main now
16.08.2013 v2 script is the main one
15.08.2013 (edit 2) Fixed probable arithmetic error bug
15.08.2013 improved compatibility with DD-WRT mini builds
14.08.2013 added sleep to wait hostapd stop, greatly reduce time to stop-start AP on Atheros routers
Q: Why do we need a title-specific MACS? I feel comfortable with common 16 MACS
A: There are over 130 StreetPass-enabled games now. If you're using less common games, you may pass hundreds of streetpasses to get a StreetPass data for them. The dedicated MAC for a title will guarantee you will get data for that title, as soon as somebody else is using it.
Q: Why not to use a siple cycle through all common MACs
A: In case it is not randomized, you have a big probability to get a StreetPass data from the same partner several times in a row
Q: Can a change MAC more often to get more streetpasses?
A: Since you can only get one StreetPass from a unique MAC per 8 hours, switching MAC too often will at least do nothing for you and at worst spam all used MACs with your data. I suggest you shold change MAC not more than (Number_of_MACS / 8)*2 times per hour
Q: Your script is not working as it should
A1: You should not check for a MAC change at the DD-WRT interface, here only the permanent MAC used at the router startup is displayed. You can check your mac have changed like this
Code:
ifconfig $(nvram get wl0_ifname)
A2: You should check DNS settings of your router. In case your router is in a Wireless Gateway mode, DNS settings may not be configured as it is not needed for the router in that mode, but DNS is still needed for the script to work properly.
A3: If you have a DD-WRT micro build, it is not supported, at least yet. If you have big/mega you should try mini build, it might work instead.
A4: If you're running your router in Access Point mode, you must have a properly configured DNS and Default gateway settings.
A5: You should try to manually run script
Code:
/tmp/nzone
If MAC is not changed please PM me the output, if any.
If MAC is changed, try to restart cron daemon
Code:
stopservice cron; startservice cron
as it seems to be a bug with cron deamon goes to sleep and prevent running scheduled jobs at several DD-WRT builds
A5: Though this script was tested on DD-WRT v24 preSP2 (Build 21061) and WL500gP (1.9.2.7-d-r2624), it may not run properly on your device because of the DD-WRT build differences for a variety of hardware. If this is the case, please make sure you have the latest DD-WRT available for your router and PM me output for this commands
Code:
cat /proc/cpuinfo
nvram get wl0_ifname
ifconfig
iwconfig
ps
- support multi-ssid configuration
- check script with Realtek-baset routers
- DD-WRT micro support
If you have any problems shoot us a message (I am busy over the next two days 11/12 and 12/12 AEST, so don't get to worried if I am slow to reply).
There probably is something I stuffed up in typing this all out too, please let me know if there is!
Nothing said about changing mac address, i sounds really weird but many comments said that work. They are using the Android connexion share and just modify the ssid... It take one weak after the first connexion to work. I'm going to try today and i report to you results.
This is a Homepass method that works with Windows only. This method only works from Windows 7 to Windows 10 (Maybe Windows Vista too).
For this to work you will need a computer with at least wireless card. Having two ways to connect to internet would work best (eg. Ethernet and Wireless or Two Wireless Cards). As the wireless card needs to be reset to change MAC Address.
First off we need to check you can change your wireless cards Mac Address to the Mac Address of 4E:53:50:4F:4F:XX (Where xx is anything) and that with your Mac Address changed you can get hosted network working with your 3DS. If you can't get your hostednetwork to change to 4E:53:50:4F:4F:XX at all, contact me with what it changes to usually the 4E will be incorrect.
Change MAC Address:
First you will need to change your Mac Address. This can be done in many ways, some wireless cards allow this to be done straight through Windows GUI. You can change it through the registry, or you can use something like MAC Shift.
GUI METHOD:
First off we need to go to control panel and search for network, and click View network connections: http://imgur.com/hXdhOVe
Now when looking at your network connections find your Wireless Network Adapter you wish to use, this is mine: http://imgur.com/CDxxjVZ
Scroll through the list of options you have and try to find one called Network Address or Locally Administered MAC Address or something along these lines they seem to differ depending on brand (If you can't find an option that allows you to change MAC Address you will have to use Registry Method or MAC Shift) Check the box where you can type, and type 4E53504F4F50: http://imgur.com/a5WQGAb
Click OK and move onto Start hostednetwork and check MAC Address.
Registry Method (Longest and most tedious method):
NOTE: Please don't change anything you don't know what it does in the registry, can be harmful changing random things.
Open start and search for regedit: http://imgur.com/gdWtHan
It will ask for Administrator privileges click yes. (can't screenshot this)
Now this part is a bit tedious, there will be a list of folders with just random numbers and if you open these folders there will be a Connection folder. Just click on this one and on the right side of the folders there will be a little bit of information about a Network Adapter. Go through these until you find the Name that is equal to your Wireless Card Adapters name (This is mine: http://imgur.com/CDxxjVZ , so the name I am after is Wireless Network Connection 3) and here it is in the registry: http://imgur.com/sAG79Ac
After you have found yours you need to write down the folder name with all the numbers and letters in it, so from the image, http://imgur.com/sAG79Ac mine is http://imgur.com/4W05Fb3 (You can right click on the folder click rename and just copy it then paste into a notepad document or something)
So now we can close the Network folder and scroll up to the Class folder and expand it (the class folder is still within the Control folder): http://imgur.com/ZVHGLq9
Now this is where we need the folder name we took note of before. This part will also be tedious but go through and click on each of the folders 0000, 0001 and so on looking at the NetCfgInstanceID and if this matches the folder name you wrote down before you have found the registry settings for your Network Adapter! Here's mine: http://imgur.com/gRgkkvs and my already changed Network Address.
Now if you can see the NetworkAddress key right click on it and choose modify: http://imgur.com/6agq1JF
If you cannot see the NetworkAddress key you will need to make one. Right click on the right side and hover on new and click String Value, Call it NetworkAddress: http://imgur.com/a/ZsPJA
Now you can right click on it and choose modify like above
For example: Open Command Prompt, get Command Prompt directory to where you saved macshift ("cd C:\Users\Your Username\Downloads\" for example) and type. macshift 4E53504F4F50 -i "Wireless Network Connection". Where you replace Wireless Network Connection with your WiFi Card's name.
If all succeeds and it says done you can move onto Start hostednetwork and check MAC Address
Start hostednetwork and check MAC Address
To begin we need to open a Command Prompt as an admin. So go to start and search cmd right click and select Run as Administrator: http://imgur.com/BqOsopH
Now type netsh wlan set hostednetwork mode=allow ssid=3DS_Test key=3DS_Test , You can make the ssid and key equal to anything you want just remember the key: http://imgur.com/cdPSf7I
You should get this as a result: http://imgur.com/MTHsu90
Now we need to check the MAC Address changed correctly and give share the internet from some connection with our hostednetwork so it can access the internet! There are two ways to check your MAC Address, through the command prompt and through Windows GUI.
And you see some information about your hostednetwork, we are interested in the BSSID and if is equals the MAC Address we changed to before: http://imgur.com/tetElkY
As you can see in the picture mine is equal to 4E:53:50:4F:4F:50 which is what I changed it to before!
Windows GUI
Get to network connections through control panel and you should see the hostednetwork you made before: http://imgur.com/QDYMjYM
Another box will open and check that the Physical Address matches what you changed the MAC Address to before: http://imgur.com/1x5L5tR
As you can see in the picture mine is equal to 4E:53:50:4F:4F:50 which is what I changed it to before!
If your MAC Address does not equal what you changed to before contact me with what yours changed too. It is also worth trying different numbers/letters for the first value eg. 3E:53:50:4F:4F:50 worked for me with an old adapter I had. And even try changing the 2nd value if the E doesn't change correctly. Note MAC Addresses only Accept from 0-9 and A-E (hex).
But if yours did change correctly all you need to do is share the internet from a connection on your computer with the hostednetworks.
In the your Network Connections in the control panel find the connection you wish to share from (it has to be connected to the internet). I wish to share mine from an Ethernet connection: http://imgur.com/pK2OL8T
Check the box and select from the drop down the Network Connection Name of your hostednetwork (It wont be 3DS_Test): http://imgur.com/BFDdJ5r
Mine is Wireless Network Connection 6 so I click that: http://imgur.com/2v03ECF
And when you double click on your hostednetwork it should say Internet Access: http://imgur.com/tb0omKO (Note I only have IPv4 Connectivity as the computer I run this on isn't the greatest and I would get blue screens from it, so I turned everything off except IPv4: http://imgur.com/a/Tqacr)
Now you can go test if you can connect to this hostednetwork from your 3DS!
Check hostednetwork works with 3DS
This should be pretty self explanatory. Go to your 3DS add a Network look for SSID you used and enter the password you made when making the hostednetwork. Probably both 3DS_Test. And all you need to do is run a Connection Test and if it works you can delete it from your 3DS networks.
If you get Connection Successful your 3DS can connect with your Windows hostednetwork!
Okay so if that all worked for you and your MAC Address changed correctly and successfully you can use Homepass!
Here is my program for Homepass on Windows Machines
About:
Currently it goes through MAC Address 4E:50:4F:4F:00 - 4E:50:4F:4F:99 in a shuffled order, if people wish to go through in a non shuffled order this could probably be done. If people wish to not use all 159 MAC Address this could probably be changed and if people have their own MAC Addresses they would like to use this could probably be implemented.
It uses the SSID NZ@McD currently, if there is anyone who is after support for other SSID's for in game things this could be implemented.
It loops forever too, so it doesn't just stop when it reaches the last shuffled MAC in the list it will start again from the first MAC in the shuffled list.
The amount of time it takes to change MAC Address is up to the user, 3 minutes is the lowest time you can choose. As 3 minutes is the most time for 159 MAC Address to all be used in 8 hours for the 8 hour cool down Streetpass has.
Finally I do wish to remove the need for this program needed to be run as administrator, not sure if possible yet but will be working on.
How to use:
This program needs to be Run as Administrator, so you will need to start Command Prompt as Administrator.
You can either get to the directory where you save the program in Command Prompt or just type the path to where it was saved.
Once that is done type RhyzHomepass.exe "YOUR WIRELESS NETWORK ADAPTER" time to wait in minutes between switching MACs
Then hit enter to begin running! (To stop it from running open the command prompt window and just press ctrl+c on your keyboard)
so what currently ssid works for this i wanting to make sure i use the ones the works with the current n3ds fw that out
update: ok i tried to do this and followed what was written on here and i got this message
the interface with this name is not registered with the router. the hosted network couldnt be started the group or resources is not in the correct state to perform the requested operation any help on this
update two got it fixed but still cant get the homepass to work it just seem to just make it like my first update
Sony made a shocking announcement today, revealing that the company plans to move away from physical game releases in the future. Citing claims of how the industry is...
Remember when you could get an Xbox Series S for $300? Those were the days. Microsoft has today announced the latest in their console price hikes, seeing their...
The delays may be behind us, but the news isn't all good for Grand Theft Auto VI. Rockstar have today announced that pre-orders for the game will go live tomorrow, on...
Last month we got confirmation of a new model of Switch 2 to better comply with upcoming EU regulations. With the legislation set to come into effect in February of...
The end has come for the PlayStation 3 and the PlayStation Vita. After supporting the PSN Store on the PS3 and PS Vita since 2006 and 2011 respectively, Sony has...
Tired of waiting for Game Freak to bring Pokemon Emerald to modern platforms? We've got you covered with a brand new port in the works. Currently available on GitHub...
In this time of economic uncertainty and rampant price hikes, the Steam sales stand as our final bastions of affordability for those opting to avoid the seas. The...
Apple have today announced price increases, primarily focused on their MacBook and iPad lines. These increases have already come into effect, with both prices and the...
For fans of Sinnoh, the pickings are slim. If you want the best experience you're left deciding between the updated region in Platinum, or the somewhat controversial...
The Switch 2 has been out for a year now, but you shouldn't count the original system out yet! Released a few days ago, popular PS2 emulator NetherSX2 has found its...
Sony made a shocking announcement today, revealing that the company plans to move away from physical game releases in the future. Citing claims of how the industry is...
Remember when you could get an Xbox Series S for $300? Those were the days. Microsoft has today announced the latest in their console price hikes, seeing their...
The delays may be behind us, but the news isn't all good for Grand Theft Auto VI. Rockstar have today announced that pre-orders for the game will go live tomorrow, on...
Last month we got confirmation of a new model of Switch 2 to better comply with upcoming EU regulations. With the legislation set to come into effect in February of...
The end has come for the PlayStation 3 and the PlayStation Vita. After supporting the PSN Store on the PS3 and PS Vita since 2006 and 2011 respectively, Sony has...
Tired of waiting for Game Freak to bring Pokemon Emerald to modern platforms? We've got you covered with a brand new port in the works. Currently available on GitHub...
Ocarina of Time is back in style as the upcoming Switch 2 remake looms on the horizon. But what's a fan of the game to do over the next few months? If you've been...
Apple have today announced price increases, primarily focused on their MacBook and iPad lines. These increases have already come into effect, with both prices and the...
In this time of economic uncertainty and rampant price hikes, the Steam sales stand as our final bastions of affordability for those opting to avoid the seas. The...
Amidst news of layoffs and cancellations in the wake of Xbox's larger changes, Bethesda has today come out with a statement discussing their active projects. In this...


")