I've seen a lot of posts of failed Kamikaze mod recently, as well as ebay/facebook listings selling oled motherboards damaged from Kamikaze. So just want to make this post to discuss different dat0 connection method and their reliability/risk before inexperienced people jumping to Kamikaze and killing their switch. Feel free to share your thoughts.
1. DAT0 adapter

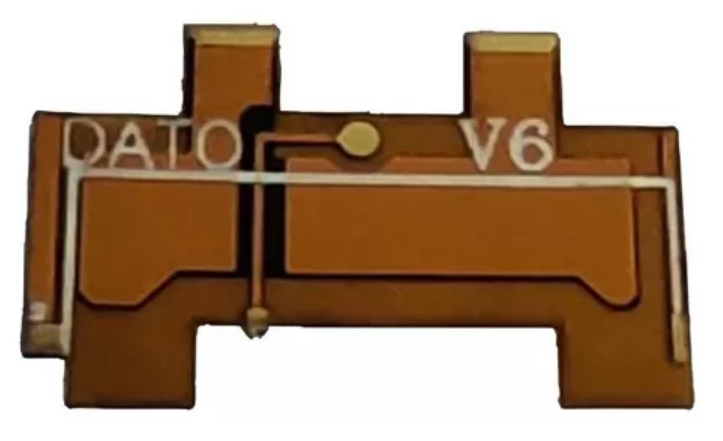

Installation difficulty: 1/5
Risk: 0/5
Long term reliability: 2/5
Fixable if installation gone wrong: yes (desolder and adjust positioning)
There are many different designs of dat0 adapter, I've used the corner one which comes with original unflashable hwfly for oled, the yellow one which comes with instinct v6, and the black one which comes with hwfly v4. Tbh there's no different between these adapters, they all do the same thing with the same method: making contact with dat0 bga ball with friction/tension. Therefore it may come loose in the future due to oxidation/heat cycling. I used to install them till people bringing their consoles back due to dat0 connection issues. By the way I installed them using the recommended method, pushing the adapter in with tweezers while soldering anchoring points. I modded about 10 consoles with dat0 adapter, 4 of them were brought back due to dat0 issue.
2. DAT0 adapter with reflow
Installation difficulty: 2/5
Risk: 3/5
Long term reliability: 5/5
Fixable if installation gone wrong: yes (desolder and adjust positioning, reball emmc)
I found this method from sthetix, you add a little bit of leaded solder to the tip of dat0 contact, then slide the adapter in and reflow emmc. After it cools down pull dat0 adapter with a pair of tweezers, if it doesn't come out then dat0 bga ball is soldered to the adapter properly. One issue i found with this method is that when heating up emmc, the adapter sometimes moves a little, maybe due to surface tension of flux or wind from hot air station, and it may short dat0 with dat1 next to it. Sometimes it pulls right out after reflow so you need to place the dat0 adapter precisely. So far I haven't re-serviced any console with this dat0 connection method.
3. Direct connection to dat0 pad
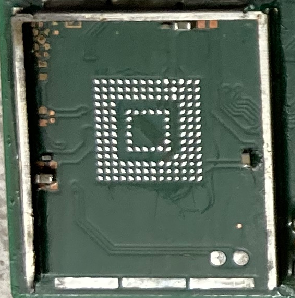
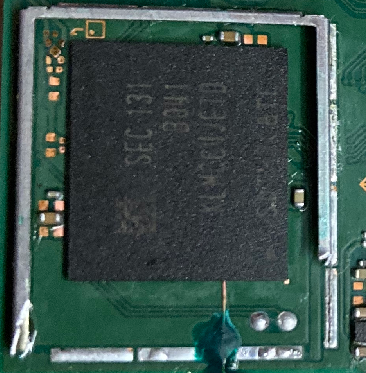
Installation difficulty: 4/5
Risk: 4/5
Long term reliability: 5/5
Fixable if installation gone wrong: yes (desolder and reball emmc)
Started using this method as sometimes takes several tries to solder in dat0 adapter properly. This method is straight forward, just desolder the emmc chip, solder a wire to dat0 pad on motherboard, reball emmc and solder it back in. Might be difficult if you never reballed bga chips before. Also toshiba emmc is a bit fragile, I once killed a toshiba emmc just by desoldering it. emmc is completely dead, not even detected in a programmer. I recommend practicing emmc reballing on those used android tv boxes before doing it on a switch. Many people are just giving away those used android tv boxes for free or for less than $10 on facebook, they make good retro gaming emulatior consoles too.
4. Reball DAT0 adapter

Installation difficulty: 4/5
Risk: 4/5
Long term reliability: 5/5
Fixable if installation gone wrong: yes (desolder and reball emmc)
Used this adapter several times with those hwfly v5 chips, stopped using it because stability issues with hwfly v5 chip and switched back to v4. The adapter itself is ok, it sandwiches between the motherboard and the emmc chip and breaks out D/A/C signals, which means you don't need to solder to those points on the front side of the motherbaord. Only down side is that you need to do reball twice. I think it's out of production right now, tried to find it on aliexpress but no match. It's a simple design anyway, you can draw it in eda in less than 10 minutes. Another issue with it is it's hard to position it on motherboard.
5. Kamikaze
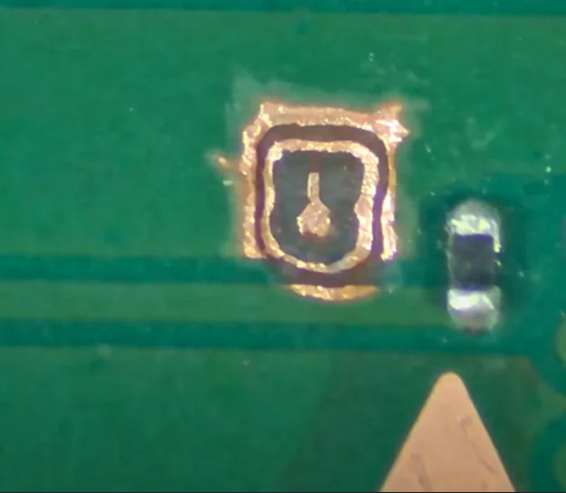
Installation difficulty: 5/5
Risk: 5/5
Long term reliability: 5/5 (?)
Fixable if installation gone wrong: no
To be honest, I never used this method on a working switch. Only practiced on 2 dead motherboards, then deemed it's too risky for me. I can reball the emmc in about 10-20 min but with this method I have to be very careful and it takes more than 30 minutes to reach the 3rd layer. Also if you damage the dat0 point on 3rd layer it's over, as this trace goes directly under tegra soc. Maybe it's easier with better tools/more practice but i'll stick with emmc reball for now.
1. DAT0 adapter
Installation difficulty: 1/5
Risk: 0/5
Long term reliability: 2/5
Fixable if installation gone wrong: yes (desolder and adjust positioning)
There are many different designs of dat0 adapter, I've used the corner one which comes with original unflashable hwfly for oled, the yellow one which comes with instinct v6, and the black one which comes with hwfly v4. Tbh there's no different between these adapters, they all do the same thing with the same method: making contact with dat0 bga ball with friction/tension. Therefore it may come loose in the future due to oxidation/heat cycling. I used to install them till people bringing their consoles back due to dat0 connection issues. By the way I installed them using the recommended method, pushing the adapter in with tweezers while soldering anchoring points. I modded about 10 consoles with dat0 adapter, 4 of them were brought back due to dat0 issue.
2. DAT0 adapter with reflow
Installation difficulty: 2/5
Risk: 3/5
Long term reliability: 5/5
Fixable if installation gone wrong: yes (desolder and adjust positioning, reball emmc)
I found this method from sthetix, you add a little bit of leaded solder to the tip of dat0 contact, then slide the adapter in and reflow emmc. After it cools down pull dat0 adapter with a pair of tweezers, if it doesn't come out then dat0 bga ball is soldered to the adapter properly. One issue i found with this method is that when heating up emmc, the adapter sometimes moves a little, maybe due to surface tension of flux or wind from hot air station, and it may short dat0 with dat1 next to it. Sometimes it pulls right out after reflow so you need to place the dat0 adapter precisely. So far I haven't re-serviced any console with this dat0 connection method.
3. Direct connection to dat0 pad
Installation difficulty: 4/5
Risk: 4/5
Long term reliability: 5/5
Fixable if installation gone wrong: yes (desolder and reball emmc)
Started using this method as sometimes takes several tries to solder in dat0 adapter properly. This method is straight forward, just desolder the emmc chip, solder a wire to dat0 pad on motherboard, reball emmc and solder it back in. Might be difficult if you never reballed bga chips before. Also toshiba emmc is a bit fragile, I once killed a toshiba emmc just by desoldering it. emmc is completely dead, not even detected in a programmer. I recommend practicing emmc reballing on those used android tv boxes before doing it on a switch. Many people are just giving away those used android tv boxes for free or for less than $10 on facebook, they make good retro gaming emulatior consoles too.
4. Reball DAT0 adapter
Installation difficulty: 4/5
Risk: 4/5
Long term reliability: 5/5
Fixable if installation gone wrong: yes (desolder and reball emmc)
Used this adapter several times with those hwfly v5 chips, stopped using it because stability issues with hwfly v5 chip and switched back to v4. The adapter itself is ok, it sandwiches between the motherboard and the emmc chip and breaks out D/A/C signals, which means you don't need to solder to those points on the front side of the motherbaord. Only down side is that you need to do reball twice. I think it's out of production right now, tried to find it on aliexpress but no match. It's a simple design anyway, you can draw it in eda in less than 10 minutes. Another issue with it is it's hard to position it on motherboard.
5. Kamikaze
Installation difficulty: 5/5
Risk: 5/5
Long term reliability: 5/5 (?)
Fixable if installation gone wrong: no
To be honest, I never used this method on a working switch. Only practiced on 2 dead motherboards, then deemed it's too risky for me. I can reball the emmc in about 10-20 min but with this method I have to be very careful and it takes more than 30 minutes to reach the 3rd layer. Also if you damage the dat0 point on 3rd layer it's over, as this trace goes directly under tegra soc. Maybe it's easier with better tools/more practice but i'll stick with emmc reball for now.