


Overview
The PlayStation Portable (PSP) has been on the market for quite some time now, it lets you enjoy games, music, films and photos - all compacted in a neat handheld device. The PSP personal portable entertainment system offers an unprecedented degree of entertainment freedom, ranging from the multiple UMD movies, the biggest ever launch titles for a gaming device, the ability to play mp3s
Using the newly designed Universal Media Discs (UMDs), the portability of information is also improved. Measuring only 60mm in diameter, the UMD is a newly developed compact high-capacity optical disc, which is the storage medium exclusive to the PSP system, The disc has the ability to store up to 1.8 gigabytes of data, more than three times that of a standard CD-ROM, and it can hold a broad range of digital entertainment which includes games, movies and music videos.
- Wikipedia
Playstation Network (?)
Sony hasn't implemented a complete online framework like PSN or Live on the PSP. But there are rumors it is coming. While I doubt there will be a degree to actually unify online accounts on the PSP like PSN or Live, it seems that even more downlodable content will be available in the near future for PSP users.
For now, you'll need a PC do acess the PSP's PlayStation Network Store and content.
Custom Firmwares
Custom Firmware is the name of a modified Firmware (the Firmware is the software that makes the hardware work. Think of it as the first thing you see when you turn on the PSP sort of), it is modify because originally, you can run only Sony approved software on your PSP, with a custom firmware you can actually execute apps developed for the PSP by independent developers (and run Backups from game that you own =). The quantity and quality of apps is huge, you can read PDF books, play emulators or even use the Japan only GPS add-on in english with a homebrew application.
One huge thing the custom firmware allows you to do is to play PlayStation One (PSX, PSOne) games that are not bought from the PSN store, but made straight from your original PSX discs. In the future I'll create a tutorial explaining how to do that.
Latest Custom Firmware: 3.95 GEN
http://dl.qj.net/Firmwares/pg/12/fid/16982/catid/163
Custom firmware: 3.90 M33
http://exophase.com/files/psp/390m33.rar
You'll need the official Official 3.90 Firmware. (Warning, don't install this file alone!)
New features:
- Skype support
Custom firmware: 3.80 M33-5
http://dax.st/380_m33.rar
3.80 M33-2 update (warning, needs the 3.80 installed first).
3.80 M33-3 update (warning, needs the M33-2 update installed first).
3.80 M33-4 update (warning, needs the M33-3 update installed first).
3.80 M33-5 update (warning, needs the M33-4 update installed first).
Why having the latest firmware update?, because not only Dark_AleX's team (and other smart developers) are always correcting bugs and adding stuff but also because firmware is required for Remote Play.
How to upgrade the latest Custom Firmware?, well, you need ANY Custom Firmware already installed, to do so, read the Pandora Method below (if you don't have a Custom Firmware installed already).
If you do, it's really easy:
1. Download the Custom firmware from above.
2. Download the OFFICIAL firmware too!
3. Decompress the Custom firmware, it is a really small file. Put the UPDATE folder from the RAR file on the PSP\UPDATE folder on your memory stick.
4. Rename the Official 3.95 firmware (a 22MB PBP file) to 395.pbp and move it to the same last PSP\UPDATE folder of the memory stick.
5. On the PSP, execute the 3.95 firmware updater and follow the instructions on the screen.
*Note: The Custom Firmare 3.80 installer is the first one that actually just modifies the official firmware installer
Essential PSP Games
The top picks voted by you in the GBAtemp [Essential] PSP Games Thread.
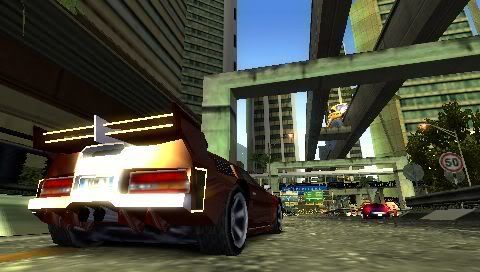
Burnout Legends / Dominator
Megaman Maverick Hunter X

Megaman Powered Up

Loco Roco

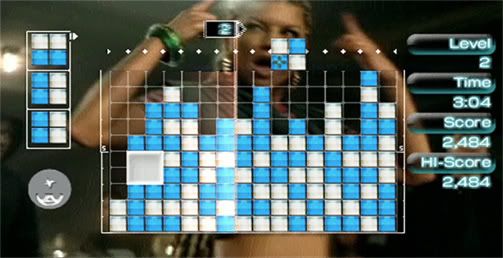
Lumines 1 & 2
Tekken: Dark Resurrection

Syphon Filter: Dark Mirror

Syphon Filter: Logan's Shadow

Metal Gear Solid: Portable Ops

Pursuit Force: Extreme Justice

NEW(and tested and improved)
PSP Downgrade Tutorial using the Pandora method, with MultiBoot. Ideal for Slim PSPs.
Some background about the method:
The Pandora method is basically two things, the first one is creating the necessary equipment and the other is actually using this equipment to make the unbrick or downgrade.
This "equipment" refers to a modified PSP Phat battery and a regular Memory Stick. Modify this two things is actually the hardest part of the whole deal. Pandora is the name the noobz team has given to the result of the Battery after being modified.
This modification or hacking to the battery is just simply installing a custom app that overwrites the PSRAM of it and makes it behave like a special battery Sony uses to reinstall and restore PSP systems, when you insert a Pandora battery into a PSP it will turn the unit ON. The Memory Stick also has to be hacked formatting it with a new logic partition and once prepared, it is used to store the apps and the firmware to restore the PSP unit.
The Pandora method alone can be used to restore ANY Phat PSP and because it is hard coded into the app, it installs either the Custom or the Official firmware 3.4X.
The update of the Pandora method was released by one of the noobz's team Dark_AleX with the name "Despertar del Cementerio" and the current version of this update (ver3 as of the end of 2007) allows support to Slim PSPs and the installation of Firmware 3.71 (Custom or Official).
With all that in mind, let's get on to the NEW tutorial first, then to the old one, both work, but I recommend using the new one from now on:
What will you need
- A PSP with a Custom Firmware 3.X already installed, it doesn't matter if its a Slim of a Phat
- That PSP has to have the 3.XX configured on the recovery menu
- A Memory Stick Pro Duo from 256 MB to 4 GB.
- A PC
- A Pandora-compatible battery fully charged, any of the following will do fine:
* Regular Phat Battery (NO FROM THE SLIM OR YOU'LL KILL IT)
* Datel; PSP Battery 3600mAh 2X
* Datel; PSP Battery 1800 MaxPower
* Datel; PSP Battery Tool (the red one)
* Sony PSP-280 2200mAh
* Atomic Battery Pack 3.6v 1800 mAh
- The following software (while there are multiple versions of downgraders based on Pandora, I've picked the best ones, here is the link to download all those:
Pandora Installer for 3.xx Kernels Rev 3a
Two programs in one, the installer (for creating the battery and MS) works in Phat and Slim, the program itself only work in a Phat, we'll be fine without it.
Despertar del cementerio V3
Despertar del cementerio V4
PSP MS MultiLoader IPL
Fantastic piece of software, it lets run any IPL by pressing the L button at boot time. Optional.
Extended Pandora Bootmenu 0.86 Test 2
I basically let's run the 1.5 fw out of the memory stick, doesn't work on Slim. Optional too.
Basically, after we are done, you'll be able to:
Normal boot / Despertar del Cementerio V4 boot
Normal boot / Pandora boot (Phat only)
Prepping the MS, step by step
1. Decompress Pandora FlashPack.zip to the MS root.
2. Run Pandora installer for 3.xx on the PSP.
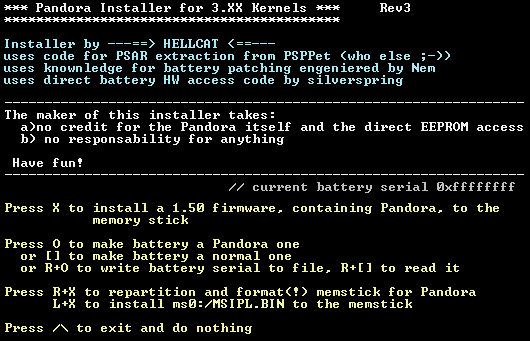
3. Press R+X to format the MS. Warning, everything will be wiped out!. Confirm by pressing L+R+X. The PSP will reboot.
4. Decompress the content from Pandora FlashPack.zip to the MS root again.
5. Run Pandora installer for 3.xx on the PSP again.
6. Install the file MSIPL.BIN in the MS, press L+X to install it. This will copy the file from the Multiloader IPL from Booster.
7. To finish prepping the MS we have to copy the required files, run Pandora installer for 3.xx on the PSP again and this time press X. Once it finishes, press Triangle to exit.
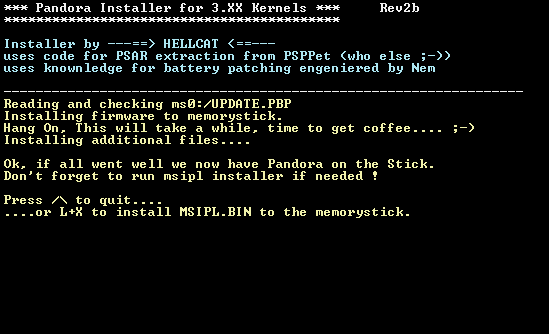
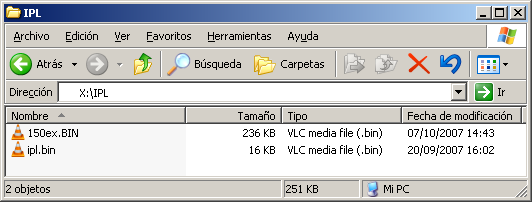
8. Connect the PSP with the MS to the PC, enable the USB mode to check the MS contents. On the MS root there will be a file called MSIPL.BIN (236 KB), copy it to a folder call \IPL and rename it to: 150ex.BIN.
9. Optionally you can check if that file is OK, download a file checker (PC| MAC|Linux) and run it on Pandora Check.MD5 that is located on the MS root.
Prepping the Battery, step by step
If you have a Red Datel Battery of if some friend of your did it for you before, skip this part.
10. Run Pandora installer for 3.xx on the PSP and press circle. The battery will be ready when a message reads: Battery pandorized.... Press Triangle to exit.
Installing the Despertar del Cementerios, step by step
While the Despertars are not required to run Pandora on a Phat they are required to run Pandora on a Slim. Also, you cannot skip installing V3 to install V4.
11. On the PSP run Despertar del cementerio 3 this may take a few minutes.
12. Now we'll install the 4 version, you cannot skip installing V3 in order to install V4. On the PSP run Despertar del cementerio 4 this may take a few minutes.
Running the Recovery Menu, step by step
11. To boot the Pandora / Despertar del Cementerio menu, restart the PSP and keep L pressed as it loads.

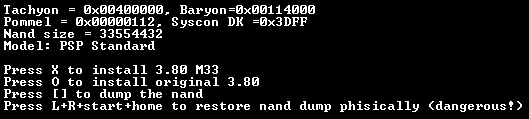
12. With that menu, press X to install the 3.85 Custom Firmware.
There congrats your PSP is fully capable of running
*Note: THanks to the installed files, you don't need to do anything else, your PSP will enter Pandora mode only when you press L at the boot, don't delete the files on the MS or you'll PSP will lose the required files to do that. I that happens, well, see the FAQ below.
OLD
PSP Downgrade Tutorial using the Pandora method
Ok, to make this thread a lot more useful, here is a tutorial to actually help people out. This method has been tested by Gaisuto.
What will you need
Pandora Installer for 3.xx by Hellcat
El Despertar del Cementerio v3 by Dark_AleX
The 1.5, 3.4 and 3.71 PBP firmware files by Sony
(Everything on the files is ready to be decompress and copied)
A fully charged Phat PSP capable of running homebrew apps. (It doesn't matter what custom firmware it currently has).
A Phat PSP Battery.
A Memory Stick of at least 256MB and not larger than 4G. (Better if it's Sony or Sandisk branded).
A PSP Power Adapter.
Preparing the files and creating the Memory Stick
1. Format the Memory Stick using the PSP.
2. Enter USB mode on the PSP, decompress and copy the contents of the Pandora Installer for 3.xx by Hellcat file to the Memory Stick (overwrite everything).
3. Execute the Pandora Installer for 3.xx by Hellcat on the PSP.
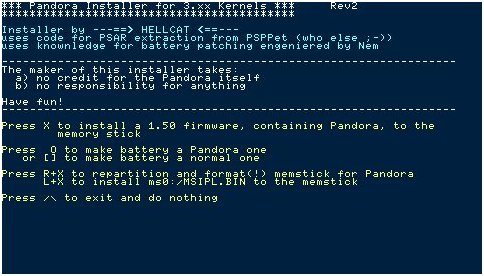
4. Once inside the app, press R+X.
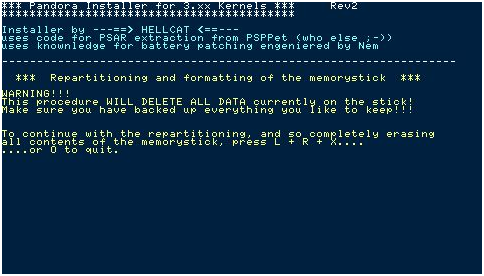
5. A warning screen will appear, confirm the last step pressing L+R+X. This will make the logical format of the MS.
6. Restart the PSP.
7. Repeat step 2. Seems stupid I know, but the content of the MS has been deleted.
8. Still in USB mode, decompress and copy the contents of Despertar del Cementerio v3.

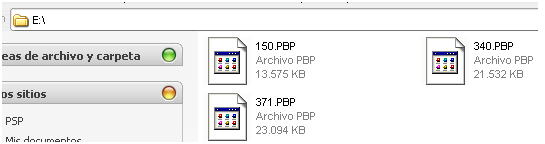
9. Yet still in USB mode, decompress and copy the contents of the last RAR file containing the firmwares 150.pbp, 340.pbp and 371.pbp. This files should be on the root of the MS. To be completely clear, it means NOT inside any folder.
10. Execute the app Pandora Installer for 3.xx again.
11. This time press L+X to finish installing everything to the MS.
Creating the Pandora (JigKick) Battery
12. Still on the Pandora Installer for 3.xx app, press the Circle button.
And that's it, this two things you now posses, the battery and the MS are really valuable as you can unbrick and downgrade and upgrade any PSP of any version with any firmware on it.
Using the Pandora Battery and the Memory Stick
Simple enough, just connect the MS and the Battery (in that order) to any PSP and press X to install Custom Firmware 3.71 M-33C to any PSP. You can also install the official 3.71 but that wouldn't be smart would it?
Remember that the Pandora Battery turns on the PSP automagically and pops up a horrendous (but very friendly) black and white menu.
Restoring the Pandora Battery back to normal
This what really troubles most people, as a Pandora Battery doesn't really work like a regular one (remember, it turns on the PSP when it is inserted). To restore it, simply follow this easy steps:
1. Remove the Pandora Battery from the PSP but keep the MS inside.
2. Connect the batteryless PSP to the Power Adapter and turn it on.
3. NOW we connect the Pandora Battery, keep the Power Adapter plugged.
4. Execute the Pandora Installer for 3.xx app.
5. Press the square Button. It is recommendable that you press it more than once, two or three times will do.
6. Exit the app with the triangle button.
Restoring the MS back to normal
If you decide NOT to keep the MS and use it as a regular one you'll have to format it using any PSP.
~Fin~ (Credits to Elotrolado.net and the users jutah and Flash78 for their tutorials)
FAQ
1. I did the whole process, restored the MS, and the Battery but now, I don't see my ISOs, did I do anything wrong?
Yes, you are a dork.
j/k, simple enough, when turning the PSP on, keep the R button pressed to open the recovery menu, in there, just set: Configurations > Game folder homebrew to 3.71
2. I restored my PSP but now I cannot execute the Pandora Installer for 3.xx app.
Same as No. 1.
3. I cannot execute the apps, a message appears saying that Cannot Load Application.
Check if that PSP has a custom firmware already installed. If not, then lend one from a friend. If it has a custom firmware installed and you still have this problem, I suggest you see No. 1 and try the NEW tutorial.
4. I ran the NEW tutorial successfully, but afterwards I deleted all the files in my MS, now my PSP won't boot!
Relax, I told you, don't delete those files, if the require files are missing, the Pandora Battery will kick in. Just take out the battery, plug the power adaptor to the wall, and the PSP, turn it ON with the MS on it, plug the USB cable and using a PC do the steps for prepping the MS again. There you go.
If you don't want to do that all the time, just see lines above the section Restoring the MS back to normal.
More games, screenshots and general info on the way. Please post suggestions about additional content.
Thread layout licensed by Opium. Check the other official discussion topics:
XBOX 360
PlayStation 3
Edit 20071227: Added the tutorial.
Edit 20080114: Added the 3.80 cfw, the m33-2 update and the Syphon Filters and MGS screenshots


