
GCN New GcP Work Thread " The Companion Cube"

  • Thread starter Thread starter Tom
  • Start date Start date
  • Views Views 5,695
  • Replies Replies 41

Tom

Gbatemp's Unofficial Modder
Member
Joined
Feb 9, 2009
Messages
987
Reaction score
115
Trophies
1
Age
30
Location
New jersey
XP
516
Country
United States
This is going to be my second Portable GameCube that I made, the "Companion Cube" for Devin. Using an Intec screen, battery, and a rev C GameCube. I'm going to turn a already portable GameCube into a truly portable GameCube.


Specs

  • 2 memory card slots.
  • 2 controller ports along with a built in controller.
  • Powered by 2 (Believe it, or not.) Intec GameCube batteries. They will have a combined play time of about 4 hours.
  • A disc drive just to boot SD Media Launcher in order to play backups from a 32GB SD card.
  • A 5 inch screen.
  • Speakers and a headphone jack.
  • Thickness is an estimated 3-4 inches. Mostly due the batteries.
Mockup Photo, as well as Progression Photos.


Mockup Photo.
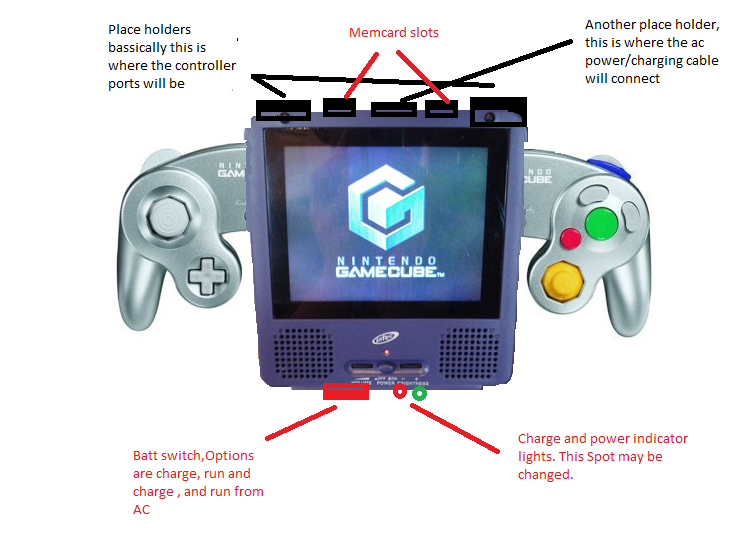
gallery_193826_461_187088.png


Un-trimmed disc drive.
2012_08_22_15_02_14_528.jpg


Trimmed disc drive.
2012_08_22_15_27_01_927.jpg


Batteries
2012_08_22_15_02_17_786.jpg


A/V Wires Micro soldering (Not detailed at all, but you can sorta get the picture.) I used a single strand of copper wire to solder to it then taped it down .
2012_08_23_12_35_51_520.jpg


A/V Wires after having thicker wires wired up.
2012_08_23_13_41_19_501.jpg


Soldering Iron Just to show how awesome I am :)
2012_08_23_12_35_29_853.jpg


Power lines 3.3v, 1.9vs and ground
2012_08_23_13_41_16_912.jpg


Top side regulator included
2012_08_23_13_40_50_992.jpg


Overview of bottom
2012_08_23_13_41_14_114.jpg
First experiment with trimming GameCubes.
Wire up the batteries.
Take a look inside the screen case, trim it. Cut some wires.
Wire battery to screen and GameCube.
Wire up VGA(Video audio).
Put everything on top of each other, get dimensions for a case.
Cut case, put together temporarily with tape, and put on top of the components to mark where holes are needed.
Cut Holes.
Wire GameCube controller.
Sand, and paint controller.
Sand, and paint case.
Mount controller.
Wire controller ports, and power switch.
Mount indicator leds.
Put together, and test.
Ship off to Dev.

 
Try this link.

http://gbatemp.net/uploads/gallery/album_461/gallery_193826_461_187088.png
 
Made up a todo list :

First experiment with trimming gamecubes

Wire up the batteries

Take a look inside the screen case, trim it Cut some wires

Wire battery to screen and gamecube

Wire up VGA(Video audio)

Put everything on top of each other , get dimensions for a case.

Cut case , put together temporarily with tape and put on top of the components to mark where holes are needed

Cut Holes

Wire gamecube controller

Sand and paint controller

Sand and paint case

Mount controller

Wire controller ports and power switch

Mount indicator leds

Put together and test

Ship off to Dev
 
Sounds like a bit of work. Once I get home tomorrow I'll print out a shipping label and send off the Gamecubes. You only need the internal parts right? They might not fit with the casings.
 
Sounds like a bit of work. Once I get home tomorrow I'll print out a shipping label and send off the Gamecubes. You only need the internal parts right? They might not fit with the casings.
Yeah it is but I enjoy it . Yes I only need the internals, the mainboards and the power regulator and the DD if you can fit it.
 
Getting the Screen batts, and game cube today, My mail lady is lazy so my mail doesn't come until 3:30. Hoping to get the batteries wired up and get a thickness measurement and wire up the av
 
  • Like
Reactions: 1 person
Ok video is wired, having issues with audio but working on them. Power regulator also wired up Heres some pics, I think my soldering job deserves some applause haha

A/V Wires Micro soldering (Not detailed at all but you can sorta get the picture) I used a single strand of copper wire to solder to it then taped it down .
2012_08_23_12_35_51_520.jpg


A/V Wires after having thicker wires wired up.

2012_08_23_13_41_19_501.jpg


Soldering Iron Just to show how awesome I am :)

2012_08_23_12_35_29_853.jpg


Power lines 3.3v, 1.9vs and ground


2012_08_23_13_41_16_912.jpg


Top side regulator included


2012_08_23_13_40_50_992.jpg


Overview of bottom


2012_08_23_13_41_14_114.jpg
 
This is going to be my second Portable GameCube that I made, the "Companion Cube" for Devin. Using an Intec screen, battery, and a rev C GameCube. I'm going to turn a already portable GameCube into a truly portable GameCube.
  • 2 memory card slots.
  • 2 controller ports along with a built in controller.
  • Powered by 2 (Believe it, or not.) Intec GameCube batteries. They will have a combined play time of about 4 hours.
  • A disc drive just to boot SD Media Launcher in order to play backups from a 32GB SD card.
  • A 5 inch screen.
  • Speakers and a headphone jack.
  • Thickness is an estimated 3-4 inches. Mostly due the batteries.
Mockup Photo.
gallery_193826_461_187088.png


Un-trimmed disc drive.
2012_08_22_15_02_14_528.jpg


Trimmed disc drive.
2012_08_22_15_27_01_927.jpg


Batteries
2012_08_22_15_02_17_786.jpg


A/V Wires Micro soldering (Not detailed at all, but you can sorta get the picture.) I used a single strand of copper wire to solder to it then taped it down .
2012_08_23_12_35_51_520.jpg


A/V Wires after having thicker wires wired up.
2012_08_23_13_41_19_501.jpg


Soldering Iron Just to show how awesome I am :)
2012_08_23_12_35_29_853.jpg


Power lines 3.3v, 1.9vs and ground
2012_08_23_13_41_16_912.jpg


Top side regulator included
2012_08_23_13_40_50_992.jpg


Overview of bottom
2012_08_23_13_41_14_114.jpg
First experiment with trimming GameCubes.
Wire up the batteries.
Take a look inside the screen case, trim it. Cut some wires.
Wire battery to screen and GameCube.
Wire up VGA(Video audio).
Put everything on top of each other, get dimensions for a case.
Cut case, put together temporarily with tape, and put on top of the components to mark where holes are needed.
Cut Holes.
Wire GameCube controller.
Sand, and paint controller.
Sand, and paint case.
Mount controller.
Wire controller ports, and power switch.
Mount indicator leds.
Put together, and test.
Ship off to Dev.


PM'd Devin Some pics but figured I'd post them here too.


Clicking on them will make them bigger
 
Haven't updated lately :( Nothing picture worthy really I have some final epoxying to do then mount the controller, I can't epoxy inside, the fumes will knock you out so I'm waiting on the weather, Hoping to get something done tomorrow. I can get a pic or two tomorrow if you want some .
 
  • Like
Reactions: 1 person

Site & Scene News

Popular threads in this forum