Mods for Marvel Ultimate Alliance 3 are coming?

charsles

Member
OP
Newcomer
Joined
Sep 22, 2022
Messages
12
Trophies
0
Age
23
Location
Brazil
XP
73
Country
Brazil
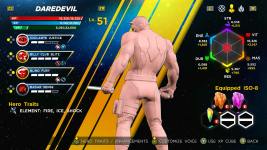
i did some mods for Bayonetta 3 for a while now and i was messing with MUA3 files to make some mods for League of Legends and i remembered that making file swaps is easy for switch games so i decided to give a try and here we are!
Screenshot 2024-08-27 00-27-12.png
Screenshot 2024-08-27 00-45-18.png


funfact: there are a 3rd skin slot for every character. 1/2 are for the 1st costume+recolor, 2/3 same thing, 4/5 are just there, i tried to make them work but the game crashes, it's almost like an empty slot.
imagem_2024-08-27_010642129.png

gonna mess around the files to see what more i can do.


UPDATE 27/08/24
i did some more tests and things are looking very ugly for some characters lol since they are using the animations of the OG characters, this was expected already
2024082721435700.jpg2024082721451900.jpg2024082722214100.jpg2024082722241000.jpg

UPDATE 04/09/24
YES INDEED THEY ARE COMING! the game now has their own unpacker/repacker. i will be making an tutorial later on today. stay tuned
1725456602386.pngimagem_2024-09-04_103026269.pngimagem_2024-09-04_103032201.pngimagem_2024-09-04_103036012.pngimagem_2024-09-04_103040510.png
 
Last edited by charsles,

charsles

Member
OP
Newcomer
Joined
Sep 22, 2022
Messages
12
Trophies
0
Age
23
Location
Brazil
XP
73
Country
Brazil

TUTORIAL ON HOW TO MAKE REXTURES AND MESS WITH THE GAME FILES​

1ST STEP: EXPORTING THE FILES​


Donwload Ryujinx Emulator, The game Rom, the Last update (4.0.1) and the DLCs if you want to get all the archives. configure your Ryujinx before doing the next steps. don't forget about the Proud Key and Firmware, also don't forget to configure the game directory on the settings.

to activate the last update: Right Click>Manage Title Updates>Add. and add the update file.

1725660821469.png

1725660832355.png

Same process with for the DLCs:
1725660846246.png

1725660855081.png

don't forget to enable all!

after this, all you need to do is: Right Click on the game>Extract Data>RomFs.

1725660861515.png

choose a folder for the game files to be exported and wait until it's done. it should look like this:
1725674640097.png


Congrats, now you have the game files exported.

2ND STEP: MUA3 DECOMPRESSOR (made by Rabatini)​

TOOL LINK: https://reshax.com/topic/1019-help-...-files/?do=findComment&comment=5201&_rid=4159

Input File is the file that you want to export
Output File is the Input File that will be exported.


HOW TO USE THE TOOL TO EXPORT:​

On the Input File option, select the .ZL_ file that you want to export

On the Output File option, i suggest you to copy the same directory from the Input option but
you can name the file whatever you want, the only thing you need to do here is to remove the .ZL_ from end of the file name. here the example:

[Image: JbkM9CA6Q4imehvHUiRTMw.png?format=webp&quality=lossless]

the .ZL_ file will turn into a dead file with 0 bytes and you will have the file exported.

HOW TO USE THE TOOL TO IMPORT:​

as you guessed, you need to do the inverse of the process of exporting.

On the Input File option, choose the file that you exported, copy and past the same directory of the Input File option on the Output File option and only ad the .ZL_ at the end of the file name and set the Compression Level to 9 otherwise the game will crash when trying to load the file that you made the changes. here the example:

1725544765943.png


and there you have it. now, if you mod something and wants to put in the game

IF YOU ARE USING RYUJINX:​

Right Click on the Game>Open Mods Directory (wich is 010060700ac50000) and create a folder called Romfs. after this, all you need to do is replicate the same folders from the game files that you exported. here the example:
1725544787400.png

after this, drag and drop the files in their indiviual folders, run the game and enjoy the mod!

IF YOU ARE USING MODDED SWITCH:​

It's the same process from above. my Firmware is Atmosphere, so the directory of the game is: atmosphere/contents/010060700AC50000. it should look like this:
1725544799430.png

do the same process of creating the folders, dragging and dropping the files and enjoy!

3RD STEP: MAKING THE RETEXTURES​

Tool Link: made by vagonumero13 (you need to create an account on the site to donwload the file and watch out for this website since it's an nsfw site, that's why i'm posting the link of the tool instead of the thread)
https://www.loverslab.com/applications/core/interface/file/attachment.php?id=929869

Drag and drop your .g1t file above the "g1t_extract.exe", a folder will show up with the same name as the .g1t file, you can edit the .dds files using Gimp or Photoshop. after this, go to the folder "qg1t_tool" and open "qg1t_tool.exe", click on ''File'' and open the .g1t file, now all you need to do is replace the right texture with the ones that you did. select the texture number on the side and click on "replace (browse)" to search for the texture you did and after replace all, click on "replace" to save the .g1t with your textures.
rvoDZITCQluNRRAk6L-xWw.png

now back to the repacker, just do the process of the 2nd step and enjoy your modded texture!

(ONCE I HAVE A MODEL TOOL TO IMPORT BACK TO THE GAME, I WILL BE POSTING THE NEXT PART IN HERE)​

1725615523494.png


i've made a discord channel just for MUA3 Mods stuffs, if someone is interested in join in, you are very welcome! i will start to post everything in there

https://discord.gg/SKB47vHPv8


Big thanks to Dmnslyr(dsx8 on Discord) for teaching me the whole process on how to mess with the game files!
 

Attachments

  • 1725660879834.png
    1725660879834.png
    24.1 KB · Views: 11
Last edited by charsles,

Site & Scene News

Popular threads in this forum

General chit-chat
Help Users
  • No one is chatting at the moment.
    SylverReZ @ SylverReZ: @K3Nv2, Too far ahead of him bro.