

How to use CMaps with NFlib
In this tutorial I will explain what CMaps are and how to make and use them with NFlib. (To understand it you have to know the basics of NDS programming and NFlib). All the resources I use are in this zip folder.
First, what are CMaps?
A CMap is a Map of collisions that we can access in order to know whether a tile has or hasn’t got collision, if the tile is a spike or other things. We can define all of that ourselves.
What are they used for?
CMaps are used to make collision detection with tiles that don’t change easier and faster. We can use it to indicate solid blocks, water and spikes, but things like pushable walls or walls that can blow up are not practical in a CMap.
Now let’s start making and using CMaps.
First let’s start by making a rom that simply displays a background.
Go into the NFlib folder on your computer and copy the template folder wherever you want to store your project and rename it to something you like. Now we can start making our rom.
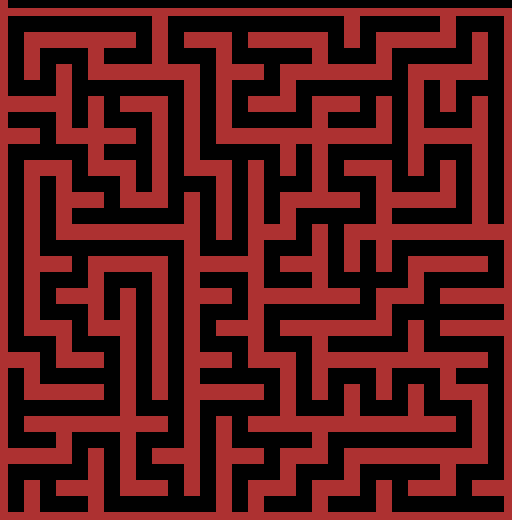
For this tutorial I’ve made a small maze that we can use as our background. You can find it in the zip folder under the name background.bmp. It has the dimensions 512x512. Now convert it and make a rom that loads and displays it. If you don’t know how to do this, you can find a really good tutorial here. Now download player.bmp (the sprite is 8x8 pixels) from the zip folder, convert it and load and display it in the rom at the coordinates (12|12). If you don’t know how to do it, the same person who made the background tutorial also made a Sprite tutorial. You can find it here. Now the code should look something like this:
Now in order to move the player, we have to detect inputs. we can do that by inserting this bit of code right at the start of the while loop:
We now have two problems: The first one is, that we can’t see the rest of our maze, since we haven’t actually implemented any screen scrolling yet. We’ll fix that problem at the end. The second problem is, that we can go right through the walls of our maze which isn’t really the goal of a maze. This is where CMaps become useful. By tweaking the background we can create a map of objects that can tell us exactly where what kind of object is and we can the determine if there’s a wall or not.
To make a CMap, map out all your collisions in one .bmp image that has the same width as your background but is 8px higher than the background. In our case it means that we have to go from 512x512 pixels to 512x520 pixels. Now that we’ve made the dimensions it’s time to draw the collisions or in our case we just have to copy the maze into the file and make the top row black (also, set the transparent color to #000000). Important sidenote: the image has to be in 8x8px tiles. Now the image should look like this:
You can find this image in the zip folder under the name cmap.bmp. It’s already set up, so you just have to convert it using grit. For that put the image into the bmp folder and run the Convert_CMaps.bat file. Now go into cmaps and copy cmap.bmp and cmap.dat into the nitrofiles folder in your project. You’re now ready to load and use it.
To load it, we first have to initiate the CMap Buffers. To do that we can just call NF_InitCmapBuffers(); at the start of our main loop. Now we have to load our CMap. To do that we can just call NF_LoadColisionMap("cmap", 0, 512, 520); after the line that initiates the Buffers. Now we just have to make use of it.
The general idea of CMaps is, that when you can call the function NF_GetTile(<slot of the CMap (in our case 0)>, x, y) it will return you, whatever type of collision you’ve drawn in in that position. In our case it will mean 0 for path (in black) and 1 for the walls (in red).
All that’s left to get the collision working is to rewrite the movement a bit.
To make it easier to edit later, we’ll first make an integer variable called vel that we can set to any velocity we want, then we make an integer variable called wall that we set to one so when we later change our CMap and walls suddenly return 2 or 3, we can just change the variable. Now just make an integer variable called keys and replace the current code for movement with this:
Now our player can no longer go through walls and we can even go faster by holding Y.
Now let’s just add a bit of code so the background can scroll.
First, let’s make two integer variables called offsetX and offsetY that we set to 0. These are going to store, where the background is shown and what we have to add to the x and y position of the player to get the right output from GetTile();. Now just add this bit of code here right after the code that handles the input:
This makes our background scroll when we go near the borders, but the CMap doesn't. To fix this, we have to replace the code for the input one last time with this:
And there you have it. This is how you make, load and use CMaps. If you have any questions because I was too unclear at any point, feel free to ask here or message/ping me on Discord (SkilLP#2197).
Also, if you’re not sure, if you’ve done everything right, the complete project folder including the complete and commented code can also be found in the zip folder.
First, what are CMaps?
A CMap is a Map of collisions that we can access in order to know whether a tile has or hasn’t got collision, if the tile is a spike or other things. We can define all of that ourselves.
What are they used for?
CMaps are used to make collision detection with tiles that don’t change easier and faster. We can use it to indicate solid blocks, water and spikes, but things like pushable walls or walls that can blow up are not practical in a CMap.
Now let’s start making and using CMaps.
First let’s start by making a rom that simply displays a background.
Go into the NFlib folder on your computer and copy the template folder wherever you want to store your project and rename it to something you like. Now we can start making our rom.
For this tutorial I’ve made a small maze that we can use as our background. You can find it in the zip folder under the name background.bmp. It has the dimensions 512x512. Now convert it and make a rom that loads and displays it. If you don’t know how to do this, you can find a really good tutorial here. Now download player.bmp (the sprite is 8x8 pixels) from the zip folder, convert it and load and display it in the rom at the coordinates (12|12). If you don’t know how to do it, the same person who made the background tutorial also made a Sprite tutorial. You can find it here. Now the code should look something like this:
Code:
#include <stdio.h>
#include <nds.h>
#include <nf_lib.h>

int main(int argc, char **argv) {
    // Turn on MODE 0 on the Top Screen
    NF_Set2D(0, 0);

    // Set the Root Folder
    NF_SetRootFolder("NITROFS");

    // Initialize the Tiled Backgrounds System on the Top Screen
    NF_InitTiledBgBuffers();
    NF_InitTiledBgSys(0);

    // Initialize the Tiled Sprites System on the Top Screen
    NF_InitSpriteBuffers();
    NF_InitSpriteSys(0);

    // Load and Create the Tiled Background
    NF_LoadTiledBg("background", "background", 512, 512);
    NF_CreateTiledBg(0, 3, "background");

    // Load our Tiled Sprite
    NF_LoadSpriteGfx("player", 0, 8, 8);
    NF_LoadSpritePal("player", 0);

    // Transfer our sprite to VRAM
    NF_VramSpriteGfx(0, 0, 0, false);
    NF_VramSpritePal(0, 0, 0);

    // Set the coordinates of our player
    int playerX = 12;
    int playerY = 12;

    while(1){
    // Draw our player
    NF_CreateSprite(0, 0, 0, 0, playerX, playerY);

        // Refresh and update the screen
        NF_SpriteOamSet(0);
        swiWaitForVBlank();
        oamUpdate(&oamMain);
    }
    return 0;
}
Now in order to move the player, we have to detect inputs. we can do that by inserting this bit of code right at the start of the while loop:
Code:
scanKeys();
keys = keysHeld();
if (KEY_LEFT & keys) {
    playerX--;
} else if (KEY_UP & keys) {
    playerY--;
} else if (KEY_RIGHT & keys) {
    playerX++;
} else if (KEY_DOWN & keys) {
    playerY++;
}
We now have two problems: The first one is, that we can’t see the rest of our maze, since we haven’t actually implemented any screen scrolling yet. We’ll fix that problem at the end. The second problem is, that we can go right through the walls of our maze which isn’t really the goal of a maze. This is where CMaps become useful. By tweaking the background we can create a map of objects that can tell us exactly where what kind of object is and we can the determine if there’s a wall or not.
To make a CMap, map out all your collisions in one .bmp image that has the same width as your background but is 8px higher than the background. In our case it means that we have to go from 512x512 pixels to 512x520 pixels. Now that we’ve made the dimensions it’s time to draw the collisions or in our case we just have to copy the maze into the file and make the top row black (also, set the transparent color to #000000). Important sidenote: the image has to be in 8x8px tiles. Now the image should look like this:
You can find this image in the zip folder under the name cmap.bmp. It’s already set up, so you just have to convert it using grit. For that put the image into the bmp folder and run the Convert_CMaps.bat file. Now go into cmaps and copy cmap.bmp and cmap.dat into the nitrofiles folder in your project. You’re now ready to load and use it.
To load it, we first have to initiate the CMap Buffers. To do that we can just call NF_InitCmapBuffers(); at the start of our main loop. Now we have to load our CMap. To do that we can just call NF_LoadColisionMap("cmap", 0, 512, 520); after the line that initiates the Buffers. Now we just have to make use of it.
The general idea of CMaps is, that when you can call the function NF_GetTile(<slot of the CMap (in our case 0)>, x, y) it will return you, whatever type of collision you’ve drawn in in that position. In our case it will mean 0 for path (in black) and 1 for the walls (in red).
All that’s left to get the collision working is to rewrite the movement a bit.
To make it easier to edit later, we’ll first make an integer variable called vel that we can set to any velocity we want, then we make an integer variable called wall that we set to one so when we later change our CMap and walls suddenly return 2 or 3, we can just change the variable. Now just make an integer variable called keys and replace the current code for movement with this:
Code:
scanKeys();
keys = keysHeld();
if (KEY_LEFT & keys) {
    if (NF_GetTile(0, playerX - vel, playerY) != wall &&
        NF_GetTile(0, playerX - vel, playerY + 7) != wall) playerX -= vel;
}

if (KEY_UP & keys) {
    if (NF_GetTile(0, playerX, playerY - vel) != wall &&
        NF_GetTile(0, playerX + 7, playerY - vel) != wall) playerY -= vel;
}

if (KEY_RIGHT & keys)) {
    if (NF_GetTile(0, playerX + 8 + vel, playerY) != wall &&
        NF_GetTile(0, playerX + 8 + vel, playerY + 7) != wall) playerX += vel;
}

if (KEY_DOWN & keys) {
    if (NF_GetTile(0, playerX, playerY + 8 + vel) != wall &&
        NF_GetTile(0, playerX + 7, playerY + 8 + vel) != wall) playerY += vel;
}


if (KEY_Y & keys) {
    vel = 2;
} else {
    vel = 1;
}
Now our player can no longer go through walls and we can even go faster by holding Y.
Now let’s just add a bit of code so the background can scroll.
First, let’s make two integer variables called offsetX and offsetY that we set to 0. These are going to store, where the background is shown and what we have to add to the x and y position of the player to get the right output from GetTile();. Now just add this bit of code here right after the code that handles the input:
Code:
while (playerY > 160 && offsetY < 320) {
    offsetY++;
    playerY--;
    NF_ScrollBg(0, 3, offsetX, offsetY);
}

while (playerY < 24 && offsetY > 0) {
    offsetY--;
    playerY++;
    NF_ScrollBg(0, 3, offsetX, offsetY);
}


while (playerX < 24 && offsetX > 0) {
    offsetX--;
    playerX++;
    NF_ScrollBg(0, 3, offsetX, offsetY);
}

while (playerX > 224 && offsetX < 256) {
    offsetX++;
    playerX--;
    NF_ScrollBg(0, 3, offsetX, offsetY);
}
This makes our background scroll when we go near the borders, but the CMap doesn't. To fix this, we have to replace the code for the input one last time with this:
Code:
scanKeys();
keys = keysHeld();
if (KEY_LEFT & keys) {
    if (NF_GetTile(0, playerX + offsetX - vel, playerY + offsetY) != wall &&
        NF_GetTile(0, playerX + offsetX - vel, playerY + offsetY + 7) != wall) playerX -= vel;
}

if (KEY_UP & keys) {
    if (NF_GetTile(0, playerX + offsetX, playerY + offsetY - vel) != wall &&
        NF_GetTile(0, playerX + offsetX + 7, playerY + offsetY - vel) != wall) playerY -= vel;
}

if (KEY_RIGHT & keys) {
    if (NF_GetTile(0, playerX + offsetX + 7 + vel, playerY + offsetY) != wall &&
        NF_GetTile(0, playerX + offsetX + 7 + vel, playerY + offsetY + 7) != wall) playerX += vel;
}

if (KEY_DOWN & keys) {
    if (NF_GetTile(0, playerX + offsetX, playerY + offsetY + 7 + vel) != wall &&
        NF_GetTile(0, playerX + offsetX + 7, playerY + offsetY + 7 + vel) != wall) playerY += vel;
}


if (KEY_Y & keys) {
    vel = 2;
} else {
    vel = 1;
}
And there you have it. This is how you make, load and use CMaps. If you have any questions because I was too unclear at any point, feel free to ask here or message/ping me on Discord (SkilLP#2197).
Also, if you’re not sure, if you’ve done everything right, the complete project folder including the complete and commented code can also be found in the zip folder.


