Emulation Homebrew Tutorial
Updated
Building SM64 for Nintendo Switch from sm64ex-alo Repository
Hi, I hope the next steps help to somebody, first forgive my bad English, is no my native language.
After the project «n64decomp» finished lots of forks emerged. One of them is the SM 64 PC Port which have as aim to be a port of n64decomp for modern devices.
Some of these ports was for the Switch console and become real on the fork fgsfdsfgs that fork seems to be staled, Now @AloXado320 have resumed the work with the repository AloUltraExt and add some features and converged the latest code with latest refresh from the decomp project.
If you read the guide:
https://github.com/fgsfdsfgs/sm64pc/wiki/Compiling-for-Nintendo-Switch
The steps are loosely explained, but they don’t work well for me, so I decided read a lot of documentation and the official SM64 thread completely.
I choose to use for this set of instructions the MSYS environment, which for me is easy to setup and as it is an enclosed environment which is not affected by other software on your computer, I mainly use Windows, but as MINGW is a Cygwin environment I think the steps could be easy extrapolated to Linux environments.
First install the prerequisites
In a MinGW64 shell (or MinGW32 if you have a Windows 32 bit edition, why will you do today?). Be sure the prompt shows MINGW64 or MINGW32 if not you started the wrong shell, close it and open the right one.
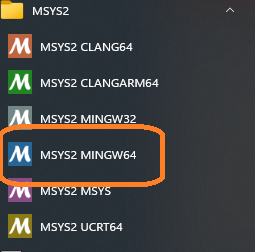
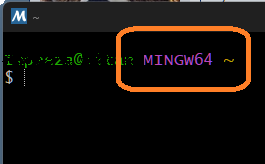
Please execute the next command, several times until you get the message "there is nothing to do", you can be asked to restarts the MINGW64 environment few times:
Then execute the next commands:
Once the installation end, verify the MSYS2 database again:
Clone the repository, using the
The repository is cloned to a subfolder of the "Home" directory of MinGWXX Shell, on the prompt "~" means your home directory.
You need copy a legal copy of the original ROM in the cloned directory, it must be in "Big Endian" format.
For each version (jp/us/eu/sh) for which you want to build an executable, put an existing ROM at ./baserom.<VERSION>.z64 for asset extraction.
By example, for US version:
that file should have this Checksums:
MD5: 20b854b239203baf6c961b850a4a51a2 *baserom.us.z64
SHA: 9bef1128717f958171a4afac3ed78ee2bb4e86ce *baserom.us.z64
SHA256: 17ce077343c6133f8c9f2d6d6d9a4ab62c8cd2aa57c40aea1f490b4c8bb21d91 *baserom.us.z64
copy the file to the path
If your ROM isn't on Big Endian format, use https://hack64.net/tools/swapper.php to convert it.
Now the environment is ready to build Switch version using any combination of the options you like, by example:
Now you are ready to build the code, executing the code:
Will activate a better camera handling, enable the drawing of far objects on the game, Fixes some texture related bugs (by example smoke), AND 60 FPS patch.
sadly the actual repo is not so compatible with multiple cores, so please do not use
After the process ends the NRO is on the build subfolder.
After a successful build you should have file
IF YOU USED THE EXTERNAL_DATA parameter, you also get the the folder
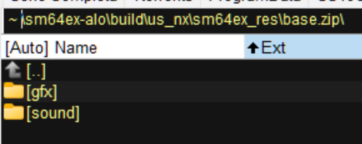
Now you need to copy to a folder (By example
Alternatively you can extract the
If you like to add texture packs to the build you put them on the
By example, a set of HD resource files are on the post https://gbatemp.net/threads/buildin...om-sm64ex-alo-repository.652092/post-10576779
a copy was uploaded to https://gbatemp.net/download/hd-pack-resource-for-sm64ex.39135/
Additional Note: For Build Windows version you can run the command without the
BUILD OPTIONS
Use nsp-forwarder.n8.io to create a customized Forwarder. Now supporting Atmosphère > 1.8.0
Command Line Options
[TABLE=full]
[TR]
[th]Command[/th][th]Description[/th]
[/TR]
[TR]
[td]--help[/td][td]Shown the command line options[/td]
[/TR]
[TR]
[td]--configfile CONFIGNAME[/td][td]Saves the configuration file as CONFIGNAME.[/td]
[/TR]
[TR]
[td]--gamedir DIRNAME[/td][td]Sets additional data directory name (only 'res' is used by default).[/td]
[/TR]
[TR]
[td]--savepath SAVEPATH[/td][td]Overrides the default save/config path ('!' expands to executable path).[/td]
[/TR]
[TR]
[td]--level LEVELID[/td][td]Start the game from a level id (Use --listlevels for a list of each level id).[/td]
[/TR]
[TR]
[td]--act ACTNUM[/td][td]Start the game from a act number, requires a --level id to be set.[/td]
[/TR]
[TR]
[td]--cheats[/td][td]Enables the cheat menu.[/td]
[/TR]
[TR]
[td]--skip-intro[/td][td]Skips the Peach and Castle intro when starting a new game.[/td]
[/TR]
[TR]
[td]--fullscreen[/td][td]Starts the game in full screen mode.[/td]
[/TR]
[TR]
[td]--windowed[/td][td]Starts the game in windowed mode.[/td]
[/TR]
[TR]
[td]--levelselect[/td][td]Offers the user a level select menu.[/td]
[/TR]
[TR]
[td]--profiler[/td][td]Enables profiler bar on the screen bottom (Not functional).[/td]
[/TR]
[TR]
[td]--debug[/td][td]Enables simple debug display.[/td]
[/TR]
[TR]
[td]--poolsize POOLVALUE[/td][td]Increase memory pool on POOLVALUE[/td]
[/TR]
[/TABLE]
Troubleshooting
After the project «n64decomp» finished lots of forks emerged. One of them is the SM 64 PC Port which have as aim to be a port of n64decomp for modern devices.
Some of these ports was for the Switch console and become real on the fork fgsfdsfgs that fork seems to be staled, Now @AloXado320 have resumed the work with the repository AloUltraExt and add some features and converged the latest code with latest refresh from the decomp project.
Switch Building Process
If you read the guide:
https://github.com/fgsfdsfgs/sm64pc/wiki/Compiling-for-Nintendo-Switch
The steps are loosely explained, but they don’t work well for me, so I decided read a lot of documentation and the official SM64 thread completely.
I choose to use for this set of instructions the MSYS environment, which for me is easy to setup and as it is an enclosed environment which is not affected by other software on your computer, I mainly use Windows, but as MINGW is a Cygwin environment I think the steps could be easy extrapolated to Linux environments.
First you need Install a MSYS environment:After you have the MSYS environment working you need to install DevKitPro
The latest instructions for install the MSYS environment are on https://gbatemp.net/threads/install-msys-environment.652234/ if you don't have one working, use them.
For that you can follow the instructions on the tutorial https://gbatemp.net/threads/setup-a-devkitpro-environment-on-windows.652238/
Now you can start the building process:
First install the prerequisites
In a MinGW64 shell (or MinGW32 if you have a Windows 32 bit edition, why will you do today?). Be sure the prompt shows MINGW64 or MINGW32 if not you started the wrong shell, close it and open the right one.
Please execute the next command, several times until you get the message "there is nothing to do", you can be asked to restarts the MINGW64 environment few times:
pacman -Syuu --needed --noconfirmThen execute the next commands:
Code:
pacman -Syuu --needed --noconfirm base-devel git make mercurial python3 subversion unzip autoconf automake libtool pkg-config autoconf-wrapper mingw-w64-x86_64-cmake mingw-w64-x86_64-gcc mingw-w64-x86_64-glew mingw-w64-x86_64-SDL2 mingw-w64-x86_64-toolchain mingw-w64-x86_64-SDL switch-dev devkitA64 dkp-toolchain-vars libnx switch-tools switch-mesa switch-libdrm_nouveau switch-sdl2Once the installation end, verify the MSYS2 database again:
pacman -Syuu --needed --noconfirmClone the repository, using the
--recursive option in order to clone all the trees.
Code:
cd ~/
git clone --recursive https://github.com/AloUltraExt/sm64ex-alo
The repository is cloned to a subfolder of the "Home" directory of MinGWXX Shell, on the prompt "~" means your home directory.
You need copy a legal copy of the original ROM in the cloned directory, it must be in "Big Endian" format.
For each version (jp/us/eu/sh) for which you want to build an executable, put an existing ROM at ./baserom.<VERSION>.z64 for asset extraction.
By example, for US version:
./baserom.us.z64that file should have this Checksums:
MD5: 20b854b239203baf6c961b850a4a51a2 *baserom.us.z64
SHA: 9bef1128717f958171a4afac3ed78ee2bb4e86ce *baserom.us.z64
SHA256: 17ce077343c6133f8c9f2d6d6d9a4ab62c8cd2aa57c40aea1f490b4c8bb21d91 *baserom.us.z64
copy the file to the path
c:\msys64\home\<USERNAME>\sm64ex-aloIf your ROM isn't on Big Endian format, use https://hack64.net/tools/swapper.php to convert it.
Now the environment is ready to build Switch version using any combination of the options you like, by example:
Code:
cd ~/sm64ex-aloFor now due some changes on GCC the file tools/armips.cpp need to be changed and add #include <cstdint> for that the PR 93 is created, you can manually edit the file or apply the PR, to apply the PR you can execute the commands:
Code:
git fetch origin pull/93/head
git checkout -b PR93 FETCH_HEAD
Now you are ready to build the code, executing the code:
Code:
make TARGET_SWITCH=1 BETTERCAMERA=1 NODRAWINGDISTANCE=1 TEXTURE_FIX=1 HIGH_FPS_PC=1Will activate a better camera handling, enable the drawing of far objects on the game, Fixes some texture related bugs (by example smoke), AND 60 FPS patch.
sadly the actual repo is not so compatible with multiple cores, so please do not use
-j parameter.After the process ends the NRO is on the build subfolder.
Code:
Build succeeded.
==== Build Details ====
File:           build/us_nx/sm64.us.f3dex2e.nro
Version:        us
Target:         Nintendo Switch
After a successful build you should have file
~\sm64ex-alo\build\us_nx\sm64.us.f3dex2e.nroIF YOU USED THE EXTERNAL_DATA parameter, you also get the the folder
~\sm64ex-alo\build\us_nx\sm64ex_res, and inside the ~\sm64ex-alo\build\us_nx\sm64ex_res folder is the file base.zip archive, which one have inside the folders: gfx & sound:Now you need to copy to a folder (By example
SM64) on SDMC:/Switch the ~\sm64ex-alo\build\us_nx\sm64.us.f3dex2e.nro and the ~\sm64ex-alo\build\us_nx\sm64ex_res folder (if you used EXTERNAL_DATA parameter)Alternatively you can extract the
base.zip archive for a quicker loading. On my test I did it so I ended with the tree:
Bash:
SMDC:
    Switch
        SM64
            sm64.us.f3dex2e.nro
                sm64ex_res
                    gfx
                       .......lots of files and folders
                    sound
                       .......lots of files and folders
If you like to add texture packs to the build you put them on the
SDMC:/Switch/switch/SM64/sm64ex_res path, thanks to @JAGSTAX for the tip.By example, a set of HD resource files are on the post https://gbatemp.net/threads/buildin...om-sm64ex-alo-repository.652092/post-10576779
a copy was uploaded to https://gbatemp.net/download/hd-pack-resource-for-sm64ex.39135/
Additional Note: For Build Windows version you can run the command without the
TARGET_SWITCH=1 parameter.Trying on a Ubuntu Virtual Machine and worked just fine:
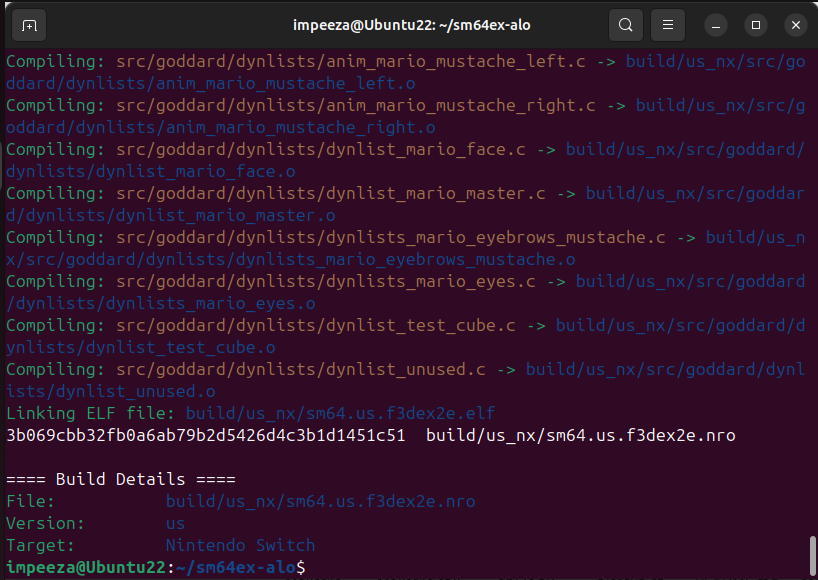
For Ubuntu I had to install DevKitPro (https://devkitpro.org/wiki/devkitPro_pacman)
Then install the packages:
Then
For now due some changes on GCC the file
YOU MUST TO COPY YOUR LEGALLY ACQUIRED ROM WITH MD5: 20b854b239203baf6c961b850a4a51a2 TO:
Then you can build the NRO:
BE SURE YOU COPY THE CORRECT ROM TO THE REPO ROOT AND HAVE THE CORRECT NAME.
For Ubuntu I had to install DevKitPro (https://devkitpro.org/wiki/devkitPro_pacman)
Then install the packages:
Bash:
sudo apt install git make python3 subversion unzip autoconf automake libtool pkg-config autoconf cmake

pacman -Syu --needed --noconfirm devkit-env switch-dev devkitA64 dkp-toolchain-vars libnx switch-tools switch-mesa switch-libdrm_nouveau switch-sdl2
Then
Bash:
cd ~
rm -rf sm64ex-alo
git clone --recursive https://github.com/AloUltraExt/sm64ex-alo
cd ~/sm64ex-alo
For now due some changes on GCC the file
tools/armips.cpp need to be changed and add #include <cstdint> for that the PR 93 is created, you can manually edit the file or apply the PR, to apply the PR you can execute the commands:
Code:
git fetch origin pull/93/head
git checkout -b PR93 FETCH_HEAD
YOU MUST TO COPY YOUR LEGALLY ACQUIRED ROM WITH MD5: 20b854b239203baf6c961b850a4a51a2 TO:
~/sm64ex-alo/baserom.us.z64Then you can build the NRO:
Bash:
make TARGET_SWITCH=1 BETTERCAMERA=1 NODRAWINGDISTANCE=1 TEXTURE_FIX=1 EXT_OPTIONS_MENU=1 QOL_FIXES=1 QOL_FEATURES=1 MOUSE_ACTIONS=1 EXT_DEBUG_MENU=1BE SURE YOU COPY THE CORRECT ROM TO THE REPO ROOT AND HAVE THE CORRECT NAME.
BUILD OPTIONS
| Build option | Default | Possible values | Description |
|---|---|---|---|
| AUDIO_API | SDL2 | SDL2 | Select audio backend. There's only one option right now. |
| BETTERCAMERA | 0 | 0, 1 | If 1, build with analog camera support (uses Puppycam). |
| CHEATS_ACTIONS | 1 | 0, 1 | Enable cheats |
| COMMAND_LINE_OPTIONS | 1 | 0, 1 | Enable Command Line Options *see them at end of post |
| CONTROLLER_API | SDL2 | SDL2 | Specify the controller backend to use. There's only one right now. |
| DISCORDRPC | 0 | 0, 1 | If 1, enable Discord Rich Presence support. Only works on x86_64. |
| EXT_DEBUG_MENU | 0 | 0, 1 | Enable Simple menu for debug on R options menu, showing basic info on the screen |
| EXT_OPTIONS_MENU | 1 | 0, 1 | If 1, enable Options menu. Accessed from the Pause menu by pressing R. |
| EXTENDED_BOUNDS | 0 | 0, 1 | Enable extended bounds In Super Mario 64, the level size, in which collision is checked, by default is limited from -8192 to 8191 in any direction. Enabling this allows for extended bounds. This patch allows the bounds to be extended up to -32768 to 32767, at the cost of using more RAM. |
| EXTERNAL_DATA | 0 | 0, 1 | If 1, load textures and soundbanks from external files. Allows you to use texture packs. The default data is copied to a res folder next to the produced executable. |
| GODDARD_MFACE | 1 | 0, 1 | If 0 disable Goddard's Mario Face (Mario Face at start screen) |
| HIGH_FPS_PC | 0 | 0, 1 | Enable 60 fps patch |
| MOUSE_ACTIONS | 0 | 0, 1 | Enable mouse support on desktop versions, for now only works on SDL mode, DirectX support is WIP. |
| NODRAWINGDISTANCE | 0 | 0, 1 | If 1, build with disabled draw distance (every object is active at all times). May affect gameplay. |
| PORT_MOP_OBJS | 0 | 0, 1 | Enable Kaze's More Objects Patch, disabled by default |
| QOL_FEATURES | 0 | 0, 1 | Enables additional quality-of-life features. |
| QOL_FIXES | 0 | 0, 1 | Activates general quality-of-life fixes. |
| QOL_REDONE | 1 | 0, 1 | Applies a set of reworked quality-of-life improvements. |
| The QOL features are NOT mutually exclusive and for the full effect should be enabled all at once. | |||
| RENDER_API | GL | GL, GL_LEGACY, D3D11, D3D12 | Select rendering backend to use. GL corresponds to OpenGL 2.1 (gfx_opengl.c), GL_LEGACY corresponds to OpenGL 1.3 (gfx_opengl_legacy.c). Direct3D backends will also force WINDOW_API to DXGI. |
| RM2C | 0 | 0, 1 | Accept RM2C level folder output https://github.com/AloXado320/rom-manager-2-c |
| RUMBLE_FEEDBACK | 1 | 0, 1 | Enable rumble functions (Originally in Shindou) |
| OSX_BUILD | 0 | 0,1 | If 1, build for OSX. |
| TARGET_SWITCH | 0 | 0,1 | If 1, the source code is built for Nintendo Switch Console. |
| TARGET_N3DS | 0 | 0,1 | Build for Nintendo 3DS, needs the 3ds-dev DevKitPro group. You can also add the CIA target to build 3DSX and CIA formats, for that you need MAKEROM on your system, you can get the most recent version from https://github.com/3DSGuy/Project_CTR/releases/ |
| TARGET_WII_U | 0 | 0,1 | Build for Wii U, needs the wiiu-dev DevKitPro group and the wiiu-sdl2 package. |
| TARGET_N64 | 0 | 0,1 | Needs MIPS N64 toolchain, so is more easy to build on Linux where you can install the apt package binutils-mips-linux-gnu . On MSYS you can install using https://github.com/glankk/n64 which requires you build and install locally on MSYS |
| TARGET_BITS | 32, 64 | TARGET_BITS=n appends some compiler flags for an n-bit build. If the value is empty, the option does nothing, assuming your native toolchain will set everything up by itself. Use this only if you're having trouble otherwise. | |
| TARGET_RPI | 0 | 0, 1 | If 1, select optimal settings for Raspberry PI hardware. See the main article (https://github.com/sm64pc/sm64pc/wiki/Helper-compiling-script-for-Raspberry-Pi) on that. |
| TARGET_WEB | 0 | 0, 1 | If 1, build Emscripten version. See the main article (https://github.com/sm64pc/sm64pc/wiki/Compiling-for-the-web) on that. |
| WINDOWS_BUILD | 0 | 0, 1 | If 1, build for Windows. Usually set automatically if building on Windows. |
| TEXTSAVES | 0 | 0, 1 | If 1, use INI-based save format instead of binary EEPROM dumps. Experimental. |
| TEXTURE_FIX | 0 | 0, 1 | If 1, enable various texture-related bugfixes (e.g. fixes the smoke texture). |
| VANILLA_CHECKS | 1 | 0, 1 | Enable some level checks to get behavior of vanilla ones |
| VERSION | us | us, eu, jp, sh | Which ROM to use. The selected ROM has to be in the repo folder with the name baserom.$VERSION.z64. «sh» is currently broken. |
| WINDOW_API | SDL2 | SDL2, DXGI | Select windowing backend. GL renderers force SDL2 and D3D renderers force DXGI for now, so you don't need to specify this. |
| WINDOWS_CONSOLE DEBUG | 0 | 0, 1 | If 1, append -mconsole to Windows CFLAGS, making a console window appear while the game is running. Can be useful for debugging purposes. On SM64-Alo WINDOWS_CONSOLE was replaced by DEBUG |
| DEBUG | 0 | 0, 1, 2 | If 1, build with debug symbols and default optimization level. Otherwise build with -O2. 1 simple debug compile, 2 max debug compile |
Use nsp-forwarder.n8.io to create a customized Forwarder. Now supporting Atmosphère > 1.8.0
Command Line Options
[TABLE=full]
[TR]
[th]Command[/th][th]Description[/th]
[/TR]
[TR]
[td]--help[/td][td]Shown the command line options[/td]
[/TR]
[TR]
[td]--configfile CONFIGNAME[/td][td]Saves the configuration file as CONFIGNAME.[/td]
[/TR]
[TR]
[td]--gamedir DIRNAME[/td][td]Sets additional data directory name (only 'res' is used by default).[/td]
[/TR]
[TR]
[td]--savepath SAVEPATH[/td][td]Overrides the default save/config path ('!' expands to executable path).[/td]
[/TR]
[TR]
[td]--level LEVELID[/td][td]Start the game from a level id (Use --listlevels for a list of each level id).[/td]
[/TR]
[TR]
[td]--act ACTNUM[/td][td]Start the game from a act number, requires a --level id to be set.[/td]
[/TR]
[TR]
[td]--cheats[/td][td]Enables the cheat menu.[/td]
[/TR]
[TR]
[td]--skip-intro[/td][td]Skips the Peach and Castle intro when starting a new game.[/td]
[/TR]
[TR]
[td]--fullscreen[/td][td]Starts the game in full screen mode.[/td]
[/TR]
[TR]
[td]--windowed[/td][td]Starts the game in windowed mode.[/td]
[/TR]
[TR]
[td]--levelselect[/td][td]Offers the user a level select menu.[/td]
[/TR]
[TR]
[td]--profiler[/td][td]Enables profiler bar on the screen bottom (Not functional).[/td]
[/TR]
[TR]
[td]--debug[/td][td]Enables simple debug display.[/td]
[/TR]
[TR]
[td]--poolsize POOLVALUE[/td][td]Increase memory pool on POOLVALUE[/td]
[/TR]
[/TABLE]
Troubleshooting
- If you get the error
gcc: command not foundormake: gcc: No such file or directoryyou did not install all needed packages or run the wrong Shell, be sure of running «MINGW32» or «MINGW64» and what that is pointed on the prompt in purple. - If the ROM is missing or wrong format/version you get the error
Failed to open baserom.us.z64!Verify the correct ROM at thec:\msys64\home\<username>\sm64ex-alofolder. - If you get the error
make: *** No targets specified and no makefile found. Stop.You are on the wrong folder the last make command should be run fromc:\msys64\home\<username>\sm64ex-alo folder. - Be sure of get the responses
Target: i686-w64-mingw32orTarget: x86_64-w64-mingw32when you run the commandgcc -vif else other is shown on screen you install the wrong gcc package or you are on the «MSYS» shell, remember the process should be run on «MINGW32» or «MINGW64» shells.
Last edited by impeeza,