Before starting this tutorial you need to have the following items.
The Usagi theme editor, it can be downloaded here.
The PSD file to create the previews, it can be downloaded here.
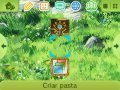
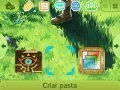
First position the icons as shown in the first image, then position the icons as shown in the second image. With the icons properly positioned, press and hold down the Y button, when you press this button with it still pressed, use the normal directional key and press down. The 3DS will create a photo of the bottom screen inside your SD or micro SD card. Remove the SD or micro SD card from your 3DS and pass it to your PC.
Inside the root folder of your card, you should look for a folder called DCIM inside this folder you will find another folder, you must access this folder and inside it you will find the image that you created. Transfer the image to your PC.
View attachment 81058
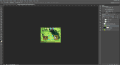
Use Usagi to generate the following files, Preview.png, preview_top.png, preview_bottom.png and largeicon.png. After unpacking the file you downloaded, you will find two files, open the preview_bottom.psd file. Right-click on the HNI_0050 layer, and choose the Replace Content option, you must replace the current layer image with the lower-screen image that you generated in your 3DS.
View attachment 81059
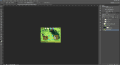
Select the preview_bottom layer and use the replace content option, you must replace the current layer with the preview-bottom.png image you generated in Usagi. Right-click on the first layer called largeicon and use the replace content option. You must replace the current layer with the largeicon.png image generated by Usagi. Save the file as preview_bottom.png.
View attachment 81060
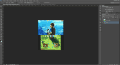
Open the preview-3dsthem.psd file, click Preview with the right mouse button, and use the option to replace current content with the preview.PNG file generated by Usagi.
View attachment 81061
Now select the preview_bottom layer and replace the current layer with the preview-bottom.png image. After changing this layer, save the image as Preview.png.
The Usagi theme editor, it can be downloaded here.
The PSD file to create the previews, it can be downloaded here.
First position the icons as shown in the first image, then position the icons as shown in the second image. With the icons properly positioned, press and hold down the Y button, when you press this button with it still pressed, use the normal directional key and press down. The 3DS will create a photo of the bottom screen inside your SD or micro SD card. Remove the SD or micro SD card from your 3DS and pass it to your PC.
Inside the root folder of your card, you should look for a folder called DCIM inside this folder you will find another folder, you must access this folder and inside it you will find the image that you created. Transfer the image to your PC.
View attachment 81058
Use Usagi to generate the following files, Preview.png, preview_top.png, preview_bottom.png and largeicon.png. After unpacking the file you downloaded, you will find two files, open the preview_bottom.psd file. Right-click on the HNI_0050 layer, and choose the Replace Content option, you must replace the current layer image with the lower-screen image that you generated in your 3DS.
View attachment 81059
Select the preview_bottom layer and use the replace content option, you must replace the current layer with the preview-bottom.png image you generated in Usagi. Right-click on the first layer called largeicon and use the replace content option. You must replace the current layer with the largeicon.png image generated by Usagi. Save the file as preview_bottom.png.
View attachment 81060
Open the preview-3dsthem.psd file, click Preview with the right mouse button, and use the option to replace current content with the preview.PNG file generated by Usagi.
View attachment 81061
Now select the preview_bottom layer and replace the current layer with the preview-bottom.png image. After changing this layer, save the image as Preview.png.