Before I start with the explanations, I should mention that this tutorial will not explain how to edit a song, this tutorial will explain how to create a custom track keeping in mind that you have already created the necessary edits explained in this tutorial. What a custom music track. It is a track that will be played once in the Home initialization, after being executed only the music track with the repeat loop will be reproduced infinitely. The custom track will only be played again when Home is restarted.
This customization is very useful because the process of creating the loop becomes easier. You can create a custom track with no time limit. Below I will leave a theme that I created with bcstm, with a custom track. Download the theme, because ogg file, which has the music preview, does not have the settings created in the bcstm file.
To begin with, you will need to have the following programs.
Audacity - Music Editor
Looping Audio Converter - music converter. to bcstm.
View attachment 104356
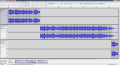
After editing the song and the project rate in HZ, change the field marked in red in the image to Samples mode.
View attachment 104357
Note: The custom track can only be created from left to right; you can not create this track in any other direction, or in the middle of the song.
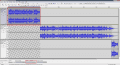
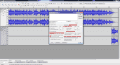
Keeping in mind that you have understood this explanation, and select your custom track. Here's how I did it in the image, area marked in red.
When selecting the music track you will receive a sample value, this value should be noted, this value can change if you change the values of the project rate. For this reason only perform this procedure after setting the project rate perfectly.
Keeping in mind that you have performed this procedure, copy this value.
View attachment 104358
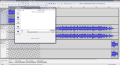
Save the file as Bgm, with the same WAV format settings as shown in the image.
View attachment 104365
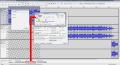
Set the Audio Converter looping, as shown in the picture (marked in red), you can use the DB or HZ field to increase the sound or decrease the audio quality. Do not change or activate other settings.
View attachment 104360
Add the WAV file, and click on Start. A settings panel will appear. Enter the Sample value copied from Audacity in the Start field.
The green area corresponds to the custom track, the blue area corresponds to the track with the loop.the yellow markers correspond to the beginning and end of the loop.
Keeping in mind that you have set everything up perfectly, click OK.
If you have done all the steps as explained in this tutorial, your bcstm will have a custom track.
Go to part 6 >>
This customization is very useful because the process of creating the loop becomes easier. You can create a custom track with no time limit. Below I will leave a theme that I created with bcstm, with a custom track. Download the theme, because ogg file, which has the music preview, does not have the settings created in the bcstm file.
To begin with, you will need to have the following programs.
Audacity - Music Editor
Looping Audio Converter - music converter. to bcstm.
View attachment 104356
After editing the song and the project rate in HZ, change the field marked in red in the image to Samples mode.
View attachment 104357
Note: The custom track can only be created from left to right; you can not create this track in any other direction, or in the middle of the song.
Keeping in mind that you have understood this explanation, and select your custom track. Here's how I did it in the image, area marked in red.
When selecting the music track you will receive a sample value, this value should be noted, this value can change if you change the values of the project rate. For this reason only perform this procedure after setting the project rate perfectly.
Keeping in mind that you have performed this procedure, copy this value.
View attachment 104358
Save the file as Bgm, with the same WAV format settings as shown in the image.
View attachment 104365
Set the Audio Converter looping, as shown in the picture (marked in red), you can use the DB or HZ field to increase the sound or decrease the audio quality. Do not change or activate other settings.
View attachment 104360
Add the WAV file, and click on Start. A settings panel will appear. Enter the Sample value copied from Audacity in the Start field.
The green area corresponds to the custom track, the blue area corresponds to the track with the loop.the yellow markers correspond to the beginning and end of the loop.
Keeping in mind that you have set everything up perfectly, click OK.
If you have done all the steps as explained in this tutorial, your bcstm will have a custom track.
Go to part 6 >>