Please note, I am not the creator or maintainer of this Library. All credit goes to @lefmarna I've only recently learned about this, and wanted to contribute to his project by creating some documentation/resources in English.
More guides will be added to this thread as I learn more & if anyone has any feedback on anything I can do, to make this post more clear, informative, or even more efficient in terms of the code posted. Please don't hesitate to let me know, as I would love to keep learning!
I’m not sure why this post keeps adding list BBCODE to the end of it randomly. If the posts formatting seems broken to you, please refresh since I’m actively adding to this guide and trying to fix it (everytime I edit it, those lists get added and break it)
For this guide you will need the following:
An Arduino Leonardo (I use this one)
Nintendo Switch Control Library (found in Arduino IDE)
This guide will be done using windows, if you would like to learn how to use OSX I recommend checking out this blog post from the creator of the Library we are using @lefmarna
Install Legacy Arduino IDE 1.8.x(Download) Do not install Arduino 2.x.x! as it currently does not function properly with this library.
Ensure that Arduino AVR 1.8.3 is installed under your boards manager. If you have a newer version installed. Please use the "select version" box to install 1.8.3. Anything newer will not function properly
Now it is time to edit your boards.txt(Make sure to close out of your IDE first, or your changes might not be detected right away) for me on windows this is located within my IDE's installation directory.
Once you have boards.txt open in an editor of your choice(I use sublime text) You will need to scroll down and edit lines 285, 286, 311, & 312 to match the following
Now the final step is to open Arduino IDE once more and install the Library by selecting "Library Manager" from the "Tools" menu within your IDE
From here you can start creating a simple macro/bot by flashing some basic code like the following to your Arduino, and after plugging it directly into your Switch or Dock
An Arduino Leonardo (I use this one)
Nintendo Switch Control Library (found in Arduino IDE)
This guide will be done using windows, if you would like to learn how to use OSX I recommend checking out this blog post from the creator of the Library we are using @lefmarna
Install Legacy Arduino IDE 1.8.x(Download) Do not install Arduino 2.x.x! as it currently does not function properly with this library.
Ensure that Arduino AVR 1.8.3 is installed under your boards manager. If you have a newer version installed. Please use the "select version" box to install 1.8.3. Anything newer will not function properly
Now it is time to edit your boards.txt(Make sure to close out of your IDE first, or your changes might not be detected right away) for me on windows this is located within my IDE's installation directory.
Code:
C:\Program Files (x86)\Arduino\hardware\arduino\avr\boards.txt
Code:
Line 285: leonardo.vid.1 =0x0f0d
Line 286: leonardo.pid.1 =0x0092

Line 311: leonardo.build.vid=0x0f0d
Line 312: leonardo.build.pid=0x0092
Now the final step is to open Arduino IDE once more and install the Library by selecting "Library Manager" from the "Tools" menu within your IDE
From here you can start creating a simple macro/bot by flashing some basic code like the following to your Arduino, and after plugging it directly into your Switch or Dock
Code:
#include <NintendoSwitchControlLibrary.h>
char userInput;
void setup()
{
    Serial1.begin(9600); // sets up serial
    pinMode(LED_BUILTIN, OUTPUT);
    pushButton(Button::B, 500, 5); //turns on the controller by pressing B(any button works)
}


void setup(){

    pushButton(Button::B, 500, 5);
}


void loop(){
    pushButton(Button::X, 600);
    pushHat(Hat::RIGHT, 200);
    pushHat(Hat::DOWN, 200);
    pushHat(Hat::LEFT, 200);
    pushHat(Hat::UP, 200);
    pushButton(Button::X, 600);
}I'm using this project to learn how to use Python and use Arduino's so please assume there is a much better way of doing this than I am. That being said, if you do know of ways this process can be improved or even just done better. Please let me know, as I would love to keep learning!
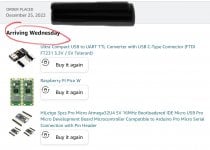
You can use any USB to TTL converter for this guide. However you will need to adjust your wiring accordingly. For this guide I will be using this converter
Connect your USB to TTL converter to your Arduino Leonardo. Like so
Now you will want to flash some basic code to your arduino. This code will allow you to interact with your arduino using the python script and serial1(this is your USB adapter. Normal serial is the arduino itself)
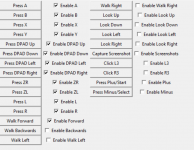
This is an example python script. It will create a GUI with 4 buttons that will send an input to your switch each time you click one
You can use any USB to TTL converter for this guide. However you will need to adjust your wiring accordingly. For this guide I will be using this converter
Connect your USB to TTL converter to your Arduino Leonardo. Like so
| Arduino Leonardo | USB to TTL |
| RX | White Wire |
| TX | Green Wire |
| GND | Black Wire |
Now you will want to flash some basic code to your arduino. This code will allow you to interact with your arduino using the python script and serial1(this is your USB adapter. Normal serial is the arduino itself)
Code:
#include <NintendoSwitchControlLibrary.h>

char userInput;

void loop(){
{
    if (Serial.available() > 0) {
        int delayTime = 0;
        int numBlinks = 0;

        userInput = Serial.read();

        if(userInput == 'w'){
            digitalWrite(LED_BUILTIN, HIGH);
            pushButton(Button::HOME);
        }

        if(userInput == 'e'){
            digitalWrite(LED_BUILTIN, HIGH);
            pushButton(Button::B);
        }

        if(userInput == 'r'){
            digitalWrite(LED_BUILTIN, HIGH);
            pushButton(Button::X);
        }

        if(userInput == 't'){
            digitalWrite(LED_BUILTIN, HIGH);
            pushButton(Button::Y);
        }
}
This is an example python script. It will create a GUI with 4 buttons that will send an input to your switch each time you click one
Code:
import serial
import tkinter as tk
from tkinter import *
from tkinter import messagebox
import time

##Open and connects to the configured serial port
comPort = 'COM12'
ser = serial.Serial(comPort, baudrate = 9600, timeout = 1) #timeout stops the connection process after x seconds

#commands
def pressA():
    ser.write(b'w')
    print('A pressed!')

def pressB():
    ser.write(b'e')
    print('B Pressed!')

def pressX():
    ser.write(b'r')
    print('X Pressed!')

def pressY():
    ser.write(b't')
    print('Y Pressed!')


def menuBlinkEnable():
    if blinkState.get() != 1:
        blinkState.set(1)
    blinkLED()

def menuDelaySelect(index):
    if blinkState.get() == 0:
        blinkState.set(1)
    userDelay.set(blinkTime[index])

def menuTurnOn():
    if blinkState.get() == 1:
        blinkState.set(0)
        ser.write(b,'0')

def menuTurnOff():
    if blinkState.get() == 1:
        blinkState.set(0)
        ser.write(b,'x')

def menuSave():
    print('Selected Save')

def exitGUI():
    root.destroy()

#init window
root =Tk()
root.title('GBATemp Example;)

#define and place buttons (creates and places widgets)
btn_ON= tk.Button(root, text='Press A', command=pressA)
btn_ON.grid(row=0, column=0)

btn_Off = tk.Button(root, text="Press B", command=pressB)
btn_Off.grid(row=0, column=1)

btn_Off = tk.Button(root, text="Press X", command=pressX)
btn_Off.grid(row=2, column=0)

btn_Off = tk.Button(root, text="Press Y", command=pressY)
btn_Off.grid(row=2, column=1)

#menu bar class
menuBar = Menu(root)

#creates and assigns the file menu
fileMenu = Menu(menuBar,tearoff=0)

#Creates and assigns the file menu options
menuBar.add_cascade(label ='File', menu = fileMenu)


#creates and assigns the settings menu
settings = Menu(menuBar, tearoff = 0)

#creates and assigns the settings menu options
menuBar.add_cascade(label='Settings', menu = settings)

##GUI Size Settings
root.config(menu = menuBar)
root.geometry("350x350") #size of the window
root.mainloop() #makes sure the GUI stays running
More guides will be added to this thread as I learn more & if anyone has any feedback on anything I can do, to make this post more clear, informative, or even more efficient in terms of the code posted. Please don't hesitate to let me know, as I would love to keep learning!
I’m not sure why this post keeps adding list BBCODE to the end of it randomly. If the posts formatting seems broken to you, please refresh since I’m actively adding to this guide and trying to fix it (everytime I edit it, those lists get added and break it)
Last edited by TheStonedModder,


