Tutorial
Updated
How to flash the HWFLY Clone chips
See below for updates.
IF YOU BREAK YOUR BOOT0 PIN. DO NOT DM ME ASKING FOR HELP. THAT'S IT. YOU BREAK THAT PIN AND YOU CANT FLASH. YOUR CHIP IS STUCK WITH WHATEVER HWFLY PUT ON IT
Pre-requisites:
Please post pictures of your work here to further the identification of the different board revisions!
UPDATE: So it seems like stitching the spacecraft bootloader and firmware together from the repo causes unstable glitching behaviors. For now, consistent glitching behavior works with this bootload/firmware combo. This is the original file on the OLED variant chip which has 0.2.0 spacecraft. As for glitching, I'll figure it out, give me some time...unless someone else wants to hop in and reverse the differences.
For now, this at least solves the 0.1.0 HWFLY gen 3 issue. More to come.
UPDATE 2: This is only going to work on some HWFLY chips. Older ones use higher protection than the new revisions that seem to use the QFN FPGA.
UPDATE 3: This should fully work on OLED modchips with the QFN FPGA. https://github.com/Pheeeeenom/firmware
IF YOU BREAK YOUR BOOT0 PIN. DO NOT DM ME ASKING FOR HELP. THAT'S IT. YOU BREAK THAT PIN AND YOU CANT FLASH. YOUR CHIP IS STUCK WITH WHATEVER HWFLY PUT ON IT
Pre-requisites:
- Raspberry Pi Zero W
- You may use another flasher if you desire.
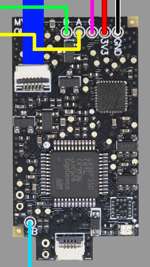
- Pinout Diagram
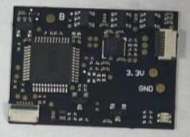
- Modchip Diagram
- FULL_CHIP_STOCK.bin
- Modchip Diagram, find the PA9(TX) and the PA10(RX) pins on your modchip, and do the following:
- Connect GPIO14(TX) on your Raspberry Pi Zero W to the PA10(RX) pin on your modchip.
- Connect GPIO15(RX) on your Raspberry Pi Zero W to the PA9(TX) pin on your modchip.
- Solder a wire to each of the following pinouts on the Raspberry Pi Zero W:
- 3.3V
- Ground
- GPIO 14 (UART TX)
- GPIO 15 (UART RX)
- Do the following to prepare the modchip:
- Lift pin 44 (also known as BOOT0).
- You will need a way to power the chip, so you need to find two 3.3v points. It can be on a MOSFET, but it will differ based on the revision of the modchip.
- Connect Ground on your Raspberry Pi Zero W to the Ground pin on your modchip.
- Check the Modchip Diagram, find the PA9(TX) and the PA10(RX) pins on your modchip, and do the following:
- Connect GPIO14(TX) on your Raspberry Pi Zero W to the PA10(RX) pin on your modchip.
- Connect GPIO15(RX) on your Raspberry Pi Zero W to the PA9(TX) pin on your modchip.
- Boot your Raspberry Pi Zero W and do the following:
- In the terminal, type the following command, and press enter:
Bash:sudo nano /boot/config.txt - Add the following line to the end of the file:
INI:dtoverlay=pi3-miniuart-bt - Press CTRL + X to save and exit the editor.
- In the terminal, type the following command, and press enter:
Bash:sudo nano /boot/cmdline.txt - Remove the following line from the file:
INI:console=serial0,115200 - Press CTRL + X to save and exit the editor.
- Restart your Raspberry Pi with this command
Bash:sudo /sbin/reboot - In the terminal, type the following commands, and press enter after each command:
Bash:git clone https://github.com/Pheeeeenom/stm32flash.git cd stm32flash sudo make install
- In the terminal, type the following command, and press enter:
- Now you will flash the modchip.
Note: This will remove read protection, and the modchip will wipe itself (that is what we want).- In the terminal, type the following command, and press enter:
Bash:stm32flash -k /dev/serial0 - Now to flash Spacecraft-NX Version 0.2.0, type the following, and press enter:
Bash:stm32flash -v -w ./FULL_CHIP_STOCK.bin /dev/serial0
- In the terminal, type the following command, and press enter:
- Once you're done flashing your modchip, remove the wiring from the modchip, and restore the 3.3v pin on the modchip to its original position.
Please post pictures of your work here to further the identification of the different board revisions!
UPDATE: So it seems like stitching the spacecraft bootloader and firmware together from the repo causes unstable glitching behaviors. For now, consistent glitching behavior works with this bootload/firmware combo. This is the original file on the OLED variant chip which has 0.2.0 spacecraft. As for glitching, I'll figure it out, give me some time...unless someone else wants to hop in and reverse the differences.
For now, this at least solves the 0.1.0 HWFLY gen 3 issue. More to come.
UPDATE 2: This is only going to work on some HWFLY chips. Older ones use higher protection than the new revisions that seem to use the QFN FPGA.
UPDATE 3: This should fully work on OLED modchips with the QFN FPGA. https://github.com/Pheeeeenom/firmware
Last edited by Mena,