


GBAtemp.net review of the...
 Flasher
Manufactured by: E3Team
Review samples supplied by: 3DStown
By Devin
Review Contents & Index:
The E3 Flasher is a nifty little device that allows you to downgrade PS3 systems to a low enough firmware in order to install Custom Firmware or CFW for short. It works with both NOR, and NAND consoles that have a base firmware of 3.55 or less. With CFW you're able to boot backups, homebrew, and fiddle with the PS3 more than possible on Official Firmware or OFW. In this review I will be showing how to install the E3 Clip, and downgrade a NOR system. I cannot downgrade a NAND console because I do not have faith in my soldering skills. NOR consoles require no soldering, NAND consoles do.
Packaging, and Contents
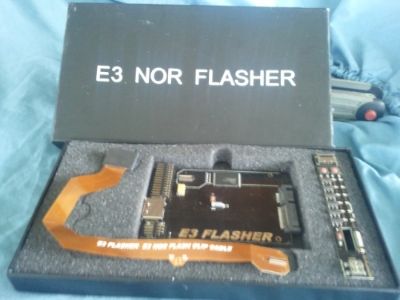
Design, and Impressions
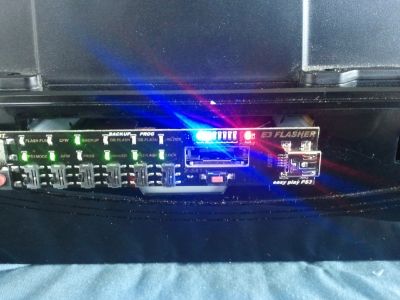
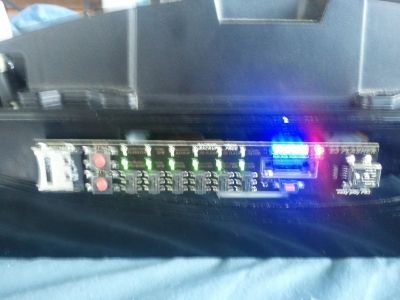
The E3 Flasher's design is decent enough for it's purposes. My only issues are with the E3 Coverboard's Micro SD card slot, and the E3 Clip. A couple of time when I've used it the metal cover for the Micro SD card slot has fell off. It didn't break off just feel off. It was easy enough to reposition it onto the board though. Next up is the E3 Clip. The fault with it is that it's a hit or miss with how much pressure you must apply to the clip for it to read the NOR chip properly. It was quite frustrating at first having to keep undoing the heatsinks from the PS3 because the chip wasn't on tight enough. I solved that by taping it down to the board using electrical tape. Another concern with the E3 Clip is that it's somewhat hard to take the clip off the NOR chip once it's on. I took the top off the E3 Clip once trying to take it off. No damage to the E3 Clip thankfully.
Set-up and Usage
Software:
The software is incredible easy to set up. You need a Micro SD Card (At least 2GBs.), a Micro SD Card reader, and a USB flash drive/USB HDD over 2GBs formatted to FAT32.
We're going to do this in steps.
1. Format the 2GB or higher Micro SD Card to FAT32.
2. Place this update.bin file onto the Micro SD Card's root.
3. Download the BwE NOR/NAND Patcher, and extract somewhere on your computer.
4. Download the CFW UPDATE.PUP file of your choice, and save it somewhere. (Rogero, Rebug, etc.)
5. Create a folder called PS3 on the root of your USB Flashdrive/USB HDD.
6. Inside the PS3 folder make another folder called UPDATE.
7. Drag the CFW update into the UPDATE folder, and rename it PS3UPDAT.PUP if not already.
Congratulations you're partially done with the software portion.
Hardware:
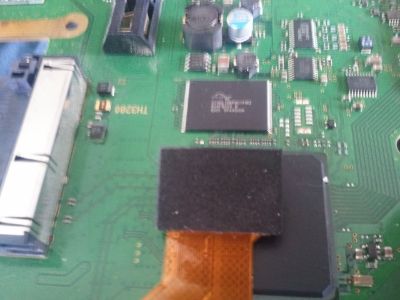
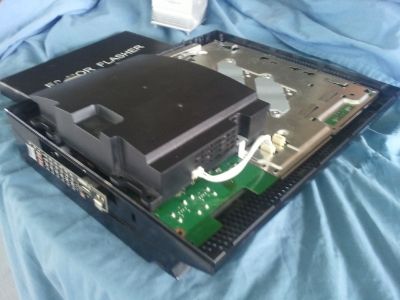
The hardware is a bit harder to set up than the software. If you don't know how to open up your PS3 then please google a tutorial. There are numerous ones on the internet. If you are scared to open up your system then send it off to someone who knows what they are doing. I'm going to assume if you weren't scared, and opened up your PS3 if you're at this point. You need to expose the NOR chip.
First up is the E3 installation.
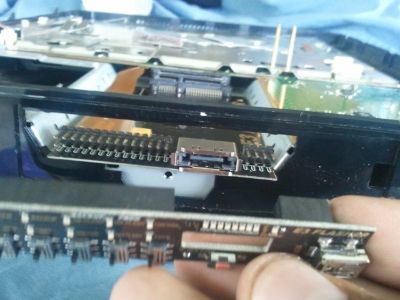
1. Apply the E3 Clip onto the NOR chip. Make sure it's pressed firmly in place. Use tape to secure it down even more if you'd like.
2. Next maneuver the ribbon cable from the clip so it moves into the PS3's HDD slot. As so.
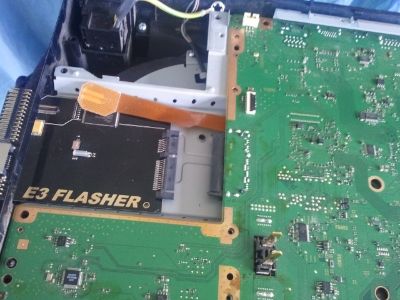
3.Take the end of the E3 Clip you maneuvered into the HDD slot, and connect it to the E3 mainboard.
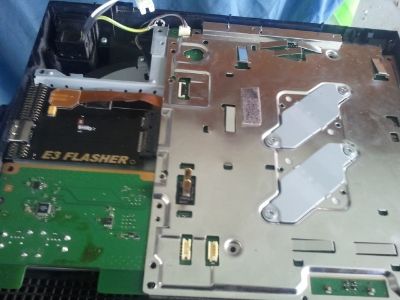
4. Next carefully position the PS3 motherboard back onto the heatsinks.
5. Place the metal casing back on top of the motherboard, and screw back in the heatsink bolts.
5. Connect the PS3's fan into the motherboard.
6. Place the PS3's power supply into place. Be sure to connect the cables that were connecting it to the PS3's motherboard.
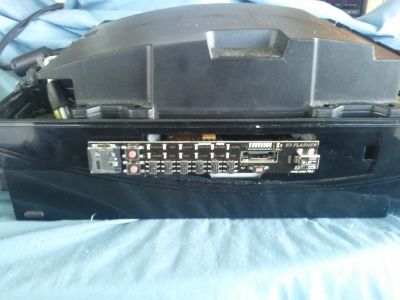
7. Next connect the E3 Coverboard onto the E3 mainboard.
9. Connect the PS3's power button board to the PS3's motherboard.
9. Connect the AV/HDMI cable, and Power cable to your PS3.
Next up is updating the E3 Flasher.
1. Insert the Micro SD Card you put the update.bin into the E3 Flasher's Micro SD Card slot. (The metal tab pulls out, and then you can push it back in once the Micro SD Card is in place. Securing it.)
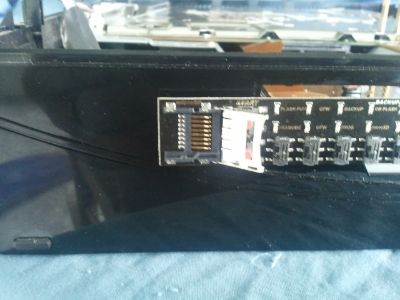
2. Now on the E3 Flasher Coverboard up all the switches except the first and second one from the right. Which should be down.
3. Turn on your PS3.
4. The E3 Flasher LEDs will start progressively go from 0% to 100% then start flashing alternatively when the update is done.
5. Turn off the console, and flip all the switches down.
6. Take out the Micro SD Card, and delete the update.bin file.
Next is dumping your NOR Backup.
1. Reinsert the Micro SD Card into the E3 Coverboard.
2. Flip the third switch from the right up on the E3 Coverboard. Make sure the rest are down.
3. Turn on the console.
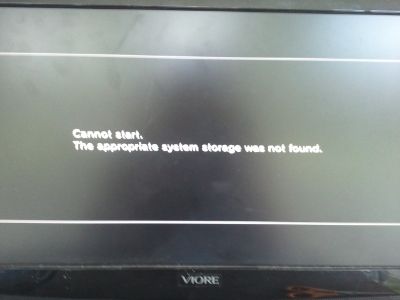
4. Once it shows the "HDD cannot be found" error, and the HDD light stops on the PS3. You're ready.
5. Press the Start button on the E3 Coverboard.
6. The E3 Flasher LEDs will start progressively go from 0% to 100% then start flashing alternatively when the NOR dump is done.
7. Next validate that the dump is good. If it is store it somewhere on your computer.
8. Dump the NOR again, and verify the new dump. Compare the two.
Next is patching, and installing the patched dump.
1. Take one of the dumps, and drag it onto the BwE NOR/NAND Patcher program you downloaded.
2. It'll patch it and ask you if you want a 3.55 downgrade. Press y, and enter.
3. It'll make a bkpps3.bin_patched file.
4. Delete any file on your Micro SD Card, and put the bkpps3.bin_patched file onto the root.
5. Rename bkpps3.bin_patched to bkpps3.bin.
6. Put the Micro SD Card into the E3 Coverboard
7. Make sure all the switches are down.
8. Turn on the console.
9. Once it shows the "HDD cannot be found" error, and the HDD light stops on the PS3. You're ready.
10. Press the Start button on the E3 Coverboard.
11. The E3 Flasher LEDs will start progressively go from 0% to 100% then start flashing alternatively when the NOR flashing is done.
12. Turn off the PS3.
Next is installing a CFW.
1. Remove the E3 mainboard from the PS3 by disconnecting the E3 clip from it.
2. Insert a HDD into the HDD slot.
3. Turn on the PS3.
4. Connect a PS3 controller via USB to the PS3.
5. It'll ask for a media device with 3.55 or later.
6. Insert your USB HDD/Flashdrive into one of the PS3's USB slots.
7. Press Start, and Select on your controller.
8. The PS3 will search for the update on the USB HDD/Flashdrive, and attempt to update.
9. Go through all the on-screen steps to update the PS3 to the CFW.
Great you've got CFW on your PS3. Now turn off the PS3 and take out the E3 Clip from the PS3's NOR chip gently. So as not to damage anything. Now put the PS3 back together. I recommend since you took the PS3's motherboard off the heatsinks that you wipe the GPU/CPU/heatsinks clean and apply some new thermal paste. After that reassemble your PS3.
Wow now you've got a CFW PS3. Worth it huh?
Conclusion
With my experiences with the E3 Flasher it's a pretty simple, easy to use device. That is if you're used to opening up PS3s, and the like. Novices that haven't opened a PS3 ever might find a little difficulty the first time around. But you'll soon get experience and it'll be a cake walk. The only issues the E3 Flasher has is it's build quality. Again the Micro SD Card clip on the E3 Coverboard, and the pressure you have to exert on the E3 Clip to have it work. That and the top of the clip coming off. But in spite of those things I'd say it's a great nifty device to use to downgrade PS3s. Thanks again to 3DSTown for supply me with a review sample.
7/10

Manufactured by: E3Team
Review samples supplied by: 3DStown
By Devin
Review Contents & Index:
- Introduction
- Official Feature List - Packaging and Contents
- Design, and Impressions
- Set-up and Usage
-Software Set-Up
-Hardware Installation - Performance
- Conclusion
The E3 Flasher is a nifty little device that allows you to downgrade PS3 systems to a low enough firmware in order to install Custom Firmware or CFW for short. It works with both NOR, and NAND consoles that have a base firmware of 3.55 or less. With CFW you're able to boot backups, homebrew, and fiddle with the PS3 more than possible on Official Firmware or OFW. In this review I will be showing how to install the E3 Clip, and downgrade a NOR system. I cannot downgrade a NAND console because I do not have faith in my soldering skills. NOR consoles require no soldering, NAND consoles do.
Packaging, and Contents
Design, and Impressions
The E3 Flasher's design is decent enough for it's purposes. My only issues are with the E3 Coverboard's Micro SD card slot, and the E3 Clip. A couple of time when I've used it the metal cover for the Micro SD card slot has fell off. It didn't break off just feel off. It was easy enough to reposition it onto the board though. Next up is the E3 Clip. The fault with it is that it's a hit or miss with how much pressure you must apply to the clip for it to read the NOR chip properly. It was quite frustrating at first having to keep undoing the heatsinks from the PS3 because the chip wasn't on tight enough. I solved that by taping it down to the board using electrical tape. Another concern with the E3 Clip is that it's somewhat hard to take the clip off the NOR chip once it's on. I took the top off the E3 Clip once trying to take it off. No damage to the E3 Clip thankfully.
Set-up and Usage
Software:
The software is incredible easy to set up. You need a Micro SD Card (At least 2GBs.), a Micro SD Card reader, and a USB flash drive/USB HDD over 2GBs formatted to FAT32.
We're going to do this in steps.
1. Format the 2GB or higher Micro SD Card to FAT32.
2. Place this update.bin file onto the Micro SD Card's root.
3. Download the BwE NOR/NAND Patcher, and extract somewhere on your computer.
4. Download the CFW UPDATE.PUP file of your choice, and save it somewhere. (Rogero, Rebug, etc.)
5. Create a folder called PS3 on the root of your USB Flashdrive/USB HDD.
6. Inside the PS3 folder make another folder called UPDATE.
7. Drag the CFW update into the UPDATE folder, and rename it PS3UPDAT.PUP if not already.
Congratulations you're partially done with the software portion.
Hardware:
The hardware is a bit harder to set up than the software. If you don't know how to open up your PS3 then please google a tutorial. There are numerous ones on the internet. If you are scared to open up your system then send it off to someone who knows what they are doing. I'm going to assume if you weren't scared, and opened up your PS3 if you're at this point. You need to expose the NOR chip.
First up is the E3 installation.
1. Apply the E3 Clip onto the NOR chip. Make sure it's pressed firmly in place. Use tape to secure it down even more if you'd like.
2. Next maneuver the ribbon cable from the clip so it moves into the PS3's HDD slot. As so.
3.Take the end of the E3 Clip you maneuvered into the HDD slot, and connect it to the E3 mainboard.
4. Next carefully position the PS3 motherboard back onto the heatsinks.
5. Place the metal casing back on top of the motherboard, and screw back in the heatsink bolts.
5. Connect the PS3's fan into the motherboard.
6. Place the PS3's power supply into place. Be sure to connect the cables that were connecting it to the PS3's motherboard.
7. Next connect the E3 Coverboard onto the E3 mainboard.
9. Connect the PS3's power button board to the PS3's motherboard.
9. Connect the AV/HDMI cable, and Power cable to your PS3.
Next up is updating the E3 Flasher.
1. Insert the Micro SD Card you put the update.bin into the E3 Flasher's Micro SD Card slot. (The metal tab pulls out, and then you can push it back in once the Micro SD Card is in place. Securing it.)
2. Now on the E3 Flasher Coverboard up all the switches except the first and second one from the right. Which should be down.
3. Turn on your PS3.
4. The E3 Flasher LEDs will start progressively go from 0% to 100% then start flashing alternatively when the update is done.
5. Turn off the console, and flip all the switches down.
6. Take out the Micro SD Card, and delete the update.bin file.
Next is dumping your NOR Backup.
1. Reinsert the Micro SD Card into the E3 Coverboard.
2. Flip the third switch from the right up on the E3 Coverboard. Make sure the rest are down.
3. Turn on the console.
4. Once it shows the "HDD cannot be found" error, and the HDD light stops on the PS3. You're ready.
5. Press the Start button on the E3 Coverboard.
6. The E3 Flasher LEDs will start progressively go from 0% to 100% then start flashing alternatively when the NOR dump is done.
7. Next validate that the dump is good. If it is store it somewhere on your computer.
8. Dump the NOR again, and verify the new dump. Compare the two.
Next is patching, and installing the patched dump.
1. Take one of the dumps, and drag it onto the BwE NOR/NAND Patcher program you downloaded.
2. It'll patch it and ask you if you want a 3.55 downgrade. Press y, and enter.
3. It'll make a bkpps3.bin_patched file.
4. Delete any file on your Micro SD Card, and put the bkpps3.bin_patched file onto the root.
5. Rename bkpps3.bin_patched to bkpps3.bin.
6. Put the Micro SD Card into the E3 Coverboard
7. Make sure all the switches are down.
8. Turn on the console.
9. Once it shows the "HDD cannot be found" error, and the HDD light stops on the PS3. You're ready.
10. Press the Start button on the E3 Coverboard.
11. The E3 Flasher LEDs will start progressively go from 0% to 100% then start flashing alternatively when the NOR flashing is done.
12. Turn off the PS3.
Next is installing a CFW.
1. Remove the E3 mainboard from the PS3 by disconnecting the E3 clip from it.
2. Insert a HDD into the HDD slot.
3. Turn on the PS3.
4. Connect a PS3 controller via USB to the PS3.
5. It'll ask for a media device with 3.55 or later.
6. Insert your USB HDD/Flashdrive into one of the PS3's USB slots.
7. Press Start, and Select on your controller.
8. The PS3 will search for the update on the USB HDD/Flashdrive, and attempt to update.
9. Go through all the on-screen steps to update the PS3 to the CFW.
Great you've got CFW on your PS3. Now turn off the PS3 and take out the E3 Clip from the PS3's NOR chip gently. So as not to damage anything. Now put the PS3 back together. I recommend since you took the PS3's motherboard off the heatsinks that you wipe the GPU/CPU/heatsinks clean and apply some new thermal paste. After that reassemble your PS3.
Wow now you've got a CFW PS3. Worth it huh?
Conclusion
With my experiences with the E3 Flasher it's a pretty simple, easy to use device. That is if you're used to opening up PS3s, and the like. Novices that haven't opened a PS3 ever might find a little difficulty the first time around. But you'll soon get experience and it'll be a cake walk. The only issues the E3 Flasher has is it's build quality. Again the Micro SD Card clip on the E3 Coverboard, and the pressure you have to exert on the E3 Clip to have it work. That and the top of the clip coming off. But in spite of those things I'd say it's a great nifty device to use to downgrade PS3s. Thanks again to 3DSTown for supply me with a review sample.
7/10


