

 Retroflag NESPi 4 (Raspberry Pi 4 case) (Hardware)
Official GBAtemp Review
Product Information:
- Official Store: https://www.retroflag.com
Review Approach:
If you're looking for a case for your Raspberry Pi you'll be hard pressed to find cases better received than the Retroflag line of classic console-inspired cases. In our Official GBAtemp Review we praised the last generation Retroflag line-up for their exceptionally high quality and attention to detail. You can read our old review here.
Since the RPi 3 compatible cases were released, the team at Retroflag have been hard at work creating a new range of Raspberry Pi 4 compatible cases and today we have been invited to share with you their latest efforts in the form of the NESPi 4 case - their first Raspberry Pi 4 compatible case.
Product Overview
For those unfamiliar with the Raspberry Pi emulation scene, the Raspberry Pi is an affordable all-in-one, credit card sized, single board computer that once loaded with a properly configured micro SD card (basically a memory card loaded with a compatible operating system), provides you with a compact yet surprisingly capable system that is able to emulate a wide range of classic gaming systems as well as being able to perform a wide range of other functions, including a more traditional desktop PC experience.
This affordability and popularity of the Raspberry Pi has made it the number one choice for emulation enthusiasts. This has also resulted in a large third party accessory market with cases being the most popular available.
Although not the first to do so, a few years ago the Retroflag team released a range of retro-inspired Pi cases that emulated the look and feel of the classic systems they are based on. The Retroflag cases were well reviewed and praised for their high quality and faithful designs, with functional switches, LEDs and support for cooling fans and more.
The team is now back with their first Raspberry Pi 4 compatible case - the NESPi 4.
Priced at $39.99 (USD), this case has been redesigned from ground up and is compatible (only) with the new Raspberry Pi 4.
Packaging
The NESPi 4 comes packaged in a simple looking cardboard box, unfortunately unlike the previous generation of cases, the box is no longer themed to look like the console itself which was a fun addition.
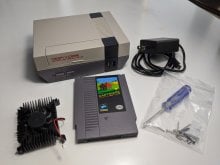
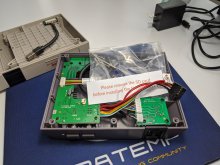
Included in the box:
- NESPi 4 unit
- NES game pak inspired SSD enclosure
- Heatsink and fan with thermal pads
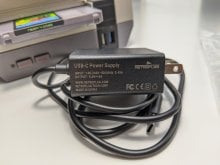
- USB-C power supply
- Screwdriver
- Fixing screws
- Manual
The included PSU is rated for 100-240V 0.45A and outputs a 5.0V 3A current through it’s USB-C connector. It is also FCC and CE certified and the cable length is approximately 120cm/3.93ft long.

Hardware Overview
As for the unit itself, just like the original Retroflag cases; the NESPi 4 feels high quality with a strong, durable plastic build and high quality matte finish. The top of the case has been given a textured finish and the lower half has received a smooth finish just as it was on the original NES. The design feels authentic and has been moulded and painted well with no blemishes or errors.
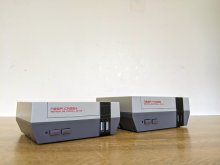
The Retroflag NESPi 4 measures up to 14.3cm x 11.3cm x 5.5cm making it approximately 17% larger than the original Raspberry Pi 3 compatible NESpi and roughly 45% the size of the original Nintendo Entertainment System.
On first inspection, the NESPi 4 looks similar in design to the original NESPi+ case but a number of differences have been made inside and out to accommodate the new Raspberry Pi 4 board and the differences it brings.
On the front of the unit you’ll find 2 USB ports with one now being USB 3 compatible (blue) and a power and reset button. A red LED situated next to the power button shows the power on status and gently blinks during shutdown/reboot. The LED is bright but not so bright that it distracts in a darkened room.
Given the Raspberry Pi has 4 USB ports, it’s a shame to see the NESPi 4 case only provides access to 2 of them. Even the previous NESPi case housed 2 additional USB ports under the cartridge flap. It would have been nice to see additional USB ports accessible for 4-player games.
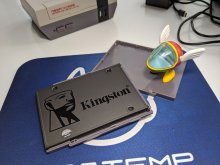
One of the new additions to the NESPi 4 is the inclusion of 2.5” drive support. Under the cartridge slot you’ll find a replica NES game pak that doubles as a removable drive enclosure.
This drive enclosure supports 7mm high 2.5” drives and is designed to house SSD’s. A 7mm mechanical drive may work but I wouldn’t recommend it given the enclosure provides zero ventilation for the drive.
The rear of the cartridge slot features a standard SATA/power connector combo and connects directly to the SSD when inserted without any kind of proprietary “inbetween” adapter. This makes removing it from the case and connecting it to a standard USB SATA adapter to transfer files from PC nice and easy.
The SSD ultimately connects to the Raspberry Pi 4 via an internal USB 3 cable given the Pi lacks native SATA support.
Moving over to the rear of the case we find the dual micro HDMI ports, 3.5mm headphone jack (actual Pi connections), USB-C power connector and RJ45 network socket (pass through ports). The Pi’s micro SD card slot can be accessed on the right-hand side of the case.
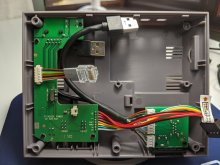
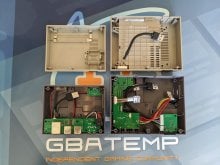
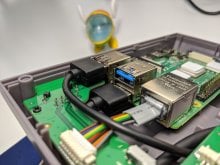
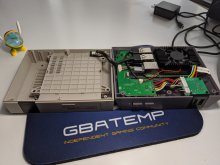
Opening up the case we see two daughterboards that are designed to help with data and power passthrough and the cables to attach them to the Pi. There are also some vents on the bottom and top of the case to help with cooling.
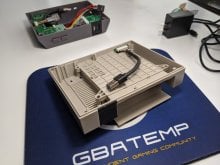
Comparison with original Retroflag NESPi case + Dimensions
Here are some shots of the Retroflag NESPi4 case up against the original Retroflag NESPi+ case so you can see the difference in size.
|
Retroflag NESPi, NESPi+ size: Length: 93.5mm |
Retroflag NESPi4 size: Length: 114.65mm |

Safe Shutdown
Just like their previous cases, the NESPi 4 features Retroflag’s safe shutdown feature. A hardware toggle that in conjunction with some custom software you will need to install, provides a way to safely shutdown the Raspberry Pi instead of just abruptly cutting power to it.
Once the toggle, which can be found inside the case, is set to ‘On’ and the necessary scripts are installed (instructions provided) and the NESPi 4 is properly set up and powered on; turning the case off via the front power button will properly shutdown the Pi by appropriately stopping all services and running software. This avoids any risk of damaging the micro SD card file system which could happen during an impromptu shutdown.
Raspberry Pi 4 Installation
The NESPi 4 is built from the ground up to support the Raspberry Pi 4 and as such is only compatible with it. It is not backward compatible with earlier generations of Raspberry Pi.
It also comes with everything you need to get started minus the Raspberry Pi 4 board itself and a micro SD card. Once you have those, you’ll have everything you need to get your retro emulation system up and running.
Getting the NESPi 4 itself setup is simple and the included instructions make it straight forward. No specialist hardware or tools are required, just the included screwdriver and accessories. It should take no longer than 10 minutes to get up and running.
For our test build we are using Retropie which is a popular choice of distribution for emulating on the Raspberry Pi.
Before building the NESPi it’s a good idea to get your Pi set up to ensure it’s up and running properly before you install and enclose it in the case. Also, at this point if you plan to use the safe shutdown feature of the case you should install the scripts as detailed below:
https://github.com/RetroFlag/retroflag-picase/
Once everything is installed and the system is working as intended, make sure the internal safe shutdown switch on the case is set to ‘On’.
Now, attach the adhesive thermal pads onto your Pi board using the manual to select the correct positions (CPU, memory and WiFi module). Ensure both sides of the thermal pad have their protective film removed. Try to avoid touching the thermal pads once installed.
The next step is to fit the Rasperry Pi into place inside the NESPi case. You need to ensure the micro SD card is REMOVED at this step or you risk damaging your RPi board as you try to install it.
Next, connect the 2 internal USB and RJ45 cable(s) into the ports as described in the manual and then drop the Pi board in to the case at a slight angle, using the HDMI and audio jacks as guides, slide it in and make the ports fit flush inside these cutouts then angle it down to fit it in place, aligning the Pi’s screw holes with the cases screw insertion points.
It’s worth noting at this point that one of the Pi’s USB 2.0 ports will be completely blocked off by the case's daughterboard. This is unavoidable due to the case's design - however it’s not accessible from outside anyway. This may be a bit annoying if you plan to fit and leave a USB dongle inside and enclosed. Even on the remaining 3 ports you will be unable to do this as they are being used by the daughterboards various pass throughs.
That aside, now connect the 5-pin header cable to the Pi’s GPIO header ensuring that the tagged cable is on the pin closest to the Pi’s bottom right corner (as seen in the NESPi 4 with the buttons facing you).
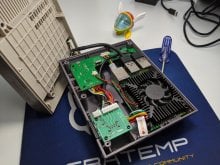
Now drop the included heatsink onto the board, being careful to align the mounting points to the Pi’s screw holes ensuring not to damage or knock the pins between the heatsinks bottom-left screw mount.
Now, you can connect the fans power header to the leftmost daughterboard, ensuring the connector is correctly oriented (red to +).
Take the 2 black 15mm screws and use them to secure the heatsink to the 2 holes to the sides of the GPIO header.
Now just ensure all cables are routed neatly and are clear of any remaining screw holes and connect the remaining USB 3 cable from the top of the case to the Pi and replace the lid. Take the remaining 6 20mm screws and secure the two halves of the case together.
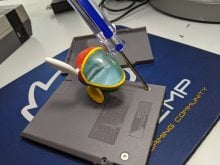
Finally, take the SSD enclosure and pry apart the two halves of the casing gently by pulling the open end apart and then pulling the labelled side away and downwards. Drop the SSD in place then replace the casing and secure it in place using the two shortest screws and then the remaining 2 screws on the sides of the casing.
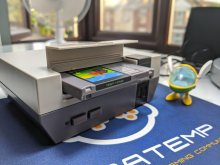
SSD Setup and Finished Build
At this point you may want to transfer your games to your SSD if you haven’t done so already. Check the link below for more info in regards to folder structure etc.
https://retropie.org.uk/docs/Running-ROMs-from-a-USB-drive/
The addition of an SSD to your Retropie build greatly simplifies things such as updating your Retropie or other OS build, you can simply remove your micro SD and flash it with the latest image safe in the knowledge that your ROMs, saved game files and more are all on the SSD ready to be picked straight back up where you left off once you have updated.
It also mitigates the damage a micro SD failure may cause which can happen.
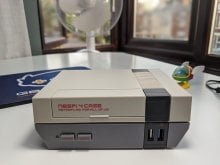
As for our build, it's now complete and we can insert the SSD into the cartridge bay (you’ll feel it click into place), insert your micro SD and connect the power and HDMI cables. A minor nitpick is that the HDMI ports aren’t labelled on the case which is slightly annoying but the leftmost port is HDMI 0.
Now after powering on the unit you should hear the fan spin up and the LED should illuminate.
Our NESPi 4 Retropie build is now complete!
Using the NESPi 4
The NESPi 4 isn’t particularly a case for those that like to tinker with things. Once it’s set up and all the screws are in place, it can be somewhat of a chore to open up again. Thankfully most ports are accessible from outside the case, but should you ever need to change anything you’ll have to remove the 6 outer screws and pry apart the case to access the inside. This isn’t necessarily a bad thing as the case is designed to be a simple, “set it and forget it” closed-box solution but it’s worth keeping in mind.
When turning on the NESPi 4 the power LED doesn’t immediately illuminate - it takes about 1-2 seconds for it to do so. This perhaps could be confusing and ideally shouldn’t happen but thankfully it’s apparent when the case is on as you can hear the fan spin up. The power LED also seems to sometimes turn off before the case itself does during safe shutdown. Sometimes the Pi will continue to shutdown after the LED has gone out (normally hanging on the saving real time clock status for longer than needed - a glitch on the Pi firmware itself). Unless you plan to pull the power from the case during this time, this is unlikely to be an issue, and even then it probably won’t harm the device as all micro SD operations should have stopped before this.
As for fan noise, it’s audible when close to the case but it’s not loud - it’s a low quiet hum. As for temperatures, under a heavy load, using the included heatsink and fan, they hovered around the 40°C mark which compared to using my other Raspberry Pi 4 using a passive cooler without a fan was about 15-20°C cooler.
Once you’ve connected a gamepad or wireless dongle to the front panel USB, you’re left with only 1 spare USB port. Depending on your specific use case this may or may not be a problem, but it’s unfortunate that there aren’t more ports available.
If you’re planning to use a USB dongle or memory stick then your only choice is to use one of the 2 front panel USB ports. As previously mentioned, even the internal ports on the Raspberry Pi are unavailable as 3 of them are used by the case and the remaining is inaccessible due to the internal layout of the case.
Final Thoughts
Besides some minor nitpicks and having just 2 USB ports, the Retroflag NESPi 4 case is a great solution for any Raspberry Pi 4 gaming setup. The attention to detail and high quality construction are evident throughout and set this case apart from the competition yet again.
We even have some new features such as the brilliantly designed game pak-inspired SSD enclosure and USB 3.0 support.
As for the $39.99 asking price, given that everything you need (except the Pi itself, micro SD, SSD) is provided, including a power supply; it seems reasonable. Especially given the quality of the product and the reputation Retroflag have built for themselves.
We would have loved to have seen their Mega Drive/Genesis and Super Nintendo inspired cases also get the Raspberry Pi 4 treatment but given the complexity of these cases compared to the originals we’re ok with waiting a little longer…
Verdict
- High quality construction
- Everything but the Pi, micro SD and optional SSD included
- Game-pak inspired SSD enclosure
- USB 3.0 support
- Safe shutdown feature
- Detailed step by step instructions
- Only 2 USB ports
- 6 long screws to remove to open the case
- Power LED not a reliable indicator of status
- HDMI ports not labelled
- A spare internal USB port is blocked
