After many hours of studying the examples included with PSn00bSDK I had an idea of how to load image data into VRAM. I confirmed the conclusions on the PSX.DEV discord to make sure I got it right. Then it still took me a few days to find the time to actually try it out....because before anything could be loaded I needed the title screen image to be resized, split into two halves and have the halves dumped to binary in an 8bit index palette format they both share! Yeah...the PS1 is not so easy but I might be doing it in awkward ways to! 
I got some help in the conversion from ChatGPT to construct me a python script to resize and dump the .bin files I needed. It took me about two hours of almost yelling at that thing....telling it whats wrong, posting the runtime errors, saying the colors were wrong...black and white...or completely messed up beyond recognition. In the end I took a few steps back...went through it again....and then finally got this glorious result!!! Ain't it beautiful!

In case you're wondering what the attempts looked like, here are a few screenshots of the process:
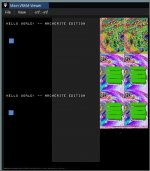
Here you see the PCSX-Reduc VRAM viewer with the two frame buffers on the left and my first attempt at loading data on the right. You can kind off make out the shape of the title screen if you look closely.
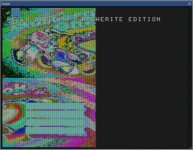
And here I finally managed to get the pixels on screen...just not entirely correct. Aside from the obviously funky colors the images looked like half their intended size. The PS1 VRAM has very specific ways to address and align graphics! Making it a kind of frustrating experience to diagnose what's wrong...if you don't know why you give half the commands to draw something on screen. Well...maybe not half but a couple are just....confusing!
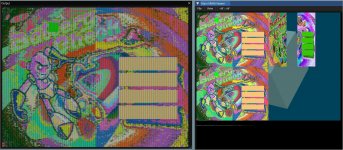
Now that is more like it...at least in the sense that the pixels are aligned and drawn correctly. The shape of the image is recognizable but the colors are still kinda funky! I did not take more screenshots in between but it was about 1,5 hours of yelling at ChatGPT that it did not do what I asked....saying what to change and such. Yes...I could have figured it out on my own. but not even close to the 1,5 hours it took me now! Most developers are lazy...or just me...and we don't like to ACTUALLY do things we don't like. So repetitive stuff or new complex things scare us (me). Having ChatGPT as a new helper is amazing! Yet...frustrating at the same time! At some point it looked like static noise....full black and white and a few other funky things.
If you ask it to do one thing...it "forgets" it also had other requirements to fulfill. I once told it to re-read everything again....make sure my intention was clear! It took a little longer to get the response after that. But it even made a comment on that later....based on your intentions.....hahahahaha. So it understood that what it previously thought I wanted was wrong...and hopefully now it was correct. In short...the direction was better but I still got many errors! It kept giving me code that broke at runtime! I told my specific python version...and after that things got better. Lesson learned: always say the exact version numbers you are working with so generated code is more correct. sometimes. mostly.
The conclusion is that ChatGPT is amazing and useful...but nowhere near capable enough to replace real human developers. yet! It's both scary and wonderful. Where does this technology lead us! For me...it's just a way to write stupid little scripts faster and just "think" my way through it instead of wasting hours trying to learn specific parameters and libraries. Those were the old days...this is the now. But it's still helpful to understand the code that is generated in case you even need to change it!
I have once studied (in my spare time) how assembly worked on older processors. Specifically the atari 800XL with it's 6502 CPU. It was simple enough to understand. Then when I was working on the Sega genesis I learned a bit of 68k assembly. Just enough to see whats happening in ASM code and make adjustments where needed. Or do simple things faster than was possible in C. Make functions in ASM callable from C and that kind of stuff. It was just playing arround but it helped give me insight into what the compiler is doing and what code is generated. Right...also did that! Have the compiler save the ASM code it generated from the C code I wrote to learn from it.
The point is that even if it's a complex subject...like ASM or a script doing things you don't full understand...or want to understand. It does help if you understand the basic underlying principles and components. Because unless you do...you can't tell a tool like ChatGPT what's wrong and how you actually want things done!
In the end I got this final screen:
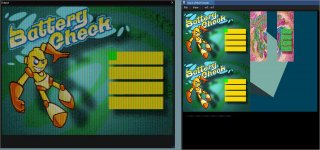
That's basically the same as the first image but with the VRAM viewer on the side. The reason those two rectangles are looking weird and funky is that they are index picture data and the "view" was set as 16bit colors. If you look closely you will also notice a gap between them. This is because the "texture" in PlayStation 1 VRAM need to be aligned by 64 pixels on the X axis. And I think it was 256 in the Y. You then point the GPU to a "TexturePage" and treat that area as a 256x256 texture. It's a little weird at first..and it still is. But at least I got it working now and I can move on to other things to make my port happen! It's going to take many more trials like this to get there though. But this is the very first step in making textures work!
What should be easy to do is change the original input image and have the splash screens show. I think there might be just enough space in VRAM to get three of the splash screens in there. It's not optimized so it wastes a bit of VRAM with that gap between them. But the next "demo" will be a "slideshow" of the title screen, level 1, level 2, level3 and the credit screen. Although...I am not sure I am allowed to use that last one. For a simple demo it's probably fine...and I need to mod it to have it say "programming by Archerite" ofcourse Only graphics, sounds and design are still by the original creators obviously.
Hope it was interesting to read. Thank you if you read it all!
TL;DR: I made progress in porting my homebrew game BatteryCheck to the PlayStation 1.
I got some help in the conversion from ChatGPT to construct me a python script to resize and dump the .bin files I needed. It took me about two hours of almost yelling at that thing....telling it whats wrong, posting the runtime errors, saying the colors were wrong...black and white...or completely messed up beyond recognition. In the end I took a few steps back...went through it again....and then finally got this glorious result!!! Ain't it beautiful!

In case you're wondering what the attempts looked like, here are a few screenshots of the process:

Here you see the PCSX-Reduc VRAM viewer with the two frame buffers on the left and my first attempt at loading data on the right. You can kind off make out the shape of the title screen if you look closely.

And here I finally managed to get the pixels on screen...just not entirely correct. Aside from the obviously funky colors the images looked like half their intended size. The PS1 VRAM has very specific ways to address and align graphics! Making it a kind of frustrating experience to diagnose what's wrong...if you don't know why you give half the commands to draw something on screen. Well...maybe not half but a couple are just....confusing!

Now that is more like it...at least in the sense that the pixels are aligned and drawn correctly. The shape of the image is recognizable but the colors are still kinda funky! I did not take more screenshots in between but it was about 1,5 hours of yelling at ChatGPT that it did not do what I asked....saying what to change and such. Yes...I could have figured it out on my own. but not even close to the 1,5 hours it took me now!
If you ask it to do one thing...it "forgets" it also had other requirements to fulfill. I once told it to re-read everything again....make sure my intention was clear! It took a little longer to get the response after that. But it even made a comment on that later....based on your intentions.....hahahahaha. So it understood that what it previously thought I wanted was wrong...and hopefully now it was correct. In short...the direction was better but I still got many errors! It kept giving me code that broke at runtime! I told my specific python version...and after that things got better. Lesson learned: always say the exact version numbers you are working with so generated code is more correct. sometimes. mostly.
The conclusion is that ChatGPT is amazing and useful...but nowhere near capable enough to replace real human developers. yet! It's both scary and wonderful. Where does this technology lead us! For me...it's just a way to write stupid little scripts faster and just "think" my way through it instead of wasting hours trying to learn specific parameters and libraries. Those were the old days...this is the now. But it's still helpful to understand the code that is generated in case you even need to change it!
I have once studied (in my spare time) how assembly worked on older processors. Specifically the atari 800XL with it's 6502 CPU. It was simple enough to understand. Then when I was working on the Sega genesis I learned a bit of 68k assembly. Just enough to see whats happening in ASM code and make adjustments where needed. Or do simple things faster than was possible in C. Make functions in ASM callable from C and that kind of stuff. It was just playing arround but it helped give me insight into what the compiler is doing and what code is generated. Right...also did that! Have the compiler save the ASM code it generated from the C code I wrote to learn from it.
The point is that even if it's a complex subject...like ASM or a script doing things you don't full understand...or want to understand. It does help if you understand the basic underlying principles and components. Because unless you do...you can't tell a tool like ChatGPT what's wrong and how you actually want things done!
In the end I got this final screen:

That's basically the same as the first image but with the VRAM viewer on the side. The reason those two rectangles are looking weird and funky is that they are index picture data and the "view" was set as 16bit colors. If you look closely you will also notice a gap between them. This is because the "texture" in PlayStation 1 VRAM need to be aligned by 64 pixels on the X axis. And I think it was 256 in the Y. You then point the GPU to a "TexturePage" and treat that area as a 256x256 texture. It's a little weird at first..and it still is. But at least I got it working now and I can move on to other things to make my port happen! It's going to take many more trials like this to get there though. But this is the very first step in making textures work!
What should be easy to do is change the original input image and have the splash screens show. I think there might be just enough space in VRAM to get three of the splash screens in there. It's not optimized so it wastes a bit of VRAM with that gap between them. But the next "demo" will be a "slideshow" of the title screen, level 1, level 2, level3 and the credit screen. Although...I am not sure I am allowed to use that last one. For a simple demo it's probably fine...and I need to mod it to have it say "programming by Archerite" ofcourse
Hope it was interesting to read. Thank you if you read it all!
TL;DR: I made progress in porting my homebrew game BatteryCheck to the PlayStation 1.

