


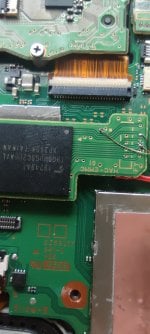
the resistance you are marking is only 1 ohm. It is normal for it to continue. Actually, everything is fine with your flex cable.Hey, I have a problem on my switch lite.
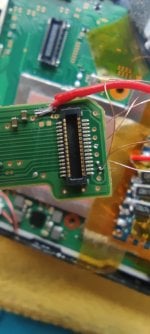
Picofly not working, i remove pico and flex.
Nintendo start OFW, but have a problem microsd. Try three microsd and nothing.
View attachment 370646
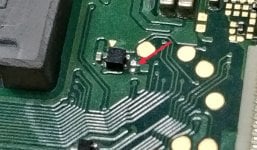
And second question. Flex mosfet has three resistor that's right?
I have a bridged resistor (multimeter 0.000 and beep).
I marked in the picture, Please help me
View attachment 370648
You are using an out of date browser. It may not display this or other websites correctly.
You should upgrade or use an alternative browser.
You should upgrade or use an alternative browser.
Staff Posts
Recent threadmarks
sharing files
Important Posts
Recent threadmarks
Firmwares

I'm aware. It's reported that the Tiny board uses 470ohm which need to be removed and replaced with 47ohm, like I said in the previous reply.470 means 47ohm/47R
https://kiloohm.info/smd3-resistor/470
If they use 470ohm/470R
Then the correct resistor smd should "4700"
https://kiloohm.info/smd4-resistor/4700#:~:text=Standard EIA Decade Values Table - decade 100 to 1000 Ω&text=The 4 digit SMD resistor,hundred and seventy Ohms resistance.
4700 stands for 470ohm
470 stands for 47ohm


you can make it fit without cutting the shield.hey guys i see people cuting the metal shield , but if you remove the 3.3v regulator the switches and the usb c , theres no rom to evoid cuting th shield ?
But cutting the shield gives you more space and (at least for me) it's easier (and it does no harm to Switch).
So it's up to you.
I used this one on the first v1.How meny point to 3v3 on v1 nintendo switch motherbord if you dont want to soldring 3v3 to the tiny smd capacitor that too close to other smd capacitor. Thank for help.
Attachments
any idea to how do this without a dremelyou can make it fit without cutting the shield.
But cutting the shield gives you more space and (at least for me) it's easier (and it does no harm to Switch).
So it's up to you.
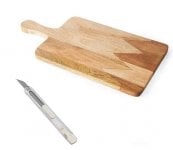
I just used a 20cent scalpel and a wooden board, the shield is really softany idea to how do this without a dremel
")
Attachments

Ok, i understand.the resistance you are marking is only 1 ohm. It is normal for it to continue. Actually, everything is fine with your flex cable.
But why microSD after install pico not working?

In order to NOT cut the shield and fit the Picofly RP2040-Zero board:hey guys i see people cuting the metal shield , but if you remove the 3.3v regulator the switches and the usb c , theres no rom to evoid cuting th shield ?
- For OLED --> USB + buttons removed and RP2040-zero on top of RAM heatsink (where HWFLY usually sits) --> there's at least 0.5mm distance between the shield and the RP2040 board upon final assembly.
- For Lite --> USB + buttons removed and RP2040-zero on top of eMMC shield --> it's a perfect pocket when closing the shield, fits well and no pressure to RP board. (If you keep it on top of RAM heatsink, it will create a bump and force the assembly).
- For V1/V2 --> don't know, will let others to comment.
Always remember to insulate everything (including the sides of the RP2040) with polyimide or similar tape.
And what about the 2040seed and the tiny versions?In order to NOT cut the shield and fit the Picofly RP2040-Zero board:
You can get even a slimmer install if you remove as well the LDO on the back of RP2040.
- For OLED --> USB + buttons removed and RP2040-zero on top of RAM heatsink (where HWFLY usually sits) --> there's at least 0.5mm distance between the shield and the RP2040 board upon final assembly.
- For Lite --> USB + buttons removed and RP2040-zero on top of eMMC shield --> it's a perfect pocket when closing the shield, fits well and no pressure to RP board. (If you keep it on top of RAM heatsink, it will create a bump and force the assembly).
- For V1/V2 --> don't know, will let others to comment.
Always remember to insulate everything (including the sides of the RP2040) with polyimide or similar tape.
In the Lite, the Seeed Xiao will sit in the same pocket the RP2040-Zero does, you just need to remove the buttons and USB-C port. If you're feeling adventurous, you can also remove the shield over the RP2040 chip, but be careful not to break anything, as components are very close to the shield housing.And what about the 2040seed and the tiny versions?
I personally kept the USB-C port on the Seeed Xiao, removed the CPU shield and buttons, and then cut the shield of my switch lite to accomodate the USB-C port.
And what about the 2040seed and the tiny versions?
There are better ways to ask things... @Phantomas77 just made a GREAT post and it feels, to me, like you sht all over it.
How's this:
That's great for anyone with a PZero. Does anyone know the procedure for the seed and tiny versions?
Even then, the best move is always to research and make your own decisions. Asking 'the internet' to hold your hand is just asking to go crazy.

Tried to install picofly, but got blue then pink (purple) light (and on switch got 2101-0001 error code). What could be causing this?
Attachments

On v1 , V2 after remove port and buttons you can put the board on top of the shield after you pass it through the fan hole just like the hwfly core , it fits fine and cover close without any bump..In order to NOT cut the shield and fit the Picofly RP2040-Zero board:
You can get even a slimmer install if you remove as well the LDO on the back of RP2040.
- For OLED --> USB + buttons removed and RP2040-zero on top of RAM heatsink (where HWFLY usually sits) --> there's at least 0.5mm distance between the shield and the RP2040 board upon final assembly.
- For Lite --> USB + buttons removed and RP2040-zero on top of eMMC shield --> it's a perfect pocket when closing the shield, fits well and no pressure to RP board. (If you keep it on top of RAM heatsink, it will create a bump and force the assembly).
- For V1/V2 --> don't know, will let others to comment.
Always remember to insulate everything (including the sides of the RP2040) with polyimide or similar tape.
Last edited by d.b,

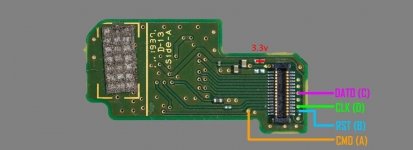
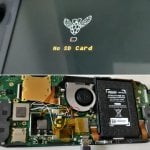
As I promised, I will report if the mod works. It worked! Blue then green led and "no sd card" appeared on the screen. So, as mentioned before, it's not a problem if the small capacitor next to the 3.3V regulator (?) is damaged (as you can see in the wiring diagram, in the case of the Lite). You have to remove it ( dont bridge!!!! ) and solder the 3.3 wire to another point!
Thank you very much to those who helped!

Thank you very much to those who helped!
Attachments
can you post a pictureOn v1 , V2 after remove port and buttons you can put the board on top of the shield after you pass it through the fan hole just like the hwfly core , it fits file and cover close without any bump..
On v1 , V2 after remove port and buttons you can put the board on top of the shield after you pass it through the fan hole just like the hwfly core ,,
IMO, that sounds fine for a chip that can easily be disconnected and has highly secured flex cables. For these manual PFly installs, though, that could interfere with further disassembly AND be more susceptible to needing said disassembly.
Again IMO, you should always think about how you're going to work on the machine again, and make sure your 'install' has an 'uninstall path'. I have an idea for how to do this with PFlys, but I need parts. Send me all your broken joycons that have dead sticks AND *dead* batteries
Switchs (Switches?) break a lot, they're portables, and now you've manually soldered wires to it as well. We're not corporations with machines, we can't GUARANTEE our solder joints will hold up to the abuse these things usually take, and now said connections are being fished through a hole and possibly pinched as well. The ability to easily remove parts and troubleshoot is priceless, HIGH chance you'll want\need to open it up again.
Interference shielding IS important, but I believe that is handled best by all the individual shields for the emmc\APU\RAM\WiFi. It seems the metal backplate doesn't really do much. So, since SOMETHING MUST be cut\removed (if even just RP2040 parts\board) to make room for MORE equipment to fit in a PORTABLE, my main target on any Switch is this plate. Sometimes the RP2040 board gets more removed and sometimes it's this shield (search the forums to figure out which I mean for which).
If anyone does a PFly install and now has all these tools that you don't plan to use again, idk what ur doing in the 1st place. Get back in there and upgrade the internal storage, or think of case swaps (don't buy cheap!), or, if it's a Lite, think about replacing the joysticks (hall effect?).
*Jimmy Valmer* I mean, come on...
*Edit*
Similar threads
- Replies
- 4
- Views
- 2K
- Replies
- 2
- Views
- 586
- Replies
- 42
- Views
- 6K
Site & Scene News
New Hot Discussed
-
-
31K views
Nintendo Switch firmware update 18.0.1 has been released
A new Nintendo Switch firmware update is here. System software version 18.0.1 has been released. This update offers the typical stability features as all other... -
26K views
New static recompiler tool N64Recomp aims to seamlessly modernize N64 games
As each year passes, retro games become harder and harder to play, as the physical media begins to fall apart and becomes more difficult and expensive to obtain. The... -
24K views
Nintendo officially confirms Switch successor console, announces Nintendo Direct for next month
While rumors had been floating about rampantly as to the future plans of Nintendo, the President of the company, Shuntaro Furukawa, made a brief statement confirming... -
23K views
TheFloW releases new PPPwn kernel exploit for PS4, works on firmware 11.00
TheFlow has done it again--a new kernel exploit has been released for PlayStation 4 consoles. This latest exploit is called PPPwn, and works on PlayStation 4 systems... -
21K views
Nintendo takes down Gmod content from Steam's Workshop
Nintendo might just as well be a law firm more than a videogame company at this point in time, since they have yet again issued their now almost trademarked usual...by ShadowOne333 129 -
19K views
Name the Switch successor: what should Nintendo call its new console?
Nintendo has officially announced that a successor to the beloved Switch console is on the horizon. As we eagerly anticipate what innovations this new device will... -
16K views
A prototype of the original "The Legend of Zelda" for NES has been found and preserved
Another video game prototype has been found and preserved, and this time, it's none other than the game that spawned an entire franchise beloved by many, the very...by ShadowOne333 32 -
13K views
DOOM has been ported to the retro game console in Persona 5 Royal
DOOM is well-known for being ported to basically every device with some kind of input, and that list now includes the old retro game console in Persona 5 Royal... -
13K views
Nintendo Switch Online adds two more Nintendo 64 titles to its classic library
Two classic titles join the Nintendo Switch Online Expansion Pack game lineup. Available starting April 24th will be the motorcycle racing game Extreme G and another... -
11K views
AYANEO officially launches the Pocket S, its next-generation Android gaming handheld
Earlier this year, AYANEO revealed details of its next Android-based gaming handheld, the AYANEO Pocket S. However, the actual launch of the device was unknown; that...
-
-
-
281 replies
Name the Switch successor: what should Nintendo call its new console?
Nintendo has officially announced that a successor to the beloved Switch console is on the horizon. As we eagerly anticipate what innovations this new device will...by Costello -
232 replies
Nintendo officially confirms Switch successor console, announces Nintendo Direct for next month
While rumors had been floating about rampantly as to the future plans of Nintendo, the President of the company, Shuntaro Furukawa, made a brief statement confirming...by Chary -
130 replies
New static recompiler tool N64Recomp aims to seamlessly modernize N64 games
As each year passes, retro games become harder and harder to play, as the physical media begins to fall apart and becomes more difficult and expensive to obtain. The...by Chary -
129 replies
Nintendo takes down Gmod content from Steam's Workshop
Nintendo might just as well be a law firm more than a videogame company at this point in time, since they have yet again issued their now almost trademarked usual...by ShadowOne333 -
92 replies
Ubisoft reveals 'Assassin's Creed Shadows' which is set to launch later this year
Ubisoft has today officially revealed the next installment in the Assassin's Creed franchise: Assassin's Creed Shadows. This entry is set in late Sengoku-era Japan...by Prans -
82 replies
Nintendo Switch firmware update 18.0.1 has been released
A new Nintendo Switch firmware update is here. System software version 18.0.1 has been released. This update offers the typical stability features as all other...by Chary -
80 replies
TheFloW releases new PPPwn kernel exploit for PS4, works on firmware 11.00
TheFlow has done it again--a new kernel exploit has been released for PlayStation 4 consoles. This latest exploit is called PPPwn, and works on PlayStation 4 systems...by Chary -
78 replies
"Nintendo World Championships: NES Edition", a new NES Remix-like game, launching July 18th
After rumour got out about an upcoming NES Edition release for the famed Nintendo World Championships, Nintendo has officially unveiled the new game, titled "Nintendo...by ShadowOne333 -
71 replies
DOOM has been ported to the retro game console in Persona 5 Royal
DOOM is well-known for being ported to basically every device with some kind of input, and that list now includes the old retro game console in Persona 5 Royal...by relauby -
65 replies
Microsoft is closing down several gaming studios, including Tango Gameworks and Arkane Austin
The number of layoffs and cuts in the videogame industry sadly continue to grow, with the latest huge layoffs coming from Microsoft, due to what MIcrosoft calls a...by ShadowOne333
-
Popular threads in this forum
General chit-chat
- No one is chatting at the moment.
-
-
-
-
-
-
-
-
 @
BigOnYa:
You ask your questions there, create a new thread if its not already answered, then eventually a 3ds genius will respond.
@
BigOnYa:
You ask your questions there, create a new thread if its not already answered, then eventually a 3ds genius will respond. -
-
-
@
BigOnYa:
@K3Nv2 I got some cheapies at wallys, that are pretty good, already have lost a few expensive ones (one falls out and gone, can't find) while cutting grass so bought some cheap ones, and of course never lose these cheap ones. (Cheap meaning only $35, compared to air buds which I only have 1 of 2 now)
-
-
-
-
-
@
BigOnYa:
You would think, esp using bluetooth, not GPS, like a "your getting hot-er" meter on your phone.
-
@
BigOnYa:
I think they should tie up diddy, and let all the victims come and abuse him, we'll make a holiday of it every year. (jk, maybe)
-
-
-
-
-
-
-
-
